You are using an out of date browser. It may not display this or other websites correctly.
You should upgrade or use an alternative browser.
You should upgrade or use an alternative browser.
SGOTM 17 - Plastic Ducks
- Thread starter AlanH
- Start date
A few comments on generalities.
I take it that our main short-term goals are the following (no particular order):
1. Secure T48 Mathematics. (T47 if absolutely necessary. Will involve sacrifices).
2. Trade for Iron Working and/or Code of Laws with Mansa.
3. Found 6-8 (?) cities.
4. Set up these cities with a Granary + Library + improved tiles ASAP.
5. Build sufficient defense for barb safety.
6. Build the Pyramids.
We can found four cities without harming #1. This fourth city lets us start work on #6 and, to a lesser extent, #4.
When we have researched Mathematics, I see no reason to hold back from expanding to 5, 6, 7 cities, provided that Workers are in place. The aim is to set these cities up as quickly as possible to speed our GP production and Representation research. I don't know how many cities we're aiming to settle ourselves, but I guess we can decide as we play.
I would prefer to hold back on #6 if it enables us to set up more good cities sooner. We will build the Pyramids in T60 just as easily as T53, so (e.g.) I would be ok with whipping a Granary at size 3 for 1-pop.
If a Settler moves from PlastDukesberg west, and then east towards the Gems/Ivory, it takes three turns to settle city #5. We need to build three roads to enable this.
If three tiles are roaded from the capital in a northwards direction, it takes two turns to settle city #5. Once again, we need to build three roads to enable this.
Since we can no longer chop the Pyramids out nice and neatly on T54, I would therefore suggest that we look to improve:
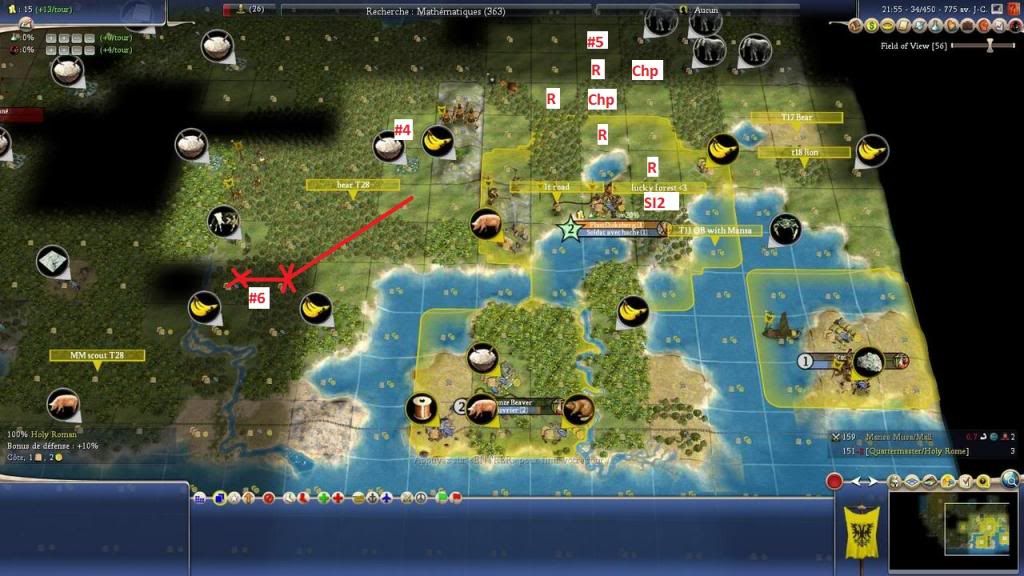
SI2 = Stone Island Worker 2 land here and chop.
Again, just to emphasize: three Workers need to be in and around the capital when Mathematics comes in. I *think* this means that the Stone should be 'roaded' by the Worker currently building the Quarry, but I'd have to check.
A Settler for City #5 is produced most quickly by 2-pop whipping a Worker in the capital at 27 (3 turns of Pigs + GH + Lake, for extra Math commerce). A combination of chops, whips, and overflow gets us (at least) two Axes and two Settlers. The unhappiness hurts (capital can only work two tiles). However, this is partly negated by earlier happiness from the Ivory and Gems, and we benefit greatly from earlier access to the Gem's commerce (work at size 2, I assume). However, if others think this is inefficient, please say so.
Finally, if Mansa doesn't found Confucianism, the tests suggest that he will immediately switch to Monarchy, Mathematics or Alpha (he already has Iron Working). I don't want to speculate further, but unless Mansa founds the religion, I think that two Math <---> IW, Alpha <---> CoL trades are unlikely.
---
@Duckweed
To get a T47 Math, Stone Island city also has to switch to Research right now. I think this does us more harm than good, but if the others want to go that route, then sure.
I take it that our main short-term goals are the following (no particular order):
1. Secure T48 Mathematics. (T47 if absolutely necessary. Will involve sacrifices).
2. Trade for Iron Working and/or Code of Laws with Mansa.
3. Found 6-8 (?) cities.
4. Set up these cities with a Granary + Library + improved tiles ASAP.
5. Build sufficient defense for barb safety.
6. Build the Pyramids.
We can found four cities without harming #1. This fourth city lets us start work on #6 and, to a lesser extent, #4.
When we have researched Mathematics, I see no reason to hold back from expanding to 5, 6, 7 cities, provided that Workers are in place. The aim is to set these cities up as quickly as possible to speed our GP production and Representation research. I don't know how many cities we're aiming to settle ourselves, but I guess we can decide as we play.
I would prefer to hold back on #6 if it enables us to set up more good cities sooner. We will build the Pyramids in T60 just as easily as T53, so (e.g.) I would be ok with whipping a Granary at size 3 for 1-pop.
If a Settler moves from PlastDukesberg west, and then east towards the Gems/Ivory, it takes three turns to settle city #5. We need to build three roads to enable this.
If three tiles are roaded from the capital in a northwards direction, it takes two turns to settle city #5. Once again, we need to build three roads to enable this.
-Three Workers must, consequently, be at or close to the capital in approximately T54. When City #5 is settled, we want to have three Workers on three tiles (two Workers on Forest, both to chop a Granary; one Worker on the Ivory, to improve the tile). These Workers can then improve the Gems before the city reaches size 2.
Since we can no longer chop the Pyramids out nice and neatly on T54, I would therefore suggest that we look to improve:
Spoiler :
SI2 = Stone Island Worker 2 land here and chop.
Again, just to emphasize: three Workers need to be in and around the capital when Mathematics comes in. I *think* this means that the Stone should be 'roaded' by the Worker currently building the Quarry, but I'd have to check.
A Settler for City #5 is produced most quickly by 2-pop whipping a Worker in the capital at 27
(3 turns of Pigs + GH + Lake, for extra Math commerce). A combination of chops, whips, and overflow gets us (at least) two Axes and two Settlers. The unhappiness hurts (capital can only work two tiles). However, this is partly negated by earlier happiness from the Ivory and Gems, and we benefit greatly from earlier access to the Gem's commerce (work at size 2, I assume). However, if others think this is inefficient, please say so.Finally, if Mansa doesn't found Confucianism, the tests suggest that he will immediately switch to Monarchy, Mathematics or Alpha (he already has Iron Working). I don't want to speculate further, but unless Mansa founds the religion, I think that two Math <---> IW, Alpha <---> CoL trades are unlikely.
---
@Duckweed
To get a T47 Math, Stone Island city also has to switch to Research right now. I think this does us more harm than good, but if the others want to go that route, then sure.
You're right; I've forgotten the overflow.Pretty sure that he won't.
Immortal AI's tech is 20% cheaper, so Math is only a bit expensive than IW in AI's estimation. 363/1.2=302. 1 turns of his research will add 25+ beakers even not considering the OF from last tech.
Bebekija
King
I'm not sure why a delayed Settler would be superior. In brief:
- City #4 is commerce neutral. It does no harm to our research capacity.
A valid point in this particular situation
- 17
Another valid point
- On T40, the capital can be at size 3. If it is at size 2 (whipped T39, not T38), we lose the 2
, 2
from the Lake (assuming we work a Lake/Pig/GH).
This one not so much. The tile you work on T40, you didn't work it on T38, since you whipped. Since no tile was improved in the meantime, there is zero difference in yield output
- Settling on T40 means that city 4's food bank will contain:
T41: 2 (Forest), T42: 4 (Nana Hill), T43: 6 (Nana Hill), T44: 10 (Irrigated Rice). 1- Settling on T41 means that city 4's food bank will contain:
T41: 0, T42: 3 (Rice), T43: 6 (Rice), T44: 10 (Irrigated Rice) 3
Not really sure where you were going to with these two
- It is better to maximize overflow whipping into Settlers, rather than out from Settlers.
True, but irrelevant. We're not discussing whether to whip in or out of a settler, we're discussing when to whip out of this one
Happy to be proved wrong, as ever.
I don't think I've ever said that delaying the city would be superior in terms of yield, I just said that the worker micro felt much more polished (at least to me) with this option. Now that I've been able to really test both options, I saw that by T44, both options lead to the exact same situation empirewise, *except* that your micro saves one forest. So I guess it is indeed superior, I'll just have to work a little bit more on the worker moves in the later turns.
Yeah I mixed those upOn the contrary,I suggested to build research immediately and delay granary according to CoL date
 , but I guess everyone had corrected by themselves
I am actually, I just spent a little more time to check Doshin's micro all the way to the Mids and see if the spared forest would be missed for the T53 Mids. It is not, so we're good to goReady to play?
~~~~
PPP to T41 :
T37.
Worker 1. Mine (4/4)
Worker 2. Road (2/2)
Worker 3. Move 1NE.
Warrior 2. Move 1 NE to check for food.
Axe 1. Move 1N.
Galley 1. Move 2S.
Worker 4. Quarry (6/6)
Plastdukeberg. Switch to Settler.
BB. Switch to build Research.
T38
Axe 1. Move 1NW.
Worker 1. Move 1N and road (1/2).
Worker 2. Move 1N2W.
Worker 3. Move 1NE.
Worker 4. Move onto Galley.
Galley 1. Move 1NW.
Warrior 2 fortify
PlastDukeberg. Whip Settler.
T39.
Settler 4. Move 1N of Nana Hill.
Worker 1. Road (2/2).
Worker 2. Chop (1/3).
Worker 3. Move to Nana Hill
Axe...heads in a N, NW direction sticking to Forests/Jungle.
Worker 4 unload on G Hill.
Galley 1. Move 1NE.
PlastDukeberg. Work Pig and Banana. Overflow to Archer.
T40.
Settler 4. Move 1W. Found city. Work Nana Hill. Build Monument.
Worker 1. Move to Nana Hill and Mine (1/4)
Worker 2. Chop (2/3).
Worker 3. Mine (2/4)
Worker 4. Move to Nana Hill
PlastDukeberg. Switch Farmed Banana to Lake.
T41
PlastDukeberg. Build Research (Pig/GH/Lake).
Archer 2. Move 1E.
Worker 1. Mine (3/4).
Worker 2. Chop (3/3).
Worker 3. Mine (4/4).
Worker 4 move to Rice and farm (1/5)
Science Slider. 100%.
---
I don't recall exactly where I was in T37 and I'm too lazy to go check the live save so I kept it in the PPP. Doesn't matter much since only the Worker 1 moves have changed on that particular turn and the build in BB can be changed anytime.
Waiting for the grün licht!
4. Set up these cities with a Granary + Library + improved tiles ASAP.
We need at most 1 lib in mids city if we can secure mids. Beakers will be more than enough.
@Duckweed
To get a T47 Math, Stone Island city also has to switch to Research right now. I think this does us more harm than good, but if the others want to go that route, then sure.
No need, I think, because that's an obvious setback immediately. If necessary we could let capital and mids city build research.
@ Bebekija
Consider green light from me as I won't check your micro. Just be sure not engaging on unnecessary battles against barbarians unless it's axe vs animal.
")
@Bebe
Could you pause on T38 before moving Worker 4 onto the Galley? I want to run through some variants. I'll be online for the next hour or two, so can report back quickly.
Green light otherwise. Good luck.
Edit
T40: PlastDukeberg. Switch Farmed Banana to Lake. ---> this might be detrimental. I think we can start on a Worker on T42 and still hit a T48 Math. Let me know exactly how many beakers we have on T40, and I can cross-check the test.
PPP to T41 :
T37.
Worker 1. Mine (4/4)
Worker 2. Road (2/2)
Worker 3. Move 1NE.
Warrior 2. Move 1 NE to check for food.
Axe 1. Move 1N.
Galley 1. Move 2S.
Worker 4. Quarry (6/6)
Plastdukeberg. Switch to Settler.
BB. Switch to build Research.
T38
Axe 1. Move 1NW.
Worker 1. Move 1N and road (1/2).
Worker 2. Move 1N2W.
Worker 3. Move 1NE.
Worker 4. Move onto Galley.
Worker 4. Move 1S. Road and cancel (1/2).
Galley 1. Move 1NW.
Warrior 2 fortify
PlastDukeberg. Whip Settler.
T39.
Settler 4. Move 1N of Nana Hill.
Worker 1. Road (2/2).
Worker 2. Chop (1/3).
Worker 3. Move to Nana Hill
Axe...heads in a N, NW direction sticking to Forests/Jungle.
Worker 4 unload on G Hill.
Worker 4. Move onto Galley
Galley 1. Move 1NE.
PlastDukeberg. Work Pig and Banana. Overflow to Archer.
T40.
Settler 4. Move 1W. Found city. Work Nana Hill. Build Monument.
Worker 1. Move to Nana Hill and Mine (1/4)
Worker 2. Chop (2/3).
Worker 3. Mine (2/4)
Worker 4. Move to Nana Hill
Worker 4. Unload 1NE of capital (grassland)
PlastDukeberg. Switch Farmed Banana to Lake.
T41
PlastDukeberg. Build Research (Pig/GH/Lake).
Archer 2. Move 1E.
Worker 1. Mine (3/4).
Worker 2. Chop (3/3).
Worker 3. Mine (4/4).
Worker 4 move to Rice and farm (1/5)
Worker 4. Move 1NW. Road and cancel.
PlastDukeberg. Switch Lake to Farmed Banana.
Science Slider. 100%.
I'll write an explanation/justification in a moment.
Bebekija
King
@Bebe
Could you pause on T38 before moving Worker 4 onto the Galley? I want to run through some variants. I'll be online for the next hour or two, so can report back quickly.
Green light otherwise. Good luck.
Edit
T40: PlastDukeberg. Switch Farmed Banana to Lake. ---> this might be detrimental. I think we can start on a Worker on T42 and still hit a T48 Math. Let me know exactly how many beakers we have on T40, and I can cross-check the test.
Playing.
I'm on T38 right now. Did you run the tests you needed? Shall I proceed?
Ok. Basically Stone Island completes its Worker on T43.
It takes one turn to load and one turn to unload, since our Galley is not depositing the unit directly into a city. Because this Worker will lose a point of movement whereever it lands, it makes most sense to deposit him on the capital's Forest that lacks a road (1E).
This means, just focusing upon the Stone Island Worker (Worker 5):
T43: Move 1S. Road (2/2).
T44. Move onto Galley.
T45. Move onto Forest. (note: capital whips a Worker this turn)
T46. Chop (1/3).
T47. Chop (2/3).
T48. Chop (3/3). (note: whipped Worker from capital chops the forested GH 3/3))
This times the chop with Mathematics, granting us another Settler on T49.
On T49, the capital is still at size 3 with one unhappy citizen. The overflow goes into another Settler.
On T50, the unhappy goes away. I would probably switch to an Axe, work the Pigs/Banana/Lake, grow to size 4 (T52), whip into an Axe for T53, and OF into a second Settler on T54. The precise order can be tweaked.
If the Worker 4 leaves the island right now, the Archer does not have time to fogbust the Ivory site. Basically, we want to road towards this, but safely.
The only tile that shouldn't be roaded towards this is 1NE of the capital. If two Workers are available 1E and 1SE of the capital on T49, they can both jointly road this tile. This lets the Settler build city #5 on T50, while one Worker is already on the Ivory (roaded already, I think) and two further Workers can move onto two Forests. The Granary will be chopped before the city's foodbank is halfway full.
Bebekija
King
Too late for me to review your ideas.
Besides, this is a drastic change to what we've been working on for the past week, so we probably need to discuss it a bit more.
The game is paused on T38.
Besides, this is a drastic change to what we've been working on for the past week, so we probably need to discuss it a bit more.
The game is paused on T38.
Ahhh. I've been working with the assumption that the capital should whip a Worker on T45 for so long now it seems second nature. Sorry if the changes sound drastic. 
My changes (and they're really not that major) do a number of things:
1) Workers traveling from the capital to Pyramid City waste a turn. They can't even irrigate along the way after the inner culture Forests are chopped. By having Workers move north, their movement is put to better use.
From Pyramid City ----> Elephant Bling (Ivory/Gems), 3 tiles need to be covered with roads.
From Plastdukesberg ---> Elephant Bling, 4 tiles need to be covered with roads.
Three Workers will travel from the capital region. So 3 turns of movement are saved. Subtract the extra tile that needs to be roaded, and one turn of Worker movement is saved.
2) It is quicker for a capital-built Settler to reach the Ivory/Gem spot traveling in a northwards direction. One turn of Settler movement is saved (or, we settle a fifth city one turn sooner, T50 vs T51.).
3) Let's say that, as before, we road the Grassland Hill 1NE of Pyramid City, as in our original plan. It is really freaking awkward for any Workers clustered around Pyramid City to travel towards Elephant Bling. They have to move into the city, then onto the Grassland Hill, only leaving a quarter movement point. Moving directly onto the GH consumes 2 movement points.
The only spot that provides direct access from Pyramid City ---> Bling Elephant is 2N1E of Pyramid City, and that Worker will be tied up until at least T53 (too late to improve a fifth city on this schedule).
4) Now that Pyramid's City's borders expand on T53, I am having real problems managing so many Workers between T48 and T52. With T52 it was easy:
T48: chop 3/chop 3
T49: four Workers available to move onto second ring tiles
T50: chop 1/chop 1/chop 1/chop 2
T51: chop 2/chop 2/chop 2/chop 2
T52: border pop. Chop 3/chop 3/chop 3/chop 3.
But now, with a border pop on T53, we have to figure out how to best use these four Worker turns. If they are all clustered around Pyramid City, at least two Worker turns are wasted on pointless roads. The other two aren't much better.
---
I can outline a more detailed PPP if you'd like. The Quarry detail was so insignificant that I didn't think it necessary. But sorry.
What did your turns reveal?
Bebekija
King
You've been working on an assumption but never told us in the thread. So it does indeed come as a surprise.Ahhh. I've been working with the assumption that the capital should whip a Worker on T45 for so long now it seems second nature. Sorry if the changes sound drastic.
The reason I stopped is that, after other members gave their green light, you swept by right when I started playing and basically changed *all* the worker micro. This kind of changes imo requires the approval of several team members, I can not just apply them on the fly.
On a more personal level, these changes feel drastic to me because, as I've mentioned previously, my RL is pretty busy with the kids and my work, so during the past week I spent *all* of my free time testing on my side, checking your own plans and micro, comparing one to another, etc.. It is then pretty disheartening to see all of this go to waste right when I was finally able to play the turns.
So, even though I don't particularly enjoy playing a turnset just blindly following a plan wrote by someone else, I feel we've wasted enough time on this turnset already, so if everyone is okay with this, I will play tonight the turns according to your post above. Then, please post a detailed plan of the turns till Mid completion so I can at least practice them a bit before playing.
As an aside :
- I spent the last 2 days arguing that we should delay the C4 because otherwise the worker micro around would feel awkward. But then you explained that it didn't matter, that the total yield of the empire was more important. Now you're making all these changes because you're not satisifed with the worker micro around C4....

- I am very much against leaving BB in this state without a worker for so long. Do you really think that a forest chop justifies delaying the Pigs and the bananas for 6+ turns? This city will bring a lot to the empire, in terms of workers, settlers, library, specs, etc...
- I don't think roading to C5 and C6 is wasting some worker turns, nor is roading the rice to allow BB to grow one more pop, but then again we don't have the same consideration for this city
Bebekija
King
Quite the contrary, I'd like to hear the feedback of other team members before we decide which way to go. This is not a decision I feel comfortable taking by myself
If Doshin's plan is superior, which it very well might be, then what I'm saying is that I don't want to spend another 2-3 days testing in reaction to this before playing. I'd like to play ASAP.
And to be clear, I'm not sulking or anything, my disappointment rather comes from the realisation that my RL doesn't leave me enough time to commit to this game as much as I'd want. If it did, it wouldn't feel as painful to throw away one week of testing whenever a different option is chosen by the team.
I don't run tests so that I can't comment on details, especially on worker micros, but I trust that Bebekija and Doshin will work out. As long as we shoot the major goal -- securing mids and ready to lay down 5th and 6th cities, a bit suboptimal micro won't matter. Just remind one thing, worker micro, especially on jungle tiles, depends on when we get IW, which is hard to be predicted precisely.
As long as we shoot the major goal -- securing mids and ready to lay down 5th and 6th cities, a bit suboptimal micro won't matter. Just remind one thing, worker micro, especially on jungle tiles, depends on when we get IW, which is hard to be predicted precisely.And to be clear, I'm not sulking or anything, my disappointment rather comes from the realisation that my RL doesn't leave me enough time to commit to this game as much as I'd want. If it did, it wouldn't feel as painful to throw away one week of testing whenever a different option is chosen by the team.
I hear you! I feel completely useless at the moment. I mean, I'm following the discussion when I can but I can't bring anything to the table as I haven't tried any of it for a while.
One way or the other it shouldn't change things too much like Duckweed said. No pressure.
@Bebekija
I have mentioned a T45 Worker in the capital on a couple of occasions. See here and here. I was not initially certain that this was the best way to go, but I am now 90% sure that it is. The build order occurred to me after I had penned the initial PPP plan, which, as you know, was based upon two minor incorrect assumptions (the Quarry was behind schedule, the Mine ahead).
All of these tests have been a learning experience and I do not mind whose plan we follow, provided it be thought best for the team. I have also found this testing quite tiring, but it has left us both in a much better position to judge what works and what does not. I think we are the only two players who fully understand the current micro at this point. (Not a jab at anyone! RL is always more important than Civ, and there will no doubt be later turns where I'm very much out of the loop).
Re. City #4, I think we were arguing at cross purposes. My fundamental points were that (a) there was no reason to delay in terms of research; (b) the city's borders would pop on T42 in either plan; (c) working a mined BH saved a Forest and four Worker turns. We have gained hammers and flexibility, so I am now trying to put those saved Worker turns to better use.
If you would like Worker 6 to travel to the Pigs, this can be achieved on T50 with my current plan (this delays the Granary in City #5). In fact, if Mansa were to tech IW next turn, I would suggest that Worker 4 road over the Stone completely (maybe... again, one of us would need to figure out the precise micro).
Rather than discuss at length, here is a revised PPP. Worker numbers might be off from the original PPP, but they're fairly self-explanatory:
---
T38
Axe 1. Move 1NW.
Worker 1. Move 1N and road (1/2).
Worker 2. Move 1N2W.
Worker 3. Move 1NE.
Worker 4. Move 1S. Road and cancel (1/2).
Warrior 2 fortify
PlastDukeberg. Whip Settler.
T39
Settler 4. Move 1N of Nana Hill.
Worker 1. Road (2/2).
Worker 2. Chop (1/3).
Worker 3. Move to Nana Hill
Axe...heads in a N, NW direction sticking to Forests/Jungle.
Galley 1. Move 2S.
Worker 4. Move onto Galley
PlastDukeberg. Work Pig and Banana. Overflow to Archer.
T40
Settler 4. Move 1W. Found city. Work Nana Hill. Build Monument.
Worker 1. Move to Nana Hill and Mine (1/4)
Worker 2. Chop (2/3).
Worker 3. Mine (2/4)
Galley 1. Move 2N1W.
Worker 4. Unload 1NE of capital (grassland)
Archer 1. Move 1S (if healed)
PlastDukeberg. Switch Farmed Banana to Lake.
T41
PlastDukeberg. Switch Lake to farmed Banana.
PlastDukeberg. Build Research (Pig/GH/Banana).
Archer 2. Move 1NE.
Archer 1. Move 1S.
Worker 1. Mine (3/4).
Worker 2. Chop (3/3).
Worker 3. Mine (4/4).
Worker 4. Move 1NW. Road and cancel.
Science Slider. 100%.
T42
Worker 2. Move 1SE. Farm (1/5).
Worker 1. Move 1W. Farm (2/5).
Worker 3. Move 1W. Farm (3/5).
Worker 4. Move 1NW. Road and cancel.
Archer 1. Move 1S. Fortify.
Galley 1. Move 1E.
PlastDukeberg. Switch farmed Banana to Lake. Build Worker.
T43
Stone Island. Build Research.
Pyramid City. Build Research. Work Rice.
Archer 2. Move 1N.
Galley 1. Move 2S.
Worker 5. Move 1S. Road (2/2).
Worker 1-2. Farm Rice (5/5).
Worker 3. Move 2N1E.
T44
Archer 2. Move 1NE.
Worker 5. Move onto Galley.
Worker 1. Move 2S1W.
Worker 2. Move 2S. Road (1/2).
Worker 3. Mine (1/4).
Worker 4. Move 1NE. Road (1/2) and cancel.
Galley 1. Move 1NW.
T45
Archer 2. Move 1E.
Worker 5. Unload onto Grassland Forest (1E of capital).
Worker 1. Road (1/2).
Worker 2. Road (2/2).
Worker 3. Mine (2/4).
Worker 4. Move 1SW. Road (2/2).
PlastDukeberg. 27/60H. Whip Worker. Work Pig/Lake.
Bronze Beaver. Switch to Granary.
T46
PlastDukeberg. Build Research. Work Pig/Lake.
Worker 5. Chop (1/3).
Worker 6. Move 1SE. Chop (1/3).
Worker 1. Road (2/2).
Worker 2. Move 1NW.
Worker 3. Mine (3/4).
Worker 4. Move 1SE. Road (2/2).
Archer 2. Move 1NE.
T47
Bronze Beaver. Whip Granary. Immediately switch to Research.
Worker 1. Move 4N.
Worker 2. Chop (1/3).
Worker 3. Mine (4/4).
Worker 4. Move 2N. Road (2/2).
Worker 5. Chop (2/3).
Worker 6. Chop (2/3).
Pyramid City. Work Banana Hill and Grassland Hill.
Science at 70%.
T48
Mathematics. Science at 0%.
PlastDukeberg. Switch to Settler. Work Pigs, Grassland Hill.
Pyramid City. Work Rice, Banana Hill. Switch to Pyramids.
Bronze Beaver. Switch to Granary.
Stone Island. Switch to Work Boat.
Worker 1. Chop (1/3).
Worker 2. Chop (2/3).
Worker 3. Move 1SE. Road (1/2).
Worker 4. Move 3N1E.
Worker 5. Chop (3/3).
Worker 6. Chop (3/3).
T49
PlastDukeberg. Switch to Settler.
Bronze Beaver. Switch to Worker.
Worker 5. Move 1N. Road (1/2).
Worker 6. Move 2N. Road (2/2).
Settler 5. Move 4N.
Worker 4. Road Ivory (1/2) and cancel.
Worker 3. Road (2/2).
(Note: I need to check all of the above, but I think it's all good.)
---
T47, Mathematics coming in:
T50. I stop here, partly because things get very flexible at this point, but also because I need to be somewhere right now:
Pyramid City has been working a Rice and a Banana. It would look more impressive if I'd worked both hills. Capital should build/chop/whip an Axe before the current Settler. Maybe even two.
The Ivory has one turn of road already built. Of the two Workers south of Elephant Bling, one could feasibly go towards Bronze Beaver. The Worker 2E of Pyramid City can do a number of things (move to the Ivory and improve this turn; move to a Forest in Pyramid City or Elephant Bling, to chop next turn; move to the Gems, to road next turn).
My description of unit movement is a little fuzzy. Look at the screenshot for relative positions of the Axe, Archers, and Warrior.
I have more to add, but like I said I need to be elsewhere right now, my apologies. Saves attached.
Incidentally, I think I work between 60-70 hours a week, albeit on my own terms. My free time last week was a rare luxury.
I have mentioned a T45 Worker in the capital on a couple of occasions. See here and here. I was not initially certain that this was the best way to go, but I am now 90% sure that it is. The build order occurred to me after I had penned the initial PPP plan, which, as you know, was based upon two minor incorrect assumptions (the Quarry was behind schedule, the Mine ahead).
All of these tests have been a learning experience and I do not mind whose plan we follow, provided it be thought best for the team. I have also found this testing quite tiring, but it has left us both in a much better position to judge what works and what does not. I think we are the only two players who fully understand the current micro at this point.
(Not a jab at anyone! RL is always more important than Civ, and there will no doubt be later turns where I'm very much out of the loop).Re. City #4, I think we were arguing at cross purposes. My fundamental points were that (a) there was no reason to delay in terms of research; (b) the city's borders would pop on T42 in either plan; (c) working a mined BH saved a Forest and four Worker turns. We have gained hammers and flexibility, so I am now trying to put those saved Worker turns to better use.
If you would like Worker 6 to travel to the Pigs, this can be achieved on T50 with my current plan (this delays the Granary in City #5). In fact, if Mansa were to tech IW next turn, I would suggest that Worker 4 road over the Stone completely (maybe... again, one of us would need to figure out the precise micro).
Rather than discuss at length, here is a revised PPP. Worker numbers might be off from the original PPP, but they're fairly self-explanatory:
---
T38
Axe 1. Move 1NW.
Worker 1. Move 1N and road (1/2).
Worker 2. Move 1N2W.
Worker 3. Move 1NE.
Worker 4. Move 1S. Road and cancel (1/2).
Warrior 2 fortify
PlastDukeberg. Whip Settler.
T39
Settler 4. Move 1N of Nana Hill.
Worker 1. Road (2/2).
Worker 2. Chop (1/3).
Worker 3. Move to Nana Hill
Axe...heads in a N, NW direction sticking to Forests/Jungle.
Galley 1. Move 2S.
Worker 4. Move onto Galley
PlastDukeberg. Work Pig and Banana. Overflow to Archer.
T40
Settler 4. Move 1W. Found city. Work Nana Hill. Build Monument.
Worker 1. Move to Nana Hill and Mine (1/4)
Worker 2. Chop (2/3).
Worker 3. Mine (2/4)
Galley 1. Move 2N1W.
Worker 4. Unload 1NE of capital (grassland)
Archer 1. Move 1S (if healed)
PlastDukeberg. Switch Farmed Banana to Lake.
T41
PlastDukeberg. Switch Lake to farmed Banana.
PlastDukeberg. Build Research (Pig/GH/Banana).
Archer 2. Move 1NE.
Archer 1. Move 1S.
Worker 1. Mine (3/4).
Worker 2. Chop (3/3).
Worker 3. Mine (4/4).
Worker 4. Move 1NW. Road and cancel.
Science Slider. 100%.
T42
Worker 2. Move 1SE. Farm (1/5).
Worker 1. Move 1W. Farm (2/5).
Worker 3. Move 1W. Farm (3/5).
Worker 4. Move 1NW. Road and cancel.
Archer 1. Move 1S. Fortify.
Galley 1. Move 1E.
PlastDukeberg. Switch farmed Banana to Lake. Build Worker.
T43
Stone Island. Build Research.
Pyramid City. Build Research. Work Rice.
Archer 2. Move 1N.
Galley 1. Move 2S.
Worker 5. Move 1S. Road (2/2).
Worker 1-2. Farm Rice (5/5).
Worker 3. Move 2N1E.
T44
Archer 2. Move 1NE.
Worker 5. Move onto Galley.
Worker 1. Move 2S1W.
Worker 2. Move 2S. Road (1/2).
Worker 3. Mine (1/4).
Worker 4. Move 1NE. Road (1/2) and cancel.
Galley 1. Move 1NW.
T45
Archer 2. Move 1E.
Worker 5. Unload onto Grassland Forest (1E of capital).
Worker 1. Road (1/2).
Worker 2. Road (2/2).
Worker 3. Mine (2/4).
Worker 4. Move 1SW. Road (2/2).
PlastDukeberg. 27/60H. Whip Worker. Work Pig/Lake.
Bronze Beaver. Switch to Granary.
T46
PlastDukeberg. Build Research. Work Pig/Lake.
Worker 5. Chop (1/3).
Worker 6. Move 1SE. Chop (1/3).
Worker 1. Road (2/2).
Worker 2. Move 1NW.
Worker 3. Mine (3/4).
Worker 4. Move 1SE. Road (2/2).
Archer 2. Move 1NE.
T47
Bronze Beaver. Whip Granary. Immediately switch to Research.
Worker 1. Move 4N.
Worker 2. Chop (1/3).
Worker 3. Mine (4/4).
Worker 4. Move 2N. Road (2/2).
Worker 5. Chop (2/3).
Worker 6. Chop (2/3).
Pyramid City. Work Banana Hill and Grassland Hill.
Science at 70%.
T48
Mathematics. Science at 0%.
PlastDukeberg. Switch to Settler. Work Pigs, Grassland Hill.
Pyramid City. Work Rice, Banana Hill. Switch to Pyramids.
Bronze Beaver. Switch to Granary.
Stone Island. Switch to Work Boat.
Worker 1. Chop (1/3).
Worker 2. Chop (2/3).
Worker 3. Move 1SE. Road (1/2).
Worker 4. Move 3N1E.
Worker 5. Chop (3/3).
Worker 6. Chop (3/3).
T49
PlastDukeberg. Switch to Settler.
Bronze Beaver. Switch to Worker.
Worker 5. Move 1N. Road (1/2).
Worker 6. Move 2N. Road (2/2).
Settler 5. Move 4N.
Worker 4. Road Ivory (1/2) and cancel.
Worker 3. Road (2/2).
(Note: I need to check all of the above, but I think it's all good.)
---
T47, Mathematics coming in:
Spoiler :
T50. I stop here, partly because things get very flexible at this point, but also because I need to be somewhere right now:
Spoiler :
Pyramid City has been working a Rice and a Banana. It would look more impressive if I'd worked both hills. Capital should build/chop/whip an Axe before the current Settler. Maybe even two.
The Ivory has one turn of road already built. Of the two Workers south of Elephant Bling, one could feasibly go towards Bronze Beaver. The Worker 2E of Pyramid City can do a number of things (move to the Ivory and improve this turn; move to a Forest in Pyramid City or Elephant Bling, to chop next turn; move to the Gems, to road next turn).
My description of unit movement is a little fuzzy. Look at the screenshot for relative positions of the Axe, Archers, and Warrior.
I have more to add, but like I said I need to be elsewhere right now, my apologies. Saves attached.
Incidentally, I think I work between 60-70 hours a week, albeit on my own terms.
My free time last week was a rare luxury.Attachments
(5 minute break...)
Worker 5 (built by Stone Island) can unload in the Jungle 2S of the capital or (better) onto the Furs, if we want to improve the Pigs ASAP. Your last post brought this out to me. Worker 4 would need to road for at least one turn on the tile directly NE of the capital. City #4/5 will be down a Worker, of course.
I haven't played this way, but I think it could work. The Worker 2NW of the capital in my T50 screenshot could possible chop a Forest in the capital, rather than finishing up the W <----> E road.
Edit: in fact, roading the Forest directly NW of the capital might prove advantageous. It will consume 3 Worker turns, whereas roading NE then N consumes 4. Also, we will have to spend a turn's movement going onto the Forest sooner or later, since we will want to chop it at some point.
Bebekija
King
Played to T39.
I stopped because Manasa got CoL IBT 38-39, and Duckweed wanted to pause at this point to evaluate his tech rate.
So there you go!
Aside from that, nothing worth mentioning, except that barbs came crashing into our Warrior + Axe. It was a free win for the axe, but the warrior was badly wounded, so I promoted him to Woodsman I cause he could techically be sniped by an animal. I took the liberty to move him 1NE to check for food North of the gems but there's nothing there. I plan to use the Axe to go check around the Phants.
Similar threads
- Replies
- 7
- Views
- 506
- Replies
- 6
- Views
- 628
- Replies
- 9
- Views
- 801
- Replies
- 6
- Views
- 934