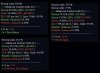
Low detail:
- Survival odds
- Main battle outcome probabilities (Victory, Defeat, Retreat, Withdraw)
- XP for each battle outcome (beside main battle outcomes)
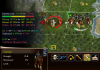
Medium detail (Recommended):
- Survival odds
- Main battle outcome probabilities (Victory, Defeat, Retreat, Withdraw)
- XP for each battle outcome (beside main battle outcomes)
- Expected hitpoints conditioned on battle outcome (beside battle outcomes)
- Att,Def damage per hit and number of hits and odds of hits and CombatRatio
- Attacker and Defender Unharmed Odds
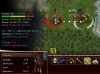
High Detail:
- Survival odds
- Main battle outcome probabilities (Victory, Defeat, Retreat, Withdraw)
- XP for each battle outcome (beside main battle outcomes)
- Expected hitpoints conditioned on battle outcome (beside battle outcomes)
- Probability of every possible Attacker HP outcome
- Att,Def damage per hit and number of hits and odds of hits and CombatRatio
- Average HP for attacker and defender
- Attacker and Defender Unharmed Odds
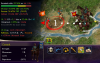
Everything!:
- Survival odds
- Main battle outcome probabilities (Victory, Defeat, Retreat, Withdraw)
- XP for each battle outcome (beside main battle outcomes)
- Expected hitpoints conditioned on battle outcome (beside battle outcomes)
- Probability of every possible Attacker HP outcome
- Probability of every possible Defender HP outcome
- Nearby XP thresholds for units without a combat limit
- Att,Def damage per hit and number of hits and odds of hits and CombatRatio
- Unconditional expected Attacker,Defender HP
- Attacker and Defender Unharmed Odds
- Unrounded XP
Visual comparison:
What do all those values mean?
Survival Odds:
These are simple - the odds of both the attacker (green) and defender (red) surviving. Sometimes using units like catapults means the defender will have 100% odds; This is because the attacker cannot kill the defender and must withdraw before dealing a killing blow.
Victory:
The odds of the attacker killing the defender. Also presented on this line is the number of XP the attacker would earn if he wins. At Medium detail and higher, there is an additional value on this line. This value is the average hitpoints of the attacker if he kills the defender.
Withdraw:
These are the odds of a forced withdrawal from combat. Units like catapults and cannons, which have a combat limit, cannot kill a defending unit. Instead they can only damage the defender down to a certain level (eg. 25HP for catapults, 20HP for cannons, 15HP for artillery). The XP a unit earns for withdrawal is 1XP. At the end of this line, the average values of both attacker and defender HP are presented for the withdrawal battle outcome (for Medium detail and higher). Note average defender HP on this line corresponds to the damage limit of the unit you are using to attack.
Retreat:
If you are using units that have inherent retreat odds or that have earned promotions that give them retreat chances, then this line tells you the probability of your unit retreating. Units will only retreat if they are one hit away from being killed, and only when they are the attacker. The HP value presented on this line (Medium detail and higher) is the number of hitpoints the attacker would have if he were to retreat from the battle injured.
Defeat:
The odds of the attacker being killed by the defender. The XP the defender will earn is displayed, along with the average number of hitpoints the defender will have if he survives combat (Medium detail and higher).
Detailed Attacker HP Outcomes:
At the High and Everything settings, these values will be displayed directly under the battle outcomes representing the attacker surviving. For each number of hitpoints the attacker could possibly have, beside it you will find the probability of the unit exiting battle with that many hitpoints. There is also a coloured bar beside each outcome, to help visually identify the scope of the values. Note if there are retreat odds involved, the lowest HP value for the attacker will include the probability of retreat in its odds. Note the sum of all the HP outcomes should be the same as the odds of the attacker surviving.
Detailed Defender HP Outcomes:
Much the same as Attacker HP Outcomes, except for the defender. Note the sum of all these values should be the odds of the defender surviving.
Attacker/Defender damager per hit, number of hits required, odds of hits and CombatRatio:
A lot of data is displayed on this line. The first two values are the amount of HP damage each of the attacker and defender (respectively) will cause per hit. Then after that, the number of hits required by each combatant are displayed. In green, is the number of hits required by the attacker to kill the defender or to force the attacker's withdrawal due to a combat limit. In red is the number of hits required for the defender to make to either kill the attacker or to make him retreat. Next, the odds displayed in green are the odds of the attacker for making a hit in each combat round. The defender's odds are just 100% minus this number. Finally on this line is the important value called the CombatRatio or simply R. This value is equal to the attacker's modified combat strength divided by the defender's modified combat strength. This number is important for many reasons - one being that it determines how many XP the attacker and defender can earn from combat. The value R takes both injured units and all combat related modifiers into account (e.g. promotions and defense bonuses).
Average HP:
This line simply gives the average hitpoints for each combatant after battle. Unlike the averages presented earlier, these averages include the possibility of the unit dying, so they better reflect the overall outcome of battle.
Unharmed:
These odds are very simple. They are the odds of the attacker/defender exiting combat without taking a single hit i.e. unharmed. Units that are already injured are counted as winning unharmed if they don't take damage during the battle.
Unrouneded XP:
These values are shown at Everything detail only. These values are rounded down to the nearest whole number, and then forced to be within 1 and 10, to give the actual XP that can be earned by each combatant for killing their opponent.
XP range:
This line is only shown at Everything detail, and it crams a lot of information on one line. In the middle, it presents the CombatRatio i.e. the R value, and the XP it corresponds to. On either side of it, the CombatRatios that would lead to different number of XP earned are shown. If you increase the value of R (for example, by taking a Combat promotion) then tipping it over the next value will cause your XP earned to drop by 1 point.


")
 ), and paired with the Attacker Unharmed odds you can cherry pick the best attacker.

") I was barely able to figure out how to make this mod (I've never done any C++ before), only getting by because of my reasonable procedural-oriented programming skills. But definitely there may be room for customising the odds display here. As we have seen already, we see different value in different statistics and being able to choose from an options screen which ones one wants would be very nifty.
I was barely able to figure out how to make this mod (I've never done any C++ before), only getting by because of my reasonable procedural-oriented programming skills. But definitely there may be room for customising the odds display here. As we have seen already, we see different value in different statistics and being able to choose from an options screen which ones one wants would be very nifty.  It would certainly be easier doing that than recompiling the code every time I need to change a constant, though this compiler I have does seem to recompile the code very quickly.
  I personally wouldn't consider the value of that to be worth the effort required.