THis exploration path to the SW makes more sense to me, given our planned settling date
Indeed, it looks good, thanks for drafting it!
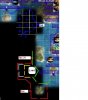
I would take the long route. (the red line)
Okay, that approach fits with trying to get more inner-circle exploration along with having the Work Boat ready to go either west or towards netting a Seafood Resource.
We could be tight on the timing of netting a Seafood Resource if we pick either the Fish in the east (by the Pig) or the Crab in the north as our targeted Seafood, either of which may warrant turning Work Boat Explorer #3 around and sending one of the first two Work Boat Explorers towards the east to explore in its place.
So, I'll just have to take the turns slowly, to give us enough time to plan a netting path with one of the three Work Boats.
LC's longer (red) scouting route looks good. Maybe worth considering going green -> red and postpone circling the closest 1 tile island.
Indeed, it is worth considering the green -> red loop. It does give us a tiny bit of immediate flexibility, in that if we need a Work Boat Explorer to head east for netting, then we can skip the red line and go there directly... but I'm not sure that this approach is a good balance... we'll still be leaving some of the western area hidden. On the other hand, if we complete the green -> red loop, the Work Boat Explorer is somewhat out of position for netting... it'll be approximately on the southern side of the GFor one-square island on the turn that we complete our Galley 1. That's a great spot to be in if there is more land to the SW that we want to explore immediately, but not so great of a spot if we'd like to choose between netting and heading west.
So, I've considered the idea but I think that the red path does look to be better in terms of our positioning as the deadline for settling approaches... we'll be more centrally-located just before Galley 1 comes out (on approximately Turn 70, according to LC's image, while Galley 1 should be ready on Turn 71). The timing might be tight, but that's why we have multiple Work Boats that could be used for netting. Besides, we will get one extra turn of movement with the Work Boat which gets used for netting, since a Settler loses all movement points on the turn that it "lands," while a Work Boat can still move on that turn.
As another option (more like the pre-LC-image plan), taking only the green path gives us less info but more time to go and net a Seafood Resource... but since that option doesn't seem to be on the table (no one has suggested it after seeing LC's image), and since I don't like it as much as the red path, I won't vote for it.
So, I think that out of the two options that we have on the table (red path or green path -> red path), I would vote for the red path.
Since we seem to have general agreement here,
I'll plan to continue play in 1 hour (unless someone asks me to wait longer), but will aim to take the remaining turns pre-City-2 slowly, to give us time to figure out which Work Boat should be positioned exactly where for netting purposes.

")

 Many good players failed at Immortal, so it must have been a tough game. I take back everything bad I've ever said about you...

