SGOTM 15 - Unusual Suspects

Have we decided whether AAA is going to continue? vra379971 suggested that. I'm fine either way. I won't be able to put together a PPP or play until Wednesday, due to a PTA meeting tomorrow night.

If I'm playing I'd like to flesh out an agreed upon order of battle since there seem to be a number of approaches being put forward, and our margin for error is small.

I think AAA's approach makes the most sense to me. Better to be somewhere the reinforcements can't hit you than to be where we have terrain bonus when we get hit.

As to who is going to play it... might be easier for AAA since he's familiar with where the units are and where the upcoming units will be, but I'm also sure you could handle it. Does AAA want to continue another 10? Anyhow, I'll leave it up to XCal.

And suggest we not only decide who will play the upcoming turns, but who will play the ones after (on-deck). That way we don't need to have this discussion after every set.:rolleyes:


I'd go 1N because you don't want the wounded units exposed to a counterattack though the woods south of Osaka. Accuracy gives you plus ten, so with walls you get 9% a turn, I think. We'll have 8-10 cats, with 4 with accuracy you only have 16% to deal with. Use 3 cats at 4%/turn leave 4% behind and crash the city with 4 (assuming we do have ten). We'd probably only lose 2 cats and nothing would survive.

I hope:D

I see what you mean... this makes sense to me. I think I can learn a lot about tactics by shutting up and listening. :) I also like the plan to use Osaka as a killing zone. We don't want to try defending Osaka in revolt with wounded units. Much more effective to heal them outside, give up the city, and wipe out a second stack. No razing, and Osaka won't have any infrastructure worth saving, either.

Right now Toku has about the same power as us, which means we should roll him pretty easily. :D

Beware that he might be able to trade for horses from Hatsegawa, and with HBR that means HA's. So spears for the second attack, might be necessary. But we'll see.
 
I have no real preference regarding who plays next, other than hoping it's soon. AAA, are you up for another few turns? We still need to settle on tactics, though, so I doubt that waiting for Trys would delay things.

I do not think that taking the city and then letting Toku take it back is a good idea; correct me if I'm wrong, but wouldn't that restore Osaka's defenses to 50%? It seems better to knock him down to one wounded unit and let others come to reinforce.

The idea behind attacking from our land is that we're worried that Toku might send out a stack to attack Drona, right? But from the perspective of us attacking Osaka, doing it from a forest is best. How about we put 2 Woody2 axes plus one more axe or spear (just to be safe) along with 3 cats with CR/Accuracy in the forest south of the corn (because I think that tile will flip to our culture when Osaka falls), and put everything else (around 5 axes and 6+ cats) on our river hill ready to attack and/or repel an invading stack? We could road the tiles N of the corn and the hill to aid our mobility, too. See this screenie.

Woody2's should be quite safe in the forest; if Toku attacks we just pick up more XPs and maybe get a Woody3 (with 15% healing). If he moves toward Drona we have a bunch of cats (unpromoted until we know what we need) ready to smack him, with axes to finish them off. The 3 Acccuracy cats in the forest take 2 turns to knock down the defenses (2turn x 3cats x 9%/turn = 54%), and during that time we'll add another cat or two to our main force which will be waiting out of Toku's reach (and standing ready to repel an invasion). Alternatively we could sit in the forest S of Osaka--I'd guess that might discourage Toku from sending reinforcements, but on the other hand we'd have a better view of what's coming. I'm not sure which forest tile is better, but I'd really like to knock down Osaka's defenses from a safe position.

I understand the desire for a bit of prudent safety ;). But that is a luxury we can't afford I think. I'm not sure what culture he'll get with the return of the city, but certainly won't get the walls (they never survive capture/recapture) which are the problem. My strategy centers around speed (it always does): speed of attack, speed of healing, speed of movement. We are being killed at tech, two Tokus can see Feudalism. Once there are longbowmen, we will need at least trebs and maces.
This is essentially a Emperor - Normal Speed - Always war game, with the worst AIs possible (Agg, Pro). If we don't move fast we are dead. Toku needs to come down fast, and we need to start teching, for any win to be possible.
 
Ah, right, the walls (and monument) will be gone. And I agree that speed is essential. But under the take-it-and-lose-it scheme our unit that takes the city will be out of movement and vulnerable to a counterstrike before he can evacuate the city, so we'll probably lose him. Then Toku takes the city and probably gets his 20% culture defense back, so we have to use 2 Accuracy cats to knock it down before attacking again. I believe you're also suggesting that we bombard and attack the same turn, so we'll need "all" our units ready to go at once.

If we start bombarding from a forest we can DoW sooner. [Edit: We could safely DoW in 3 turns.] Yes, we lose a turn moving some units to the forest (and I'm thinking the one S of the city is better) but we don't need all our other units in position to attack yet--just put enough on the river hill to defend themselves. [Edit: Wouldn't hurt to put an axe in the other forest to keep Toku out.] We then knock down the defenses for two turns, attacking with the rest of our fully assembled force on that 2nd turn. [Edit: That would be 5 turns from now. We can't wipe out 12 units in one go so we'd finish them off and take Osaka for keeps 6 turns from now.] I think the timing works out as well as for the all-in-one-go scenario, and I claim we'll have superior ground. One of the units on the forest tile can pillage the road. We should have one or two Guerilla2 archers ready to move onto the hill E of Osaka once we take the city, pillage that tile, then move SE and S and pillage those roads and mines as we bring up our main attack units. This will bottle up Toku in Kyoto so we can attack him with all our units and not worry (I hope) about him sending units into the field, where we have no attack advantage. One axe NE of Kagoshima should keep units from that city in check, and we'll have a constant stream of units coming from other cities to defend our rear if necessary. By only attacking Toku's units when they're in a city we leverage our cats' CR power and collateral damage capabilities--letting him attack us in a city gives no advantage to us. And while we're in the field, advancing toward Kyoto, we stick to forests and hills, leveraging our defensive double promos.
 
The main advantage we have in attack is our catapults. Catapults are geared towards attacking cities. They will have either accuracy or CR promos to make them even more effective against cities. We don't really want to put our axes against his axes in the open field because that just evens the odds. We want to kill as many units in the cities as is possible.

Now... I do not think that we sacrifice our axe to take Osaka. Better to leave one weakened unit there and let new units come into the city. However, it depends on where/whether/when the Japanese reinforcements arrive whether to take the city or give it back.

I envision we take Osaka and our whole stack moves there to heal. But if a Japanese counter-attacking strike comes, we simply retreat and let him have it. Then when we take it again, there won't be any reinforcing stack, and we keep rolling.

OTOH, it could be that the reinforcements arrive about the same time we would just barely be able to take Osaka. That's what I think XCal is concerned about. I agree that in such a scenario, taking Osaka the first time would only be worth it if it was the only way to prevent strike. Better to allow the reinforcements to enter the city before killing them.

The point being that every battle outside the cities works to Japan's favor. So it would be much better not to go onto the forest and be defended against his attacks. That requires us to DOW earlier, before we can start hitting him. That gives him more time to make more units, and more deals for horses or bribes to war or whatever. Far better to get hits on his units on the same turn we DOW. Wounded AI units are very unlikely to attack our stack in that scenario because the odds would be worse than a healthy shock axe against a healthy woody axe in the forest.

Also, in my experience, the AI is totally unprepared and inadequate for defending against the city slaughter, but is programmed to handle open field combat somewhat competently. How many woody2 axes do we need to defend against 9 combat1/shock1 axes? I'd rather wound them all so we don't have to find out.

On the third hand... I'm not the expert on combat here, so best arguement can win my vote.
 
Well put. :) Are we agreed that we should only capture Osaka if it looks like we can hold it? And if, after having moved in, we find that we can't, we run away? I'm more worried about how we get our stack to Kyoto and keep Toku bottled up where we can kill him. We each have our own way of doing things, but all of us understand that action in the field is to be avoided, so I'm content to trust the active player.

Shall we consider this resolved? Any other issues to address? Bolly will pop a GP in 4 turns. What kind would we prefer? Right now we're running scientists. A Great Sci will bulb a bunch of piddly techs at this point (correct me if I'm wrong) so I would prefer a Prophet that can be used to bulb CS after we get CoL. That means shifting our scientists over to priests to improve the odds (and get more hammers for building units). If we get a Prophet I'd say hold him for later bulbing. If we get a Scientist, settle him?

Move the workboat to fogbust the south, and send the scout east so he can be Warlorded into a supermedic. Worker actions?

What units do we want to build? I'd like a spear for the north in case of horsies--we'll have one from Drona next turn--another would be nice but we need cats more. It would be good to have a couple 5XP archers for city garrison or to defend our attacking units while on hills. We really need to get the game moving so I won't ask for a detailed PPP, but we need something to look at.

Who will play next (AAA or Trys), when, and how many turns? Should we pause before the DoW or just after the opening assault? To give something to poke at, I suggest AAA play until one turn before our DoW.
 
I'll make one last pitch, but I'm pretty sure people won't agree. :groucho:

I've been doing this for a long time (although I don't post much), I remember when the Russians still played with us - my god could they smash stuff:lol:.
The cities are in many ways an afterthought, it is the armies you have to destroy. Otherwise you get deep into enemy territory, with wounded units that take to long to heal, with no movement, and all of a sudden the AI has more units than you.

Let Toku come to us, with a pile of raiding axes (that defend poorly - the AIs always promote immediately), let him whip his cities, let him gather up his extra units (AIs will only pull so many units from a city, and after that they leave them in no matter how stupid it is) and bring them to retake Osaka - so we can destroy them. Then he will only be able to whip and run stuff singly and we can overwhelm him.

Anyway, that's my pitch.
Since this isn't likely to be the consensus opinion, why don't I finish the build up and hand the generalling over to whoever is next.:ar15:
 
(From post 937) If I was doing it, I'd attack from 1 north of the corn(it needs a road), I'd promote three (maybe more)cat to accuracy and bombard Osaka close to 0% and sacrifice a few cats and kill everything before he has any chance to respond (or whip). We have the units, I believe. Then we heal on a road and in our own territory with a super medic. While Toku organizes a response, if possible, I'd scrub his roads within one of Osaka and then leave the stack in Osaka. When he responds in force with double raiding axes move out of Osaka let him have it, then wipe out his second stack. Then he will be vulnerable and I'd make for his capital along the hills.

(Post 939) I'd go 1N [of the corn] because you don't want the wounded units exposed to a counterattack though the woods south of Osaka. Accuracy gives you plus ten, so with walls you get 9% a turn, I think. We'll have 8-10 cats, with 4 with accuracy you only have 16% to deal with. Use 3 cats at 4%/turn leave 4% behind and crash the city with 4 (assuming we do have ten). We'd probably only lose 2 cats and nothing would survive.

I generally like the above. To be picky, though, it needs 11 cats, not 10: 4@9% bombard, 3@4%, leaving 2% for 3 CR cats to attack. Eh, we could delay to gather more cats or only bombard to 6%. But can a mere 3 or 4 CR cats cause enough collateral damage to make it a cakewalk for our axes against his 12+ defenders? Since we won't have enough units to take out all of his at once we need our axes to be in good enough shape to defend against the survivors. I guess that's not a big worry; on the second turn we can throw all our bombardment cats into the battle, too.

I think we're in closer agreement than it seems, and am intrigued enough by AAA's approach to let him play for another 10 turns provided others agree (and that AAA documents exactly what happens in the attacks so that we can vicariously enjoy and learn :)). As I see it, the main difference is that in my scheme we start sooner but take longer to set up the main attack, which will use a larger fraction of our cats, and that we have units posted inside Toku's territory. (And yes, I think 2 Woody2 axes and one unpromoted axe in a forest would survive any assault Toku could throw at them. I really doubt he'd try.) The main danger I see is that Jap units might be diverted from reinforcing Osaka; we want them all to head for where we can kill them. And as mentioned before there's a chance that Toku might send a stack from Osaka toward Drona, which we don't want. AAA's scheme delays the DoW until we're ready for a full assault (although the fraction of cats actually attacking as opposed to reducing defenses is smaller), and all our units stick together, reducing the odds of any Japanese units straying from Osaka or the roads leading to it.

I don't have enough confidence in predicting how Toku will react to stick to my guns. If we let AAA do it his way and there are disappointments it won't be my fault. ;) But if we go this route I think we need to let AAA do it. Let's make a decision quickly; I think Chris and I are about ready to say "green" to anything. ;)
 
I'm fine with AAA carrying on. I think he should carry out the attack on Toku using the tactics he describes, as well. I would probably take the more conservative approach (attack and hold the city), which suggests to me that AAA's approach is probably better. :) I'm willing to take a risk to learn something new.
 
kcd's latest post approved AAA's approach so I think we have a pretty good quorum to proceed, and we've been discussing this for a couple days so SH has had a chance to comment. AAA007, if you're ready, you have a licence to kill.
 
I like the approach - good luck AAA.
Get us a few screens along the way and some play-by-play!

EDIT: Only other thought is to switch espionage points at this point to Hammy to see what he is up to.
 
Green from me for AAA's plan.

Had to open game and check great prophet bulbing. So, plan is to use GP to bulb CoL or CS. If we don't know monarchy, then Divine Right doesn't become available.
 
Thanks for the vote of confidence :eek:

Actually I confess that as I was building and moving units about, there was a pang of regret that I wouldn't get to smack Toku silly with them. I guess I do :woohoo:

Can I use the save I have, or do I need to grab the save from the SGOTM site?
 
Anyway, that's my pitch.
Since this isn't likely to be the consensus opinion, why don't I finish the build up and hand the generalling over to whoever is next.:ar15:

Great pitch, poor prognostication. :lol:

You got the consensus to proceed. :D

Kick some Tokubutt! :popcorn:
 
Thanks for the vote of confidence :eek:

Actually I confess that as I was building and moving units about, there was a pang of regret that I wouldn't get to smack Toku silly with them. I guess I do :woohoo:

Can I use the save I have, or do I need to grab the save from the SGOTM site?

The saves are identical, so its no problem to use the save you have. :)
 
Things have not gone as planned, sort of.
I overestimated the effect of 4 cats crashing. Spread over 12 units it didn't have the effect I had hoped. Consequently I didn't get the city in the first go and I lost to many axes. Sorry my fault.
Spoiler :

Spoiler :


I did get it next turn, with no extra loss of units. But we need those axes I lost, again sorry. The good news is we are now 1.5 of Toku, the bad news is Hamtoku DoWed us immediately
Spoiler :

Spoiler :


I'm going to load the save into the SGOTM site so everyone can look at the situation.
War is a lot more nerve-wracking when it is not your game:cringe:
 
The logs


Spoiler :
Logging by BUFFY 3.19.003 (BtS 3.19)
------------------------------------------------
Turn 116/500 (25 AD) [05-Apr-2012 17:49:57]
Archer 5 (Vijayanagara) promoted: City Garrison I
Bollywood begins: Catapult (3 turns)
0% Research: 0 per turn
0% Espionage: 4 per turn
100% Gold: 11 per turn, 226 in the bank

After End Turn:
Bollywood finishes: Catapult
Holy Cow grows to size 4
Holy Cow finishes: Axeman

Turn 117/500 (50 AD) [05-Apr-2012 17:57:18]
Holy Cow begins: Axeman (6 turns)
A Mine was built near Drona
A Cottage was built near Vijayanagara
0% Research: 0 per turn
0% Espionage: 4 per turn
100% Gold: 10 per turn, 237 in the bank

After End Turn:
Bollywood finishes: Axeman
Vijayanagara grows to size 6

Other Player Actions:
Attitude Change: Hatsegawa (Egypt) towards Gandhi (India), from 'Annoyed' to 'Cautious'
Attitude Change: Shakagawa (Zululand) towards Gandhi (India), from 'Annoyed' to 'Cautious'
Civics Change: Hammuragawa(Babylon) from 'Despotism' to 'Hereditary Rule'

Turn 118/500 (75 AD) [05-Apr-2012 18:05:21]
Bollywood begins: Axeman (2 turns)
A Mine was built near Bombay
Holy Cow begins: Barracks (7 turns)
0% Research: 0 per turn
0% Espionage: 4 per turn
100% Gold: 8 per turn, 247 in the bank

After End Turn:
Bollywood finishes: Axeman
Abu Bakr (Great Prophet) born in Bollywood
Drona finishes: Catapult
Delhi grows to size 6
Vijayanagara's borders expand

Other Player Actions:
Attitude Change: Hatsegawa (Egypt) towards Gandhi (India), from 'Cautious' to 'Annoyed'

Turn 119/500 (100 AD) [05-Apr-2012 18:10:25]
Bollywood begins: Axeman (2 turns)
Drona begins: Archer (2 turns)
0% Research: 10 per turn
0% Espionage: 4 per turn
100% Gold: 4 per turn, 255 in the bank

After End Turn:
The whip was applied in Delhi
Bollywood finishes: Axeman
Drona grows to size 9
Drona finishes: Archer
Delhi finishes: Axeman
Holy Cow grows to size 5
Pataliputra grows to size 2

Other Player Actions:
Attitude Change: Shakagawa (Zululand) towards Gandhi (India), from 'Cautious' to 'Annoyed'

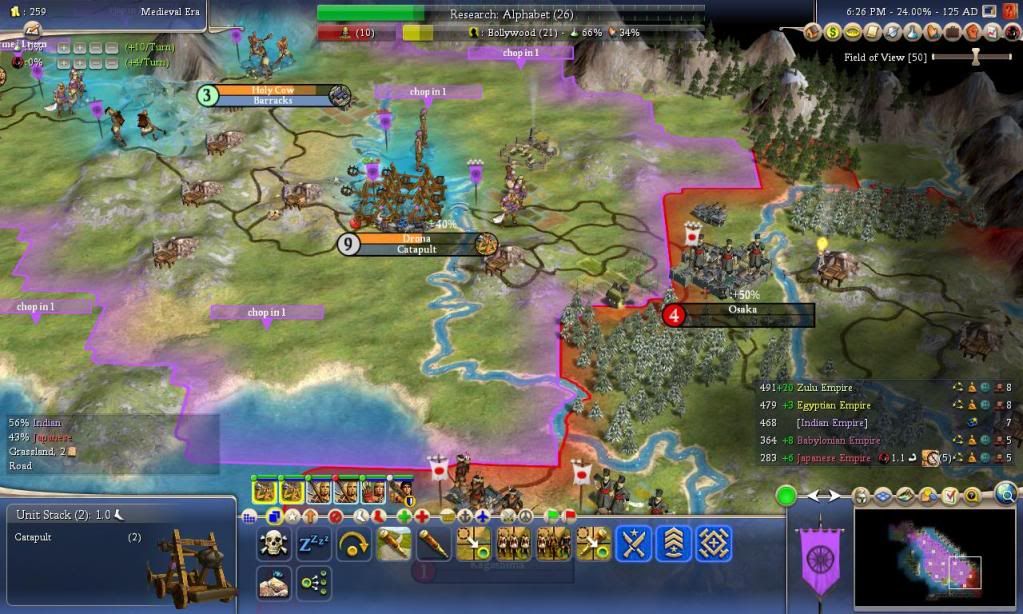
Turn 120/500 (125 AD) [05-Apr-2012 18:21:32]
Bollywood begins: Axeman (2 turns)
Drona begins: Catapult (4 turns)
Delhi begins: Axeman (7 turns)
A Cottage was built near Pataliputra
A Cottage was built near Drona
Gandhi (India) declares war on Tokugawa (Japan)
Catapult 1 (Bollywood) promoted: City Raider I
Catapult 1 (Bollywood) promoted: Accuracy
Catapult 3 (Bollywood) promoted: City Raider I
Catapult 3 (Bollywood) promoted: Accuracy
Catapult 4 (Bollywood) promoted: City Raider I
Catapult 4 (Bollywood) promoted: Accuracy
Catapult 6 (Delhi) promoted: City Raider I
Catapult 6 (Delhi) promoted: Accuracy
Catapult 10 (Bollywood) promoted: City Raider I
Catapult 10 (Bollywood) promoted: City Raider II
Catapult 8 (Bollywood) promoted: City Raider I
Catapult 8 (Bollywood) promoted: Accuracy
While attacking, Catapult 10 (Bollywood) escapes from Japanese Archer (Prob Victory: 48.4%)
While attacking in Japanese territory at Osaka, Catapult 10 (Bollywood) loses to Japanese Archer (1.29/3) (Prob Victory: 48.4%)
Catapult 12 (Drona) promoted: City Raider I
Catapult 12 (Drona) promoted: City Raider II
While attacking, Catapult 12 (Drona) decimates Japanese Archer (Prob Victory: 48.4%)
Catapult 2 (Vijayanagara) promoted: City Raider I
While attacking, Catapult 2 (Vijayanagara) escapes from Japanese Swordsman (Prob Victory: 48.1%)
While attacking in Japanese territory at Osaka, Catapult 2 (Vijayanagara) loses to Japanese Swordsman (5.46/6) (Prob Victory: 48.1%)
Catapult 5 (Vijayanagara) promoted: City Raider I
While attacking, Catapult 5 (Vijayanagara) escapes from Japanese Swordsman (Prob Victory: 48.1%)
Axeman 13 (Delhi) promoted: City Raider I
Axeman 13 (Delhi) promoted: City Raider II
While attacking, Axeman 13 (Delhi) escapes from Japanese Axeman (Prob Victory: 44.8%)
While attacking in Japanese territory at Osaka, Axeman 13 (Delhi) loses to Japanese Axeman (3.60/5) (Prob Victory: 44.8%)
While attacking, Axeman 3 (Bollywood) escapes from Japanese Axeman (Prob Victory: 48.5%)
While attacking in Japanese territory at Osaka, Axeman 3 (Bollywood) loses to Japanese Axeman (3.10/5) (Prob Victory: 48.5%)
Axeman 10 (Delhi) promoted: City Raider I
Axeman 10 (Delhi) promoted: City Raider II
While attacking, Axeman 10 (Delhi) escapes from Japanese Axeman (Prob Victory: 71.0%)
While attacking in Japanese territory at Osaka, Axeman 10 (Delhi) loses to Japanese Axeman (1.70/5) (Prob Victory: 71.0%)
While attacking, Axeman 7 (Bollywood) decimates Japanese Axeman (Prob Victory: 82.2%)
While attacking in Indian territory at Osaka, Axeman 7 (Bollywood) (5.00/5) defeats Japanese Axeman (Prob Victory: 82.2%)
Axeman 8 (Drona) promoted: City Raider I
While attacking, Axeman 8 (Drona) escapes from Japanese Axeman (Prob Victory: 48.8%)
While attacking in Japanese territory at Osaka, Axeman 8 (Drona) loses to Japanese Axeman (0.10/5) (Prob Victory: 48.8%)
Axeman 15 (Drona) promoted: City Raider I
While attacking, Axeman 15 (Drona) escapes from Japanese Axeman (Prob Victory: 48.8%)
While attacking in Japanese territory at Osaka, Axeman 15 (Drona) loses to Japanese Axeman (1.80/5) (Prob Victory: 48.8%)
Axeman 14 (Drona) promoted: City Raider I
While attacking, Axeman 14 (Drona) decimates Japanese Axeman (Prob Victory: 52.2%)
While attacking in Indian territory at Osaka, Axeman 14 (Drona) (5.00/5) defeats Japanese Axeman (Prob Victory: 52.2%)
Axeman 12 (Bombay) promoted: City Raider I
Leonidas (Great General) born in Bollywood
While attacking, Axeman 12 (Bombay) decimates Japanese Axeman (Prob Victory: 68.4%)
While attacking in Indian territory at Osaka, Axeman 12 (Bombay) (3.95/5) defeats Japanese Axeman (Prob Victory: 68.4%)
While attacking, Axeman 2 (Bombay) decimates Japanese Axeman (Prob Victory: 67.3%)
While attacking in Indian territory at Osaka, Axeman 2 (Bombay) (2.80/5) defeats Japanese Axeman (Prob Victory: 67.3%)
While attacking, Axeman 5 (Drona) decimates Japanese Axeman (Prob Victory: 69.0%)
While attacking in Indian territory at Osaka, Axeman 5 (Drona) (3.95/5) defeats Japanese Axeman (Prob Victory: 69.0%)
While attacking, Axeman 17 (Holy Cow) decimates Japanese Spearman (Prob Victory: 87.8%)
While attacking in Indian territory at Osaka, Axeman 17 (Holy Cow) (2.30/5) defeats Japanese Spearman (Prob Victory: 87.8%)
While attacking, Axeman 11 (Bollywood) decimates Japanese Archer (Prob Victory: 94.6%)
While attacking in Indian territory at Osaka, Axeman 11 (Bollywood) (4.05/5) defeats Japanese Archer (Prob Victory: 94.6%)
While attacking, Lotus (Axeman) decimates Japanese Axeman (Prob Victory: 97.0%)
While attacking in Indian territory at Osaka, Lotus (5.00/5) defeats Japanese Axeman (Prob Victory: 97.0%)
While attacking, Archer 2 (Drona) decimates Japanese Axeman (Prob Victory: 85.0%)
While attacking in Indian territory at Osaka, Archer 2 (Drona) (1.50/3) defeats Japanese Axeman (Prob Victory: 85.0%)
Leonidas (Scout) promoted: Lead by Warlord
Leonidas (Scout) promoted: Combat I
Leonidas (Scout) promoted: Medic I
Leonidas (Scout) promoted: Medic II
Leonidas (Scout) promoted: Medic III
While attacking, Spearman 1 (Drona) decimates Japanese Swordsman (Prob Victory: 97.9%)
While attacking in Indian territory at Osaka, Spearman 1 (Drona) (4.00/4) defeats Japanese Swordsman (Prob Victory: 97.9%)
Drona begins: Axeman (3 turns)
Axeman 16 (Delhi) promoted: Combat I
Axeman 16 (Delhi) promoted: Shock
0% Research: 10 per turn
0% Espionage: 4 per turn
100% Gold: 7 per turn, 259 in the bank

After End Turn:
Whip anger has decreased in Bollywood
The whip was applied in Vijayanagara
The whip was applied in Holy Cow
Vijayanagara finishes: Axeman
Holy Cow finishes: Barracks

Other Player Actions:
Attitude Change: Tokugawa (Japan) towards Gandhi (India), from 'Annoyed' to 'Furious'

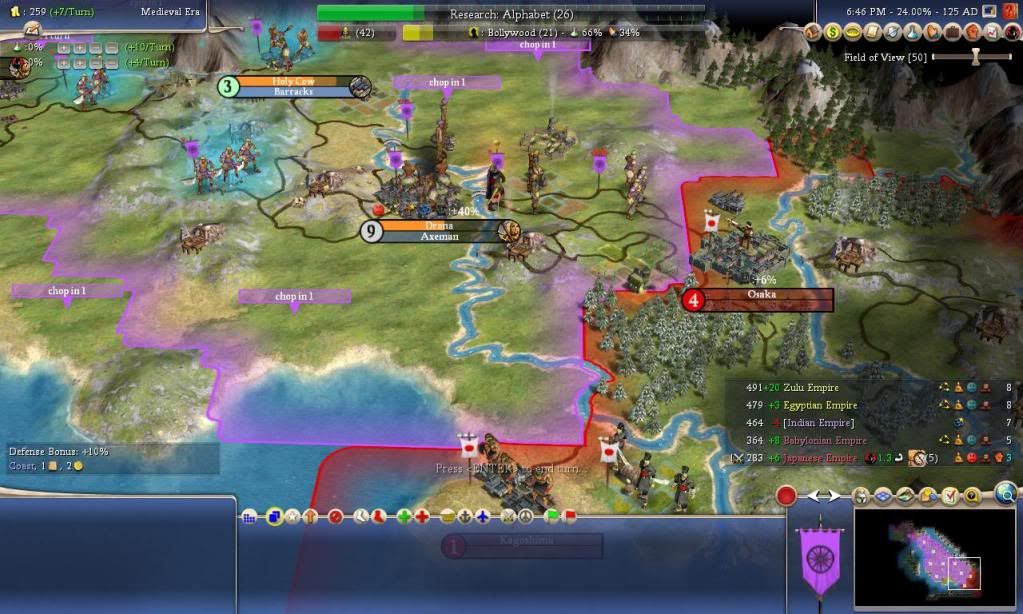
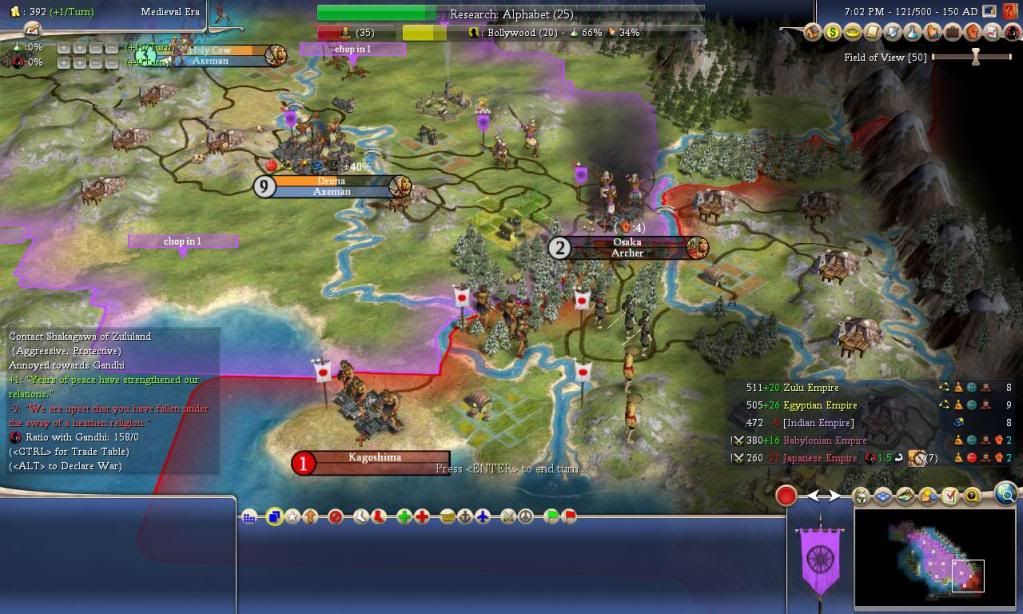
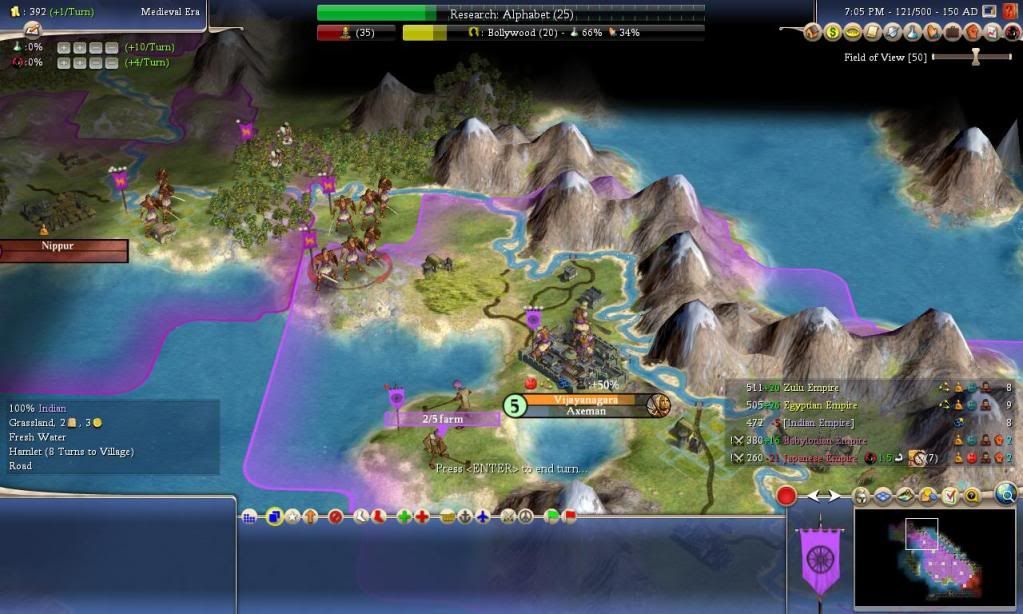
Turn 121/500 (150 AD) [05-Apr-2012 18:47:24]
Vijayanagara begins: Archer (13 turns)
Vijayanagara begins: Axeman (18 turns)
Axeman 7 (Bollywood) promoted: City Raider III
While attacking, Axeman 7 (Bollywood) decimates Japanese Archer (Prob Victory: 94.9%)
While attacking in Indian territory at Osaka, Axeman 7 (Bollywood) (2.00/5) defeats Japanese Archer (Prob Victory: 94.9%)
While attacking, Lotus (Axeman) decimates Japanese Archer (Prob Victory: 94.2%)
While attacking in Indian territory at Osaka, Lotus (4.05/5) defeats Japanese Archer (Prob Victory: 94.2%)
While attacking, Axeman 16 (Delhi) escapes from Japanese Swordsman (Prob Victory: 76.5%)
While attacking in Indian territory at Osaka, Axeman 16 (Delhi) loses to Japanese Swordsman (0.72/6) (Prob Victory: 76.5%)
Axeman 5 (Drona) promoted: Shock
While attacking, Axeman 5 (Drona) decimates Japanese Axeman (Prob Victory: 100.0%)
While attacking in Indian territory at Osaka, Axeman 5 (Drona) (4.45/5) defeats Japanese Axeman (Prob Victory: 100.0%)
Christianity has been removed: Osaka (Japanese Empire)
Christianity has spread: Osaka
Captured Osaka (Tokugawa)
Osaka begins: Archer (26 turns)
Archer 6 (Drona) promoted: City Garrison I
Archer 6 (Drona) promoted: City Garrison II
While attacking, Axeman 14 (Drona) decimates Japanese Swordsman (Prob Victory: 100.0%)
While attacking in Indian territory at Osaka, Axeman 14 (Drona) (5.00/5) defeats Japanese Swordsman (Prob Victory: 100.0%)
Axeman 18 (Bollywood) promoted: Combat I
Axeman 18 (Bollywood) promoted: Shock
Axeman 2 (Bombay) promoted: Shock
Axeman 17 (Holy Cow) promoted: Combat I
Archer 2 (Drona) promoted: Shock
Axeman 12 (Bombay) promoted: City Raider II
Axeman 22 (Vijayanagara) promoted: Combat I


We got a GP waiting in Bolly and a GG already turn in to a super healer.
Notre Dame went.
 
Top Bottom