SGOTM 13 - One Short Straw

Looking back at my notes, I actually two-pop whipped settler #2 from 5 pops to 3 so that there was enough overflow along with a chop to complete the galley the next turn (T74). I learned Sailing on T70 but didn't start the galley until T73. I guess it should be possible to pull in the galley (and settling city #2) by three turns, but it would delay WB #5 until after settler #2 and the galley are done. Maybe that's not such a big deal if we can have one of our two exploring work boats "in the area" to net the seafood just as city #2 is settled.

It was for settler #3 that I three-pop whipped from 6 to 3 on T80.

I assume that you're play testing out until T80ish or so, which enables us to compare it to the other test runs and also so that you can fine-tune these first 10 turns for any impacts they may have on the future turns (i.e. getting some tech a turn sooner, having just enough food to grow at the right time, maximize food overflow when whiping the granary, etc.). If you can post your current "non-optimized" plan, we can start providing feedback. Or are you still stuck in your typical optimization loop? ;)
 
Okay, I've done a lot of playing around... I was able to get Sailing 1 turn faster, on Turn 69, due to the fact that by getting +1 Commerce per turn, we actually earn +2 Flasks, due to meeting a breakpoint.

However, the net result ends up being that by Turn 82:
We are behind by 2 Food and 3 Hammers, while being up 10 Flasks and 2 turns' worth of Cottage growth. We will complete Settler 2 on Turn 71 and Galley 1 on Turn 72.

Unfortunately, getting Sailing 1 turn earlier doesn't really seem to help us, in that by delaying Sailing until Turn 70, unless I made a mistake (I'll be double-checking with a new runthrough shortly) I can actually complete Settler 2 on Turn 70 and Galley 1 on Turn 71, allowing us to settle City 2 one turn faster.

Either scenario allows us to 3-pop-whip Settler 3 on Turn 82 for maximum whip overflow (with the only difference being the 3 Hammers in terms of whip overflow).

The first scenario, which is up by 10 Flasks, does get us Writing 1 turn sooner, but who cares if we're using our early Work Boat Exploration turns for finding nearby City locations instead of meeting the AIs.


By the way, it turns out that I was wrong... not only do you "gain back" your Food lost to Unhappiness while building a Settler or a Worker, but you also "gain back" your Food lost to Unhealthiness while building a Settler or a Worker. So, as long as you start building a Settler on the turn immediately after growing into either Unhappiness or Unhealthiness (or in this case, both), you won't lose any Food due to Unhappiness or Unhealthiness.

And I learned this info after trying so hard to find a way to get our Lighthouse 1 turn before growth by getting Sailing 1 turn sooner... ah well, live and learn.


So, yeah, sometimes a few hours of testing, you find that things can't really be further optimized in a desirable way... oh well, at it looks like we'll be getting Settler 2 loaded onto Galley 1 on Turn 71 (pending me being able to reproduce that mini-test run from all of the hordes of saved games that I now have). :)
 
@Dhoom

Sounds very good!! Settler #2 on a galley on T71 is 3 turns faster than I was getting. I assume that WB#5 is delayed until after the galley??? That is what I was refering to in post #441 above but hadn't actually tried it yet.

When you get a chance, please post your T82 save and I'll add it to the table so that we can compare it to the other test runs we've seen. I'll also compare the total hammer output to the saves the LC had in his "mini" table.
 
Okay, so here's the test run that I'm thinking of using.

I still haven't compared against whipping the Lighthouse, as opposed to how we're slow-building it here, but I'm not sure that doing so is as strong as it would have been for SIP, since we're only working 2 Coastal squares. It might work out, in that at Size 4, we'll gain +2 Food per turn, while at Size 5 we'll have 1 extra Unhappy person which will consume the 2 extra Food, making it all equal out.

Of course, there is the lasting effect of the 15 Unhappiness, which may or may not have more impact in the long run... I haven't quite worked through that idea yet.

Otherwise, though, I'm pretty happy with what we've got:

Work Boat Explorer #1 (WB #3) comes out on Turn 47, 2825 BC (on schedule)
Work Boat Explorer #2 (WB #4) comes out on Turn 56, 2600 BC (2 turns ahead of schedule)
Work Boat Explorer #3 (WB #5) comes out on Turn 65, 2375 BC (1 turn ahead of schedule)
Settler 2 can board Galley 1 on Turn 71, 2225 BC (1 turn ahead of schedule)
Settler 3 is completed on Turn 83, 1925 BC with maximum whip overflow Hammers (on schedule)

On Turn 82, we have:
In Paris:
City Size 3
28/39 Food
191/149 Hammers in Settler 3

In Orleans:
City Size 2
3/36 Food
9/90 Hammers in a Granary

255/280 Flasks in Writing and 2 Gold


As for a PPP... how long am I supposed to play until again? When did people want me to pause? I'll go back and dredge through the old messages to see if I can find where this point was brought up, but if you have a quick answer, I'm all ears.


Oh yeah, I also put down signs on the map up until Turn 74, 2150 BC, of where I sent the Work Boat explorers... I can provide a couple of screenshots upon request but it's hard to get good screenshots with signs since they look messy when you zoom out... so, for now, you'll just have to look at the saved game (or ask nicely and I'll try and screenshot the exploration). I'm not sure that I picked the best way to send out the Work Boat Explorers, so this part of my turnset is the most up-in-the-air part as far as I am concerned.

What I did was send WB Explorer #1 east towards the Fish, then looped around towards the Stone, came back up into our cultural borders, then headed south-west.

I sent WB Explorer #2 north and then north east around the Crab and then would plan to potentially explore other islands that are connected. I brought Work Boat Explorer #2 back as the guy who would net the Clam for City 2, but who knows if we'll actually settle by the Clam, so I'll just have to pay attention to this detail while playing and figure out which Work Boat should plan to be at the relevant Seafood Resource at the appropriate time.

I sent WB Explorer #3 almost due west, figuring that it could explore the nearby islands there for a bit but then would head out to see how far it could get west before being blocked by the Ocean.

Presumably, whichever of WB Explorers #1 and #2 does not get netted will head east, but to be honest, WB Explorer #1 was still to the south-west on Turn 74 when I stopped exploring, so I'm not sure how well this idea will work in practice.
 

Attachments

  • OSS Spreadsheet10.zip
    19.7 KB · Views: 120
I noticed that with 3 Work Boat Explorers as well as a Galley with a Settler and a Worker in it, we incur a temporary 1 Gold per Turn cost for Unit Supply Maintenance.

I "cheated" in order to avoid this cost by scooting Galley 1 back into our Cultural borders after dropping off the Settler and the Worker on the western island, which is something that we may not be able to do in the real game. It's a minor point... since we'll probably settle the Settler on the turn that it lands, we're only really looking at a maximum loss of 1 Gold per turn for every turn that our Galley needs to be outside of our borders on its way to our chosen City 2's location plus 1 turn for the Settler to "land."


How much of my spreadsheet am I expected to reproduce in a PPP? I ask because I plan to play by following the spreadsheet, so if I were to write up individual steps for a PPP and if there was any difference between the two (say, due to a transcription error), then whatever exists in the spreadsheet would be the version that would get used (barring mis-clicks or me making mistakes).

In other words, the last worksheet on the lastest spreadsheet is probably the bulk of my PPP.
 
PPP for Round 2, Version 1

Screenshots
The plan is to take screenshots of the following items:
F8 VICTORIES
F9 DEMOGRAPHICS
F9 TOP CITIES / WONDERS
Work Boat exploration whenever something interesting appears or whenever I want to ask for help in where to explore next
Turn 51 The Most X (Largest, Wealthiest, etc) Civs of the World (if I remember--I usually dismiss this screen without looking at it)
EDIT: When pausing play, hover the mouse over our Leader's Name in the Scoreboard

I'll try to take screenshots of the first three items every turn, but if I forget, then oh well. I'll also try to remember to manually save the game on each turn so that if I do forget some screenshots and someone desperately wants them, then I should be able to go back and take them.


Steps
I plan to follow the steps laid out in my OSS Spreadsheet10.zip, which is just a link that points to the same file from a couple of messages ago.


Exploration
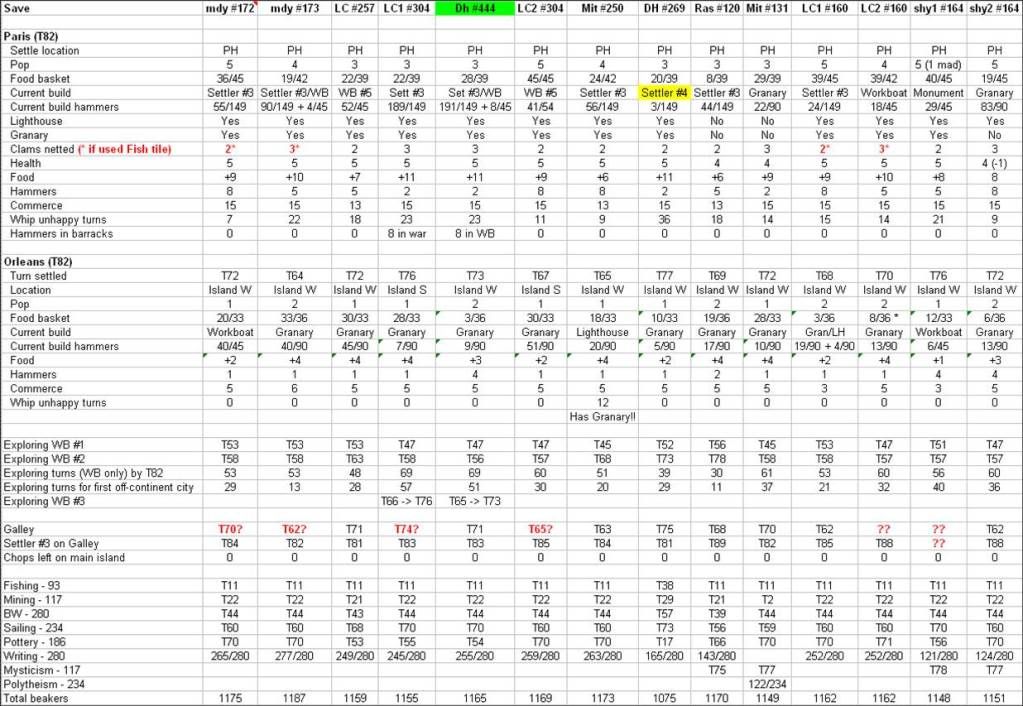
I'll do my best to explore the "corners" of islands. See my latest test run's Turn 82, 1950 BC saved game for an example (although I stopped exploring at Turn 74 since the relevance to the real game started to become questionable).

As of right now, I am going to tentatively plan to:
Send WB Explorer #1 east to scout around the Fish then back towards the Stone, then back near the southern part of our Cultural borders, then south-west
Send WB Explorer #2 north then north-east to scout around the Crab and then probably towards the north
Send WB Explorer #3 west, only pausing to explore a tiny bit of the nearby islands before trying to push as far west as possible to see if we can meet any AIs or if we will be blocked by Ocean

One of WB Explorers #1 and #2 will be used for netting for City 2.

This plan is totally flexible... give your feedback if you'd prefer to see it changed.


How long should I play until I pause play?
One suggestion was:
If we stop the next session around T55-58 (Pottery-WB2), we should have a lot more information for making further decisions.

There was also talk about whipping an early Galley if we find an interesting settling location, but I think that our first Work Boat Explorer comes too late. We need to decide on Pottery versus Sailing NOW, and we do not even have Work Boat Explorer #1 NOW.

I think the fact that I was able to optimize Pottery-first in order to save 1 turn on getting City 2 set up should help assuage anyone who wanted an earlier City 2. Anyone who is not convinced should refer to LC's production-comparison table of whipping with and without a Granary.

So, in other words, we don't need to stop play in order to decide if we should get an earlier Galley--this option is off of the table.

Therefore, I guess I will just pause play and upload a screenshot whenever I find anything interesting, such as a new Resource that might influence our settling location. Getting this info won't necessarily matter, since we won't be settling until many turns after we discover this info, but it will probably be MORE FUN to follow the turnset if you get periodic screenshot updates, so that's what I will plan to do! :)


EDIT: Pause play on Turn 56, 2600 BC, when Work Boat Explorer #2 (WB #4) is completed (as per Mitchum's suggestion).


EDIT: Pause play on Turn 67, 2325 BC, a few turns before starting on Galley 1 (as per Mitchum's suggestion).


EDIT: Pause play on Turn 70, 2250 BC, when we learn Sailing. This way, we can decide on which tech to research next and still can change our desired City 2 settling location (as per mdy's suggestion).


When is my turnset over?
That part, I'm not sure about yet. Thoughts? On the turn that City 2 is settled? Up until Turn 82 since we've tested that far so thoroughly? On some other specific turn or after some other specific event?


Anything else?
Let me know if I missed anything.

Also, if I need to make updates to the PPP, is the expecation that I will edit this message or just repost the updated contents of this message as a new message?
 
For anyone who is having trouble managing the pages and pages of messages in our thread, there is a forum option that can help. Specifically, you can change the number of messages per page from 10 to up to 40.

Here's how:
1. Click on the My Account link at the top of the page, listed underneath of the "BTS] SGOTM 13 - One Short Straw" breadcrumb.
2. You'll be brought to a page that shows you any recently-subscribed threads, unread private messages, and that has a list of options on the left side of the screen.
3. On the left side of the screen (in the Your Control Panel area), look for the Edit Options link and click on it (it is found under the Settings & Options heading).
4. Scroll down on that page quite a ways until you find the "Number of Posts to Show Per Page" option, found under the Thread Display Options heading.
5. There, you will see a drop-down list with a selected option such as "Show 10 Posts Per Page." Change that drop-down list's value to "Show 40 Posts Per Page."
6. Have fun exploring the other options that you can change on this page--there are quite a number of customisation options available.
7. Click on the Save Changes button at the bottom of the page.


Note that if you do not use the "Remember Me?" option when you log in, i.e. if you don't use your web browser's cookies to keep track of your login info, then when your login expires and you refresh a page, you may find yourself viewing the wrong content... this situation can arise if the URL is listed by Page number... if you had recently posted a message, then your URL will list a particular message number and you'll be at the right spot.

Basically, since when you are not logged in, the default is to see 10 messages per page, you probably shouldn't change the option if you often browse the forums without logging-in, as flipping back and forth between 10 and 40 messages per page can get annoying or confusing. For the rest of us, though, it makes a large volume of messages a lot easier to handle. :goodjob:
 
The PPP plan looks good to me.

I think we should probably pause after sailing in order to decide our next techs/settling locations.
 
Excellent work, Dhoomstriker. Attached is a comparison of your save to all of the other PH starts. I put it right next to LC1 #304 for easy comparison. It stacks up favorably in all aspects. The biggest advantage is settling Orleans 3 turns sooner. :goodjob:

Spoiler :


I'm fine with Dhoom's current PPP.

I suggest that you pause at T56 when WB#4 (explorer #2) is completed and post a screenshot of what you've explored so far. The reason I suggest this is that you could get some timely feedback on where to send the two explorers based on what you've uncovered so far. It may make sense to send WB#3 to the outer ring if there is a particularly interesting spot. This may or may not affect which direction you initially send WB#4.

I would again pause about 3 or 4 turns before finishing the galley (T67/T68). By this time, we should know enough of the area to decide where to send Settler #2. This "should" give you enough time to get one of the 3 exploring work boats into position in time to net the seafood on the turn the city is settled.
 
@Dhoomstriker

I just reviewed your spreadsheet in more detail. I see that you grow into :yuck: on T55 for 2 turns. Did you try to start the granary on the turn you learned Pottery and whip it on T56 rather than T57? This delays WB #5 but gets the granary one turn sooner.

I guess it depends more on the timing of the granary whip and how much food overflows into the granary on T60 when you grow to 4 pops...
As I discussed previously, the net result is that we are behind by 1 Food, due to the timing of the Granary's arrival (we lose 2 Food on paper but we get 1 extra Food from extra stored Food in the Granary, with a net result of 1 Food lost).

I asked if anyone wanted that extra 1 Food or 2 extra turns of Work Boat Exploration and only LC replied, suggesting that the extra exploration was worth the loss of 1 Food.

If you would like to cast your vote in favour of gaining 1 Food instead of 2 turns' worth of exploration with Work Boat Explorer #2, that's your vote to cast. But I won't count it as such until you state so explicitly, since you were under the impression that we would lose 2 Food but the net result (thanks to the timing of the Granary) is only 1 Food lost.


The only part about my test run that is really bugging me comes later... it is that while completing the Lighthouse, right before building Settler 3, we will grow such that we will experience 1 turn of 1 Unhappiness and 1 Unhealthiness on the last turn of completing the Lighthouse.

EDIT: For anyone following-along in the spreadsheet, this fact happens on Turn 78, 2050 BC, when we grow to Size 6 into 1 Unhappiness and 1 Unhealthiness while still having 1 more turn left of building the Lighthouse. Like I said, I can play around and probably just grow 1 turn later by working a Cottage instead of the Corn square.


I suppose that it might be possible to delay growth while completing the Lighthouse by working a Grassland Cottage instead of a Corn square for a turn or a couple of turns... but that detail happens after Sailing (obviously, since we talking about the time period when building a Lighthouse and Sailing is required in order to build a Lighthouse), so I will definitely pause play or possibly end my turnset before this point in time.


Excellent work, Dhoomstriker. Attached is a comparison of your save to all of the other PH starts. I put it right next to LC1 #304 for easy comparison. It stacks up favorably in all aspects. The biggest advantage is settling Orleans 3 turns sooner. :goodjob:
To be absolutely fair, LC's test saved game for Pottery first (i.e. LC1 #304) had City 2 being settled 1 turn sooner than displayed in the spreadsheet, on Turn 75, 2125 BC. Both the sign in the game and the Event Log correspond with this fact.


I suggest that you pause at T56 when WB#4 (explorer #2) is completed and post a screenshot of what you've explored so far.

I would again pause about 3 or 4 turns before finishing the galley (T67/T68).
I will update the PPP accordingly.
 
If you would like to cast your vote in favour of gaining 1 Food instead of 2 turns' worth of exploration with Work Boat Explorer #2, that's your vote to cast. But I won't count it as such until you state so explicitly, since you were under the impression that we would lose 2 Food but the net result (thanks to the timing of the Granary) is only 1 Food lost.

I agree that two turns of exploration is more valuable than 1F. I didn't remember this discussion when I was just reviewing your PPP and saw that we were delaying the granary by a turn. No need to change anything.


To be absolutely fair, LC's test saved game for Pottery first (i.e. LC1 #304) had City 2 being settled 1 turn sooner than displayed in the spreadsheet, on Turn 75, 2125 BC. Both the sign in the game and the Event Log correspond with this fact.

What!! A mistake in my table. Inconceivable!! :mischief:

Regarding the pausing of your turnset, should we wait for more input? I don't want to subject you to more stopping/starting than necessary...

Also, when do you plan to play? I suppose that we should wait for at least 3 more people to respond favorably. Maybe playing tomorrow after giving 24 hours for people to comment is the most appropriate.
 
Also, when do you plan to play? I suppose that we should wait for at least 3 more people to respond favorably. Maybe playing tomorrow after giving 24 hours for people to comment is the most appropriate.
I know that it is easy to get anxious about "playing already" when things look like they are falling into place, but it hasn't even been 12 hours yet since I posted the PPP (maybe not even 11 hours yet if Daylight Saving Time is affecting CFC-displayed times), so I'm comfortable with waiting...
I'm not sure what the team's policy is, but I would tend to think that we should follow an algorithm similar to:
a) Every single player on the team must approve the PPP and then play can begin at any time
AND
b) A good portion of the team (what number do we go with--I'd say 6 people, counting the UP player by default, given our team's size) approving the PPP with ZERO people objecting to anything in the PPP, in order for the UP player to play after 24 hours have passed but prior to 48 hours passing
AND
c) A reasonable amount of the team approving the PPP (I'd say about 4 people, including the UP player by default) with ZERO people objecting to anything in the PPP, in order for the UP player to play after 48 hours have passed
AND
d) If ANYONE objects to ANYTHING in the PPP, then play should not happen no matter how much time has passed, until a satisfactory resolution can be made. We should make every effort to satisfy everyone on the team, but if there are still outstanding objections that can't be resolved after a reasonable amount of discussion and/or testing, we might resolve said objections with a vote... at which point a vote can override a dissenting opinion, but with the understanding that we will first try to find a solution that satisfies everyone

So, basically I'm saying that I'll probably wait until 48 hours have passed unless we get a lot of people approving the PPP, in which case then it seems fair to play sometime after 24 hours have passed.


Note that I am not the team captain, so this approach is just a suggestion, but it seems reasonable given the fact that the exact timing of when a PPP is posted may work unfavourably for someone's timezone (say, the message gets posted 5 minutes after they are done surfing CFC for the day and they are in a position where they can only view the forum once per day).
 
My thinking is that we would prefer to settle where there is a forest to chop, if at all feasible. A fast granary makes a huge difference.
 
Btw, Dhoom, I think the worker MM is probably easier if you just cottage the forest starting with pottery, roading up till then.

Also, the chop can go into the settler after poprushing. No probs.
 
My thinking is that we would prefer to settle where there is a forest to chop, if at all feasible. A fast granary makes a huge difference.

Agreed. This can be debated in more detail once we have a lay of the land and an accuarate idea of our settling options in the real game.
 
Regarding the pausing of your turnset... I don't want to subject you to more stopping/starting than necessary...
I think that people have given reasonable suggestions for times of when we should pause play.

Technically, we could even swap the UP player at each of these intervals, which of course will take even longer than pausing, so I think that it is a fair compromise to pause play at these times.


What's not clear is how long we are planning to wait for a pause. I mean, we're pausing at potentially important points of the game, but the decision that needs to be made at each pause will differ based on factors that we can't predict at this time. For example, we plan to pause when Work Boat Explorer #2 is completed, but if Work Boat Explorer #1 only had one possible path that it could follow, then there won't be much to discuss.

So, I think that we'll have to approach each pause session individually, pausing for a longer time period for more important decisions (such as what tech to research after Sailing and where to settle City 2).

Again, it will depend upon how actively people are participating in the discussion... if there are a lot of people responding who all seem to be in consensus about what to do next, then we won't necessarily have to pause for too long. On the other hand, if there is any sort of disagreement, then play should definitely stop until the disagreement is resolved. If people aren't posting anything, then play should probably stay paused until we get a reasonable amount of feedback.


Basically, we should try to be sensible about how long to pause the game, but should err on the side of pausing for a longer period of time if there is not much feedback, in order to give people a chance to share their input.
 
I'm for pausing play and uploading when WB2 is complete.
Just to be absolutely clear, you mean Work Boat Explorer #2 (Work Boat #4), right?

Work Boat #2 will be whipped into existence a couple of turns into my turnset, on Turn 46, 2850 BC and will be used to net the second Clam. Of course, we could complete this Work Boat on the same turn without whipping, but I am pretty certain that we will whip at this time so that:
a) We can "use up" our Whipping Unhappiness quota ASAP
AND
b) We can use the overflow to get Work Boat Explorer #1 (Work Boat #3) out as soon as possible


If you meant Work Boat Explorer #2 (Work Boat #4), then yes, your suggestion is being taken into account.


Btw, Dhoom, I think the worker MM is probably easier if you just cottage the forest starting with pottery, roading up till then.
It's all pretty arbitrary. I figured that I'd try to get a Road on the GH to the SE of Paris, as per your suggestion. The best way to do so seemed to be to skip putting a Road on the GH to the north of Paris, which seems to be fine since I'll instead put a Road on the GFor to the NW of Paris, meaning that we'll still have a Road to the north, as well as one to the south-east.

But, to avoid losing 2 turns in moving to the SE GH immediately, I move to the GFor and Road it first, so that I only lose 1 turn in moving.

In so doing, I was able to Road the GFor (to be able to get back to it later and to save that 1 turn of movement point) as well as to pre-Chop it to within 1 turn of completing the Forest Chop.

Then, when Pottery arrives, I have the Worker just having arrived on our Settler's initial location, so that we can get a Cottage up ASAP, in case we later decide to change which squares we want to work. Putting a Cottage on a Forest-free square is faster than putting one on a Forested square, giving us the fastest Cottage possible.

Then, since I had turns to kill, I built a Road on our Settler's initial location, followed by moving to the GH to the SE of Paris and building a Road there.

Only then did I move back to the GFor, spending some turns to partially-Cottage it, before completing the Forest Chop.


At this point, I assumed that our Worker would board Galley 1, before completing the second Cottage.

Technically, if you'd prefer, I could skip some of the Road-building and could see if I could complete the 2nd Cottage, but until we get more Happiness, I don't see us being able to use this square, so it didn't really seem to be a priority.


Also, the chop can go into the settler after poprushing. No probs.
Agreed, I could do that. It doesn't really make a difference in this case, since I'm either Cottaging a GFor square for 2 turns before Chopping it or am Cottaging the GFor for 1 square before chopping it then Cottaging the resulting G square for 1 turn after Chopping the Forest there. There's no functional difference in this particular case.
 
I'm for pausing play and uploading
Uploading, huh? That's fine if you really insist upon it, but is there any particular detail that I could instead just give to you, such as hovering the mouse over our Leader's Name in the Scoreboard and taking a screenshot?

I'd prefer not to upload when pausing play, unless we're pausing for a long period of time due to facing an important decision, because then I'd have to worry about someone potentially making a mistake and advancing play. Someone accidentally advancing play between PPPs is not a major issue, as there will be no UP player that could concurrently continue play and although we might not like the situation, we would not be in violation of the "replaying" rules. However, in this case, there is the risk that I would continue play while someone else also continued play (but by accident). At that point, we'd have to involve the game admins to figure out what we're going to do about the situation.

To me, it just seems safer for me to provide you with whatever info you feel that you can get from the saved game.

If there is a decisive "breaking point," such as when we are about to get Galley 1 for our 2nd City, then sure, we can upload the game, as we'll be pausing play for a long time period and people may want to do some fog-gazing... but fog-gazing prior to deciding where to move a Work Boat Explorer seems to be a bit too much overkill and like I said, I'd rather not risk a situation where I decide to play forwards while someone else accidentally makes a mistake while concurrently looking at the saved game.

So... taking a screenshot of the mouse hovered over our Leader's Name on the Scoreboard when we pause play... that I can do... is there anything else that you'd feasibly want to look at that I could instead take a screenshot of?


Agreed. This can be debated in more detail once we have a lay of the land and an accuarate idea of our settling options in the real game.
Especially since you deleted the Tundra Forest square in our test game--the square that LC was using for his southern City 2's Forest chop. :p That's why I settled on the western island in my latest test run... the southern location definitely got nerfed.
 
Top Bottom