i am not very good

My first couple of scouts usually go where I might find another civ. I put a high priority on getting contacts, the early brokering opportunities can fill out your first tech column, and sometimes your second column, for a bargain price.

Since I wanted to build a granary and get to size 4 before making my first settler, I had more than enough time to bust the fog around the capitol, which I did by 2590BC.

I often wondered if it was better to build a settler or a granary first, I guess this format with this fertile start will provide an answer to that :).

I think the scoring would better measure the 'quick start' if there was no huts on the map. As it stands now a good dice roll can mean a lot of points. It is true that if you don't explore, you don't get to pop the huts, but even if you send a scout you may just get barbs, barbs, barbs :)
 
By the way, Cracker, "her" scoring position would be the proper wording in your earlier post. ;)

As for discussion, I'm wondering what other people think about the early granary build as compared to pumping out a settler immediately. I usually find that building a granary first means faster settlers later, as well as a good rebound to wonder-building size for the capital. When/if does everyone else build granaries, and why?

Also, I notice that as of 2950 BC I'm the only person with a Spearman defending my capital. Would it have been better to build a warrior and get the granary earlier? I've tried this in the past, but it seems that every time I do that, the AI finds me and a spear would have been more useful, to either move to a border city or deter attack. (This may also be a difficulty level issue- the AI seems to like to attack me much earlier on Regent/Monarch.)
 
It's good that we are discussing "exploring" and I have some points on that, but first I want to focus on the very first moves of the game.

Most players settled right at the startposition but two players (stwils and LKendter) decided to move.

Here is and image of the start position as it would look after the worker would be moved onto the wheat:


I posted an image of the start position before the worker moved in a very early post, and I think you have to look at the start position in combination with the minimap position to decide if moving the settler is a good idea.

In the "Improving Your Opening Play Sequences" article, I recommend that you develop a list of rules that help you decide when it would be a good idea to move the settler. If the position doesn't satisfy your rules that you like to play by, then don't move the settler. Don't just wander around unless there is something that tells you the current position is bad.

(here's the link to page in the article that discusses when to move the settler.)

The issue is not if you might be able to find a better position, but is this position good enough to give you a strong start.

If you look at the annoted image above, this is a great start position. The minimap position gives us our position in the world and indicates that there is probably tundra or the edge of the world to the south of us and in fact we can see a bit of tundra peeking out from under the fog if we look closely.

We can also look at the river position and see that we get the commercial bonus from every square next to a river indicated with a "gold dollar sign" in the image.

stwils made the choice to move one step southeast and I would rate this as a bad move for 4 reasons:

  1. the move gives up 5 squares adjacent to rivers and this loosing commerce power that is not offset by a gain
  2. The move obviosly moves you further away from any potential neighbors
  3. The move costs one turn of output (at least 5 power points) and this delays the first explorer and first settler by a turn without a clear benefit
  4. The move kicks you off the river and will force you to build an aqueduct.
    [/list=1]

    LKendter's move northwest by one step is hard to label as not a good move, but some of the factors that add value to the move you could not possibly see unless you had foreknowledge of the map. In the short view, I cannot say this would be a recommended move.

    In general, there is nothing in this start position that would lead you to make any choices other than move the worker to the wheat and found the capital right where the settler stands at the opening. If I would holding up score cards, like a judge at a figure skating competition, I would give higher marks to all the players that found the city right away rather than moving the settler.

    You can also look at the image and see the two terrain squares marked "1" and "2" and these represent the two most powerful terrain squares that should probably be improved first under any of the starting sequences. Even if you move the settler to one of the two choices made, I would still have improves these two squares first.

    The order of the improvements and what you built would be based on you overall strategy and what you decided to build in the town.

    I believe a couple of players built irrigation or a mine without building roads in the same square and on this map, at this lower difficulty, I definately would not have skipped the road after I already had invested in the ditches or mines.
 
I think the early exploration techniques can have some impact on how successful we might be.

First, there will always be the random luck of the draw with the positions of things, so even good technique could yield a "less better" result, but that is related to the phase of the moon and hindsight.

Here is an image that shows what I refer to as the "swastika" effect that tends to make it a better choice to move units straight in one of the compass directions instead of taking the diagonal paths.


If you look at the image, the yellow paths will get you to the same ending explore positions as the green paths and will use the same number of moves.

Moving straight N, E, S, or W will reveal at least 5 new terrain squares per move while moving diagionally will only expose 3 terrain squares per move. On a perfectly flat map, with no hills or mountains, if you explore 10 squares in the straight orthogonal directions, then you would reveal 50 new terrain squares while the diagonal path would reveal 30 squares. The orthogonal explorer would have a 40% greater chance of finding a hut or making contact.

A second major issue in early exploration is to read the terrain and use it to expose more visibility. Jumping up on a hill or a mountain reveals an average of 15-18 new terrain squares while making an equivalent move on flat terrain reveals just 3-5. This view distance advantage helps you choose the direction of your next move.

In this case, we have to explore with warriors or workers so the 1 movement rate vs 2 movement rate is not an issue. Jumping up on a hill or a mountain when it is generally in you path would almost always be a great idea in these circumstances.

I think the combination of the orthogonal movement and good use of extended terrain vision can double or even triple the general effectiveness of your exploration.

Look at the positions the James1 warrior and the position of the stwils warrior in the composite image of the 3450bc warrior positions. These two warriors end up in almost identical positions using the same number of moves but James has seen twice as much terrain and already popped a hut.

Here's an image that accents these path choices:

The orange diagonal path is approximately the path that stwils chose, while the blue path was the route James chose. The yellow path would also lead to the same end destination and both the blue and the yellow paths would reveal a goody hut while the orange path would reveal about 40% less territory to view.

The final major explore issue is the general minimap position in the world. Just based on the first glimpse of the map, I would be planning to explore North, then choose either east or west, and follow eventually with the other east or west. Whether this choice is randomly a good fit for where the other civs and the goody huts actually lie is something we cannot guess about in the first several moves.
 
I was tempted to move NW or N when I saw the bit of tundra under the fog. But then I figured that by the time I would need to use that square, the game will be almost over.

A question about the orthogonal moves, if a mountain range is oriented diagonally, is is better to follow the range?
 
Jaxom,

I think you have to read the terrain combined with the minimap position to decide if following a diagonal mountain ridge would be a good move for whatever situation you are in.

You can test some of these and count the visibiity impact if you think it might give you a better feel.

I think the diagonal mountain trace will reveal about 18 new squares in the first move and then 4-5 new squares for each subsequent step.

A straight N, E, S, or W path even on plain flat ground will reveal 5 new squares in the first move and then 5 new squares in each subsequent move.
 
At the current time there was almost NO military.
If the hut at barbs, 3 barbs next to the capital.
Not a fun situation. Much more dangerous in PTW with the new lurking barbs.
 
plus, on the issue of bypassing the hut ...

Lee's assessment of bypassing the hut to avoid spewing warriors back into my capital is exactly why I left the hut.

That would also have pulled my explorer warrior a bit off the track I was trying to follow because I was trying to follow and extreme example of the go straight N, E, S, or W principles. (I wasn't gonna do anything obviously stupid but I was trying not to be distracted from going way north as quickly as possible.

I looked at the position of the hut and saw that there were mountains and forests on the side of the hut away from my capital. This made it a bit safer to bypass the hut without as much risk that a wandering scout could use its two move advantage to poach the hut from my next explorer unit that was planned to follow.
 
Here is the QSC score table for turn 30 at the 2590bc save point:


(note that for James, I tried to subtract off the right number of things to move the data back just through the production cycle since his position at the beginning of 2550bc would be almost the same as 2590bc :spank: )

In this table, I highlighted all the new tech discoveries in green and also highlight where contacts went up from last turn. The contact scoring gives you more points for each subsequent contact so the first contact is 10pts, 2nd = 20pts, 3rd = 30pts etc.

On techs you will notice that the first level techs that are the freebies for some civs only count as their base research value while the higher order techs are worth their value plus teh value of their prerequisites. This is to emphasize pushing early research further to the right as quick as possible in at least one of the 4 major branches.

Don't let the nuances of the scoring system worry you to much, because it is designed to give a higher score for a more powerful position but not necessarily to cause you to do things just to increase your score alone without doing the things that will win the game quicker.

A quick look at the table will show that 3 players have grabbed early granaries.

Lee is still spanking us fairly well with the benefits of the tech lead and contacts coming from exploration.

Yes, some of the benefits of early exploration are just lucky (or potentially unlucky) outcomes but as things progeress we should see some of this balance out.

A couple of players are showing no variance in their treasury (stuck at 10 gold) and this usually is an indicator that your may not be managing the research slider properly when you get down to just 1 or 2 turns left to go in the research. A little tweaking for a turn or two may save you a full turn of research and leave more gold available in your treasury each time you discover a new tech.

I will try to update the table with results from handyandy and stwils if we get those
 
Here's my attempt.

Target Saves:
3450bc (turn 12: shifted a bit)
2950bc (turn 22)
2590bc (turn 30)

4000BC-Move worker to wheat since thats his first job, also to bust some fog. Build city at start. Pottery ordered. 90/0 0gpt pot in 12.
3950-irrigation of wheat started.
3900-
3850- irrigation of wheat done. start road. city using wheat for fast growth.
3800-
3750-road done. move to bonus grass on river for mining. MM to save wasted food on next turn grown, gain 1 sheild.
3700-start mine.
3650-
3600-warrior built, and ordered. head north.
3550-mine done, road started. warrior head to mountian E.
3500-borders expand. War N. Sci at 80 pot in 2.
3450-warrior build, order worker. Warrior W. Worker to next BG. E War N. Sci 40 +5gpt, pot in 1.
3400-Get pottery, start alpha. Sci to 100 +0gpt Alpah in 15. Wars NW and NE. Wokr start mine.
3350-Worker bld, start granery. worker to bg SE. Wars, W and NE.
3300-War NE and W. W sees coast and ivory.
3250-Worker done mine, start road.Wars N.
3200-W war N, E war NW, sees goodyhut. MM for growth in 1 + 2 shd.
3150-workr, NE cross river, head to ivory. Wars, NE, NW take cerimonial bury from hut.
3100-E war W to mtn.W war NE to hill. MM to mines instead of wheat for faster granery. wrkr srt rd.
3050wrkr to NE bg. wars E.
3000wrkr done rd, mov to bg NW. Wars E, NE see incense.
2950 were 2nd place behind england. learn wheel from hut.
2900 more exploring.
2850-mine done rd strt. lux tax 90/10.
2800-mine done rd strt.
2750-granery done,strt settlr. wrker done rd, W to help other. Horse found NE.
2710-rd done, W to bg.
2670-strt road.
2630-Alpha done, strt IW 16@80/20 -1 gpt. wrk done rd, NE.
2590-Settlr done, ordr spear. War learn mysticism from hut. Sci 90/0 -1gpt, IW in 17.

Slowed growth a bit to bld granery but can now start cranking out cities. Theres tons of bonuses and no AI net so the plan is to alternate 1 near city for growth, then 1 far citi for land grab, until AI found. Target rivers with food bonus for free aquaduct and quick growth. grab both ivory and incense.

EDIT:Zipped Together


EDIT: Sorry, I posted before cathing up on the thread. Lots of discussion in 1 day. Hope you find time to add my score. I'll try to play next round also.


Here is a graph of the power progression up through 2590bc:


Jaxom, the graph is updated to include the granary, I'll catch the table graphic update if we get the other submissions from stwils and handyandy.
 
Sorry, I couldn't post the discussion before Saturday, but I couldn't get on the net for enough time lastnight to post anything good!

Anyway here's a few tips from myelf.

As you've probably seen, my best strategy for early game is explore! I think handyandy should really think about doing this. New civs really are worth it, usually, and hopefully they'll have something that you don't have, and visa-versa so you both benefit! (and if the AI isn't a miser, maybe make it your benefit!!) ;)

Also, just as important, is finding huts. I love finding techs! They really give you a head start, and the more you get, the less the AI's will get! (They seem to leave them alone though, at times...the AI'S loss is the humans gain.) This strategy has given me great headstarts through games. 3 warriors is my minimum for exploration, because your usually stuck aginst some edge, that will leaving only 3 possible orthoganic ways to explore. :)

--And by then, you'll have used up your units per town allowance! This is why I have 3: Under despotism, you are allowed 4 per town, city and metro. This means 4 units total (3xwarrior, 1xworker) and means you don't waste a bit of that unit allowance, while not using gold per turn (useful in early game for tech discovery!!) ;)

I usually follow mountain ranges, providing there's no mountains on both sides of me. Mountins give a great view, 2 square radii is really a great improvement from 1:

1 square radii is only 9 squares
2 square radii is 25 squares!
So going orthagonically can really give a difference in each of these. Compare it to a mountain and a grassland, each being explored by a warrior (and othogonal of course). From grassland to grassland you would discover a total of 5 squares. From grassland to mountain you would discover (providing it's the only mouhntain in a 4 square radius) a total of 16 squares! Ther's a significant difference.

This map generated by handyandy's computer was great for this SG, because it has so many thigs to discuss about it! Such as city placement, exploration, and technologies, etc etc.


The scores for QSC are really good, and very interesting, and I can't wait too see them at the 30 turn mark! My score should rise, I hope! I built a city, got more techs, explored a great deal more, and discovered the Zulus!

It's amazing how much can happen in a matter of only 10 turns!!! Wow!
 
Dejvu : 2590 - 2190

2590 (0):Nothing to change, imagine that :lol:

2550 (1): Pasargadae builds worker starts granary, may change to granary with sooo much good land to the north the more settlers the better. Want a city on the coast asap, I see a coast to the east.

2510 BC (2): Learn WC, start Iron working for my immortals. MM persepolis to grow in 2 get new settler in 2.

2470 BC (3): Continue to explore to the NE.

2430 BC (4): Settler completes and head to north cow and at any possible other civs. Start another settler, reduce lux for now.

2390 BC (5): MOre warrior movement.

2350 BC (6): same

2310 BC (7): Found Susa on the river Bend by the cows, start warrior. See furs and more wheat to the NE. MM Capital to get settler and growth in 3 turns. Increase lux to 10% to avoid riots.

2270 BC (8): more exploring.

2230 BC (9): Settler next turn.

2190 BC (10): Persepolis builds settler and starts another. Settler heasing toward SW coastline. See incense and a hut on a northern hill top, still no contacts, IW due in 3 turns, 58 gold in the bank.


2150 BC (1): Settler moves south W, warriors continue to the north and NE.

2110 BC (2): Susa builds warrior will go pop the hut. Starts on barracks. Reduce research to 70%.

2070 BC (3): Learn IW start on the wheel. There are 2 iron deposits one to the North and the other to the Western coat by the ivory. MM capital again to ensure growth and the new settler match. Found Arbela on the river on the coast, some overlap but decided on the river site, start warrior.

2030 BC (4): Pop the hut and learn Mysticism.

1990 BC (5): More exploring.

1950 BC (6): Persepolis builds settler and starts another., Settler heading north.

1910 BC (7): Settlers and warrior continue moving. NO sign of barbs yet but may be a concern soon.

1870 BC (8): Pasargadae builds granary starts settler. Arabea builds warrior starts worker.

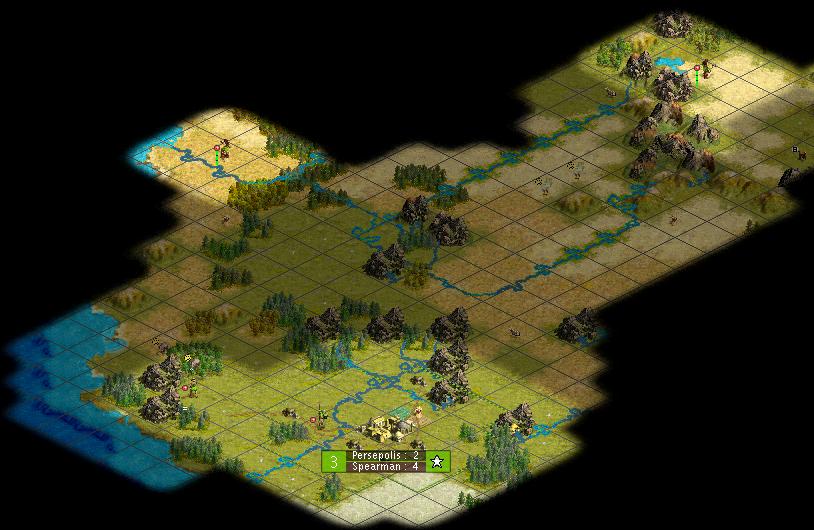
Stopped for dot map break, many options for city placeement at this point, very fertile lands and no AI to contend with.

1830 BC (9): First contact with the zulu. They lack Masonry only, decide to hold for one more turn. Only 1 turn away from the wheel at this point.

1790 BC (10): Learn the wheel begin on writing. Decide to hold onto Masonry, they can offer up 70 gold but will hold it for now.

Addmittedly I am running a risk without any homeland protection but have yet to see a threat with a barracks due in susa vet troops are right around the corner.

1750 BC (1): See another hut to the NE. more wheat to the NW. Horses to the west across the sea.

1725 BC (2): Persepolis builds a settler and starts yet another. Hut to the north gives barbs. move settler toward my next city spots. MM Pasargadae to grow in 2 settler in 2.

1700 BC (3): Worker in Arbela completes start temple. Found Antioch to the north on the river, start temple.

1675 BC (4): Pasargardae completes settler starts another.

1650 BC (5): more movement.

1625 BC (6): Found the zulus territory. Found Tarsus, start worker. Susa completes baracks starts spearman.

1600 BC (7): Contact the Iroquois, they too lack masonry.

1575 BC (8): Another settler completes heading to the inscence and flood plains.

1550 BC (9): Found Gorduim to the NE. start warrior.

1525 BC (10): Learn writing, start code of laws for the necessary courthouses. Write 2 embassies with Zulu and Iroqouis for 36 and 38 gold respectively. Pasargdae builds settler starts another. Sign ROP with Zulu for his 29 gold.

I realize this may be early but I will be travelling next week and wanted to submit my next 3 ten turn blocks to add to the discussion.


http://civfanatics.net/uploads2/ha1_hotrod_2190BC.zip
http://civfanatics.net/uploads2/ha1_hotrod_1790BC.zip
http://civfanatics.net/uploads2/ha1_hotrod_1525BC.zip
 
Top Bottom