Lord Tirian
Erratic Poster
This is a tutorial for re-creating the Firaxis-style for improvement, policy and unit action icons, meaning 3D icons with the distinct blue shimmer. You should know how to make other buttons already (see Irkalla's or Wodhann's tutorials on button creation and whoward69's tutorial on DDS files). I don't assume much in terms about Blender knowledge (so if you already know how to use it, you'll probably be bored - just grab the Template.blend and play around with it), but you'll need to know your way around it if you want to make your own models or import things to make your own buttons.
Finally, there's a template and some instructions to achieve the golden version of the same icons, used for active policies and for promotions.
Tools Used:
Files Used:
Download this file, find a directory to work in and extract the contents of the archive into it. You should find:
Test Render:
First, we're going to check whether everything is working as expected, so open Template.blend in Blender and you should see something like this:

Now, let's make sure the scene settings are correct, so select the scene panel (click the button shown below or press 'F10') and set the render to "Premul" (see screenshot). Then set the output format to PNG and RBGA colour (also screenshot) This sets the background of the render transparent and saves in PNG format with alpha transparency enabled, saving us a lot of work later.

Now let's test the setup by hitting "F12" to render the scene. This may take anything between a few seconds to a minute or two depending on how beefy your CPU is, you should see a window like this popping up:

Now hit "F3" while the render window is active and you can save the render as PNG file. The result should be identical to the TestRender.png in the archive. If not, something went wrong - either with the settings or I forgot to list some default settings on my Blender install, so ask away!
Import an Object:
Next, we're going to render something else, using the same setup. As example, I provided the HourglassExample.blend. Don't open that file, just re-open the Template.blend again, so we're starting with a "clean" template file again. You should see the same screen as when you opened the template the first time.
Now select the Embassy object in the template by right-clicking it. It should be highlighted by a pink outline (if it was already selected, another right-click unselects it, so check for the outline). Get rid of it by hitting 'X' or 'DEL'.
Let's import the hourglass now. Click "File" > "Append or Link" (or just press "Shift+F1") and a file browser should come up. You're likely inside the Template.blend, so click on ".." and you'll see the contents of your working directory. Click "HourglassExample.blend", then click "Object", then select "HourGlass". Click "Load Library" or hit 'ENTER' and an hourglass model should appear in the scene.

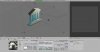
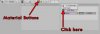
Now we need to set the material. Click on the "Material buttons" (sic) as shown in the screenshot and then open the dropdown menu of existing materials (see screenshot). There should only be one called "KhakiMatter", pick that one. This will give the hourglass the correct material to emulate the gloss and colour of the Firaxis models.

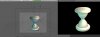
The model is, however, too small, so let's rectify that. Hit "0" on your numpad to switch to the camera view. This shows what the camera renders (the dotted frame). Hit 'S' and you can scale up the hourglass to your liking, you'll probably end up with something like this (then, as before, render by pressing 'F12' and save with 'F3'):

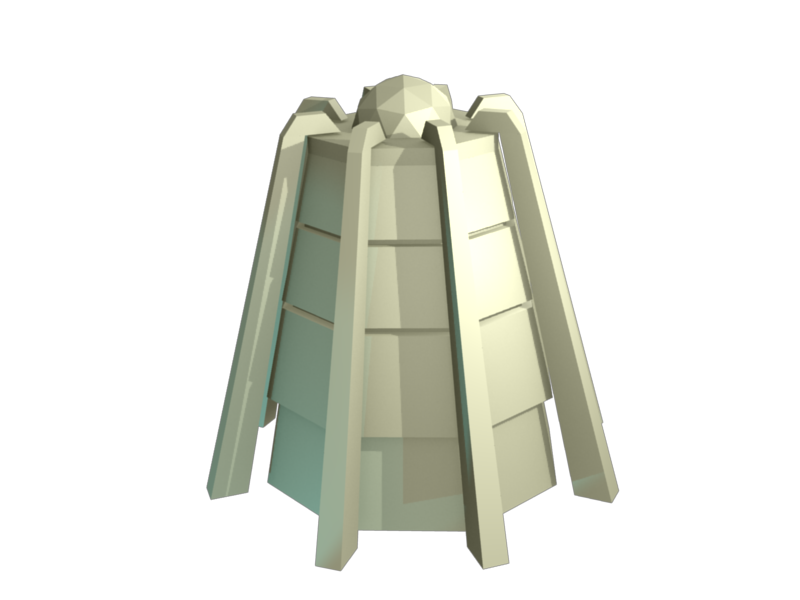
Following this procedure, you'll be able to import any other 3D object you have in a Blender file and should get a Firaxis-like look for it. You can then scale down the resultant PNG file and paste it on the BlueBackground.png for the Civilopedia/Strategic View icon or use it without the background for the action button.


Further Notes:
Of course, the tutorial isn't exhaustive, so here's a list of random notes relating to the process:
Making a Golden Icon
Finally, once you got the transparent symbol itself, you might want to make a golden version of it. I assume here that you have the icon already scaled down and transparent (without the blue background).
Open the GoldTemplate.psd. There you will see a golden apiary (the sample icon I used for this). Simply copy and paste your icon you want to modify into the template and move the layer below the "Gold Fill" layer. Delete the "Base Icon" layer and you'll see your icon in a gold version.
In order to get your icon with the correct transparency, simply select your icon as active layer, then go to the menu "Select" > "Load Selection". Just hit OK and you'll have your icon selected. Either select "Edit" > "Copy Merged" or hit 'SHIFT'+'CTRL'+'C' - you now copied the golden icon with the correct transparency into the clipboard.
Just create a new file and paste it into it - finished!
In case you don't have Photoshop available, below are the steps used to achieve the gold effect:
EDIT (10/July/14): Added gold template and explained usage.
Finally, there's a template and some instructions to achieve the golden version of the same icons, used for active policies and for promotions.
Tools Used:
- Blender 2.49b: This is what I used, since it's the latest version compatible with all NIFscripts and Deliverator's scripts. Blender 2.6 will work, too, but will differ in interface.
- Image Editor: Any decent image editing programs like GIMP, Paint.NET and Photoshop will work fine. You'll need Photoshop to use the "gold" template, but I have instructions on how to achieve the same effect without Photoshop.
Files Used:
Download this file, find a directory to work in and extract the contents of the archive into it. You should find:
- BlueBackground.png: Background template for the finished render (we're going to use this last, so ignore this for the moment).
- GoldTemplate.psd: Template to achieve the gold effect (only useful once you have a button).
- HourglassExample.blend: An example object we are going to use for this tutorial.
- Template.blend: The template file containing the render setup.
- TestRender.png: What the output of the template file should look like.
Test Render:
First, we're going to check whether everything is working as expected, so open Template.blend in Blender and you should see something like this:
Spoiler Blender Opening :
Now, let's make sure the scene settings are correct, so select the scene panel (click the button shown below or press 'F10') and set the render to "Premul" (see screenshot). Then set the output format to PNG and RBGA colour (also screenshot) This sets the background of the render transparent and saves in PNG format with alpha transparency enabled, saving us a lot of work later.
Spoiler Scene Settings :
Now let's test the setup by hitting "F12" to render the scene. This may take anything between a few seconds to a minute or two depending on how beefy your CPU is, you should see a window like this popping up:
Spoiler Finished Render :
Now hit "F3" while the render window is active and you can save the render as PNG file. The result should be identical to the TestRender.png in the archive. If not, something went wrong - either with the settings or I forgot to list some default settings on my Blender install, so ask away!
Import an Object:
Next, we're going to render something else, using the same setup. As example, I provided the HourglassExample.blend. Don't open that file, just re-open the Template.blend again, so we're starting with a "clean" template file again. You should see the same screen as when you opened the template the first time.
Now select the Embassy object in the template by right-clicking it. It should be highlighted by a pink outline (if it was already selected, another right-click unselects it, so check for the outline). Get rid of it by hitting 'X' or 'DEL'.
Let's import the hourglass now. Click "File" > "Append or Link" (or just press "Shift+F1") and a file browser should come up. You're likely inside the Template.blend, so click on ".." and you'll see the contents of your working directory. Click "HourglassExample.blend", then click "Object", then select "HourGlass". Click "Load Library" or hit 'ENTER' and an hourglass model should appear in the scene.
Spoiler Imported Object :
Now we need to set the material. Click on the "Material buttons" (sic) as shown in the screenshot and then open the dropdown menu of existing materials (see screenshot). There should only be one called "KhakiMatter", pick that one. This will give the hourglass the correct material to emulate the gloss and colour of the Firaxis models.
Spoiler Material Settings :
The model is, however, too small, so let's rectify that. Hit "0" on your numpad to switch to the camera view. This shows what the camera renders (the dotted frame). Hit 'S' and you can scale up the hourglass to your liking, you'll probably end up with something like this (then, as before, render by pressing 'F12' and save with 'F3'):
Spoiler Hourglass :
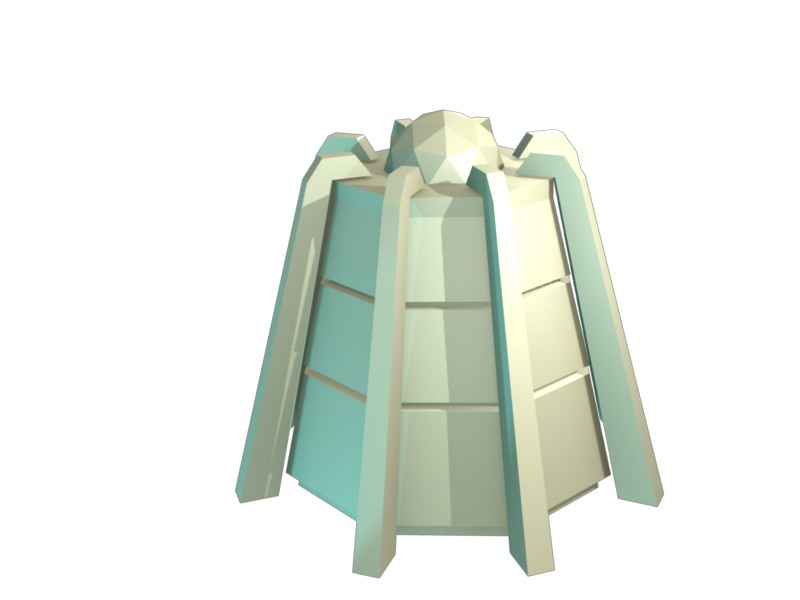
Following this procedure, you'll be able to import any other 3D object you have in a Blender file and should get a Firaxis-like look for it. You can then scale down the resultant PNG file and paste it on the BlueBackground.png for the Civilopedia/Strategic View icon or use it without the background for the action button.
Spoiler Example Icons :
Further Notes:
Of course, the tutorial isn't exhaustive, so here's a list of random notes relating to the process:
- Camera Settings & Object Position: Experiment with your object and your camera position and settings. For example, the policy icons are always head-on shots unlike the perspective setup here. If you manage to find a view you like, you can do 'Ctlr+Alt+0' to set the camera to your current view port. Select the camera and hit 'F9' to change the camera settings, like the camera field of view (called "Lens") or even set it to an orthographic view (this might be useful for policy icons).
- Prototype Faster: Speed up your render by deactivating ambient occlusion. Select the world button, then you'll find a tab "Amb Occ" and you can turn off the "Ambient Occlusion". This will make it look worse but speeds up the render a lot - useful for testing different perspectives.
- Model Guidelines: Select models with lots of details, don't use textures. We're rendering, so nobody cares about the complexity of the object in terms of polygons, so make a model that has all detail modelled in and not textured in. Also, don't have too many sharp angles. Have chamfers, rounded shapes, visible gaps, segmentation, exaggerated proportions and so on, similar to the proper Firaxis icons. This will make the lighting a lot more interesting, especially when scaled down to button size.
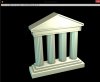
- Edit the Result: Somewhat obvious, but so far, my settings don't replicate the Firaxis-look perfectly, especially getting a metallic sheen is a bit challenging. Feel free to increase the contrast and paint areas brighter to make it look better. For example, the embassy icon isn't just the raw PNG result, I used a warm filter to bring out the colour a bit more and adjusted the brightness a little bit.
- Sharing is Caring: Experiment with the lighting setup, with the material setup... and if you get better results than I do, please share it here so we can all make better stuff!
Making a Golden Icon
Finally, once you got the transparent symbol itself, you might want to make a golden version of it. I assume here that you have the icon already scaled down and transparent (without the blue background).
Open the GoldTemplate.psd. There you will see a golden apiary (the sample icon I used for this). Simply copy and paste your icon you want to modify into the template and move the layer below the "Gold Fill" layer. Delete the "Base Icon" layer and you'll see your icon in a gold version.
In order to get your icon with the correct transparency, simply select your icon as active layer, then go to the menu "Select" > "Load Selection". Just hit OK and you'll have your icon selected. Either select "Edit" > "Copy Merged" or hit 'SHIFT'+'CTRL'+'C' - you now copied the golden icon with the correct transparency into the clipboard.
Just create a new file and paste it into it - finished!
In case you don't have Photoshop available, below are the steps used to achieve the gold effect:
Spoiler Gold Effect :
- Make a layer above the icon, fill with R 252, G 249, B 66 as colour and set the blending mode to "Multiply"
- Duplicate the layers and merge them (so the icon with the gold fill merged in sits as layer above the previous two layers).
- Apply a gradient map to this layer with the following settings: Stop at 0% and 75% with R 255, G 194, B 30, stop 85% with R 255, G 232, B 30, stop at 100% with R 252, G 249, B 66.
- Set this layer to blend mode Hue with 87% opacity.
EDIT (10/July/14): Added gold template and explained usage.
Attachments
-
 1_blender.jpg143.3 KB · Views: 319
 -
 2_scenesettings.jpg125.7 KB · Views: 322
 -
 3_testrender.jpg81.2 KB · Views: 250
 -
 4_hourglass.jpg171.7 KB · Views: 266
 -
 5_setmaterial.jpg42.2 KB · Views: 372
 -
 6_renderglass.jpg65.7 KB · Views: 277
 -
 8_embassy.png34.1 KB · Views: 259
 -
 7_hourglass.png29.4 KB · Views: 356

")
")


 But the method you gave to edit the laboratory models worked fine!