OpenFX Skeleton Tutorial

muffins

Lemon scented
Joined
Aug 19, 2003
Messages
1,115
Location
United Kingdom
OpenFX Skeleton Tutorial

Building and moving them

Firstly you want to build your model in Designer and have all the parts in their final positions before you insert the skeleton (I’ll explain why later).

For this tutorial I’m using a model of the fearsome Muffin Tank
 

Attachments

  • MuffinTank2.gif
    MuffinTank2.gif
    3.2 KB · Views: 613
Click Edit > Skeleton > Build Joints

You should see a little toolbar appear like below. The two buttons that we’ll be using are the two on the left. The first is ‘Build’ and should already be selected and the second is ‘Move’ which we’ll be using later.
 

Attachments

  • SkeletonBuildTools.gif
    SkeletonBuildTools.gif
    3.1 KB · Views: 601
Next comes the joint that we will attach the turret to. Click and drag it out of the ‘TurretPivot’ joint and name it ‘TURRET’. I personally use capitals to remind myself which joints are supposed to be moved and which ones are just there as rotation points or as joints just there to align/position the next joint along.
 

Attachments

  • MuffinTank6.gif
    MuffinTank6.gif
    5 KB · Views: 584
Now click and drag one last joint out of ‘GunPivot’ and call it ‘GUNEND’. You should then have a skeleton that looks like the one below. If your joints are out of alignment you can click the ‘Move’ button on the Skeleton Build Tools toolbox and just drag your joints to better positions.
 

Attachments

  • MuffinTank8.gif
    MuffinTank8.gif
    5.5 KB · Views: 590
Now use the object selector in Designer to select all the objects that you want to be the ‘hull’. With my Muffin Tank I’ve selected the hull and the wheels. Make sure that nothing else is selected! It’s the mistake that I most often do :D Press Ctrl – D, if you like, to deselect everything before you use the object selector.
 

Attachments

  • MuffinTank9.gif
    MuffinTank9.gif
    4.8 KB · Views: 569
In the Skeleton Hierarchy window make sure that ‘Hull’ is selected and click the ‘Attach’ button (sixth from the left). Sometimes when the Skeleton Hierarchy window is deselected when you try to click ‘Attach’, it won’t always do it so I always click twice to make sure.

Designer creates the ‘bounding boxes’ for the joints when you click ‘Attach’ so only attach things to the skeleton when they are in their final positions. If you don’t then the bounding-box view of your model will look odd in the Animator.

Now deselect everything (Ctrl – D) and use the object selector to select everything that you want to be the ‘TURRET’. For my Muffin Tank I’ve only selected the dome of the turret.
 

Attachments

  • MuffinTank10.gif
    MuffinTank10.gif
    4.9 KB · Views: 542
Now select the ‘TURRET’ joint in the Skeleton Hierarchy window and click the ‘Attach’ button.
Deselect everything again and select everything that you want to be the ‘GUNEND’. Select the ‘GUNEND’ joint in the Skeleton Hierarchy window and click the ‘Attach’ button.
 

Attachments

  • MuffinTank11.gif
    MuffinTank11.gif
    4.7 KB · Views: 557
Save your model now.

You’re probably itching to pose your model. Don’t. If you use the Skeleton > Pose function in Designer it will alter your model and you will have to re-load your model just to reset it’s exact pose if you find that you’ve missed something.

Instead, close Designer and start up OpenFX Animator

Click Edit > Insert Actor and choose ‘Robot’ (not 'Model' ), then find your model. Adjust the camera, lights and ground object to your satisfaction.

Next set your animation length with Frame > Set Animation Length. 16 frames should be enough. Hit ‘A’ and a list of ‘Actors’ pops up. Choose your model, which should be named ‘Robot1’ unless you’ve renamed it.

If you can only see your model’s skeleton then hit F6 to ‘Draw Full’.

‘Robots’ are posed with ‘Costume’ keyframes. Your model should only currently have one such keyframe. Drag it so that it’s only in frame one like below.

If you can't see the keyframes then hit 'K'
 

Attachments

  • MuffinTank12.gif
    MuffinTank12.gif
    2.3 KB · Views: 579
Double-click this keyframe and click ‘copy’. This gives you an exact copy of this pose. Drag this new keyframe halfway down your animation, then go to this exact frame with the slider on the preview window in the upper-right of your screen.

With your model selected, hit ‘V’ to bring up the Robot-Hierarchy window (if it doesn’t work then make sure that the ‘Vertex’ selector isn’t selected).
 

Attachments

  • RobotHierarchy.gif
    RobotHierarchy.gif
    7.8 KB · Views: 554
Open up the hierarchy so that you can see all the joints. Select ‘TURRET’.

The second row of buttons are seven ways that you can rotate your joints. The first three rotate the joint relative to its’ parent joint (ie – relative to the joint that it’s attached to). The last three rotate the joint relative to the bottom-left view screen. The middle button will spin the joint on its’ axis.

Click the very last button (the one with the ‘Z’ on it), and then in an empty part of one of your three view screens, click and drag to rotate your turret.
Now select the ‘GUNEND’ joint in the Robot-Hierarchy window. We are going to elevate the gun.

If the gun is pointing forward I then use the sixth button (the one with the ‘X’ on it) but if the gun is pointing elsewhere then use one of the first three buttons (it’s usually the second one). Click the button and move your gun.

If you ever want to move or rotate your whole model it’s easier to do it with the movement and rotation keyframes (because you can enter exact figures).

Close the Robot-Hierarchy window and double-click the costume keyframe that is in frame 1 and click ‘copy’. Drag this new keyframe to the very end of your animation. It should look like below.
 

Attachments

  • MuffinTank13.gif
    MuffinTank13.gif
    2.3 KB · Views: 567
:aargh: AHHHH!!! WATCH OUT FOR THE FEARSOME MUFFIN TANK!!! :aargh:

Anyway, great tutorial! :goodjob: I'm sure lots of people will find this very useful, and it confirmed I'm doing it the right way :D

the first three rotation buttons annoy me greatly, I never use them, and I rarely use the 4th, but that one doesn't piss me off as much. the last three buttons I ALWAYS use. Could you give an explanation of the first three buttons?

Human skeletons are a bit harde to make since you have to make a good structure, when I was just learning the head would stay in place but the whole body (including legs) would all move if you tried to move his back ;).
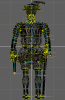
Here are some tips on makeing a human skeleton -
1. have the root around the crotch area
2.have each leg come out of the root seperatley
3. have ~5 "spine" jointsthat start at the root (first joint = as close as possible to the root) and finish at the neck, then have a neck jiont coming off of the 5th(last) spine joint and the head off that
4. have the arms come off the 5th(last) spine joint.

this way your models won't look all wierd when you move them. If you do make a mistake with your skeleton then altering the positions of the joints will totally mess up your animation and you'll have to restart. But you CAN reassign verticies to different joints with no problem :cool:

EDIT: here's a pic of what I'm saying
 

Attachments

  • ofxtut2.png
    ofxtut2.png
    19.8 KB · Views: 586
Can you provide the fearsome Muffins Tank model for some of us to go step by step with your tutorial? I've not messed with the designer much and don't really know how to use it. I have learned a good bit of the animator though.

If not the "Ultra Secret" Muffins Tank, then some other model with moveable parts please. :D
 
Dease said:
the first three rotation buttons annoy me greatly, I never use them, and I rarely use the 4th, but that one doesn't piss me off as much. the last three buttons I ALWAYS use. Could you give an explanation of the first three buttons?
I don't enjoy using the first three either.

The last three allow you to rotate your joints reletive to the bottom-left view screen. The first three do the same but reletive to the joint it's attached to. They're useful if you've got things sticking out at odd angles or if you've got a skeleton in a weird pose.
 
Tzar Sasha said:
Can you provide the fearsome Muffins Tank model for some of us to go step by step with your tutorial? I've not messed with the designer much and don't really know how to use it. I have learned a good bit of the animator though.

If not the "Ultra Secret" Muffins Tank, then some other model with moveable parts please. :D
Here you go :goodjob:

I also posted the Leman Russ model in its' unit thread if you want something pretty to look at instead :lol:

EDIT: The below model already has the skeleton. If you want to work step-by-step with the tutorial then delete all but the 'Root' joints in the Skeleton Hierarchy window (the button with the "-" sign in it)
 

Attachments

  • MuffinsTutorialModel.zip
    4.6 KB · Views: 260
Top Bottom