[cheap advertisement mode on]
With this you will be making icons like crazy!
[cheap advertisement mode off]
If you have any questions related to this template or info provided, just ask in this thread...
Civilization: Beyond Earth - Sponsors' Icons PSD Template
created by Artisanix (2014/11/02)
This is not a tutorial per se but rather some kind of a description to Photoshop's template I've created.
Such template is very flexible and robust, it can help modders to create icons for game's sponsors very quickly with the quality very close to originals. The main purpose of this template is to save time spent on technical aspects, thus the more time will be available then for much more creative activities")
so let's get started...
Sponsor Icons - details
In short we can say that sponsor icons are just logos that identify the chosen faction in game. And these are used in many various places.
As for technical details, to have a sponsor's logo, you need to create two images with the same logo but with different looks. And then resize those images to various dimensions and save as separate file each. These are reffered in game's code as Icon and Alpha Atlases.
No matter how many variants you need to create overall, you always start the same: by creating sponsor's logo image with 128x128 dimensions and save it as IconAtlas* file, then you create black and white modified version of that logo and save as AlphaAtlas* file.
(* actually you can name files in any way you want, but game reffers to those files with such names for convenience: IconAtlas - color version of logo, AlphaAtlas - b/w version of logo without frame)
To better understand and use the template you should know how icons are constructed in the first place.
Icon Atlases (logos in color) have following properties (the highest quality/dimensions image example):
- the whole image dimensions 128x128 px (background not important - not visible in game)
- logo frame dimensions 116x116 px (frame thickness 5 px - including 1 px black edge outside), can have gradients
- logo frame background (area inside of the frame) 106x106 px, can have gradients
- logo/symbol itself, can have gradients and subtle glow outside to blend in with frame's background
- alpha channel: all white with 6 px thin black frame outside
Alpha Atlases (logos in neutral color with alpha gradient) have following properties:
- the source image dimensions 128x128 (this image is never used, but we create it from Icon Atlas version, so there's no point of resizing it at this point)
- background all black (no frame, or frame background present)
- the shape of the logo in all white
- alpha channel black with the shape of the logo in white but with subtle gradient applied (light gray at top, white at bottom)
INSTRUCTIONS:
To use template to make a new Icon Atlas image:
1. Make sure the following layers are turned off: FOR ALPHA (BKG), FOR ALPHA (WHITE LOGO), FOR ALPHA CHANNEL (GRADIENT).
The rest of layers and effects should be turned on.
2. You need to create a new logo/shape:
- if you want to work relativly undistracted, you may want to reset all color schemes (gradients) to more neutral (e.g. just set gradient colors for FRAME layer to dark gray, for FRAME BKG to black, and for LOGO to white, and you may want to switch Outer Glow Effect off for LOGO layer as well)
- to create new logo make layer LOGO active and click on vector mask, then delete content from there and start to draw your own shapes
[note to those who have no experience working with vector graphic and are quite new to Photoshop: vector graphic may be the biggest obstacle you encounter here and even may decide whether you create that logo or not - but to get some tutorials and play with it a bit can be quite beneficial - it may have some steep learning curve, especially at the very beginning, but it's soo powerful later - if you know it, your limits know no bounds
3. After you finish with your logo/shape then just set all gradients (FRAME, FRAME BKG, LOGO) to your liking. Don't forget to enable Outer Glow for LOGO layer and set its colour to match that of frame's background (or not if you so desire
4. Save your image as ARGB 8888 dds file (e.g. SponsorsName_IconAtlas_128.dds). You may want to check the option to save with DXT5 compression if you like as well - though it may have some problems with gradients, but for solid color logos (some of originals are like this) it should not be a problem with this format.
To use template to create Alpha Atlas from Icon Atlas:
If you finished creating your Icon Atlas and exported it as dds successfully, to create color map and alpha channel for Alpha Atlas image do the following:
1. enable FOR ALPHA (BKG) layer - it's black so it should hide the frame and frame's background (Alhpa Atlases don't have such features)
2. enable FOR ALPHA (WHITE LOGO) layer - it should make logo shape in all white.
3. disable Outer Glow effect for LOGO layer
4.
- add one empty layer on the top of stack, activate it, and press the most difficult keyboard shortcut in Photoshop CTRL+ALT+SHIFT+E - this combination makes the composite image in one layer from all other enabled layers
- select and copy newly created layer to clipboard (it should contain white logo on black background), then create new image with 128x128 dimensions, paste the clipboard's content, and merge with background - this will be your Alpha Atlas main file
5.
- return to the template,
- delete that composite layer you created in previous step,
- enable FOR ALPHA CHANNEL (GRADIENT) layer
- do the same actions from previous point to create new composite image (this time image should have the same black background but the white logo/shape should have subtle gray gradient on it)
- select and copy that layer to clipboard
- switch to that new file for Alpha Atlas you created in previous step, and add new Alpha channel there, and paste the content from clipboard
- save image as dds (e.g. Sponsor'sName_AlphaAtlas_128.dds)
FINAL NOTES:
At the end you should have two dds files: one with color icon (logo, frame, possibly gradients), and another with simpler content (just white logo on black background). The dimensions of files should be 128x128.
And if you want to have all icon sizes you need for your mod, following information may be helpfull:
The game uses sponsors' icons of these sizes:
- for Icon Atlases - 128x128, 64x64, 45x45, 32x32
- for Alpha Atlases - 48x48, 32x32, 24x24
In game's code and in original files we can find other sizes:
- for Icon Atlases - 80x80, 57x57
- for Alpha Atlases - 128x128, 64x64, 57x57, 45x45, 16x16
but I've found no icon at such sizes used in game (and I was quite "brutal" in my tests, but still, I may have missed something)
In short, if you want to be on "safe side" you may want to resize the icons you created with or w/out this template to all these dimensions and save them in separate dds files, but definietly you need to make sure that you have those that game certainly uses (from the first list).
FILES ATTACHED TO THIS POST:
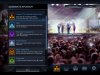
CBE_icon_sponsor_ingame.jpg - shows template icon in action
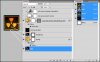
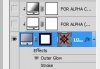
CBE_icon_sponsor_pslayers.jpg - view of layers in PSD template file with "connections"
CBE_icon_sponsor_template.zip - archive with PSD file template and template icon converted already to proper DDS formats - the icon is free to use for anyone who likes it and wants to use it in his/hers CBE mods The original version of the text in this post is also included in archive as rtf file, and jpg images too.
With this you will be making icons like crazy!
[cheap advertisement mode off]
If you have any questions related to this template or info provided, just ask in this thread...
Civilization: Beyond Earth - Sponsors' Icons PSD Template
created by Artisanix (2014/11/02)
This is not a tutorial per se but rather some kind of a description to Photoshop's template I've created.
Such template is very flexible and robust, it can help modders to create icons for game's sponsors very quickly with the quality very close to originals. The main purpose of this template is to save time spent on technical aspects, thus the more time will be available then for much more creative activities
so let's get started...
Sponsor Icons - details
In short we can say that sponsor icons are just logos that identify the chosen faction in game. And these are used in many various places.
As for technical details, to have a sponsor's logo, you need to create two images with the same logo but with different looks. And then resize those images to various dimensions and save as separate file each. These are reffered in game's code as Icon and Alpha Atlases.
No matter how many variants you need to create overall, you always start the same: by creating sponsor's logo image with 128x128 dimensions and save it as IconAtlas* file, then you create black and white modified version of that logo and save as AlphaAtlas* file.
(* actually you can name files in any way you want, but game reffers to those files with such names for convenience: IconAtlas - color version of logo, AlphaAtlas - b/w version of logo without frame)
To better understand and use the template you should know how icons are constructed in the first place.
Icon Atlases (logos in color) have following properties (the highest quality/dimensions image example):
- the whole image dimensions 128x128 px (background not important - not visible in game)
- logo frame dimensions 116x116 px (frame thickness 5 px - including 1 px black edge outside), can have gradients
- logo frame background (area inside of the frame) 106x106 px, can have gradients
- logo/symbol itself, can have gradients and subtle glow outside to blend in with frame's background
- alpha channel: all white with 6 px thin black frame outside
Alpha Atlases (logos in neutral color with alpha gradient) have following properties:
- the source image dimensions 128x128 (this image is never used, but we create it from Icon Atlas version, so there's no point of resizing it at this point)
- background all black (no frame, or frame background present)
- the shape of the logo in all white
- alpha channel black with the shape of the logo in white but with subtle gradient applied (light gray at top, white at bottom)
INSTRUCTIONS:
To use template to make a new Icon Atlas image:
1. Make sure the following layers are turned off: FOR ALPHA (BKG), FOR ALPHA (WHITE LOGO), FOR ALPHA CHANNEL (GRADIENT).
The rest of layers and effects should be turned on.
2. You need to create a new logo/shape:
- if you want to work relativly undistracted, you may want to reset all color schemes (gradients) to more neutral (e.g. just set gradient colors for FRAME layer to dark gray, for FRAME BKG to black, and for LOGO to white, and you may want to switch Outer Glow Effect off for LOGO layer as well)
- to create new logo make layer LOGO active and click on vector mask, then delete content from there and start to draw your own shapes
[note to those who have no experience working with vector graphic and are quite new to Photoshop: vector graphic may be the biggest obstacle you encounter here and even may decide whether you create that logo or not - but to get some tutorials and play with it a bit can be quite beneficial - it may have some steep learning curve, especially at the very beginning, but it's soo powerful later - if you know it, your limits know no bounds
3. After you finish with your logo/shape then just set all gradients (FRAME, FRAME BKG, LOGO) to your liking. Don't forget to enable Outer Glow for LOGO layer and set its colour to match that of frame's background (or not if you so desire
4. Save your image as ARGB 8888 dds file (e.g. SponsorsName_IconAtlas_128.dds). You may want to check the option to save with DXT5 compression if you like as well - though it may have some problems with gradients, but for solid color logos (some of originals are like this) it should not be a problem with this format.
To use template to create Alpha Atlas from Icon Atlas:
If you finished creating your Icon Atlas and exported it as dds successfully, to create color map and alpha channel for Alpha Atlas image do the following:
1. enable FOR ALPHA (BKG) layer - it's black so it should hide the frame and frame's background (Alhpa Atlases don't have such features)
2. enable FOR ALPHA (WHITE LOGO) layer - it should make logo shape in all white.
3. disable Outer Glow effect for LOGO layer
4.
- add one empty layer on the top of stack, activate it, and press the most difficult keyboard shortcut in Photoshop
CTRL+ALT+SHIFT+E - this combination makes the composite image in one layer from all other enabled layers- select and copy newly created layer to clipboard (it should contain white logo on black background), then create new image with 128x128 dimensions, paste the clipboard's content, and merge with background - this will be your Alpha Atlas main file
5.
- return to the template,
- delete that composite layer you created in previous step,
- enable FOR ALPHA CHANNEL (GRADIENT) layer
- do the same actions from previous point to create new composite image (this time image should have the same black background but the white logo/shape should have subtle gray gradient on it)
- select and copy that layer to clipboard
- switch to that new file for Alpha Atlas you created in previous step, and add new Alpha channel there, and paste the content from clipboard
- save image as dds (e.g. Sponsor'sName_AlphaAtlas_128.dds)
FINAL NOTES:
At the end you should have two dds files: one with color icon (logo, frame, possibly gradients), and another with simpler content (just white logo on black background). The dimensions of files should be 128x128.
And if you want to have all icon sizes you need for your mod, following information may be helpfull:
The game uses sponsors' icons of these sizes:
- for Icon Atlases - 128x128, 64x64, 45x45, 32x32
- for Alpha Atlases - 48x48, 32x32, 24x24
In game's code and in original files we can find other sizes:
- for Icon Atlases - 80x80, 57x57
- for Alpha Atlases - 128x128, 64x64, 57x57, 45x45, 16x16
but I've found no icon at such sizes used in game (and I was quite "brutal" in my tests, but still, I may have missed something)
In short, if you want to be on "safe side" you may want to resize the icons you created with or w/out this template to all these dimensions and save them in separate dds files, but definietly you need to make sure that you have those that game certainly uses (from the first list).
FILES ATTACHED TO THIS POST:
CBE_icon_sponsor_ingame.jpg - shows template icon in action
CBE_icon_sponsor_pslayers.jpg - view of layers in PSD template file with "connections"
CBE_icon_sponsor_template.zip - archive with PSD file template and template icon converted already to proper DDS formats - the icon is free to use for anyone who likes it and wants to use it in his/hers CBE mods
The original version of the text in this post is also included in archive as rtf file, and jpg images too.