Flintlock1415
Emperor
I have been interested in finding out how create new units of my own using my mac, and after discovering that I couldn't make new unit models I found a compromise: unit skinning.
I had planned on making a tutorial for anyone who is interested for a while, and just decided to make time to do so.
NOTE: This is only for skinning (basically recoloring) units and not new unit models. I Believe this method can be used for other applications i.e. building and leaderhead skins, (probably even flags/buttons, but that is a bit more complex) but have only used this for units.
Now, lets get started
Applications Needed
1. Macapaka by AlanH
needed for extracting the art files, instructions in thread
2. GraphicConverter
needed to converter dds files to png
NOTE: This is only a demo version (costs about $30 US) and loads after a 30 second wait, but will work for this and I don't believe the trial ever ends. (I've been using the demo for nearly 200 days and it still works.)
3. GIMP
Needed to edit the png files.
4. SquishDDS
Needed to convert .png file back into .dds (download the third item in brown lettering)
Alternate Link
Tutorial
After extracting the .fpk files, go into CivilzationIV/Assets/Art/Units and pick a unit folder that you want to skin. Then make a duplicate of the unit's dds file i.e. bear.dds or warrior_128.dds. (some units have a dds file w/ a number after it, use that file.) Drag the duplicate file to your desktop and change the from bear copy.dds to bear.dds (the file needs to keep the same name as the original)
IMPORTANT!-NEVER alter the original game files, always make a duplicate and alter that.
Now, open the file in GraphicConverter and save it as a .png file. Then open up GIMP (Photoshop also works, but the GIMP works fine and is free)
Then paint the file as you desire it to look. This will take some guesswork to figure out how the file is laid out but isnt *too* difficult.
After you have the file looking the way you want, then save it (obviously) and then open it up in SquishDDS and export the file as a .dds file.
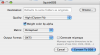
Your setup should look like this:
Quality: High
(unchecked) Weight color by alpha
Metric: Perceptual
Output Format: DXT 3 (uncheck)--> Generate mitmaps
and click Convert to DDS...
You're done!
Adding to the game
To have the file replace the original skin (in game), simply drop your finished file into your Documents/CivilizationIV/CustomAssets/Art/Units/ folder path and drop the skin into the corresponding folder.
To actually make a separate unit, there are many tutorials available in the Creation/Customization forum. (I used Sovarn's tutorial here) this requires XML work, but it is a very easy to learn language.
I hope this helps anyone interested, and please tell me if I missed anything!")
I had planned on making a tutorial for anyone who is interested for a while, and just decided to make time to do so.
NOTE: This is only for skinning (basically recoloring) units and not new unit models. I Believe this method can be used for other applications i.e. building and leaderhead skins, (probably even flags/buttons, but that is a bit more complex) but have only used this for units.
Now, lets get started
Applications Needed
1. Macapaka by AlanH
needed for extracting the art files, instructions in thread
2. GraphicConverter
needed to converter dds files to png
NOTE: This is only a demo version (costs about $30 US) and loads after a 30 second wait, but will work for this and I don't believe the trial ever ends. (I've been using the demo for nearly 200 days and it still works.)
3. GIMP
Needed to edit the png files.
4. SquishDDS
Needed to convert .png file back into .dds (download the third item in brown lettering)
Alternate Link
Tutorial
After extracting the .fpk files, go into CivilzationIV/Assets/Art/Units and pick a unit folder that you want to skin. Then make a duplicate of the unit's dds file i.e. bear.dds or warrior_128.dds. (some units have a dds file w/ a number after it, use that file.) Drag the duplicate file to your desktop and change the from bear copy.dds to bear.dds (the file needs to keep the same name as the original)
IMPORTANT!-NEVER alter the original game files, always make a duplicate and alter that.
Now, open the file in GraphicConverter and save it as a .png file. Then open up GIMP (Photoshop also works, but the GIMP works fine and is free)
Then paint the file as you desire it to look. This will take some guesswork to figure out how the file is laid out but isnt *too* difficult.
After you have the file looking the way you want, then save it (obviously) and then open it up in SquishDDS and export the file as a .dds file.
Your setup should look like this:
Quality: High
(unchecked) Weight color by alpha
Metric: Perceptual
Output Format: DXT 3 (uncheck)--> Generate mitmaps
and click Convert to DDS...
You're done!
Adding to the game
To have the file replace the original skin (in game), simply drop your finished file into your Documents/CivilizationIV/CustomAssets/Art/Units/ folder path and drop the skin into the corresponding folder.
To actually make a separate unit, there are many tutorials available in the Creation/Customization forum. (I used Sovarn's tutorial here) this requires XML work, but it is a very easy to learn language.
I hope this helps anyone interested, and please tell me if I missed anything!

")
