Kal-el
Deity
Science Advisor Tutorial:
How to get you Modified Tech Tree to Look Like a Professional
1: Back up files science_ancient.pcx, science_middle.pcx, science_industrial.pcx, and science_modern.pcx. these files are located in the Art/advisor folder
2: Make Three copies of science_blank.pcx
3: Name the four science_blank files; science_ancient.pcx, science_middle.pcx, science_industrial.pcx, and science_modern.pcx, one each.
4: Start the Game
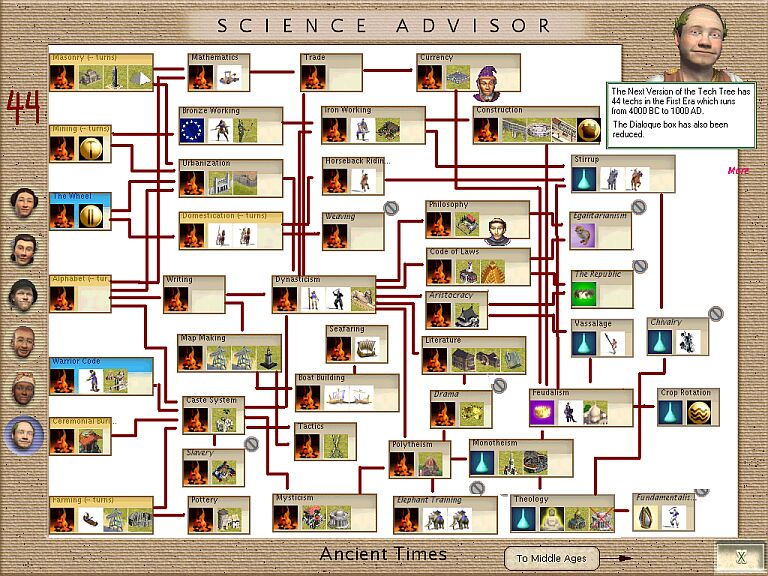
5: Go to Science Advisor Ancient Screen
6: Hit the Print Screen Button on your keypad
7: Open Windows Paint - paste copied page into Paint - Save image as "Science Ancient Original.bmp"
8: Repeat steps 6 and 7 for the other three eras naming the new images accordingly.
9: Plot out the X Y coordinates for each of your techs.
Hint 1: Use the attached Grid for even easier plotting.
Hint 2: It is easier if you just do one era at a time.
Hint 3: Use the positions of the original techs as a guide for your techs. Better yet use the positions of the techs in DYP mod - there are more points of reference
10: Repeat steps 6 and 7 rename new file "Science Ancient Working.bmp" This should give you an approximate view of what your tech tree will look like. You can now cut and paste the techs and move them around to there exact desired locations.
Hint 4: It is easier if you have already completed the relationships between techs, units and improvements. This allows you to have a better feel of what size tech boxes you will be dealing with.
Using the Grid Overlay:
11: Once all the tech boxes are in place on the bitmap you can now use the attached grid overlay to easily plot out your tech coordinates. Using a program that allows layers, such as Adobe PhotoShop, open your image with all the tech boxes in their desired places.
12: Copy the Grid overlay and paste in onto the working advisor screen as a new layer.
13: Select all the white areas of the Grid overlay.
14: Cut all the selected white areas from the image. This should leave you with the just the pink lines over your tech boxes.
15: Use the Grid Coordinates to help plot your coordinates.
16: Enter the coordinates into the .bic or .bix file.
17: Open the Game and Capture the image of your new advisor screen.
18: Compare your new Working image with the Original image or the DYP image to plot a more accurate position for your techs.
19: Repeat until satisfied.
Ok, so you have everything in order now what about the arrows?
Using the two arrow sheets I have supplied below all it takes is a little time and patience and you can have your tech tree in playing order.
20: Now that you have your tech boxes in place go ahead and take some screen shots of them.
21: The next step is draw in the arrows by hand. This will give you a rough idea of what you will be looking at. At this time you may notice that some of the tech boxes need to be moved around a bit to accomodate all the necessary arrows. If so go back and repeat steps 15-18.
21: Once you have all the arrows drawn in you can move on to the finished arrows. Find an arrow that you like from the arrow sheet and go to town on a clean version of the advisor screen.
Hint 5: I find the easiest way is to do most of your editing in Paint. This program allows you to make anything white, clear so you can copy an arrow from one of the arrow sheets and easily place it into your advisor screen.
22: After you have all your arrows in place cut out all the tech boxes
23: Copy the Whole Image
24: Open the blank versions of the advisor screens and paste your arrow image into the blank advisor screen. Make sure you set the white to transparent.
25: Save
26: Open your new file in PSP and set the Palette Transparency.
27: Repeat for each era.
Congratulations! Your Done.
How to get you Modified Tech Tree to Look Like a Professional
1: Back up files science_ancient.pcx, science_middle.pcx, science_industrial.pcx, and science_modern.pcx. these files are located in the Art/advisor folder
2: Make Three copies of science_blank.pcx
3: Name the four science_blank files; science_ancient.pcx, science_middle.pcx, science_industrial.pcx, and science_modern.pcx, one each.
4: Start the Game
5: Go to Science Advisor Ancient Screen
6: Hit the Print Screen Button on your keypad
7: Open Windows Paint - paste copied page into Paint - Save image as "Science Ancient Original.bmp"
8: Repeat steps 6 and 7 for the other three eras naming the new images accordingly.
9: Plot out the X Y coordinates for each of your techs.
Hint 1: Use the attached Grid for even easier plotting.
Hint 2: It is easier if you just do one era at a time.
Hint 3: Use the positions of the original techs as a guide for your techs. Better yet use the positions of the techs in DYP mod - there are more points of reference
10: Repeat steps 6 and 7 rename new file "Science Ancient Working.bmp" This should give you an approximate view of what your tech tree will look like. You can now cut and paste the techs and move them around to there exact desired locations.
Hint 4: It is easier if you have already completed the relationships between techs, units and improvements. This allows you to have a better feel of what size tech boxes you will be dealing with.
Using the Grid Overlay:
11: Once all the tech boxes are in place on the bitmap you can now use the attached grid overlay to easily plot out your tech coordinates. Using a program that allows layers, such as Adobe PhotoShop, open your image with all the tech boxes in their desired places.
12: Copy the Grid overlay and paste in onto the working advisor screen as a new layer.
13: Select all the white areas of the Grid overlay.
14: Cut all the selected white areas from the image. This should leave you with the just the pink lines over your tech boxes.
15: Use the Grid Coordinates to help plot your coordinates.
16: Enter the coordinates into the .bic or .bix file.
17: Open the Game and Capture the image of your new advisor screen.
18: Compare your new Working image with the Original image or the DYP image to plot a more accurate position for your techs.
19: Repeat until satisfied.
Ok, so you have everything in order now what about the arrows?
Using the two arrow sheets I have supplied below all it takes is a little time and patience and you can have your tech tree in playing order.
20: Now that you have your tech boxes in place go ahead and take some screen shots of them.
21: The next step is draw in the arrows by hand. This will give you a rough idea of what you will be looking at. At this time you may notice that some of the tech boxes need to be moved around a bit to accomodate all the necessary arrows. If so go back and repeat steps 15-18.
21: Once you have all the arrows drawn in you can move on to the finished arrows. Find an arrow that you like from the arrow sheet and go to town on a clean version of the advisor screen.
Hint 5: I find the easiest way is to do most of your editing in Paint. This program allows you to make anything white, clear so you can copy an arrow from one of the arrow sheets and easily place it into your advisor screen.
22: After you have all your arrows in place cut out all the tech boxes
23: Copy the Whole Image
24: Open the blank versions of the advisor screens and paste your arrow image into the blank advisor screen. Make sure you set the white to transparent.
25: Save
26: Open your new file in PSP and set the Palette Transparency.
27: Repeat for each era.
Congratulations! Your Done.


")