Deliverator
Graphical Hackificator
Update: Don't have time to rewrite this tutorial ATM but if you want to do reskins use this version of NexusBuddy. Just open the GR2 you want to reskin, switch the textures on the materials to your new ones and save the gr2 with a new name.
This tutorial assumes the following:
1) You have installed the mod tools and have ModBuddy and Nexus working.
2) You have unpacked the FPK containing the art files - see here if you're not sure how to do this.
3) You have Paint.NET or Photoshop with the DDS plugin to do the actually reskinning.
Reskinning a Unit
1) Copy the following unpacked files from .../Resource/Common and .../Resource/DX9 to a working directory:

These are the GR2 model file, the two DDS texture files and the Civ 5 asset file (the fxsxml).
2) Do your reskinning! I used Paint.NET to make a simple redcoat texture saving with the following options. You can use the Photoshop DDS export if that's what you're used to. I saved the file as redcoat.dds.

3) Download lemmy101 and CaptainBinky's GrannyMaterialHacker from here. Copy the executable to your Nexus directory (this is Nexus/x86 on my Windows 7 64-bit machine).
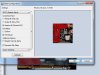
4) Run the GrannyMaterialHacker.exe. Select u_american_minuteman.gr2 as both the Source GR2 and My GR2. Then navigate to the DIFF texture as shown and double click on it. Select the redcoat.dds created in step 2 to replace this texture. Click HACKIFY! and a new GR2 file will be created called u_american_minuteman_new.gr2.


5) In your working directory rename u_american_minuteman_new.gr2 to redcoat.gr2 and u_american_minuteman.fxsxml to redcoat.xml.
6) Edit the newly renamed redcoat.fxsxml, changing the second line to <Mesh file="redcoat.gr2"/> and the line that refers to U_American_Minuteman_DIFF.dds to <Texture file="redcoat.dds"/>.
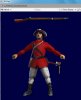
7) Now you can open up the redcoat.fxsxml in the Nexus Asset Viewer and see the reskinned unit in the 3D View.

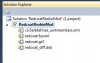
8) Now to make a simple mod to get the unit into the game. Create a new Project in ModBuddy. Select "Empty Mod" and give it a name. In the solution explorer, right click your mod pick Add Existing Item and add redcoat.fxsxml, redcoat.dds and redcoat.gr2.

9) Copy the xml file civ5artdefines_unitmembers.xml from ../Resource/Common. For testing purposes, edit the entries for the three different warrior art defines to point to redcoat.fxsxml like this (the entry originally being copied from the one for the Minuteman):
9) Now use Add Existing Item to add the civ5artdefines_unitmembers.xml file to your mod.
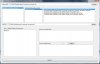
10) Finally, set the Reload Unit System checkbox in the properties of the mod as shown.

11) Save your Project and then run Build -> Build Solution.
12) Activate your mod in the Mod Browser and start a game. Hey presto - your reskinned Minuteman is in the game!

Hopefully this will allow reskinners much more talented than myself to get to work.
This process should also work for Buildings and City Sets - basically anything where the DDS files can be opened OK (i.e. not the 3D Leaders).
Thanks to lemmy101 and CaptainBinky without whom this would not be possible.
Notes
1. You can put your art into subdirectories in your mod, without needing to change the <Granny> tag in the art defines from just the filename. The files will still be found.
This tutorial assumes the following:
1) You have installed the mod tools and have ModBuddy and Nexus working.
2) You have unpacked the FPK containing the art files - see here if you're not sure how to do this.
3) You have Paint.NET or Photoshop with the DDS plugin to do the actually reskinning.
Reskinning a Unit
1) Copy the following unpacked files from .../Resource/Common and .../Resource/DX9 to a working directory:
These are the GR2 model file, the two DDS texture files and the Civ 5 asset file (the fxsxml).
2) Do your reskinning! I used Paint.NET to make a simple redcoat texture saving with the following options. You can use the Photoshop DDS export if that's what you're used to. I saved the file as redcoat.dds.
3) Download lemmy101 and CaptainBinky's GrannyMaterialHacker from here. Copy the executable to your Nexus directory (this is Nexus/x86 on my Windows 7 64-bit machine).
4) Run the GrannyMaterialHacker.exe. Select u_american_minuteman.gr2 as both the Source GR2 and My GR2. Then navigate to the DIFF texture as shown and double click on it. Select the redcoat.dds created in step 2 to replace this texture. Click HACKIFY! and a new GR2 file will be created called u_american_minuteman_new.gr2.
5) In your working directory rename u_american_minuteman_new.gr2 to redcoat.gr2 and u_american_minuteman.fxsxml to redcoat.xml.
6) Edit the newly renamed redcoat.fxsxml, changing the second line to <Mesh file="redcoat.gr2"/> and the line that refers to U_American_Minuteman_DIFF.dds to <Texture file="redcoat.dds"/>.
7) Now you can open up the redcoat.fxsxml in the Nexus Asset Viewer and see the reskinned unit in the 3D View.
8) Now to make a simple mod to get the unit into the game. Create a new Project in ModBuddy. Select "Empty Mod" and give it a name. In the solution explorer, right click your mod pick Add Existing Item and add redcoat.fxsxml, redcoat.dds and redcoat.gr2.
9) Copy the xml file civ5artdefines_unitmembers.xml from ../Resource/Common. For testing purposes, edit the entries for the three different warrior art defines to point to redcoat.fxsxml like this (the entry originally being copied from the one for the Minuteman):
Code:
  <UnitMemberArtInfo>
    <Type>ART_DEF_UNIT_MEMBER_WARRIOR</Type>
    <fScale>0.14</fScale>
   [B][COLOR="Red"] <Granny>redcoat.fxsxml</Granny>[/COLOR][/B]
    <Combat>
      <Defaults>ART_DEF_TEMPLATE_SOLDIER</Defaults>
      <bHasShortRangedAttack>1</bHasShortRangedAttack>
      <bReformBeforeCombat>1</bReformBeforeCombat>
      <Weapon>
        <WeaponTypeTag>BULLET</WeaponTypeTag>
        <WeaponTypeSoundOverrideTag>BULLET</WeaponTypeSoundOverrideTag>
      </Weapon>
    </Combat>
    <MaterialTypeTag>CLOTH</MaterialTypeTag>
    <MaterialTypeSoundOverrideTag>FLESH</MaterialTypeSoundOverrideTag>
  </UnitMemberArtInfo>
9) Now use Add Existing Item to add the civ5artdefines_unitmembers.xml file to your mod.
10) Finally, set the Reload Unit System checkbox in the properties of the mod as shown.
11) Save your Project and then run Build -> Build Solution.
12) Activate your mod in the Mod Browser and start a game. Hey presto - your reskinned Minuteman is in the game!
Hopefully this will allow reskinners much more talented than myself to get to work.
This process should also work for Buildings and City Sets - basically anything where the DDS files can be opened OK (i.e. not the 3D Leaders).
Thanks to lemmy101 and CaptainBinky without whom this would not be possible.
Notes
1. You can put your art into subdirectories in your mod, without needing to change the <Granny> tag in the art defines from just the filename. The files will still be found.


")
