Revision 1.2: March 30, 2018
Summary
This is a tutorial that provides instructions to apply various effects to a unit by using effects from other existing Civ V units. For example, in this tutorial we will be using the Gandalf Wizard unit (which uses Scout animations and effects) and demonstrating how it can alternately use city-attack effects for all of its basic attacks to give the appearance of a spellcasting unit. An advanced tutorial will additionally apply Dromon fire, rocket artillery, and Giant Death Robot (GDR) autocannon and rocket effects. Once the technique is understood, virtually any combination of effects may be used.
Prerequisites
This tutorial assumes a basic understanding of unit creation tools (NexusBuddy, Granny Viewer, Civ V ModBuddy) and some idea of the underlying unit mechanics (defined by .gr2, .fxsxml, and .ftsxml files). A working knowledge is not necessary and this tutorial will not require any graphic conversion tools or software (as we will only be modifying text) - but understanding the entire process is useful if you wish to customize unit effects. Therefore, if you wish to better understand how units are converted and modified before delving in, I would highly encourage you to start with Deliverator's excellent tutorial of the unit conversion process which is located here.
Caveats
There are two major issues with modifying unit effects. First, some effects (such as the Byzantine Dromon's fire effect, which we will discuss in detail in the advanced tutorial) use unique bones that assist with creating the effect. So for units requiring these, unless you are creating custom animations that can add this unique bone animation into the model, you will not get the desired effect. Fortunately, most effects only require a single point of origination which can be assigned to any bone desired.The second caveat is that custom units (i.e., units that are not rigged over an existing Civ V unit skeleton) must be converted at a relative scale to that of Civ V units because (to my knowledge) the animation effects are not scalable. An example of this is converted Civ IV units with custom animations; most of them are 1/10 to 1/100 the scale of a Civ V unit. Although you may compensate for the unit scale difference in the ArtDefines, you cannot compensate for the size of the effects, which display proportionately to the scale of the ArtDefines setting. A typical Civ V unit has a scale of ~0.12-0.14, so a custom unit that requires a scale of 1.4 in order to appear correctly in-game will also have animation effects that are about 10x larger than a normal unit (which make for some very hefty city attack torch projectiles). Unless/until there is a known workaround discovered, you may want to keep this in mind when converting custom units if you intend to use specialized effects. EDIT: This issue has been corrected. Thank you, Deliverator!!! Refer to this post.
Software/Tools Used
For this tutorial you will need to unpack the Civ 5 art resources (steps 1-4) and have the following software installed:
- Nexus Buddy 2 - make sure you are using a later version (with integrated Granny Viewer). I strongly recommend the latest version!
- Sid Meier's Civilization V SDK (which contains ModBuddy) - downloaded from Steam
- An XML or text editor (I highly recommend Notepad++ or another XML editor, but Notepad or any text editor will still work); alternately, you can edit from ModBuddy
- The tutorial files, downloaded here.
OK, life is short and this boring intro is getting long. So now it's time for the fun stuff!
SECTION I: Gathering the Requisite Files
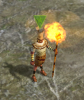
For purposes of this tutorial we are going to use the Gandalf Wizard unit. This unit is rigged to Civ V Scout animations, so for now it is limited to the capabilities of a scout unit. However, Gandalf is not a scout - he is a wizard! Also, unfortunately for our Gandalf, the stock Civilization V game doesn't usemany ANY wizard units. So if we want to build a kick-butt fantasy mod with wizards using trick spellcasting animations, what are we to do? Hmmmm, well let's think about some of the units in the game that have effects that are similar to a magic attack or spell. We have:
City-attack torch projectiles - Fireball
Rocket Artillery - Magic missiles (REALLY, REALLY BIG magic missiles!!!)
Byzantine Dromon fire - Flame strike/ fiery breath
Giant Death Robot autocannon - Chromatic orbs
GDR rockets - Magic missiles (the "not-quite-so-big-as-rocket-artillery" missiles)
XCOM Infantry plasma rifle - Death ray (frickin' laser beams, baby!)
We could go on, but your imagination is beyond the scope of this tutorial . So, let's get this learnin' thang over with so you can do what you do - however you want to do it.
OK, the obvious question is, "how do we get the unit to use Giant Death Robot attacks?" Well, we could rig Gandalf to the GDR skeleton but I think he would look rather stupid lumbering around in the game like an overstuffed Mongo. Besides, we may want multiple effects for the same unit. So the best option is to somehow attach the unit effect to the scout skeleton. Well, why not all of them? Let's gather the source files to take a better look at our unit and the desired effects we want to apply.
Steps:
1. Create a new folder directory to copy source files and serve as our work folder.
2. Go to the Civ V Resource folder that you should have already unpacked (it should be a subfolder of the Civ V installation directory). From there, we will need to find the source unit files for each effect we are going to use and copy them to our work folder. For both tutorials you will need the following source files:
scout.gr2
scout_attacka.gr2
scout_attack_city.gr2
scout_fortify.gr2
scout.fxsxml
fx_triggers_scout.ftsxml
rocketartillery.gr2
rocketartillery_attack_city.gr2
rocketartillery.fxsxml
fx_triggers_rocketartillery.ftsxml
u_byzantium_dromon.gr2
u_byzantium_dromon_attacka.gr2
u_byzantium_dromon.fxsxml
fx_triggers_u_byzantium_dromon.ftsxml
mech.gr2
mech_attacka.gr2
mech.fxsxml
fx_triggers_mech.ftsxml
heavy_infantry_xcom.gr2
heavy_infantry_xcom_attacka.gr2
heavy_infantry_xcom.fxsxml
fx_triggers_heavy_infantry_xcom.ftsxml
Fortunately for you, I have already provided these files for the tutorial so that you don't actually need to get them. But you will need to do this when you are designing your own unit effect combinations. At a minimum, you will need the base .gr2 file plus at least one animation .gr2 that uses the desired effect (often it is an attack animation) as well as the .fxsxml and .ftsxml files.
3. Copy the necessary files for the unit you wish to modify into the work folder. This should consist of the base .gr2, .fxsxml, and .ftsxml files. If the unit uses custom animations, copy them as well. If not, copy the source files for the unit to which it is rigged (e.g., Scout for the Gandalf unit in this tutorial). If for some reason the unit does not have .fxsxml and/or .ftsxml files, don't worry; as long as you know to which Civ V unit your unit is rigged, we can build these files from scratch using copies of the source unit files. For custom units, select an existing Civ V unit that most closely resembles the kind of animations and effects you are trying to achieve.
4. Using NexusBuddy, open every .gr2 file that you previously copied from the Resource directory and then click Save to overwrite it. Otherwise, they will not open in the Granny Viewer (the tutorial files have already been prepared so you may skip this step for the tutorial).
Now that we have prepped our work folder with the necessary source files and readied them for use, we can now begin to take a closer look at how these files interact with each other so that we may manipulate them to our purpose.
SECTION II: Examining Unit Animations and Triggers
OK, what the H-E-double-hockey-stick are these files for, anyway? Let's describe each type of file a little bit to better understand how they integrate with each other to form a fully-functioning unit in Civ V:
.gr2 - Granny 3D animation file. For our purposes, this file contains the bone (skeleton), mesh, texture, and animation information for the unit. The base .gr2 defines the mesh and the animation .gr2's define the deformation (i.e., animation) of the mesh for each specified action.
.fxsxml - This is a text/XML file that defines the base .gr2 to use and which .gr2 animation file to use for a corresponding action in the game. Each animation is assigned one or more 4-digit event codes for a particular action. For example, when a unit attacks a city it will likely use its city-attack animation; the event codes in the game for city-attacks (e.g., 1160 & 1180) are therefore assigned to that animation. It also defines which "trigger" (.ftsxml) file to use and which bones to assign for those triggers in that file. This file serves other purposes as well but they are beyond the scope of this tutorial.
.ftsxml - Another text/XML file that assigns "triggers" (i.e., sounds, effects, transfers, and actions) for each event code. Initiating an action in the game will "trigger" the corresponding attributes to execute. For example, attacking a city will trigger certain sounds and effects, such as the torch projectile, and these are defined within this file. This file will be the heart and soul of this tutorial and we will be exploring it in greater detail.
The reality is that these files are only part of the process; much of the process we are more-or-less still unable to manipulate. So we have to stay within the realm of that which we can manipulate. So let's begin by looking at our Gandalf "scout" unit and better understand how he works.
Steps:
1. Using NexusBuddy, open the Gandalf_M1.gr2 file and click View to open the Granny Viewer.


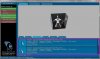
2. We are interested in two things with the .gr2 file: the bone names and the animations. We can view all of this from the Granny Viewer. First, let's look at the bones. Right-click in the scene preview and select "Skeletons" from the menu. The left sidebar changes to the Skeleton Display. From that side menu select "Bone Connectors" and "Bone names" and then adjust the scene preview window to get a better display of the bones in the upper torso.

3. This is the skeleton/bones of our unit which tell the animations what to move (deform) when making an action. Consequently, since Gandalf was rigged using the Civ V scout skeleton, it is also identical to the scout skeleton. That means that we should be able to apply any of the scout's animations to Gandalf and he should animate perfectly in the Granny Viewer. Let's find out! In the Granny Viewer, click on the "Animation List" tab. Now select the 3 scout .gr2 animation files from our work folder (not the base "scout.gr2", only "scout_attacka.gr2", "scout_attack_city.gr2", and "scout_fortify.gr2") and drag-and-drop the files into the "empty slot" field in the bottom center pane. You should see a preview of them working in the Granny Viewer. Nice!

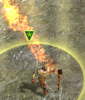
4. OK, let's start with a simple custom effect for Gandalf. The city-attack torch projectiles actually make pretty decent fireballs, so how can we use that effect for every attack that Gandalf makes and not just for a city-attack? We begin by taking a closer look at the city-attack animation. In the Granny Viewer, click on the preview animation for "scout_attack_city.gr2" and reorient the scene preview to get a closer look. You will see that the city-attack shows Gandalf making a throwing action. That is because most melee units show the effect of throwing torch projectiles at the city and not using a weapon. Well, if the torch projectiles are thrown from the hand, then it follows that the effect will originate from the bone in the hand.
5. Upon closer inspection you will see that the name of the bone is "Base HumanRPalm" (if you cannot see it because of the animation, click on "Back to Main Menu" in the top-left corner of the Granny Viewer, then select "Animation Preview" and then "Stop All Animations." Remember the name of this bone; we will be seeing it again. Keep the Granny Viewer open.

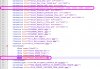
6. Time now to open the "scout.fxsxml" file. It opens with any text editor (preferably an XML editor like NotePad++). Open it and we see a lot of instructions for the scout.gr2 animations that we were just viewing with our Gandalf_M1.gr2. As a matter of fact, the Gandalf.fxsxml file for this tutorial will be created from a copy of the scout.fxsxml file and then editing it. It uses scout animations so those are the base instructions that we will use for Gandalf. Now, however, we want to edit those instructions so that we can make him a spellcaster.
7. From your text editor, save the name of the file as Gandalf_M1.fxsxml to our work folder (usually by selecting File | Save As... from the menu). Make sure you type the correct extension name (.fxsxml) and make sure the "Save As Type" pulldown is selected as "All Types (*.*)" or similar so that it doesn't get a .txt or other unwanted file extension.

8. Now let's edit our new Gandalf_M1.fxsxml file (for Notepad++ users, go to Language | XML to view this file as an XML for easier reading). We start first by renaming the base .gr2 file from Scout.gr2 to Gandalf_M1.gr2.

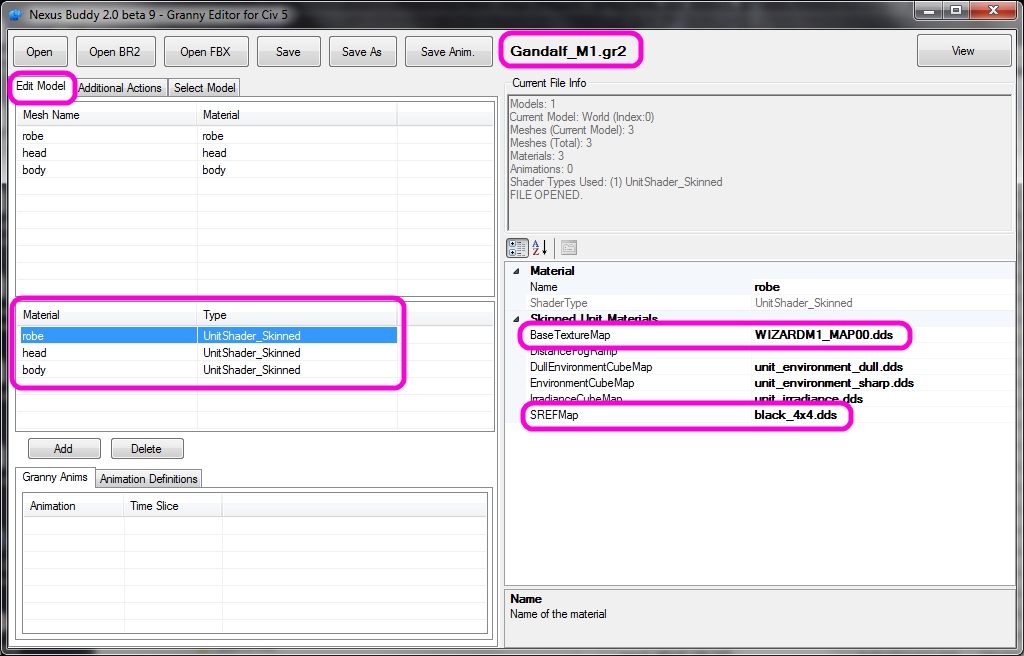
9. Next we need to label our texture files. For the scout unit there are two texture files: one diffuse reflection texture (Scout03_DIFF.dds) and it's corresponding specular reflection texture (Scout03_SREF.dds). For Gandalf there are four: three diffuse reflection textures (WIZARDM1_MAP00.dds, WIZARDM1_MAP01.dds, WIZARDM1_MAP02.dds) and a single specular reflection texture named black_4x4.dds. What's not important (for this tutorial) is what these texture files are and how they function (apart from displaying the "skin" of our model); what is important is that they are added to this file. Delete the 2 scout files and replace them with the 4 texture files for Gandalf. The remaining texture files listed in the file (Unit_Environment_Dull.dds, Unit_Environment_Sharp.dds, Unit_Irradiance.dds) are standard for all units in Civ V; do not modify these. If you do not know which files your model uses, you can find out in NexusBuddy; select the Edit tab and inspect each material on the list.

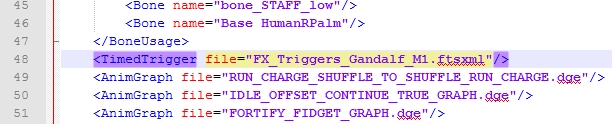
10. OK, a little foreshadowing of things to come: we will need to create a custom trigger file (.ftsxml) for Gandalf in order for him to make custom effects that are different from those of a scout. So, in our current Gandalf_M1.fxsxml file we need to identify the name of a unique trigger file. On line 48 of our file we see the entry for the current scout trigger file "FX_Triggers_Scout.ftsxml." Replace the name of this file with "FX_Triggers_Gandalf_M1.ftsxml" to represent the name of the file we will create in the next step. Keep the .fxsxml file open.
11. From our work folder, create a copy of the "fx_triggers_scout.ftsxml" file. Rename the copy to match the line entry from Step 10 (fx_triggers_gandalf_m1.ftsxml). As you may notice, the case of these files is different; this does not matter as case is irrelevant to the .fxsxml file. Do ensure that the spelling is correct, however.
12. Open the newly-renamed fx_triggers_gandalf_m1.ftsxml file with your text editor. No peeking!
Now, you should have the "Gandalf_M1.gr2" file with scout animations running in the Granny Viewer and have both the "Gandalf_M1.fxsxml" and the "fx_triggers_gandalf_m1.ftsxml" files open. In the next section is where the magic begins! <Ahem>, pardon my pun....
SECTION III: Modifying the .fxsxml Event Codes
In the last section I got you anxious to create a custom effect for Gandalf so that all of his attacks mimicked the city-attack animation and effects. So, let's start to make it happen!
To quickly recap, from the information we gathered thus far we have determined that:
- The animation file for scout city-attacks is scout_attack_city.gr2.
- The bone from the scout's skeleton used to perform the city-attack is named "Base HumanRPalm."
- The .fxsxml file lists the animations used for the unit and assigns corresponding event codes for each action.
- The .ftsxml file assigns sounds and effects for each event code.
From the above information we can see that the logical process to make Gandalf use city-attack animations and effects for all of his attacks would be to re-assign the event codes from ALL of the scout's attack animations to the scout_attack_city.gr2 animation. Subsequently, we will need to modify the actual event code effects for the other attack event codes to match the event code(s) for city-attack effects. In order to do this we will need to edit both the .fxsxml and .ftsxml files. In this section we will look at the .fxsxml file in greater detail and then modify it as necessary in order to create our new effect.
Steps:
1. In the Granny Viewer, we can see from selecting the animation for scout_attacka.gr2 that it uses the staff in a striking motion. From this, we realize that it will not be a suitable attack animation to simulate fireball effects for our spellcaster. So, we know that we can safely omit it from the list of animations in the Gandalf_M1.fxsxml file. It is obvious that the scout_attack_city.gr2 is the one we will use for all of the scout's attacks. Close the Granny Viewer and NexusBuddy; we have the information we need and no longer require them to create our custom effect.
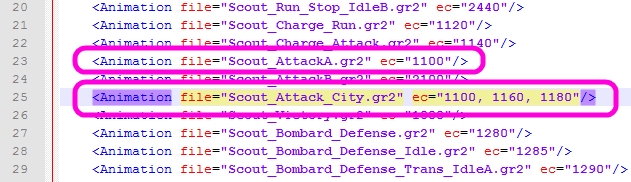
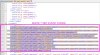
2. Go to the Gandalf_M1.fxsxml file and find the animation for "Scout_AttackA.gr2" (line 23 for Notepad++ users). The first part of the line calls the animation file and the last part defines the event code for the animation. That 4-digit event code is "1100." We have already determined that we will not use the animation file; what we need to do is re-assign the event code to another animation file. As you may have guessed, that animation file is "Scout_Attack_City.gr2" (on line 25).
3. There are two event codes listed for Scout_Attack_City.gr2; "1160" and "1180." Remember these numbers - we will be using them later! From the previous step we are going to add event code "1100" to this line (the numbering order is irrelevant).
4. Now, delete the entire line containing "Scout_AttackA.gr2" (line 23).
5. Notice that there are other animations that appear to be attack animations. For brevity's sake I did not add them to this tutorial to view in the Granny Viewer, but nevertheless they will also need to have their event codes added to the "Scout_Attack_City.gr2" animation line and then be deleted. There are two: "Scout_AttackB.gr2" (which is now line 23 since we have deleted "Scout_AttackA.gr2") and "Scout_Charge_Attack.gr2" (on line 22). Add their event codes ("2100" and "1140") to the "Scout_Attack_City.gr2" event codes and then delete the two animation lines from the file.

6. We should now have all attack animation event codes defined by the city-attack animation with no other attack animations listed in our .fxsxml file. We are finished editing the .fxsxml file, but before we move on to the .ftsxml file let's review one last part of this file. Remember that the bone used for city-attack animations appeared to be "Base HumanRPalm" in the Granny Viewer? We need to ensure that it is referenced in this file. Go to lines 38-44 in our file to view the <BoneUsage> tag. You will see it listed on line 43. As suspected, it is already defined. You may wish to create an effect using a bone that has not been defined in this file (like frickin' laser beams shooting out of his eyes!!!). If you did you would need to add the respective bone to the list. Save the file but keep it open; we will need to reference it later.

SECTION IV: Modifying the .ftsxml File
OK, in the last section we modified the .fxsxml file. So, let's now have our first good look at the "fx_triggers_gandalf_m1.ftsxml" file. It should already be open and still be an exact duplicate of the scout triggers file. That is about to change!
The file begins with a series of repetitive elements similar to the following:
<event_track ec="1180">
<track id="1" name="Sound"/>
<track id="2" name="Effect"/>
<track id="3" name="Transfer"/>
<track id="4" name="Action"/>
</event_track>
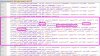
The stuff we want to edit in the .ftsxml file is actually down at the bottom after the <triggers> tag; the elements for each event code at the top part of the file will most likely never be changed. They do impart one piece of useful information for us that we will need to remember, however, so let's discuss this before we begin editing the file. There are four tracks: Sound ("1"), Effect ("2"), Transfer ("3"), and Action ("4"). They are the same for all event codes. Now, look at the first line after the <triggers> tag (line 204). In that line you will see type="FTimedTriggerSound" and track="1" attributes. A couple of lines further (line 206) and you see will type="FTimedTriggerAction" and track="4" attributes. Notice how they match the event code elements per their respective type: Sound ("1"), Effect ("2"), Transfer ("3"), and Action ("4"). When editing this file sometimes things may get a bit messy but you must always ensure that these attributes correspond correctly. Boring? Yes - but also important.

OK, moving on! Or, actually, moving back a bit first. Remember in the last section the two original event codes for Scout_Attack_City.gr2? Of course you do, because I told you to remember them! Nevertheless, I will repeat them; they are "1160" and "1180" and, not surprisingly, they can be found within the <triggers> element of the file. Remember also that the .ftsxml file's purpose is to assign triggers to event codes. Oh, and that we want Gandalf to use the city-attack for ALL of his attacks. So, what do think we need to do next? That's right, we want to copy the "1160" and/or "1180" event code attributes to the other three actions that we have assigned as city-attacks in the .fxsxml file (1100, 1140, and 2100). Without looking at each event in greater detail I will simply let you know in advance that the triggers for "1160" and "1180" are not identical but they are very similar. So, for this tutorial let's just pick "1160" as the event code that we will copy (you could use either or both; it's up to you).
Now, we know what we need to do - so onward!
Steps:
1. We need to find all of the instances of the "1160" event. Place your cursor at the end of line 203 and then use Ctrl+F to find "1160" within the <triggers> element of the file. Doing so reveals seven lines altogether: lines 236, 270, and 272-276. But what a mess - the event codes are all over the place! So for this tutorial I have re-sorted them all by event code: they are in the "triggers_gandalf_sorted.ftsxml" file. For purposes of this tutorial only, copy the contents of this file and paste it over the <triggers> element (lines 203-281) of our "fx_triggers_gandalf_m1.ftsxml" file (be careful not to copy over the closing tag at the end). You may also wish to re-sort event codes with files that you modify but it is not necessary.If you have Notepad++ you can do this rather easily from the Find dialogue and selecting the "Find All in Current Document" button. EDIT: NexusBuddy 2.2.4 and greater can re-sort the event codes for you automatically using the Reorder FTSXML Triggers button in the Additional Actions tab. So easy! Once again, thank you Deliverator!
2. Now that we have all of our "1160" event triggers located (which should now be on lines 226-232 just after the comment tag I inserted for clarity), let's examine them more carefully. There are 5 sound triggers, 1 effect trigger and 1 transfer trigger. The first item of importance is that they each have a unique "id" attribute; to be more precise, every trigger in the <triggers> element must have a unique "id" attribute. Second, on line 228 the transfer trigger has a "refid" attribute with a value of "23" which is a reference to the effect trigger "id" attribute on line 227. Finally, the effect trigger on line 227 has a "bone" assignment with a value assigned to "Base HumanRPalm" as defined from the .fxsxml file. This is the value we would change if we wanted the effect to originate from another location on the model (such as the staff or the head). We need to consider everything we have just mentioned whenever we apply these event triggers to other event codes.
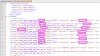
3. Since we have re-assigned event code "1100" to be a city-attack code, we will replace the existing lines for this event code with the "1160" city-attack event code triggers. Delete the lines for event code "1100" and then Copy+Paste the "1160" event codes where the "1100" event code triggers were.

4. There must be unique "id" values for all event triggers (EDIT: this is not entirely true as will be discussed in an advanced tutorial, but for the sake of the basic tutorial it is). So, we need to replace the "id" attribute values for the recently pasted event codes with unique values. I have already determined that the highest "id" attribute value within this particular <triggers> element is "80" and therefore any value higher than this number will be unique. This will not be the case with all .ftsxml files so you will have to predetermine this before re-assigning values. Replace the existing "id" attribute values for all 7 pasted lines, starting with "81" and remembering to match the "refid" attribute value on the transfer event trigger with that of the "id" attribute value you assign to the effect trigger.
5. Replace the "ec" attribute value of "1160" with "1100" for all of the pasted lines. We have now fully assigned the "1100" event code to match that of the triggers from the "1160" event code. Yay!
6. Repeat lines 3-5 for the other two remaining event codes (1140 and 2100). Remember to assign unique "id" attribute values for each line and match the "refid" attribute accordingly.
We are done! We should now have a Gandalf that uses city-attack animations and effects for all of his attacks. Now to test the new unit in the game!
Creating a mod in ModBuddy is not in the scope of this tutorial; reference Deliverator's tutorial from above or one of the other tutorials if you do not know how to create a mod using ModBuddy. I have included sample XML files to build the test mod. Of note, I added <RangedCombat> and <Range> tags to the GameData so that Gandalf will also behave as an archer (i.e., a ranged unit) vice that of a melee unit. This is a mod for unit testing purposes only and not intended for any other purpose.
You will need the Gandalf_M1.fxsxml and fx_triggers_gandalf_m1.ftsxml files created from this tutorial. All other files required for the test mod are included with the tutorial download.
Start the game and load the mod. If you used the sample XML files created for this tutorial you will see "Fireball Wizard" as a unit option that will build in one turn. Select it and you should be able to test the unit on the next turn!

This concludes the basic tutorial on creating custom units using existing Civ V unit effects. In the next tutorial I will go into some more advanced methods and techniques that I have used, which are certainly far from exhaustive.
I want to see your unique creations - please post them in this thread!
Summary
This is a tutorial that provides instructions to apply various effects to a unit by using effects from other existing Civ V units. For example, in this tutorial we will be using the Gandalf Wizard unit (which uses Scout animations and effects) and demonstrating how it can alternately use city-attack effects for all of its basic attacks to give the appearance of a spellcasting unit. An advanced tutorial will additionally apply Dromon fire, rocket artillery, and Giant Death Robot (GDR) autocannon and rocket effects. Once the technique is understood, virtually any combination of effects may be used.
Prerequisites
This tutorial assumes a basic understanding of unit creation tools (NexusBuddy, Granny Viewer, Civ V ModBuddy) and some idea of the underlying unit mechanics (defined by .gr2, .fxsxml, and .ftsxml files). A working knowledge is not necessary and this tutorial will not require any graphic conversion tools or software (as we will only be modifying text) - but understanding the entire process is useful if you wish to customize unit effects. Therefore, if you wish to better understand how units are converted and modified before delving in, I would highly encourage you to start with Deliverator's excellent tutorial of the unit conversion process which is located here.
Caveats
There are two major issues with modifying unit effects. First, some effects (such as the Byzantine Dromon's fire effect, which we will discuss in detail in the advanced tutorial) use unique bones that assist with creating the effect. So for units requiring these, unless you are creating custom animations that can add this unique bone animation into the model, you will not get the desired effect. Fortunately, most effects only require a single point of origination which can be assigned to any bone desired.
Software/Tools Used
For this tutorial you will need to unpack the Civ 5 art resources (steps 1-4) and have the following software installed:
- Nexus Buddy 2 - make sure you are using a later version (with integrated Granny Viewer). I strongly recommend the latest version!
- Sid Meier's Civilization V SDK (which contains ModBuddy) - downloaded from Steam
- An XML or text editor (I highly recommend Notepad++ or another XML editor, but Notepad or any text editor will still work); alternately, you can edit from ModBuddy
- The tutorial files, downloaded here.
OK, life is short and this boring intro is getting long. So now it's time for the fun stuff!
SECTION I: Gathering the Requisite Files
For purposes of this tutorial we are going to use the Gandalf Wizard unit. This unit is rigged to Civ V Scout animations, so for now it is limited to the capabilities of a scout unit. However, Gandalf is not a scout - he is a wizard! Also, unfortunately for our Gandalf, the stock Civilization V game doesn't use
City-attack torch projectiles - Fireball
Rocket Artillery - Magic missiles (REALLY, REALLY BIG magic missiles!!!)
Byzantine Dromon fire - Flame strike/ fiery breath
Giant Death Robot autocannon - Chromatic orbs
GDR rockets - Magic missiles (the "not-quite-so-big-as-rocket-artillery" missiles)
XCOM Infantry plasma rifle - Death ray (frickin' laser beams, baby!)
We could go on, but your imagination is beyond the scope of this tutorial
. So, let's get this learnin' thang over with so you can do what you do - however you want to do it.OK, the obvious question is, "how do we get the unit to use Giant Death Robot attacks?" Well, we could rig Gandalf to the GDR skeleton but I think he would look rather stupid lumbering around in the game like an overstuffed Mongo. Besides, we may want multiple effects for the same unit. So the best option is to somehow attach the unit effect to the scout skeleton. Well, why not all of them? Let's gather the source files to take a better look at our unit and the desired effects we want to apply.
Steps:
1. Create a new folder directory to copy source files and serve as our work folder.
2. Go to the Civ V Resource folder that you should have already unpacked (it should be a subfolder of the Civ V installation directory). From there, we will need to find the source unit files for each effect we are going to use and copy them to our work folder. For both tutorials you will need the following source files:
scout.gr2
scout_attacka.gr2
scout_attack_city.gr2
scout_fortify.gr2
scout.fxsxml
fx_triggers_scout.ftsxml
rocketartillery.gr2
rocketartillery_attack_city.gr2
rocketartillery.fxsxml
fx_triggers_rocketartillery.ftsxml
u_byzantium_dromon.gr2
u_byzantium_dromon_attacka.gr2
u_byzantium_dromon.fxsxml
fx_triggers_u_byzantium_dromon.ftsxml
mech.gr2
mech_attacka.gr2
mech.fxsxml
fx_triggers_mech.ftsxml
heavy_infantry_xcom.gr2
heavy_infantry_xcom_attacka.gr2
heavy_infantry_xcom.fxsxml
fx_triggers_heavy_infantry_xcom.ftsxml
Fortunately for you, I have already provided these files for the tutorial so that you don't actually need to get them. But you will need to do this when you are designing your own unit effect combinations. At a minimum, you will need the base .gr2 file plus at least one animation .gr2 that uses the desired effect (often it is an attack animation) as well as the .fxsxml and .ftsxml files.
3. Copy the necessary files for the unit you wish to modify into the work folder. This should consist of the base .gr2, .fxsxml, and .ftsxml files. If the unit uses custom animations, copy them as well. If not, copy the source files for the unit to which it is rigged (e.g., Scout for the Gandalf unit in this tutorial). If for some reason the unit does not have .fxsxml and/or .ftsxml files, don't worry; as long as you know to which Civ V unit your unit is rigged, we can build these files from scratch using copies of the source unit files. For custom units, select an existing Civ V unit that most closely resembles the kind of animations and effects you are trying to achieve.
4. Using NexusBuddy, open every .gr2 file that you previously copied from the Resource directory and then click Save to overwrite it. Otherwise, they will not open in the Granny Viewer (the tutorial files have already been prepared so you may skip this step for the tutorial).
Now that we have prepped our work folder with the necessary source files and readied them for use, we can now begin to take a closer look at how these files interact with each other so that we may manipulate them to our purpose.
SECTION II: Examining Unit Animations and Triggers
OK, what the H-E-double-hockey-stick are these files for, anyway? Let's describe each type of file a little bit to better understand how they integrate with each other to form a fully-functioning unit in Civ V:
.gr2 - Granny 3D animation file. For our purposes, this file contains the bone (skeleton), mesh, texture, and animation information for the unit. The base .gr2 defines the mesh and the animation .gr2's define the deformation (i.e., animation) of the mesh for each specified action.
.fxsxml - This is a text/XML file that defines the base .gr2 to use and which .gr2 animation file to use for a corresponding action in the game. Each animation is assigned one or more 4-digit event codes for a particular action. For example, when a unit attacks a city it will likely use its city-attack animation; the event codes in the game for city-attacks (e.g., 1160 & 1180) are therefore assigned to that animation. It also defines which "trigger" (.ftsxml) file to use and which bones to assign for those triggers in that file. This file serves other purposes as well but they are beyond the scope of this tutorial.
.ftsxml - Another text/XML file that assigns "triggers" (i.e., sounds, effects, transfers, and actions) for each event code. Initiating an action in the game will "trigger" the corresponding attributes to execute. For example, attacking a city will trigger certain sounds and effects, such as the torch projectile, and these are defined within this file. This file will be the heart and soul of this tutorial and we will be exploring it in greater detail.
The reality is that these files are only part of the process; much of the process we are more-or-less still unable to manipulate. So we have to stay within the realm of that which we can manipulate. So let's begin by looking at our Gandalf "scout" unit and better understand how he works.
Steps:
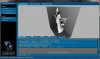
1. Using NexusBuddy, open the Gandalf_M1.gr2 file and click View to open the Granny Viewer.
2. We are interested in two things with the .gr2 file: the bone names and the animations. We can view all of this from the Granny Viewer. First, let's look at the bones. Right-click in the scene preview and select "Skeletons" from the menu. The left sidebar changes to the Skeleton Display. From that side menu select "Bone Connectors" and "Bone names" and then adjust the scene preview window to get a better display of the bones in the upper torso.
3. This is the skeleton/bones of our unit which tell the animations what to move (deform) when making an action. Consequently, since Gandalf was rigged using the Civ V scout skeleton, it is also identical to the scout skeleton. That means that we should be able to apply any of the scout's animations to Gandalf and he should animate perfectly in the Granny Viewer. Let's find out! In the Granny Viewer, click on the "Animation List" tab. Now select the 3 scout .gr2 animation files from our work folder (not the base "scout.gr2", only "scout_attacka.gr2", "scout_attack_city.gr2", and "scout_fortify.gr2") and drag-and-drop the files into the "empty slot" field in the bottom center pane. You should see a preview of them working in the Granny Viewer. Nice!
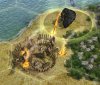
4. OK, let's start with a simple custom effect for Gandalf. The city-attack torch projectiles actually make pretty decent fireballs, so how can we use that effect for every attack that Gandalf makes and not just for a city-attack? We begin by taking a closer look at the city-attack animation. In the Granny Viewer, click on the preview animation for "scout_attack_city.gr2" and reorient the scene preview to get a closer look. You will see that the city-attack shows Gandalf making a throwing action. That is because most melee units show the effect of throwing torch projectiles at the city and not using a weapon. Well, if the torch projectiles are thrown from the hand, then it follows that the effect will originate from the bone in the hand.
5. Upon closer inspection you will see that the name of the bone is "Base HumanRPalm" (if you cannot see it because of the animation, click on "Back to Main Menu" in the top-left corner of the Granny Viewer, then select "Animation Preview" and then "Stop All Animations." Remember the name of this bone; we will be seeing it again. Keep the Granny Viewer open.
6. Time now to open the "scout.fxsxml" file. It opens with any text editor (preferably an XML editor like NotePad++). Open it and we see a lot of instructions for the scout.gr2 animations that we were just viewing with our Gandalf_M1.gr2. As a matter of fact, the Gandalf.fxsxml file for this tutorial will be created from a copy of the scout.fxsxml file and then editing it. It uses scout animations so those are the base instructions that we will use for Gandalf. Now, however, we want to edit those instructions so that we can make him a spellcaster.
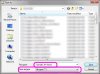
7. From your text editor, save the name of the file as Gandalf_M1.fxsxml to our work folder (usually by selecting File | Save As... from the menu). Make sure you type the correct extension name (.fxsxml) and make sure the "Save As Type" pulldown is selected as "All Types (*.*)" or similar so that it doesn't get a .txt or other unwanted file extension.
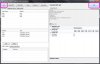
8. Now let's edit our new Gandalf_M1.fxsxml file (for Notepad++ users, go to Language | XML to view this file as an XML for easier reading). We start first by renaming the base .gr2 file from Scout.gr2 to Gandalf_M1.gr2.
9. Next we need to label our texture files. For the scout unit there are two texture files: one diffuse reflection texture (Scout03_DIFF.dds) and it's corresponding specular reflection texture (Scout03_SREF.dds). For Gandalf there are four: three diffuse reflection textures (WIZARDM1_MAP00.dds, WIZARDM1_MAP01.dds, WIZARDM1_MAP02.dds) and a single specular reflection texture named black_4x4.dds. What's not important (for this tutorial) is what these texture files are and how they function (apart from displaying the "skin" of our model); what is important is that they are added to this file. Delete the 2 scout files and replace them with the 4 texture files for Gandalf. The remaining texture files listed in the file (Unit_Environment_Dull.dds, Unit_Environment_Sharp.dds, Unit_Irradiance.dds) are standard for all units in Civ V; do not modify these. If you do not know which files your model uses, you can find out in NexusBuddy; select the Edit tab and inspect each material on the list.
10. OK, a little foreshadowing of things to come: we will need to create a custom trigger file (.ftsxml) for Gandalf in order for him to make custom effects that are different from those of a scout. So, in our current Gandalf_M1.fxsxml file we need to identify the name of a unique trigger file. On line 48 of our file we see the entry for the current scout trigger file "FX_Triggers_Scout.ftsxml." Replace the name of this file with "FX_Triggers_Gandalf_M1.ftsxml" to represent the name of the file we will create in the next step. Keep the .fxsxml file open.
11. From our work folder, create a copy of the "fx_triggers_scout.ftsxml" file. Rename the copy to match the line entry from Step 10 (fx_triggers_gandalf_m1.ftsxml). As you may notice, the case of these files is different; this does not matter as case is irrelevant to the .fxsxml file. Do ensure that the spelling is correct, however.
12. Open the newly-renamed fx_triggers_gandalf_m1.ftsxml file with your text editor. No peeking!
Now, you should have the "Gandalf_M1.gr2" file with scout animations running in the Granny Viewer and have both the "Gandalf_M1.fxsxml" and the "fx_triggers_gandalf_m1.ftsxml" files open. In the next section is where the magic begins! <Ahem>, pardon my pun....
SECTION III: Modifying the .fxsxml Event Codes
In the last section I got you anxious to create a custom effect for Gandalf so that all of his attacks mimicked the city-attack animation and effects. So, let's start to make it happen!
To quickly recap, from the information we gathered thus far we have determined that:
- The animation file for scout city-attacks is scout_attack_city.gr2.
- The bone from the scout's skeleton used to perform the city-attack is named "Base HumanRPalm."
- The .fxsxml file lists the animations used for the unit and assigns corresponding event codes for each action.
- The .ftsxml file assigns sounds and effects for each event code.
From the above information we can see that the logical process to make Gandalf use city-attack animations and effects for all of his attacks would be to re-assign the event codes from ALL of the scout's attack animations to the scout_attack_city.gr2 animation. Subsequently, we will need to modify the actual event code effects for the other attack event codes to match the event code(s) for city-attack effects. In order to do this we will need to edit both the .fxsxml and .ftsxml files. In this section we will look at the .fxsxml file in greater detail and then modify it as necessary in order to create our new effect.
Steps:
1. In the Granny Viewer, we can see from selecting the animation for scout_attacka.gr2 that it uses the staff in a striking motion. From this, we realize that it will not be a suitable attack animation to simulate fireball effects for our spellcaster. So, we know that we can safely omit it from the list of animations in the Gandalf_M1.fxsxml file. It is obvious that the scout_attack_city.gr2 is the one we will use for all of the scout's attacks. Close the Granny Viewer and NexusBuddy; we have the information we need and no longer require them to create our custom effect.
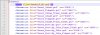
2. Go to the Gandalf_M1.fxsxml file and find the animation for "Scout_AttackA.gr2" (line 23 for Notepad++ users). The first part of the line calls the animation file and the last part defines the event code for the animation. That 4-digit event code is "1100." We have already determined that we will not use the animation file; what we need to do is re-assign the event code to another animation file. As you may have guessed, that animation file is "Scout_Attack_City.gr2" (on line 25).
3. There are two event codes listed for Scout_Attack_City.gr2; "1160" and "1180." Remember these numbers - we will be using them later! From the previous step we are going to add event code "1100" to this line (the numbering order is irrelevant).
4. Now, delete the entire line containing "Scout_AttackA.gr2" (line 23).
5. Notice that there are other animations that appear to be attack animations. For brevity's sake I did not add them to this tutorial to view in the Granny Viewer, but nevertheless they will also need to have their event codes added to the "Scout_Attack_City.gr2" animation line and then be deleted. There are two: "Scout_AttackB.gr2" (which is now line 23 since we have deleted "Scout_AttackA.gr2") and "Scout_Charge_Attack.gr2" (on line 22). Add their event codes ("2100" and "1140") to the "Scout_Attack_City.gr2" event codes and then delete the two animation lines from the file.
6. We should now have all attack animation event codes defined by the city-attack animation with no other attack animations listed in our .fxsxml file. We are finished editing the .fxsxml file, but before we move on to the .ftsxml file let's review one last part of this file. Remember that the bone used for city-attack animations appeared to be "Base HumanRPalm" in the Granny Viewer? We need to ensure that it is referenced in this file. Go to lines 38-44 in our file to view the <BoneUsage> tag. You will see it listed on line 43. As suspected, it is already defined. You may wish to create an effect using a bone that has not been defined in this file (like frickin' laser beams shooting out of his eyes!!!). If you did you would need to add the respective bone to the list. Save the file but keep it open; we will need to reference it later.
SECTION IV: Modifying the .ftsxml File
OK, in the last section we modified the .fxsxml file. So, let's now have our first good look at the "fx_triggers_gandalf_m1.ftsxml" file. It should already be open and still be an exact duplicate of the scout triggers file. That is about to change!
The file begins with a series of repetitive elements similar to the following:
<event_track ec="1180">
<track id="1" name="Sound"/>
<track id="2" name="Effect"/>
<track id="3" name="Transfer"/>
<track id="4" name="Action"/>
</event_track>
The stuff we want to edit in the .ftsxml file is actually down at the bottom after the <triggers> tag; the elements for each event code at the top part of the file will most likely never be changed. They do impart one piece of useful information for us that we will need to remember, however, so let's discuss this before we begin editing the file. There are four tracks: Sound ("1"), Effect ("2"), Transfer ("3"), and Action ("4"). They are the same for all event codes. Now, look at the first line after the <triggers> tag (line 204). In that line you will see type="FTimedTriggerSound" and track="1" attributes. A couple of lines further (line 206) and you see will type="FTimedTriggerAction" and track="4" attributes. Notice how they match the event code elements per their respective type: Sound ("1"), Effect ("2"), Transfer ("3"), and Action ("4"). When editing this file sometimes things may get a bit messy but you must always ensure that these attributes correspond correctly. Boring? Yes - but also important.
OK, moving on! Or, actually, moving back a bit first. Remember in the last section the two original event codes for Scout_Attack_City.gr2? Of course you do, because I told you to remember them! Nevertheless, I will repeat them; they are "1160" and "1180" and, not surprisingly, they can be found within the <triggers> element of the file. Remember also that the .ftsxml file's purpose is to assign triggers to event codes. Oh, and that we want Gandalf to use the city-attack for ALL of his attacks. So, what do think we need to do next? That's right, we want to copy the "1160" and/or "1180" event code attributes to the other three actions that we have assigned as city-attacks in the .fxsxml file (1100, 1140, and 2100). Without looking at each event in greater detail I will simply let you know in advance that the triggers for "1160" and "1180" are not identical but they are very similar. So, for this tutorial let's just pick "1160" as the event code that we will copy (you could use either or both; it's up to you).
Now, we know what we need to do - so onward!
Steps:
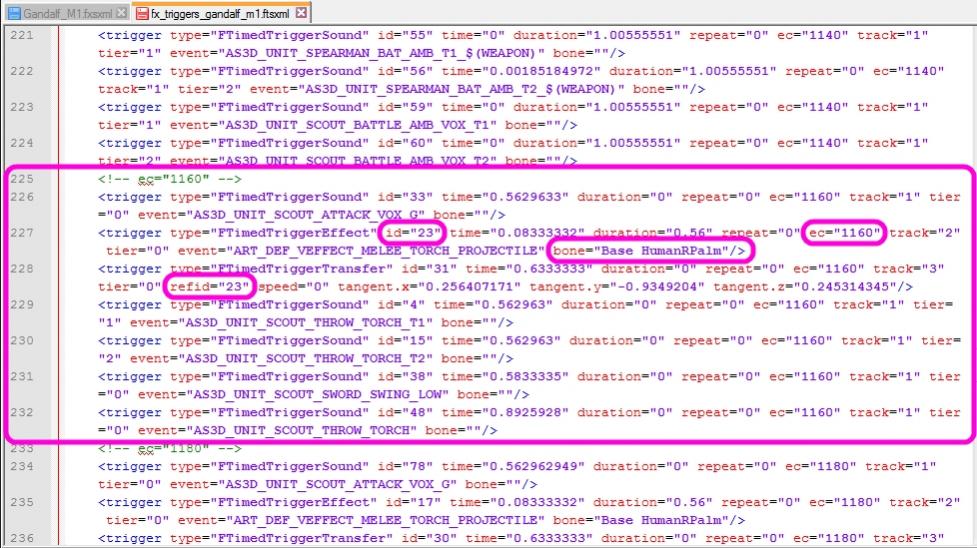
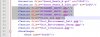
1. We need to find all of the instances of the "1160" event. Place your cursor at the end of line 203 and then use Ctrl+F to find "1160" within the <triggers> element of the file. Doing so reveals seven lines altogether: lines 236, 270, and 272-276. But what a mess - the event codes are all over the place! So for this tutorial I have re-sorted them all by event code: they are in the "triggers_gandalf_sorted.ftsxml" file. For purposes of this tutorial only, copy the contents of this file and paste it over the <triggers> element (lines 203-281) of our "fx_triggers_gandalf_m1.ftsxml" file (be careful not to copy over the closing tag at the end). You may also wish to re-sort event codes with files that you modify but it is not necessary.
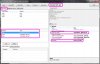
2. Now that we have all of our "1160" event triggers located (which should now be on lines 226-232 just after the comment tag I inserted for clarity), let's examine them more carefully. There are 5 sound triggers, 1 effect trigger and 1 transfer trigger. The first item of importance is that they each have a unique "id" attribute; to be more precise, every trigger in the <triggers> element must have a unique "id" attribute. Second, on line 228 the transfer trigger has a "refid" attribute with a value of "23" which is a reference to the effect trigger "id" attribute on line 227. Finally, the effect trigger on line 227 has a "bone" assignment with a value assigned to "Base HumanRPalm" as defined from the .fxsxml file. This is the value we would change if we wanted the effect to originate from another location on the model (such as the staff or the head). We need to consider everything we have just mentioned whenever we apply these event triggers to other event codes.
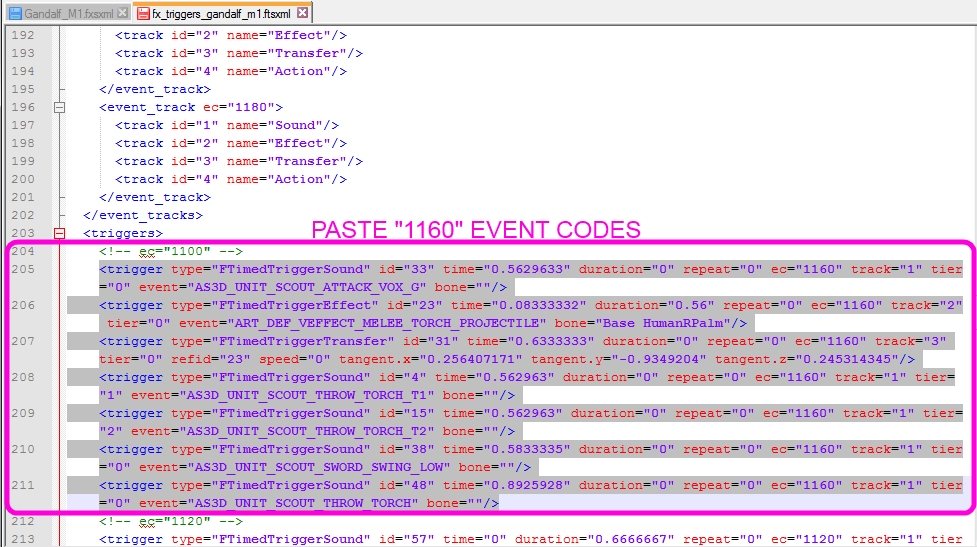
3. Since we have re-assigned event code "1100" to be a city-attack code, we will replace the existing lines for this event code with the "1160" city-attack event code triggers. Delete the lines for event code "1100" and then Copy+Paste the "1160" event codes where the "1100" event code triggers were.
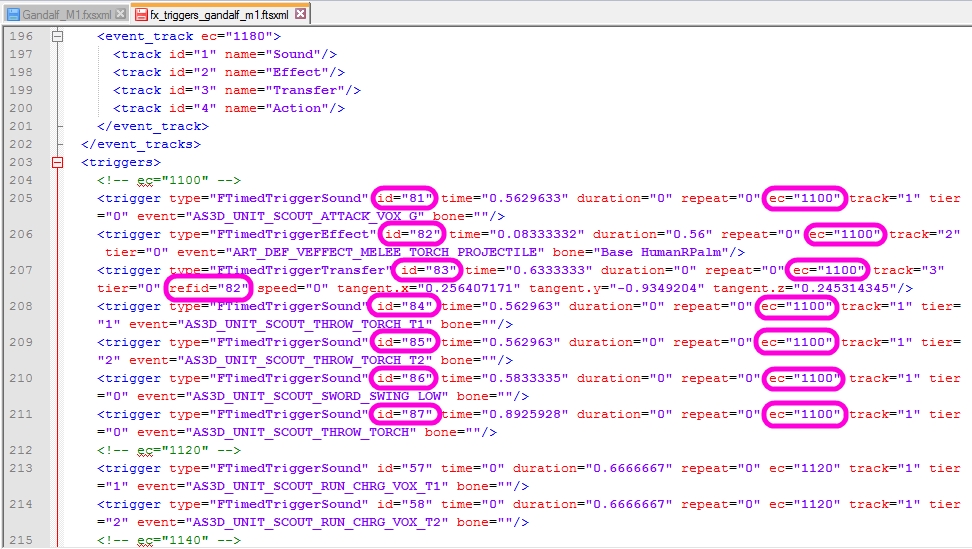
4. There must be unique "id" values for all event triggers (EDIT: this is not entirely true as will be discussed in an advanced tutorial, but for the sake of the basic tutorial it is). So, we need to replace the "id" attribute values for the recently pasted event codes with unique values. I have already determined that the highest "id" attribute value within this particular <triggers> element is "80" and therefore any value higher than this number will be unique. This will not be the case with all .ftsxml files so you will have to predetermine this before re-assigning values. Replace the existing "id" attribute values for all 7 pasted lines, starting with "81" and remembering to match the "refid" attribute value on the transfer event trigger with that of the "id" attribute value you assign to the effect trigger.
5. Replace the "ec" attribute value of "1160" with "1100" for all of the pasted lines. We have now fully assigned the "1100" event code to match that of the triggers from the "1160" event code. Yay!
6. Repeat lines 3-5 for the other two remaining event codes (1140 and 2100). Remember to assign unique "id" attribute values for each line and match the "refid" attribute accordingly.
We are done! We should now have a Gandalf that uses city-attack animations and effects for all of his attacks. Now to test the new unit in the game!
Creating a mod in ModBuddy is not in the scope of this tutorial; reference Deliverator's tutorial from above or one of the other tutorials if you do not know how to create a mod using ModBuddy. I have included sample XML files to build the test mod. Of note, I added <RangedCombat> and <Range> tags to the GameData so that Gandalf will also behave as an archer (i.e., a ranged unit) vice that of a melee unit. This is a mod for unit testing purposes only and not intended for any other purpose.
You will need the Gandalf_M1.fxsxml and fx_triggers_gandalf_m1.ftsxml files created from this tutorial. All other files required for the test mod are included with the tutorial download.
Start the game and load the mod. If you used the sample XML files created for this tutorial you will see "Fireball Wizard" as a unit option that will build in one turn. Select it and you should be able to test the unit on the next turn!
This concludes the basic tutorial on creating custom units using existing Civ V unit effects. In the next tutorial I will go into some more advanced methods and techniques that I have used, which are certainly far from exhaustive.
I want to see your unique creations - please post them in this thread!
Attachments
-
Tutorial.zip864.5 KB · Views: 785
-
 II_3a.jpg362.9 KB · Views: 6,920
 -
 II_5a.jpg174.9 KB · Views: 7,003
 -
 II_7a.jpg111.3 KB · Views: 6,849
 -
 II_8a.jpg135.9 KB · Views: 6,708
 -
 II_9a.jpg99.9 KB · Views: 6,727
 -
 Gandalf_01.jpg265.5 KB · Views: 6,628
 -
 II_2a.jpg169.3 KB · Views: 6,842
 -
 II_1a.jpg212.5 KB · Views: 6,930
 -
 II_1b.jpg380.5 KB · Views: 7,048
Last edited:

")