Deliverator
Graphical Hackificator
Update 6th May 2013: I'm going to do a better version of this that goes into a higher level detail on rigging Civ 4 meshes to Civ 5 skeletons. Watch this space!
This is a tutorial on how to rig a Civ 4 unit mesh to a Civ 5 unit skeleton and animations.
The Civ 5 Skeleton Template Library
Here is a collaborative Google spreadsheet for tracking which units have been extracted to .blend files by the community to use as unit templates in Blender. You'll need to select an appropriate Civ 5 unit to rig your Civ 4 unit mesh to.
To see how more templates can be created see this thread.
Making your Civ 4 unit use Civ 5 animations in Civ 5
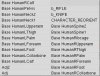
1) First load the unified NIF you have made in Stage 2 of the other tutorial. Using Nifskope rename the bones so that they have the Civ 5 equivalent names. The purpose of this is that we don't have to do as much work with Vertex Groups when we merge this unit with our Civ 5 template in Blender. To rename a bone just double click on the name then you can either type or (easier) paste in the new name.

Rename as follows:
i) Some Civ 4 bones names begin with Bip01 instead of BIP - it should be easy to figure out the equivalents.
ii) Don't worry if your model doesn't have some of these bones like Clavicles or Neck - it doesn't really matter - just rename the ones out this list you do have.
iii) Any bones names not in this list (like BIP and BIP Footsteps) don't need to be renamed.
Here's the list of target names on its own for easy copy-and-pasting into Nifskope:
After you've finished the renaming in Nifskope save your NIF as a new file.
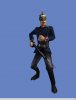
2) Start up two separate instances of Blender. In the first, open civ5_minuteman_template.blend from the Skeleton Template Library. In the second, import the NIF that you were just working with in Nifskope.
3) In the blender instance that has your imported NIF, right click on the mesh in the 3D window so that only it is selected and not the skeleton. Now we are going to use the Copy and Paste script to copy the mesh into the other Blender instance.
For the Copy and Paste script to work you need to save your file as a .blend first - so press Ctrl-S or use the File menu to save it. Once you've done that in Scripts window go to Scripts -> Objects -> Copy and Paste Objects then select Copy object(s) to buffer. (If the option to Copy and Paste Objects isn't there then either you have installed the attached scripts or you need to restart Blender)

4) Now in the other Blender instance where we loaded civ5_minuteman_template.blend, in the Scripts window go to Scripts -> Objects -> Copy and Paste Objects then select Paste object(s) from buffer. A small copy of your Civ 4 unit should appear.
Now before you do anything else, join the newly pasted mesh with the larger mesh - you may have to use Shift-click to multi-selected in the Outliner window. Ctrl-J will join the two meshes together. This is to fix the paste mesh in place in terms of position and rotate - if you try and do anything to it without doing this the rotation and position usually jumps. You can then go into Edit Mode use the Material selector to select only the parts of the mesh you pasted in and press P to separate them again. Now you have two separate objects again which is easier to work with for the next step.

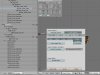
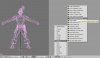
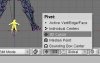
5) Now we need to match our pasted mesh to the position of the one that came with the template. First, to scale the model to the correct proportion it is useful do the following, (i) Snap the Cursor to the origin using Shift-S and Snap Cursor to Grid. (ii) Switch the Pivot to 3D Cursor as shown below. Now you can use S to scale and the model with scale from the floor up rather than from its centre point.


(In the screenshots I didn't split the mesh into two again as described in Step 4 - I thought of that idea later)
Now it is a question of trying to match the mesh accurately to the pose of the template. Some tips for doing this.
i) Use Numpad 1, 3 and 7 keys to check things from all angles. Often the alignment will look fine from one angle but needs fixing in another. Remember you can use G,X or G,Y or G,Z to move all or parts of a mesh along a particular axis.

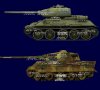
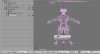
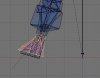
ii) You can use 3D Cursor pivot to rotate parts of the mesh around a specific point - this is useful to rotate of arms around shoulder sockets, legs around hips or to fix the rotation of ankles as shown:

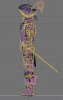
iii) Positioning hands really accurately is important if there are going to be holding weapons or something else:

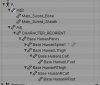
6) Once you've matched the position of the mesh, you can delete the templete mesh leaving just you new one. Ctrl-J join the mesh back with weapons if needs be. Then go through the Vertex Group names and make sure there are no names that refer to Civ 4 bones. For the Minuteman the list should be this - it should be the same as when you first loaded it - if merging your new mesh has added to this list then just delete the surplus nodes. If you don't then your FBX export will probably be scrambled.

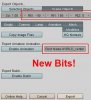
7) Export your FBX. My updated script adds two changes, the ability to set the name of the root bone and the ability to enter any rotation values you like for X, Y and Z. If you are rigging to the Minuteman template you won't need to change anything.

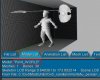
If you want to try out your model with different Civ 5 animation set you'll need to get the Root Bone name from the Model List tab in Granny Viewer for the unit you want to use the animations of. (This is how we can expand the template library but more on that later).

8) Convert your FBX into a GR2 using Indiestone NexusBuddy - I use the older v0.1 version as I find it quicker for this - set your textures and material and use Save not Export - you shouldn't need the Smart Exporter tab at all.
(I recommend you give your FBX a short name like a1.fbx as you'll likely need to repeat this step several times to get things looking right with the Civ 5 animations. When you press Save in NexusBuddy the name of the GR2 will be the same as the FBX.)
9) Make a new fxsxml using the Minuteman one as a base - you only need to change the second line to, for example:
Everything else can stay the same.
10) Load up your fxsxml in Asset Viewer in Nexus you can use the 3D Viewer and Animation Triggers to test your converted model with the Civ 5 animations.
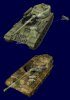
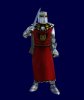
11) By making adjustments to the skeleton, mesh and vertex groups in Blender then repeating steps 7 to 10, you should eventually be able to make new unit using Civ 5 animations like this one.

Old Irrelevant Info:
This is a tutorial on how to rig a Civ 4 unit mesh to a Civ 5 unit skeleton and animations.
The Civ 5 Skeleton Template Library
Here is a collaborative Google spreadsheet for tracking which units have been extracted to .blend files by the community to use as unit templates in Blender. You'll need to select an appropriate Civ 5 unit to rig your Civ 4 unit mesh to.
To see how more templates can be created see this thread.
Making your Civ 4 unit use Civ 5 animations in Civ 5
1) First load the unified NIF you have made in Stage 2 of the other tutorial. Using Nifskope rename the bones so that they have the Civ 5 equivalent names. The purpose of this is that we don't have to do as much work with Vertex Groups when we merge this unit with our Civ 5 template in Blender. To rename a bone just double click on the name then you can either type or (easier) paste in the new name.
Rename as follows:
Code:
BIP Pelvis -> Base HumanPelvis
BIP L Thigh -> Base HumanLThigh
BIP L Calf -> Base HumanLCalf
BIP L Foot -> Base HumanLFoot
BIP R Thigh -> Base HumanRThigh
BIP R Calf -> Base HumanRCalf
BIP R Foot -> Base HumanRFoot
BIP Spine -> Base HumanSpine1 (Note!)
BIP Spine1 -> Base HumanSpine2 (Note!)
BIP Neck -> Base HumanNeck1
BIP Head -> Base HumanNeck2
BIP L Clavicle -> Base HumanLCollarbone
BIP L UpperArm -> Base HumanLUpperarm
BIP L Forearm -> Base HumanLForearm
BIP L Hand -> Base HumanLPalm
BIP R Clavicle -> Base HumanRCollarbone
BIP R UpperArm -> Base HumanRUpperarm
BIP R Forearm -> Base HumanRForearm
BIP R Hand -> Base HumanRPalm
i) Some Civ 4 bones names begin with Bip01 instead of BIP - it should be easy to figure out the equivalents.
ii) Don't worry if your model doesn't have some of these bones like Clavicles or Neck - it doesn't really matter - just rename the ones out this list you do have.
iii) Any bones names not in this list (like BIP and BIP Footsteps) don't need to be renamed.
Here's the list of target names on its own for easy copy-and-pasting into Nifskope:
Spoiler :
Base HumanPelvis
Base HumanLThigh
Base HumanLCalf
Base HumanLFoot
Base HumanRThigh
Base HumanRCalf
Base HumanRFoot
Base HumanSpine1
Base HumanSpine2
Base HumanNeck1
Base HumanNeck2
Base HumanLCollarbone
Base HumanLUpperarm
Base HumanLForearm
Base HumanLPalm
Base HumanRCollarbone
Base HumanRUpperarm
Base HumanRForearm
Base HumanRPalm
After you've finished the renaming in Nifskope save your NIF as a new file.
2) Start up two separate instances of Blender. In the first, open civ5_minuteman_template.blend from the Skeleton Template Library. In the second, import the NIF that you were just working with in Nifskope.
3) In the blender instance that has your imported NIF, right click on the mesh in the 3D window so that only it is selected and not the skeleton. Now we are going to use the Copy and Paste script to copy the mesh into the other Blender instance.
For the Copy and Paste script to work you need to save your file as a .blend first - so press Ctrl-S or use the File menu to save it. Once you've done that in Scripts window go to Scripts -> Objects -> Copy and Paste Objects then select Copy object(s) to buffer. (If the option to Copy and Paste Objects isn't there then either you have installed the attached scripts or you need to restart Blender)
4) Now in the other Blender instance where we loaded civ5_minuteman_template.blend, in the Scripts window go to Scripts -> Objects -> Copy and Paste Objects then select Paste object(s) from buffer. A small copy of your Civ 4 unit should appear.
Now before you do anything else, join the newly pasted mesh with the larger mesh - you may have to use Shift-click to multi-selected in the Outliner window. Ctrl-J will join the two meshes together. This is to fix the paste mesh in place in terms of position and rotate - if you try and do anything to it without doing this the rotation and position usually jumps. You can then go into Edit Mode use the Material selector to select only the parts of the mesh you pasted in and press P to separate them again. Now you have two separate objects again which is easier to work with for the next step.
5) Now we need to match our pasted mesh to the position of the one that came with the template. First, to scale the model to the correct proportion it is useful do the following, (i) Snap the Cursor to the origin using Shift-S and Snap Cursor to Grid. (ii) Switch the Pivot to 3D Cursor as shown below. Now you can use S to scale and the model with scale from the floor up rather than from its centre point.
(In the screenshots I didn't split the mesh into two again as described in Step 4 - I thought of that idea later)
Now it is a question of trying to match the mesh accurately to the pose of the template. Some tips for doing this.
i) Use Numpad 1, 3 and 7 keys to check things from all angles. Often the alignment will look fine from one angle but needs fixing in another. Remember you can use G,X or G,Y or G,Z to move all or parts of a mesh along a particular axis.
ii) You can use 3D Cursor pivot to rotate parts of the mesh around a specific point - this is useful to rotate of arms around shoulder sockets, legs around hips or to fix the rotation of ankles as shown:
iii) Positioning hands really accurately is important if there are going to be holding weapons or something else:
6) Once you've matched the position of the mesh, you can delete the templete mesh leaving just you new one. Ctrl-J join the mesh back with weapons if needs be. Then go through the Vertex Group names and make sure there are no names that refer to Civ 4 bones. For the Minuteman the list should be this - it should be the same as when you first loaded it - if merging your new mesh has added to this list then just delete the surplus nodes. If you don't then your FBX export will probably be scrambled.
7) Export your FBX. My updated script adds two changes, the ability to set the name of the root bone and the ability to enter any rotation values you like for X, Y and Z. If you are rigging to the Minuteman template you won't need to change anything.
If you want to try out your model with different Civ 5 animation set you'll need to get the Root Bone name from the Model List tab in Granny Viewer for the unit you want to use the animations of. (This is how we can expand the template library but more on that later).
8) Convert your FBX into a GR2 using Indiestone NexusBuddy - I use the older v0.1 version as I find it quicker for this - set your textures and material and use Save not Export - you shouldn't need the Smart Exporter tab at all.
(I recommend you give your FBX a short name like a1.fbx as you'll likely need to repeat this step several times to get things looking right with the Civ 5 animations. When you press Save in NexusBuddy the name of the GR2 will be the same as the FBX.)
9) Make a new fxsxml using the Minuteman one as a base - you only need to change the second line to, for example:
Code:
<Mesh file="a1.gr2" source="Tool"/>10) Load up your fxsxml in Asset Viewer in Nexus you can use the 3D Viewer and Animation Triggers to test your converted model with the Civ 5 animations.
11) By making adjustments to the skeleton, mesh and vertex groups in Blender then repeating steps 7 to 10, you should eventually be able to make new unit using Civ 5 animations like this one.
Old Irrelevant Info:
Spoiler :
This tutorial assumes you have some followed or understood Stage 2 from the Getting Civ 4 Units into Civ 5 tutorial or have a reasonable degree of Blender know-how to start off with.
In this thread, I am going to go through things in general terms rather than describing particular examples in detail - hopefully this is enough for people to be able to follow, but I'll try and answer any questions that arise.
You will need to add the scripts in the attached zip to your Blender scripts repository. (The bundled export_fbx.py script will be overwritten so you may want to back it up somewhere outside the scripts folder first.)
")