New Unit: Italian Dardo Hitfist.

utahjazz7

Deity
Joined
Dec 17, 2001
Messages
2,068
Location
Toledo, Ohio
This unit is a replacement for Mechanized Infantry. The "real world" unit, which you can read about here, is being produced for the Italian Army. In CivIII terms, it's for the Romans. Well, like always, let me know if anything is missing from the .zip file. Enjoy. :D

Download. New PediaIcons.

 
Man, that was indeed fast :) Good job!

What is your next unit? ;)
 
Originally posted by BeBro
Man, that was indeed fast :) Good job!

What is your next unit? ;)

Well, it was fast because I developed a technique using Adobe Photoshop. Let's see . . . my fidget animation--six frames--took me four minutes to complete the storyboard.

As for my next unit . . . I'm not sure. I was thinking about one of these. The Turkish Cobra for the Ottomans. The Italian Ariete MBT for the Romans. The South African Olifant MBT for the Zulu. I think I'm leaning toward the Cobra because it would be another Mech. Infantry unit, and we have some tanks already.
 
Originally posted by zulu9812
Personally, I'd like to see you do the Challenger 2 for the English ;)

English? Eww. ;) No, Just kidding; I love all people of the British Isles--pretty girls I understand. ;) I might make one in the future, but I want to make sure that no one else is making one, since there have been so many requests for that tank. (When I say no one else, I'm speaking of Boulboulgadol because his tanks are awesome. Although, I haven't seen him around here lately. I sent him a message, asking what his plans are.)
 
nice missile fire animation.

Whats the adobe technique that speeds things up?
 
Originally posted by Kal-el
looks cool, but seems a bit shiny.

Just that one corner in the southwest view is really shiny. I don't know why, but the light is just very strong there. Oh well.
 
Originally posted by Neomega
nice missile fire animation.

Whats the adobe technique that speeds things up?

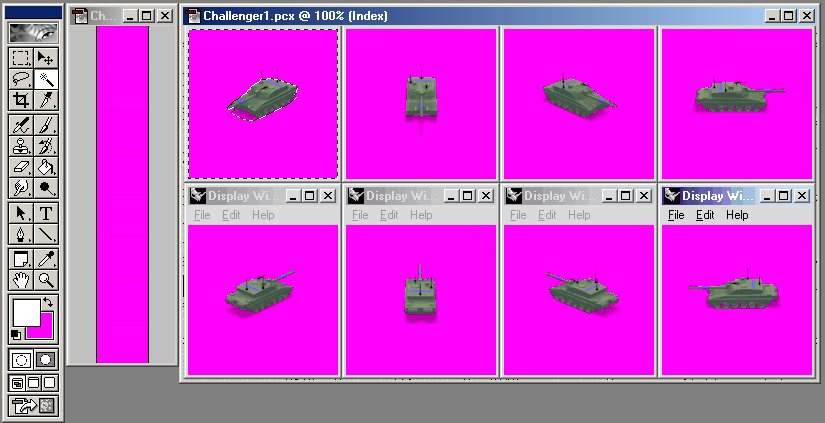
Oh it's nothing special--just a technique I developed. I start by using your tutorial on Rhinoceros and importing the eight directional frame renderings for each step of the animation using Paintshop Pro. When I render though, I change the render properties so that all of the renderings are at 125x125-pixels. I make sure that the windows do not overlap, preserving the 125x125-pixel size. Then I apply palette and save in Paintshop Pro. For instance in the Fidget folder I would have Fidget2.pcx, Fidget3.pcx, Fidget4.pcx, etc. for as many different frames as I have.

I then create a base.flc--there's no use in the game. It's just one frame long and is the beginning frame of all my animations and the end frame of most. From the base.flc file I export storyboards for whatever animations I want to make: Run, Attack, Default, etc. Each storyboard will then have the first frame of each direction filled, but the rest of the squares will be magenta--it's important that the rest of the frames be purely magenta.

Then in Photoshop 6.0 I open one of the storyboards (UnitFidget) and one of the files I saved earlier with the animation frames (Fidget2).

1. In the storyboard, zoom out to where you can see the whole image, but can see all the lines making up the animation squares--usually 33%. Press "W" for the magic wand. Set the tolerance for one. Click in the square where the "SW frame 2" will go. The magic wand will select the 125x125-pixel blank magenta square.

2. Then click in the file containing the animation renderings (Fidget2). Still using the magic wand, click in the magenta around the SW view.

3. Press "M" to bring up the selection tool. Hold "shift" while dragging a box around the SW unit. Now you will have a 125x125-pixel selection.

4. Press "CTRL C" to copy.

5. Click on the Storyboard and press "CTRL V" to copy. The 125x125-pixel unit selection will paste into the 125x125-pixel magenta square you selected earlier. You don't even have to move it.

6. Press "W" to bring up the magic wand, and click on the blank space where the "S frame 2" will go.

7. Repeat for all eight directions and then open the file with the next frame of the animation (Fidget3). Then the next animations (Fidget4) . . .

It's still copy and paste, but it's a lot faster than what I was doing before. Hot-keys, baby! I copy-and-pasted all the animations for my Cobra unit in about 20 minutes. That's pretty quick . . . at least I think it is. Plus, I'm a lot more familiar with Photoshop than Paintshop Pro, so I can manuveur a lot easier. This is a clearly as I can describe it in words--hopefully this will help someone.
 
Originally posted by Steph
Why don't you use CIV3_SBB?

Because this is easier for me than naming and saving every frame of every animation. Plus, I can organize my files anyway I want, rather than how your program recongizes them. Don't get me wrong, your program sounds great; it's just not for me. ;)
 
You say you cahnge the render properties.....
when you render do you get rid of the gray borders somehow?
or does photoshop do that?
 
Originally posted by Neomega
You say you cahnge the render properties.....
when you render do you get rid of the gray borders somehow?
or does photoshop do that?

I'm assuming that you mean the gray window frame. If I'm correct in assuming this, here's what happens. The magic wand--with the tolerance set to one--will basically only select the magenta square. Here's a picture. The picture correlates to step 2: 2. Then click in the file containing the animation renderings (Fidget2). Still using the magic wand, click in the magenta around the SW view.

 
Top Bottom