ControlFreak
Not An Addict, Really
<<The Save>>
Turn Notes/Handoff
Operation Cleanup
There were many parts to this activity but all are nearing an end.
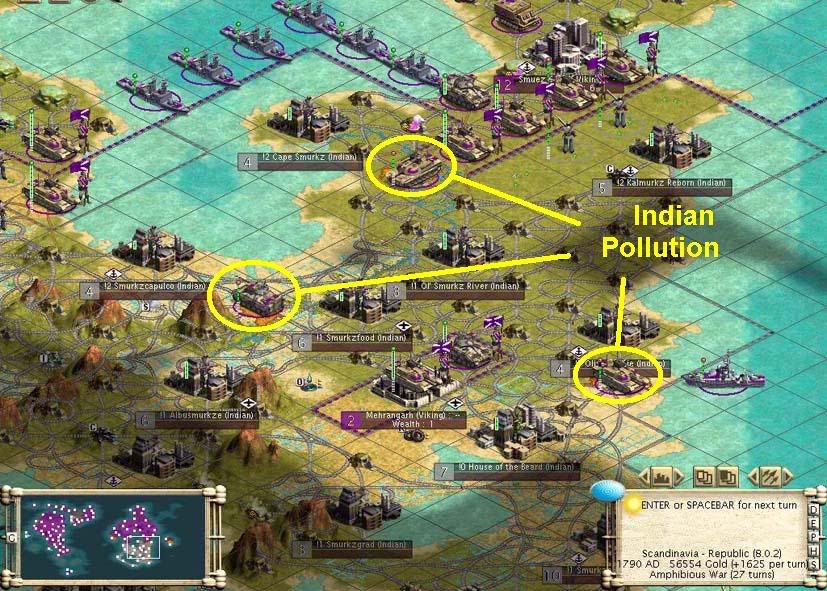
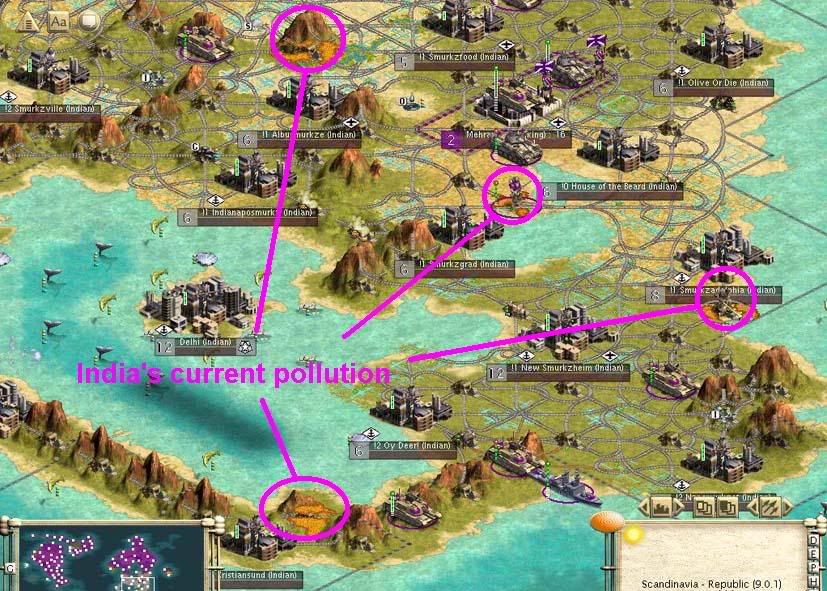
The Land Crew - Where pollution was on our border, I treated it with slaves and covered with a single MA. When they were done, I pulled them back into our territory. Where pollution was deep in indian territory, I marched the workers there, covering them each step of the way with a single MA. There was pollution on a hill and on flatlands. Hills require 12 workers, flatland requires 6. When done they joined up and were headed to a mountain pollution together (requires 18workers).
The Custodian Marines When a pollution was near the shore, a transport or many transports were loaded and sailed to a good disembarkation site. They were covered by a single MA who drove there over land taking advantage of the three move ability. In the case of Deer, there is a section of the Mountain Atoll that is outside of Indian territory. four MA were sent there via the Oe-Hah strikeforce transport and landed on the mountians. They are to be used to cover a worker landing party. There are several transports floating south of Deer as well as one offshore to the West of Kastle and another somewhere near Canal. The three southern transports carry the necessary 18 workers for the Mountain Pollution near Kristian. Don't forget to cover them with at least one MA. The one to the East is for the Adelphia pollution. There is an MA on it's way to cover them.
Trial by Flight Thinking I could send workers by helicopter, I used our spy to steal Advanced Flight from the Ottomans. The spy was caught and killed, but was easily replaced and succeeded on the next try.
Helicopters do not carry workers. Nor do they carry MI or MA, so the only thing they are good for is carrying Infantry or Paratroopers. Neither have a very large defensive number. Still, I was hoping to use the helicopters to airdrop infantry to cover a distant pollution tile. I did a trial run on my last turn so there are two infantry standing on a pollution tile South of Meh.
If they go unmolested through the IBT, then the helicopter is a viable way to cover workers. Then one worker can be disbanded and the infantry ride back on the boat with the workers.
If the infantry draw any kind of attack (because of their lower defensive number) then we might as well put the infantry in the helicopters and rebase to Tadpole where they can be used against spain or america if need be. Worker cover will have to come from MA's moving across Indian territory, or landing from the troop transport (under destroyer cover SW of Kristian).
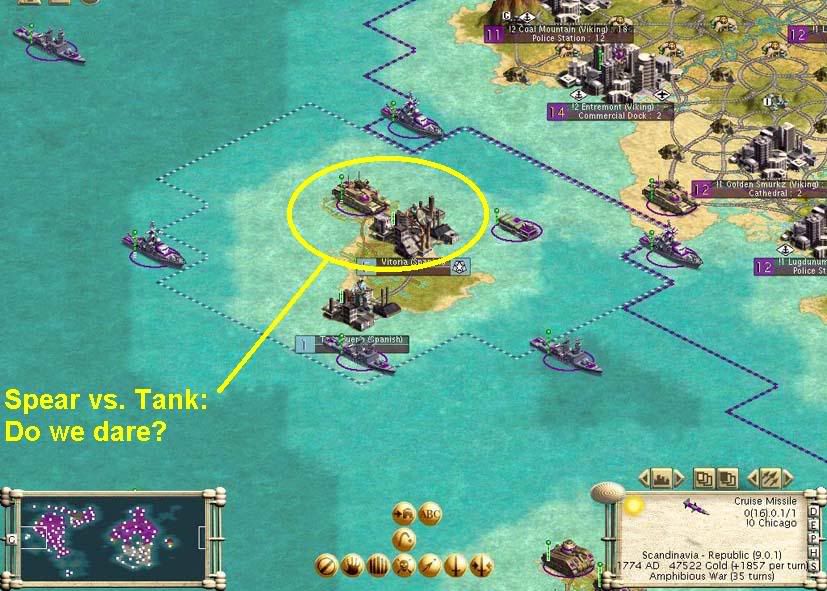
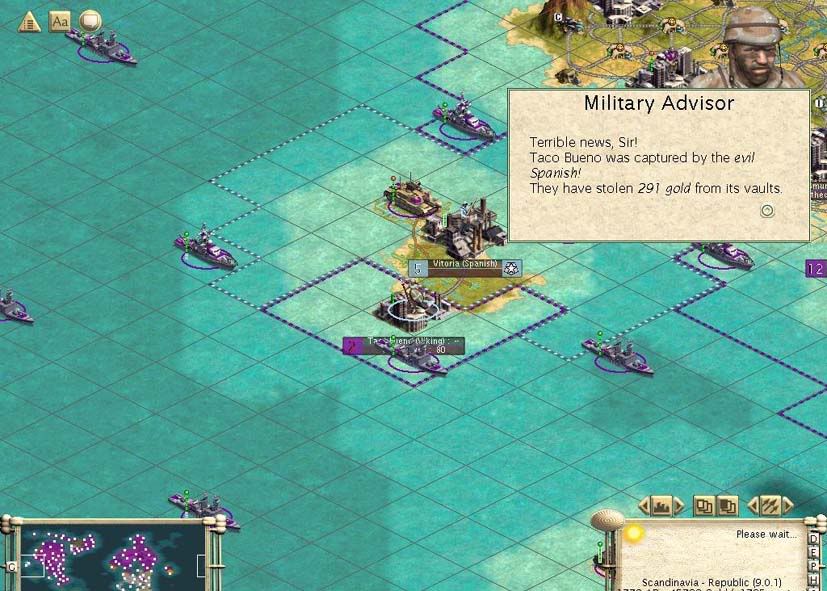
The only tech left is Amphibious Assault. Marines can be scary since we've left coast cities undefended. Marines require rubber. The only civ that has rubber is Spain. To take rubber from them, we need to destroy their capitol.
Since they are at war with us, I hatched a scheme to give them another city on their island and then destroy their city. I've landed two settlers and two MA on their island.
Note that this is a temporary measure. We won't have a way to prevent them from reconnecting to the rubber unless we found a city next to the Rubber on the island. There are settlers building in the south of Tad. Rush one of those and transport it to the island to prevent the connection of rubber. Don't found on top of the rubber incase the city would flip. Just put it next to the rubber and we can pillage the rubber tile.
Moats
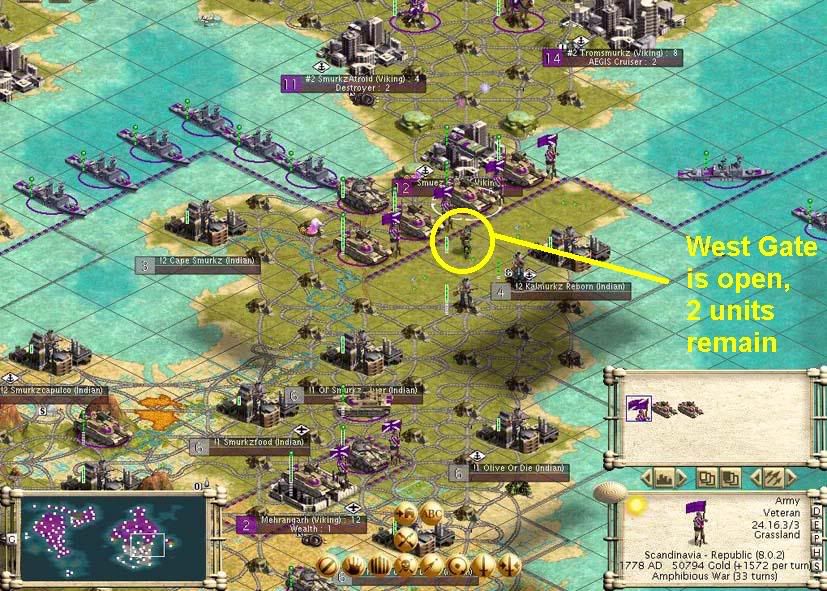
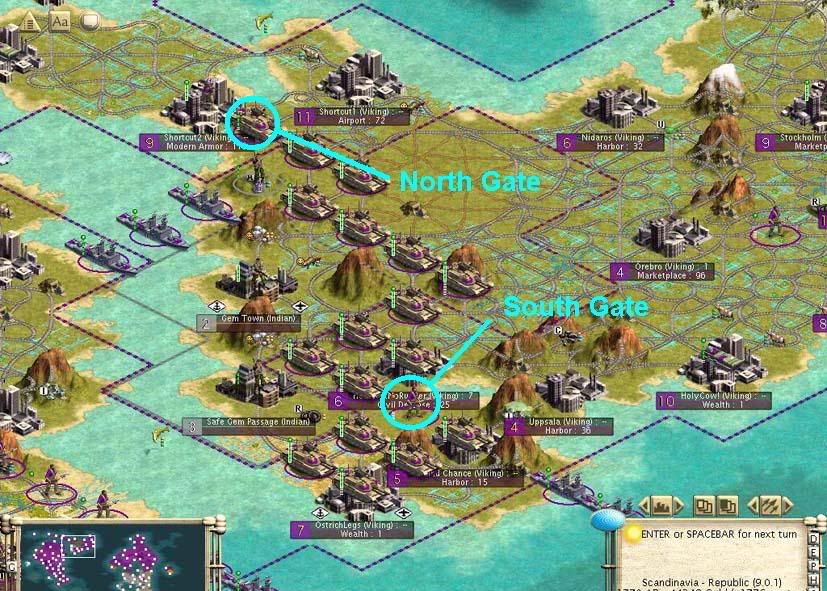
The Smurkz moat works very well. Take the MA Army that is not fortified and move him to the other gate tile. Don't fortify him or you'll forget to move him. Instead, put him in the right spot (He should always end the turn North of an enemy Guerilla) and then hit the spacebar to skip the rest of his turn. He will ask for orders every turn and you can just move him back to the other gate tile.
The Ostrich moat also works well but it's not quite finished. I moved a bunch of workers onto the gate tile so they can road and rail it next turn. It could also use a fortress. (I had been using the Iron Mountain as the gate tile, but it works better using their rubber tile as the moat and the grass to it's East as the gate.) There are two MA named Gatekeeper 1 and Gatekeeper 2.
Ironclad target practice
I found that stealth bombers redline ironclads too often. If we're going to go with a no WW policy in the future, we shouldn't bomb ironclads (or anything) with stealth bombers. I rebased them to MO island incase we want to eliminate the Ottomans at some point.
Most of the ironclads leave Nansmurket or Adelphia and end up near the Aegis/carrier stacks. They don't like attacking Aegis or Elite Destroyers but do attack Veteran Destroyers if in their range. I've tried to back the destoyers up out of range and/or cover with Aegis, so try to put the stacks back where they are now. You will need to sail from the set locations to bombard the ironclads and then sail them back. You can also use excess fighters to bomb them. My hit/miss ratio was about 50% for both fighters and destroyers and I often went looking for extra units to make sure I wounded every ironclad. That's why I have a lot of Aegis and destroyers on order. The West Coast (near Kastle) has had fewer ironclads and there are a lot of ships covering Carthage that could temporarily pull out to bomb if necessary. Just remember not to leave veteran destroyers by themselves.
There was a galleon and ironclad in Gem City. I left the southern outlet of the Channel open to allow them to ferry troops as necessary. Stealing plans will tell you if they are still there or have been abandoned. I thought about lining the Channel shore with units to prevent an indian invasion from Gem City to Ostrich, but didn't finish that in my preparations for Operation Rubber Ball (see above).
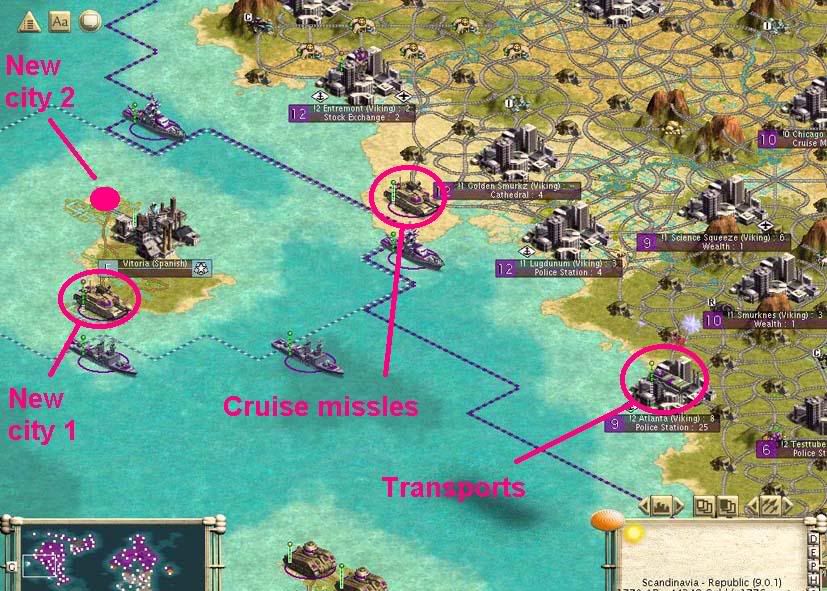
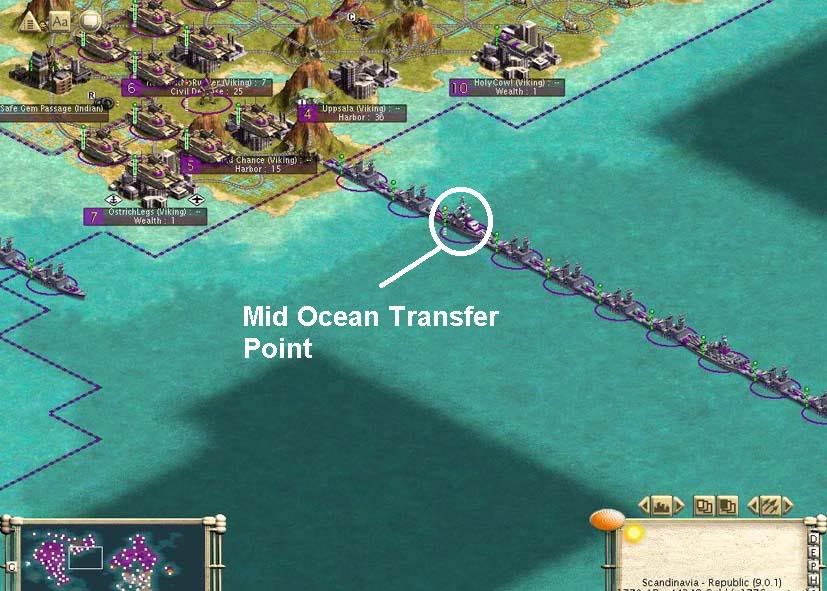
Ship Chain
I had to relocate the ship chain to make it work. The transfer point is under the AEGIS in the shipwall, south of Second Chance. (It's easily distinguished from the destroyers by the white gun deck on the AEGIS.) This position is within range of Buffalo, HolyCow and Point. All of the Transports are named "BCP transit" with a numbers 1-10. To move units:
I'll post more notes later, but that should be enough to play.
Turn Notes/Handoff
Operation Cleanup
There were many parts to this activity but all are nearing an end.
The Land Crew - Where pollution was on our border, I treated it with slaves and covered with a single MA. When they were done, I pulled them back into our territory. Where pollution was deep in indian territory, I marched the workers there, covering them each step of the way with a single MA. There was pollution on a hill and on flatlands. Hills require 12 workers, flatland requires 6. When done they joined up and were headed to a mountain pollution together (requires 18workers).
The Custodian Marines When a pollution was near the shore, a transport or many transports were loaded and sailed to a good disembarkation site. They were covered by a single MA who drove there over land taking advantage of the three move ability. In the case of Deer, there is a section of the Mountain Atoll that is outside of Indian territory. four MA were sent there via the Oe-Hah strikeforce transport and landed on the mountians. They are to be used to cover a worker landing party. There are several transports floating south of Deer as well as one offshore to the West of Kastle and another somewhere near Canal. The three southern transports carry the necessary 18 workers for the Mountain Pollution near Kristian. Don't forget to cover them with at least one MA. The one to the East is for the Adelphia pollution. There is an MA on it's way to cover them.
Trial by Flight Thinking I could send workers by helicopter, I used our spy to steal Advanced Flight from the Ottomans. The spy was caught and killed, but was easily replaced and succeeded on the next try.
Helicopters do not carry workers. Nor do they carry MI or MA, so the only thing they are good for is carrying Infantry or Paratroopers. Neither have a very large defensive number. Still, I was hoping to use the helicopters to airdrop infantry to cover a distant pollution tile. I did a trial run on my last turn so there are two infantry standing on a pollution tile South of Meh.
If they go unmolested through the IBT, then the helicopter is a viable way to cover workers. Then one worker can be disbanded and the infantry ride back on the boat with the workers.
If the infantry draw any kind of attack (because of their lower defensive number) then we might as well put the infantry in the helicopters and rebase to Tadpole where they can be used against spain or america if need be. Worker cover will have to come from MA's moving across Indian territory, or landing from the troop transport (under destroyer cover SW of Kristian).
What to do next
Watch the Infantry test results on the IBT and act accordingly. If they do get attacked, they will probably loose and you will have to kill their conquerors with artillery, then MA attacks so that the worker stack can move onto the pollution.
All other landbased worker stacks are adjacent to the tile they are to clean up. Move them on your first turn and clean it up on your second. The two transport based worker stacks are within range of their target and should be unloaded on their pollution tile and covered with the nearby MA.
Operation Rubber BallWatch the Infantry test results on the IBT and act accordingly. If they do get attacked, they will probably loose and you will have to kill their conquerors with artillery, then MA attacks so that the worker stack can move onto the pollution.
All other landbased worker stacks are adjacent to the tile they are to clean up. Move them on your first turn and clean it up on your second. The two transport based worker stacks are within range of their target and should be unloaded on their pollution tile and covered with the nearby MA.
The only tech left is Amphibious Assault. Marines can be scary since we've left coast cities undefended. Marines require rubber. The only civ that has rubber is Spain. To take rubber from them, we need to destroy their capitol.
Since they are at war with us, I hatched a scheme to give them another city on their island and then destroy their city. I've landed two settlers and two MA on their island.
On the next turn, the first settler should found a city. The second settler should be joined to it so it's big enough to be captured. Then the MA's should move towards the Spainish Capitol. On turn two, Spain should have captured the new city. There are three cruise missles within bombard range. Use them plus the new one from Chicago to kill as many units as possible then take out the city with the MA's. There are two transports SE that could be used to drop more MA's off on turn one to be ready for the attack on turn 2.
Note that this is a temporary measure. We won't have a way to prevent them from reconnecting to the rubber unless we found a city next to the Rubber on the island. There are settlers building in the south of Tad. Rush one of those and transport it to the island to prevent the connection of rubber. Don't found on top of the rubber incase the city would flip. Just put it next to the rubber and we can pillage the rubber tile.
Moats
The Smurkz moat works very well. Take the MA Army that is not fortified and move him to the other gate tile. Don't fortify him or you'll forget to move him. Instead, put him in the right spot (He should always end the turn North of an enemy Guerilla) and then hit the spacebar to skip the rest of his turn. He will ask for orders every turn and you can just move him back to the other gate tile.
The Ostrich moat also works well but it's not quite finished. I moved a bunch of workers onto the gate tile so they can road and rail it next turn. It could also use a fortress. (I had been using the Iron Mountain as the gate tile, but it works better using their rubber tile as the moat and the grass to it's East as the gate.) There are two MA named Gatekeeper 1 and Gatekeeper 2.
On the next turn move the gatekeepers to the other gate tile (make the road and rail with the workers first) and then hit spacebar.
I had intentions of bringing one of the armies up there so you could gate with just one moving unit, but I didn't get that done in time.Ironclad target practice
I found that stealth bombers redline ironclads too often. If we're going to go with a no WW policy in the future, we shouldn't bomb ironclads (or anything) with stealth bombers. I rebased them to MO island incase we want to eliminate the Ottomans at some point.
Most of the ironclads leave Nansmurket or Adelphia and end up near the Aegis/carrier stacks. They don't like attacking Aegis or Elite Destroyers but do attack Veteran Destroyers if in their range. I've tried to back the destoyers up out of range and/or cover with Aegis, so try to put the stacks back where they are now. You will need to sail from the set locations to bombard the ironclads and then sail them back. You can also use excess fighters to bomb them. My hit/miss ratio was about 50% for both fighters and destroyers and I often went looking for extra units to make sure I wounded every ironclad. That's why I have a lot of Aegis and destroyers on order. The West Coast (near Kastle) has had fewer ironclads and there are a lot of ships covering Carthage that could temporarily pull out to bomb if necessary. Just remember not to leave veteran destroyers by themselves.
There was a galleon and ironclad in Gem City. I left the southern outlet of the Channel open to allow them to ferry troops as necessary. Stealing plans will tell you if they are still there or have been abandoned. I thought about lining the Channel shore with units to prevent an indian invasion from Gem City to Ostrich, but didn't finish that in my preparations for Operation Rubber Ball (see above).
Ship Chain
I had to relocate the ship chain to make it work. The transfer point is under the AEGIS in the shipwall, south of Second Chance. (It's easily distinguished from the destroyers by the white gun deck on the AEGIS.) This position is within range of Buffalo, HolyCow and Point. All of the Transports are named "BCP transit" with a numbers 1-10. To move units:
- Load units in transport at departure city
- Drive transport to transfer point
- Rightclick transfer point and WAKE one of the unmoved transports (12/12)
- Rightclick transfer point and "WAKE ALL TRANSPORTED"
- Press "L" to load unit and select the transport you WOKE above. Repeat until all units are in the new transport.
- Verify new transport has 12/12 moves and all passengers. Sail new Transport to destination city.
- To reset the chain this turn: Rightclick destination city and WAKE one of the empty, unmoved transports and sail him back to the transfer point. Right click transfer point and wake one of the empyt, unmoved transports and move him back to the departure city. If you don't do this, you will have broken the ship chain until you reset it next turn.
- You can verify you did this right by making sure there are two transports in each of the three cities and 4 transports at the transfer position at the end of each turn.
- You can carry units in the return transport as well making a two directional transport.
- Right click your destination city and "WAKE ALL TRANSPORTED". Move the units to their desired positions.
I'll post more notes later, but that should be enough to play.


 ).
).


")
")
 'Run away, run away'