Scotch0101
Centurion
Hello everyone, and today I will be showing you how to colorize old black and white photos with Gimp 2.68. If you're doing a DoM, leader screen, or icons this might be helpful. I will be colorizing an old photo of a Tiger I tank from WWII. This tutorial is for those of us who don't want to drop 8 Washingtons on Photoshop (though it is an ok investment ") ).
).
Step 1: If you don't already have Gimp or the .dds plug-in you can get them from here and here.
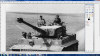
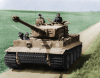
Step 2: Open Gimp and copy and paste this picture into your workspace.

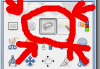
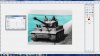
Step 3: Now you have the picture. Select the 'free select tool' (the one that looks like a lasso) and select the portion of the photograph you want to color.

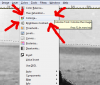
Step 4: Go to the 'colors' tab and select 'colorize'.
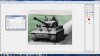
Step 5: Slide the bars up and down to generate the desired color.

Step 6: Repeat steps 3, 4, and 5 until the entire picture (or desired portion of it) is colored.
That is how you colorize with Gimp! I hope this was helpful!
). Step 1: If you don't already have Gimp or the .dds plug-in you can get them from here and here.
Step 2: Open Gimp and copy and paste this picture into your workspace.
Step 3: Now you have the picture. Select the 'free select tool' (the one that looks like a lasso) and select the portion of the photograph you want to color.
Step 4: Go to the 'colors' tab and select 'colorize'.
Step 5: Slide the bars up and down to generate the desired color.
Step 6: Repeat steps 3, 4, and 5 until the entire picture (or desired portion of it) is colored.
That is how you colorize with Gimp! I hope this was helpful!