The Sound of Drums - A British Hearts of Iron II AAR
Part Forty-Five
24th July, 1940
The Battle of the Southern Bight
The First Flotte was in a terrible position. Trapped at Rotterdam, it was blockaded by the British Grand Armada and subject to bombardment by every plane based in Britain. The port of Rotterdam was large enough to attempt some improvised repair work on damaged vessels, but bombardment of the facilities by Canadian bombers had halted progress. It was only the reluctance of the British to bomb a former allied territory that meant the port had not been completely destroyed.
To Admiral Raeder an attempt at a breakout and withdrawal to Kiel was the only option, but such a retreat would hardly look good to the rest of the world, and certainly not to the Fuhrer. Some form of victory would have to be achieved, and that could only come with another strike at a British ASDIC fleet that patrolled British waters. Dönitz’s U-boat was largely intact, and with the surface fleet largely destroyed it was Germany’s only hope for a naval victory. Raeder would take command of the First Flotte, destroy an ASDIC fleet, take the fleet safely to Kiel and achieve some honour before resignation. The Kriegsmarine would be handed over to Dönitz, and Raeder could be left at peace to plan and construct a new surface fleet.
Getting out of Rotterdam would be harder than Raeder could have imagined. British agents in Berlin learnt of the admirals plans as soon as he relayed his intentions to the capital. Reporting the news back to Britain, they triggered an immense joint operation between the Joint Intelligence Committee and the Admiralty. While First Lord Darth Pugwash ordered an increase in destroyer activity near the south-east coast, Chief IronMan2055 directed his staff that false reports should be created that suggested the First ASDIC fleet was now patrolling in the southern North Sea. It was a simple strategy designed to bait the First Flotte out of Rotterdam before it was ready.
Bismarck under repair
The First Flotte left Rotterdam before midnight on the 23rd July. Linking up some 50 miles west of the port, they took a careful route through the treacherous minefields that had been hastily laid in the past month. Raeder commanded from the
Tirpitz - the
Bismarck still in bad shape after its previous engagements with the Royal Navy and in no position to be the lead vessel. Raeder had even suggested to Hitler that the battleship be left at Rotterdam - her poor condition would force the fleet to a maximum speed of 10 knots - but the Fuhrer refused to let the pride of his fleet be abandoned. As such, the First Flotte was charged with defending the
Bismarck, for the battleship was barely able to manoeuvre herself, let alone while utilising her guns.
Even at 10 knots the First Flotte could be expected to reach Kiel in three days, though Raeder would need a lot of luck if he expected to do that and hit the ASDIC fleet. He didn’t have it - planes were spotted at first light, undoubtedly from the carriers of the Admiral Cleric. The commander of the Grand Armada had known the First Flotte was going to leave Rotterdam for some time now, thanks to the efforts of British Intelligence. For days his planes had been in the air at every available opportunity, and now the perseverance of his pilots had paid off. The First Flotte was being tracked!
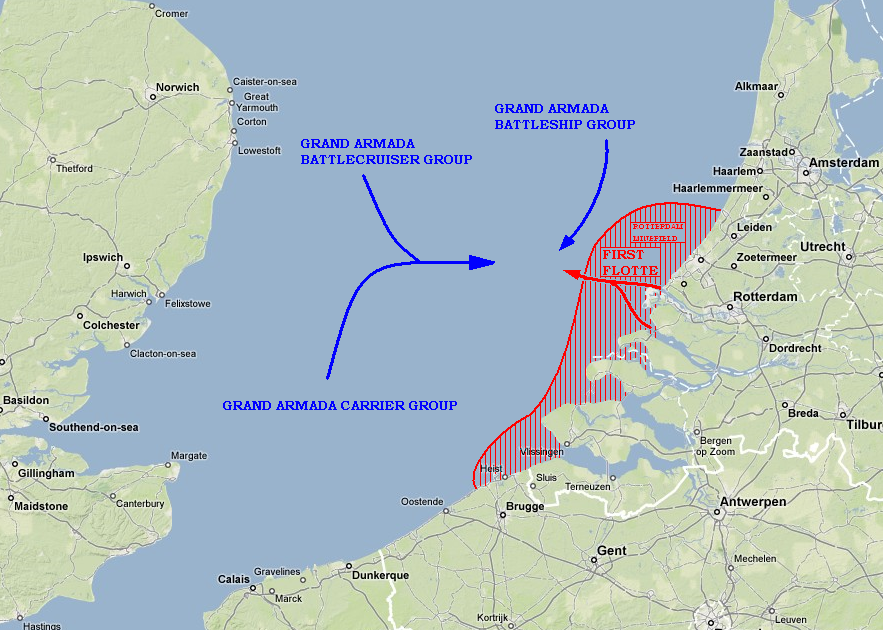
The fleets move into position
The Grand Armada had been spread across the southern North Sea in preparation of the ambush. The carriers were to the south, their planes ready to intercept any Luftwaffe aircraft or fly north to bombard the enemy fleet. The battlecruisers and battleships were further north, Cleric using them to block any attempt by the First Flotte to flee north. As soon as Raeder’s fleet was spotted, he had the Grand Armada move into action.
The two fleets first spotted each other at 09:12, the battlecruisers of the Grand Armada firing into the First Flotte immediately on contact. Their job was to confuse and delay the enemy before the battleships and carriers could enter action. Seeing the tactic for what it was, but with little choice beyond retreat or battle, Raeder returned fire. If he wanted the First Flotte free of Rotterdam, he would have to break through the British cruisers before they could be reinforced.
Here the two
Bismarck battleships were in their element. Easily able to outgun the cruisers at a further distance, they attempted to distract the British ships while the rest of the First Flotte steamed quickly north. The first salvo alone scored a direct hit on the light cruiser HMS
Arethusa, causing a terrific explosion amidships. By the time the smoke and water had cleared, the
Arethusa had overturned and sinking far too quickly for the nearby
Orion to offer assistance. A second salvo caused more indirect damage, hitting
Orion and
Ajax and causing the cruisers to scatter. Raeder’s plan was working, and he was set to press his advantage when he received the news that two aircraft squadrons had been spotted bearing on his position.
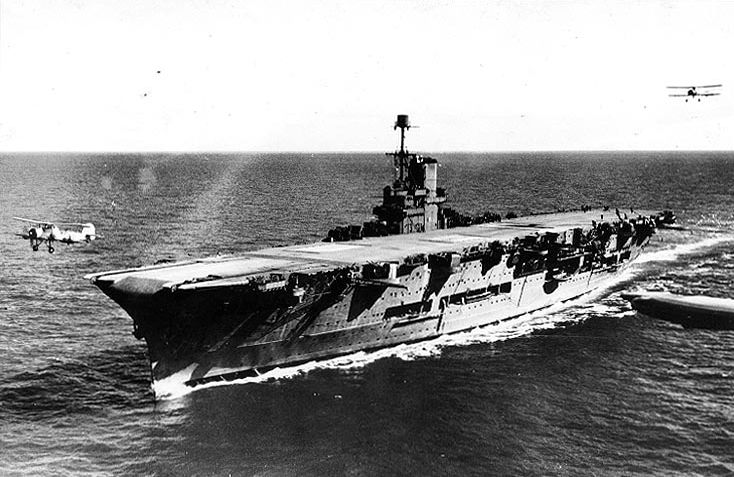
Fairey Swordfish planes in flight above the Furious
The planes of the
Argus and
Furious had been fitted with torpedoes the minute that Admiral Cleric had received word the First Flotte had left Rotterdam. Their pilots had been given special instruction by Cleric - sink the
Bismarck! He had been chasing it for nine months now, and he certainly didn’t want it escaping again. Even the
Tirpitz was considered a secondary target, though at this time British Intelligence believed that Raeder was commanding the First Flotte from the
Bismarck, not her sister ship.
Hitting the two German battleships at 11:48, the Fairey Swordfish launched what was a largely ineffective torpedo attack on the
Bismarck except in one detail. One of the torpedoes, probably among the last dropped, managed to strike the very rear of the ship, smashing the rudder and disabling at least two of the propellers.
Bismarck was effectively adrift, unable to steer or direct herself. She was still a threat though, and continued to fire at the British cruisers as they struggled to reorganise. On the
Tirpitz, Raeder struggled to come to a decision on whether or not to abandon the
Bismarck and rejoin the rest of the First Flotte, or attempt a rescue of the battleship. In the end it didn’t matter - the decision was made by the arrival of the HMS
Nelson at 12:35, leading the four British battleships of the Grand Armada
Reader had lost his window of opportunity to escape to Kiel, and any moment now he would lose the
Bismarck. The British cruisers, under the direction of the HMS
Hood, unleashed a at the stricken battleship before turning north-east to chase the rest of the First Flotte. In the meantime, the
Nelson was moving to engage the
Bismarck while the other three battleships -
Royal Oak,
Sovereign and
Malaya bore down on the
Tirpitz. He could do nothing but order the rest of the fleet back to Rotterdam while he used the
Tirpitz to focus the British away from them. In what could be considered either a brave or foolhardy action, he ordered the
Tirpitz to move directly into the British cruisers.
In doing so, he managed to save the First Flotte, but not the
Bismarck. Alone, the German battleship put up a brave, but doomed defence, firing at the
Nelson as it approached. The British battleship responded in kind, striking the
Bismarck four times before it became clear the ship was sinking. The
Tirpitz meanwhile managed to once again scatter the cruisers, slipping to join the rest of the First Flotte and attempt an escape back to Rotterdam.
Here the Royal Navy claimed one more victory. With the British battleships still chasing the
Tirpitz, the smaller vessels of the First Flotte attempted to hold them while Raeder made a dash for the relative safety of the minefields. The tactic worked, though at the cost of the light cruiser
Köln. The
Tirpitz and the rest of the First Flotte managed to escape, entering the minefields at 14:02.
The aftermath of the battle.
Grand Admiral Cleric had finally destroyed the
Bismarck, and had severely damaged the
Tirpitz for good measure. He had been disappointed to learn from the survivors of the sinking that Raeder had switched command ships before the battle, but even this did little to dampen his spirits. He ordered an extra ration of rum to be given to every sailor in the fleet, and retired to his quarters to work out just how he was going to word the delightful report to the Prime Minister…


")

 I said I'll be updating more often from now on, and I will be. Next update in the next couple of days, Cleric will like it.
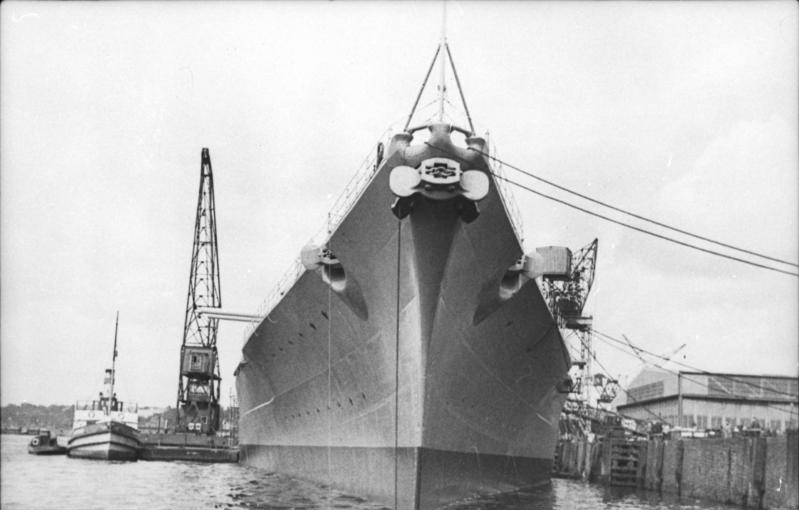

 three cheers for that old war horse HMS Royal Oak[/I] and the monster that is is HMS Nelson
")