How to create flags for civ4 - for dummys :)

cool3a2

Deity
Joined
Mar 30, 2007
Messages
2,177
Hi there. I recognized that questions about how to create flags for civ4 occur periodically although this is a quite simple job compared with units, buildings and leaderheads. In deed there are some tutorials that cover this topic already, but they are well hidden as part of other, more general tutorials (in how to create a civilization tutorials for example), quite old and thus at the end of this section where nobody finds them and the information they give are spread over different tutorials. So I thought it would be a good idea to create a more comprehensive tutorial that deals with flags only. One, that solves and prevents as much problems as possible for most users. This way the count of these questions will hopefully be minimized and even in rare cases of such questions the questioner can be referred to this thread where he finds everything. It would be helpful if someone could add this tutorial to the index thread to make it as easy as possible to find this tutorial, even for greenhorns.

I will concentrate on windows systems, Mac users shall follow this link. Please ask there if there is still something unclear. I couldn’t help you anyways. However, in the first time this will be somewhat incomplete as I don’t have much time currently. Therefore the tutorial will be about non-decal flags only for at least a week.

BTW: this is my first tutorial. Please keep that in mind when complaining about things 


Introduction

Some theory

To get prepared we have to speak about the theory. But as you’ll see there is not much you have to know about flags and their creation, so we can keep this very short.

There are two sorts of flags: decal and non-decal. Let’s speak about decals first.

If you have played civ4 before, you have already seen decal flags. They are the default flags of civ4 and consist of only two colours, which is why they are sometimes called bicolour flags and, as the colours are the civilizations teamcolours, teamcolour flag. Every civilization has those two teamcolours assigned. In the XMLs they are called primary and secondary colour. Usually these flags have a background in one of the two colours and a more or less simple sign in the other colour in the center.

In contrast to that, non-decal flags can consist of an unlimited amount of colours. But of course two or one coloured flags are also possible. The clue is, that those flags can be completely independent of the primary and secondary colours of the civilization. They simply use a more or less ordinary picture file (of course the picture files have certain properties simple pictures haven’t and the picture must also be in a certain file format, otherwise there wouldn't be that much problems with that topic).

One other thing worth to be mentioned here, is that there are two types of machines as well. Of course there are much more then two as you know, but in case of civ4 flags they all can be categorized in two types. We’ll come back to this later, all I want to mention here is, that in case of non-decal flags both types of machines each require a slightly different version. So if you want to share your new mod using a non-decal flag, you’ll have to provide two flags so that other users can patch the flag issue if necessary.

That’s all you need to know about the theory of flags for now. But to start our tutorial, we’ll need the right tools first.


Preparing

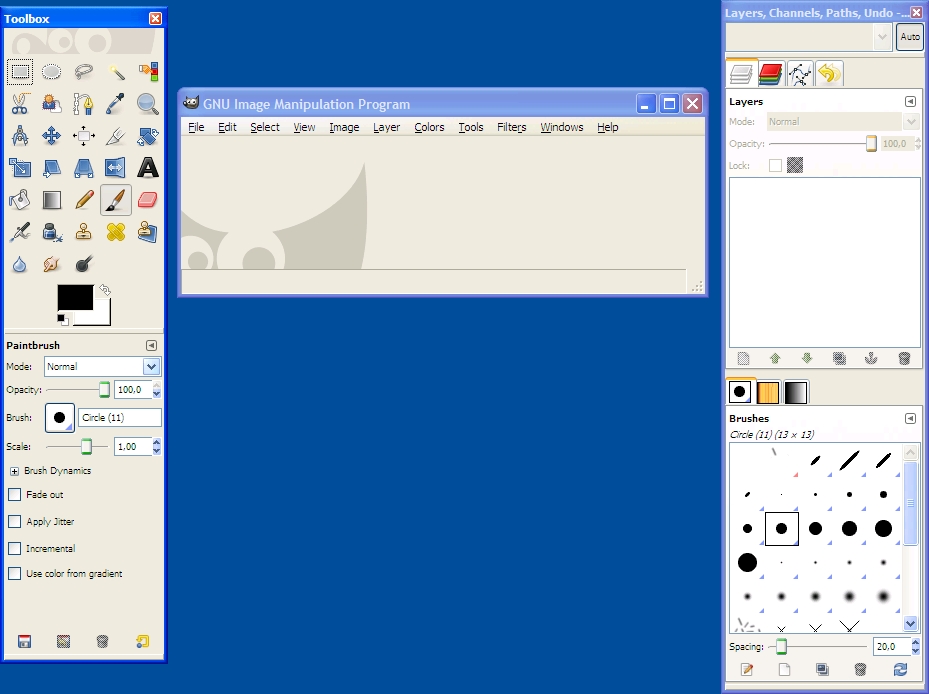
Creating flags for civ4 in Windows can be done by the following tools for example: Photoshop, GIMP (both with plugin), DXTBMP and dds converter (not in Vista). I thought I’ll base this tutorial on freeware so everyone can do it the same way described here. So Photoshop gets fired. Dds converter is quite useful and easy to use, but lots of users reported troubles. It is its hobby to crash. Other users say it runs stable for them and indeed I believe it is possible to get it stable by first installing version 2.0 and then install version 2.1 over. But I am not sure enough to take the risk to base this tutorial on that program and then get a useless piece of text. Also, dds converter is Vista incompatible, so this would be useless for Vista users. It’s similar with DXTBMP. Lots of users reported that they had no problems and they don’t use anything else for flags. But when I prepared myself for writing this, I encountered serious problems. I created files with DXTBMP that looked okay, but caused the game to crash. So both, DXTBMP and dds converter, conflict with one of the goals of this how-to: solve or prevent as much problems as possible with a maximum of reliability. So the Windows part will be based on GIMP and its plug-in.

Load the latest version of GIMP from here.
And get a dds plugin:
- http://code.google.com/p/gimp-dds/#Downloads
- http://forums.civfanatics.com/downloads.php?do=file&id=17058
One of the two will be enough, though, so no need to install both. Also, the rest of the tutorial was written with a different plugin that is not available anymore. Thus, regarding the dialog when saving, things might look a bit different. Still, you should find the same settings somewhere. With the old plugin, things were imperfect. Opening dds files is buggy and when exporting the count of options was, compared to other solutions, reduced to minimum. This ways, some hints about the plugin and about avoidence of trouble in the following text might be outdated. Nevertheless, 90% of the information given here, should still be valid as they don't have anything to do with the plugin.

So all we have still to do is installing the programs. We will cover the creation of non-decal flags first as I think this type of flags is more popular. At least it will be easier.

Proceed to the second post.
 
How to create non-decal flags

Creating a valid flag image

The first thing you have to do now, is to get a picture you’d like to use as flag. The height and the width should be in the ratio of 4 to 3 roughly. For demonstration I’ll use the coat of arms of Saxony which I got from Wikipedia, hope it’s not a problem for Saxony that I use it. You can use a different picture of course. Avoid dds files, the GIMP plugin has problems opening them.

Start GIMP now. This is what you should see:
Spoiler :

So there should be three windows now. One on the left, which is the toolbox, in the middle there is the main window and on the right you should see a panel for “layers, channels, paths, undo…” (see the title bar). Go to the main window and open your file with File->Open. If you like to make changes to the picture, do them now. If you made any changes, save them before proceeding, preferably not as dds. As mentioned GIMP sometimes has problems with opening dds, so save it as bmp for example or, if you like to keep layers, xcf or psd. If you later decide to make further changes to the flag, you can open that generic file you have just created. The further procedure should always be the last step.

Civ4 flag files need to be in a certain ratio: 128x128 pixels. Before, I mentioned a ratio of 4 to 3 which seems to conflict with what I just said. Well, the file needs to be in 128x128 pixels, but in the game the flag will be rescaled and displayed in a ratio of 4 to 3. That means it is intended that the flag gets stretched after resizing it, just don’t worry. The game will rescale it by its own. To resize the flag, choose image->scale image:
Spoiler :

A window will open where you can set width and height to 128 pixels each. GIMP will try to keep the proportions by default. Switch that off by clicking on the chain on the right of the two textboxes where you type in the values for width and height.

Next, set your picture to RGB mode. Select image->Mode, select RGB and hit “assign color profile”. This step may not be necessary if your picture is already in RGB mode.

Now we have to check if there already is an alpha channel in our picture. Go to the right panel about layers and channels. By default the layers should be displayed, but we are interested in the channels now. Switch to the channel view, the button you need to press is highlighted on the following screenshot:
Spoiler :

1 layers
2 channels (this is what we need now)

Now there should be either three or four channels (there are four on my picture). The first three channels are about the red, green and blue tones of the current picture. If there is a forth channel (called Alpha on my screenshot), we’ll need to remove it in order to create the first version of our flag. If there are only three layers, everything is okay. Unfortunately it won’t be that easy to select the alpha channel, then right click on it and select remove. Instead, switch back to the layer view. Select the layer – there should be only one – and right click on it. Hit “remove alpha channel”:
Spoiler :

Now save that file in dds format. Use DXT3 for compression. Don’t save mipmaps, otherwise the flag may become blurry in the game. Now we created the first version, which we’ll need for machines of type A. I’ll come back to that later.

Now we have to add a well-defined alpha channel. We could add a new alpha channel similar to how we removed the old one: right-click on the layer and hit “add alpha channel”. But for the next step we’ll have to use the menu of the main window anyways, so I’ll show an alternative way to add the alpha channel. In the main windows menu choose layer->transparency-> add alpha channel. Next, choose layer->transparency again, but this time hit threshold alpha (it’s still grayed out on my screenshot, but should be available for you now):
Spoiler :

This menu will open:
Spoiler :

Push the bar to the very right or enter 255 in the textbox. Your picture will disappear, that’s normal. Close the window. If you check the channels now, then they should be all black if things worked. That’s also why opening dds in GIMP fails, it seems to be unable to handle alpha channels in dds. However, save the file as DXT3 dds again, but without overwriting the old file and without mipmaps. We finished the work on our picture, so we can close GIMP now.

The moment has come to tell you why we had to create two files. As mentioned there are two types of machines. The first type wants to have the file with and the second type wants it without alpha channel. Both types seem to exclude each other and thus there is no way to make a flag that works for both. If we don’t give them what they want, the flag will become plain white. You’ll have to try out which file your machine wants by having a guess and starting the game to see if it works. But before that we must tell civ4 that it should use our file. That has to be done by xml.


XML work

Copy one of the dds to your mods folder. Besides of that you’ll need the following xml files:

- CIV4ArtDefines_Civilization.xml (Assets\XML\Art folder of Civ4)
- CIV4PlayerColorInfos.xml (Assets\XML\Interface); only needed if you like to change your civilizations teamcolours
- CIV4CivilizationInfos.xml (Assets\XML\Civilizations); not needed if you are modding a civilization being part of default civ4 (vanilla, Warlords, Bts)

Copy them to your mods files if you haven’t so far. I won’t cover the differences between modular and non-modular mods here, so I’ll only show you which entries to change. The ArtDefines should be full with something like that:
<CivilizationArtInfo>
<Type>ART_DEF_CIVILIZATION_MAGYAR</Type>
<Button>Modules/Custom Civilizations/Hungary/Magyar.dds</Button>
<Path>Modules/Custom Civilizations/Hungary/FlagDecal_Magyar.dds</Path>
<bWhiteFlag>1</bWhiteFlag>​
</CivilizationArtInfo>
The Path entry is for the path to your flag file. Correct it so it fits to your mod and flags path. In case of a decal flag, you need to switch bWhiteFlag to 1, just as it is in the listing above. Note: your xml won't be necessarily coloured, I just highlighted an entry we'll need later. The text can be different from here.

For any case this is a possible listing of the PlayerColorInfos:
<PlayerColorInfo>
<Type>PLAYERCOLOR_MAGYAR_COLOUR</Type>
<ColorTypePrimary>COLOR_PLAYER_DARK_GREEN</ColorTypePrimary>
<ColorTypeSecondary>COLOR_PLAYER_WHITE</ColorTypeSecondary>
<TextColorType>COLOR_PLAYER_DARK_GREEN_TEXT</TextColorType>​
</PlayerColorInfo>
The first entry (Type) is for giving your colour setting a name. ColorTypePrimary and ColorTypeSecondary are the primary and secondary colours that I already mentioned. Look up the original version of this file to have an overview about possible colours. However, I recognized that for non-decal flags the secondary colour should be white in most cases, just as in the listing. Otherwise your flag can get a colouring in the secondary colour defined here. The green entry is again highlighted for later use.

The last file of interest is the CIV4CivilizationInfos.xml. It consists of such blocks:
<CivilizationInfo>
<Type>CIVILIZATION_MAGYAR</Type>
<Description>TXT_KEY_CIV_MAGYAR_DESC</Description>
<ShortDescription>TXT_KEY_CIV_MAGYAR_SHORT_DESC</ShortDescription>
<Adjective>TXT_KEY_CIV_MAGYAR_ADJECTIVE</Adjective>
<Civilopedia>TXT_KEY_CIV_MAGYAR_PEDIA</Civilopedia>
<DefaultPlayerColor>PLAYERCOLOR_MAGYAR_COLOUR</DefaultPlayerColor>
<ArtDefineTag>ART_DEF_CIVILIZATION_MAGYAR</ArtDefineTag>
<ArtStyleType>ARTSTYLE_MAGYAR</ArtStyleType>
<UnitArtStyleType>UNIT_ARTSTYLE_HUNGARIAN</UnitArtStyleType>
...​
</CivilizationInfo>
Blocks of this kind are longer, I only shortened it a bit shown by the three dots. I hope you see now why I have highlighted the lines. The two red and the two green texts need to be the same each, just like it is in this case. Still, your entries don't need to be the same as given here. For flags, only the highlighted lines of the CIV4CivilizationInfos.xml are of interest.

That&#8217;s all! Your non-decal flag should work now:
Spoiler :


For decal flags, see next post!
 
How to create decal flags

As I mentioned in the introduction, there is also a second type of flags that consist of only two colours. Those colours are the teamcolours of the civilization the flag is assigned to. These flags are called decal flags. So let&#8217;s create such a flag! We will concentrate on methods here. That means that I will show you how to create a simple decal flag to teach you general facts. For more advanced techniques and GIMP specific tricks, search for tutorials focusing especially on GIMP.


Creating a valid flag image

First step is to create a new image. Go to the main window, select File->New. In the opening window set both, width and height, to 128. This should create a white plain:
Spoiler :

Now we&#8217;ll have to set up the alpha channel again. In the main window select Layer->Transparency->Add Alpha Channel, then Layer->Transparency->Threshold Alpha&#8230; A window will open which we already know from the non-decal flag part of this tutorial. From here on, there are two ways to continue. Either you push the bar to the right (or set the value to 255 if you prefer) and paint with the Paintbrush tool (from now on called method A), or you push the bar to the left (or set the value to 0) and then removing parts you don&#8217;t need (from now on method B). We will cover both methods here. No matter how you decide (which is, as we&#8217;ll see, truly only a question of taste), we going to use the toolbar window on the left now.

Method A.
Push the bar to the right or set the value to 255. Our image will turn into a squared plain, which means that it is completely transparent:
Spoiler :

Now select the Paintbrush Tool from the toolbox on the left. I think the colour you will paint with, doesn&#8217;t make a difference, but for safety select white. Black and white should already be selected as default colours. Simply click on the double-sided arrow to swap their priority:
Spoiler :

1 - Paintbrush Tool
2 - swap priority of selected colours

Now paint the structure that should be displayed in the civilizations secondary colour later. I will show you how to swap the colours in a moment, so even if you want to have this structure painted in the primary colour, this method is suitable. This is my result:
Spoiler :

Note: It is not necessary, that you paint your structure with the paintbrush tool. Instead you could also select something from another image and copy it to our image for example. As this is about the main ideas of creating civ4 flags, this is not topic of this tutorial. Search for a GIMP specific tutorial.

Method B.
Push the bar to the left or set the value to 0. Our image will keep to be plain white.
Choose the Rectangle Select Tool in the toolbox. Select an area you like to have in the civilizations primary colour and press DEL on your keyboard. The area will be deleted.

Note: Again, there are sincerely other tools and ways how to select the area to delete that may be more precise. For example you could select an area of a different image and use the selection for your civ4 flag image. Search for a GIMP tutorial for more detailed information.​

Our picture is now ready. Save it via File->Save as&#8230; as dds. Keep care to save it as DXT3 (compression mode) and without mipmaps.


XML work

Last thing to do is XML work again. It&#8217;s very similar to what we&#8217;ve done when creating a non-decal flag. First of all we alter the CIV4ArtDefines_Civilization.xml file.
<CivilizationArtInfo>
<Type>ART_DEF_CIVILIZATION_MAGYAR</Type>
<Button>Modules/Custom Civilizations/Hungary/Magyar.dds</Button>
<Path>Modules/Custom Civilizations/Hungary/FlagDecal_Magyar.dds</Path>
<bWhiteFlag>0</bWhiteFlag>​
</CivilizationArtInfo>
Again, make the <Path> entry suit to your flag file, but this time set the value of <bWhiteFlag> to 0. If you&#8217;d set it to 1, only your secondary colour would be used for the flag. The rest of it would be white. This could be useful in special cases. Think about the following: your civilization has two colours that absolutely don&#8217;t fit to each other. On the other side you don&#8217;t want to change them for some reason. In this case you could create a decal flag that consists of white and your civilizations secondary case. Well, that might conflict with the definition of a decal flag, but it is possible. But let&#8217;s come back to our XML files. We finished work on the CIV4ArtDefines_Civilization.xml. All we still have to do is setting the civilization colours and assign the colour set to our civilization. This has already been covered in the non-decal flag part of this tutorial and won&#8217;t be repeated here.

Alter the CIV4PlayerColorInfos.xml as described in the tutorials non-decal flag part.

This could be your Civ4_CivilizationInfos.xml:
<CivilizationInfo>
<Type>CIVILIZATION_MAGYAR</Type>
<Description>TXT_KEY_CIV_MAGYAR_DESC</Description>
<ShortDescription>TXT_KEY_CIV_MAGYAR_SHORT_DESC</ShortDescription>
<Adjective>TXT_KEY_CIV_MAGYAR_ADJECTIVE</Adjective>
<Civilopedia>TXT_KEY_CIV_MAGYAR_PEDIA</Civilopedia>
<DefaultPlayerColor>PLAYERCOLOR_MAGYAR_COLOUR</DefaultPlayerColor>
<ArtDefineTag>ART_DEF_CIVILIZATION_MAGYAR</ArtDefineTag>
<ArtStyleType>ARTSTYLE_MAGYAR</ArtStyleType>
<UnitArtStyleType>UNIT_ARTSTYLE_HUNGARIAN</UnitArtStyleType>
...​
</CivilizationInfo>
(Highlighted text here should be the same as the one in the listing above.)


Conclusion

I will repeat some major points of creating decal flags here, because for beginners some things may be hard to understand at first. Also, when searching for and reading tutorials about GIMP you need to keep them in mind in order to figure out more advanced techniques of flag creation.
- Create a plain white image, wifth and height both 128 pixels
- Add an alpha channel and set its threshold. The threshold depends on the method you have decided for. Alpha channels usually control transparency, in our case they control which part of the flag will be displayed in which colour. Transparent parts (in GIMP shown as squared plains) will be displayed in your civilizations primary colour, the rest will be coloured in the secondary colour
- There are two methods to divide the flag in transparent and non-transparent areas: start with a plain white image and delete all unnecessary parts or start with a completely transparent image and paint the logo of your civilization; the alpha channel will be automatically updated when you make your changes, keep an eyes on the channel view during your work
- Set the bWhiteFlag tags value to 0
- This time there is no need to create two versions of the flag, unlike in case of non-decal flags


How to swap colours

This was part of another, old flag tutorial. I found that useful and thought it may be of interest for you. So I&#8217;ll show how to do that as well.

Theoretically you could simply swap the primary and the secondary colour of your civilization in the CIV4PlayerColorInfos.xml. But this would affect the borders colours as well, which may be undesired. Alternatively you could keep the xmls and work on the flag image instead. You would simply have to swap transparent and non-transparent areas there. That&#8217;s what we gonna do now, of course with GIMP.

In GIMP, open a finished flag file that&#8217;s colours you&#8217;d like to swap. From the left toolbox window, choose the Fuzzy Select Tool which looks like a magic wand:
Spoiler :

1 - Fuzzy Select Tool
2 - Threshold of the Fuzzy Select Tool

With this tool, you can select whole areas of the same or similar colour of your image by clicking on that area. You can adjust its tolerance against similar colours (in other words how big the difference between the colour of the pixel you have clicked on and the colour of surrounding pixels can be in order to influence the size of the selected area or to ignore minor differences of the colours of neighbouring pixels) by changing the tools threshold (do not mix it up with the alpha threshold!). In this case you can keep the threshold as it is. With the Fuzzy Select Tool you can also select several areas (connected with each other or unconnected) by holding down the SHIFT key on your keyboard when selecting the areas. This way the new selection will be added to the already existing selection.

Again, you have two options to choose from: either select the transparent part, then choose Select->invert or select all non-transparent parts (without inverting the selection). Add a new layer. To do that, right-click on the existing layer in the layer view (right window) and choose New Layer&#8230; from the context menu:
Spoiler :

A window will open. Keep everything as it is except of the Layer Fill Type, which you should set to White:
Spoiler :

Your selection should still be active, as well as the new layer. Press DEL on your keyboard. Take a look at the layer view. You should see two layers, their transparent and non-transparent areas should be inverted. Now delete the old layer by right-clicking on it (make sure you haven&#8217;t clicked on the new layer) and select Delete Layer from the context menu:
Spoiler :

The result should be the exact opposite of your initial image. The alpha channel should be intact. Last thing to do, is saving the image as dds (compression mode: DXT3, no mipmaps). As mentioned before there is no additional xml work.

And these are the flags inside civ4:
Spoiler :


(original file)


(swapped colours)
 
Appendix

Overview over alternative tools for creating flags:

- Dds converter; handy (+), unstable for some users (-), Vista incompatible (-), only for converting images to dds therefore you&#8217;ll need a second program for picture work (-)
- DXTBMP; can create buggy flags that are able to crash civ4 (-), but worked for some users, inaccurate for picture work (-)
- Aorta; only beta version for Windows (-), untested (-) -> see iggys Mac tutorial
- Photoshop; mighty for picture work (+), expensive (-), just as GIMP it needs a plugin to make it handle dds files


Alternative tutorials about creating flags (none of them is using GIMP):
- 0d1n3oo3Broad: [GUIDE] How i invert civ-coloured flags in 6 steps - about decal flags with dxtbmp
- LAnkou: HOW TO create a decalc flag and use it with proper colors
- Raize: On Prettiful, Nondistorted Flags (60 tall by 90 wide!)
- Jecrell: HOW TO: Create a Civilization - about adding civilizations, also covers (non-decal) flags in post 1
- iggymnrr: Flag Tutorial for Mac - as its title says for Mac users, but also introduces Aorta


Known issues:

- Dds converter is not Windows Vista compatible. See post #16 to #32 for a detailed description of this problem. Thanks God the tutorial is based on GIMP solely, so if you follow it, there should be no problems.


If there is still anything unclear or if you have encountered problems, feel free to ask here.
 
Okay, finished my work for now. And thank you for your words. As you can see I have linked iggys part only instead of putting something together. He posted his tutorial in the Mac section. If we'd try to put both together now, it may become hard to maintain. All changes he makes to the Mac part would have to be done twice then.
 
Thank you, iggy!
 
Thank you!

Unfortunately I have to state that I can't write the second part of this tutorial about non-decal flags. I got a small flu, thank's God it isn't so heavy. I also have to do something for university. So there will be no time for this tutorial. Next weekend I'll have some guests, probably no time again. I really plan to write the second part in two weeks, because if I don't, there's a high risk that I'll forget it completely... :mischief: No, really, I'll do it then!
 
I could need some hint. I just played around with bicolour flags to discover how to create them with GIMP. I still need to give it a go in the game, but I am quite sure I figured out the method. However, when taking a look at the flags shiped out with civ4 I saw that they are all called decal flags. This conflicts with the definition I gave in the introduction of this tutorial. I searched for the word decal in a dictonary before I wrote this tutorial and I'd say my definition makes more sense. Still, I am confused which definition is right. I'd like to correct that if necessary when writing the second part. So, could anyone tell me what's true? It would cause chaos if people use the words in opposite senses...
 
:) I skirted that issue in favor of the other one. The game also uses Teamcolor which brings to mind 2 colors like in sports where team colors are usually 2. That just left the problem of what to call the other kind of flag. My solution was multicolor. Not perfect either.
 
Yeah, I thought about such phrases, too, sometimes even using them when answering on questions. I use bicolour instead of TeamColour flags (also in the tutorial) and also using multicolour for the other sort of flags. My problem with the word multicolour in this context is, that a flag of that sort can consist of one or two colours as well. Then the word multiple either doesn't fit or doesn't make clear the difference to bicolour. However, I guess I'll also use multicolour if no one can clearify this problem.
 
Think of it as a car decal. Generally speaking, most car decals are single color, using the Window or the car body as a background so you can see the logo etc.

Decals are different from stickers because stickers (e.g. a bumper sticker) are solid and multi color. So I guess you could think of one as a decal (bicolor) and one as a sticker (non-decal).
 
Okay, that clearifies things up. Then my dictonary must be kind of wrong. The translation given there made me think of models. Not in sense of 3d graphics, but of for instance military vehicles consisting of parts made out of plastic which you have to glue together. Sometimes there are things too detailed to paint them onto the model, logos for example. Instead there is kind of a paper with these logos which you put into water. The logo then gets off of the paper and you can put it onto your model. Once it gets dry it is fixed. This is what the dictonary gave as translation for decal. As this would be a multicoloured, detailed structure I thought decal flags a multicolour flags. However, I guess english is your mother tongue, so you are the pro, not my dictonary ;).
 
Hi this my first ever post so i hope i am posting it in the right place? Anyway i followed your tutorial and it seems pretty good and to the point (thanks!). However i downloaded DDS converter 2 (unlike what you advised!) and having problems. I am only getting a white flag in the game. Could you tell me please where i might be going wrong and how i install the dds plug in for gimp? Would be most appreciated (not the most computer savvy person!). I am running vista if this has any bearing on the situation. :):confused:
 
First of all this is the right place for questions. As there already is a thread in this section that covers the topic (just like in this case) you have problems with, you are allowed to ask here. But you should not start a new thread here only containing your question without any tutorial.
Next, I'd say it is actually a good idea to try dds converter. If it works for you, then it is the easiest way to deal with alpha channel. But as problems with this program don't seem to be unusual, I based this tutorial on GIMP.
However, I don't think white flags can be caused by Vista, although I never ran Civ4 on a Vista system before. Usually white flags are caused by the alpha channel. I have mentioned that somewhere in my tutorial. Some machines want to have an alpha channel, others don't want it. If you start dds converter (I am assuming here that it works for you) and select your flag (by a single click, no double click), then it should display whether the file contains an alpha or not. I think dds converter v2.0 doesn't support work on the alpha channel or only doesn't display the current setting. However, you should update to v2.1 (don't know if there is a later version now...) if you don't have so far. This may cause the mentioned problems. Try to not uninstall v2.0 before, but installing the new version in the same directory, this made it more stable for me (although it still crashes sometimes, I think when the flag is buggy itself as civ4 also crashed then). Assuming you have v2.1, check you file as described above. If it already has an alpha channel, save it without. With it don't, save it with. This usually solves the problem. I have no time now to describe you in detail where you'll find the setting, but actually dds converter is kind of easy, so you'll probably find it out by yourself. Alternativly use GIMP as described in the tutorial. Post again here if you like or if there are still problems with your flag. It's just that I don't know if I'll find some minutes to help you within the next two or three days. Still, there is a chance that other users will help you.

Ah. There is another possible reason for your problem. But you would be the first one having this problem. This could theoretically be caused if both the primary and the secondary colour of your civ are white. Check the "XML work" section in the decal (actually it is about non-decal) flags chapter. There the file you'd have to change is mentioned (second xml listing). Again, I have no time to give you a detailed description what to do. I think with a little time you'll figure out what's to do, but check your alpha channel first!

Again, sorry for having this so short, but I have no time now...
 
Thanks for your reply. I will go back to my flags and try a few of your suggestions out. I might post in a few days or so hopefully if the problems been solved or not. Thanks again.:)
 
cool3a2 can answer questions well. He may be able to pinpoint answer better if you mention the colors of the flag you are trying to make.
 
The colours of my flag were black and blue. I noticed that on my XML work i had made the primary colour white however having changed the primary and secondary colours to (black and blue) the flag in game was just a blank blue colour. I have read a number of tutorials on other websites and it seems this is not uncommon. I might be wrong (obviously) but it seems it isn't reading the alpha channel. Vista users who have DDS 2.1 have also experienced a similar problem it seems (according to what i have read). I hope i am wrong though because the plug in for GIMP looks terrifically complicated to in fact plug in. This might be a little out of my league currently. So any practical advice on this from anybody would be most appreciated.:)
 
Top Bottom