Blender: Usage of bake to texture to apply one texture to a new UV

The_Coyote

Emperor
Joined
Mar 1, 2008
Messages
1,367
Location
Europe
It´s only a mini tutorial, but perhaps someone has use for this function. But because, beside some tests, i havn´t really used this option til now, consider this as introductional tutorial and not as real knowledge transfer tutorial. You have to discover for your yourself if have use for it - or not. The reason for posting it: i can imagine some cases where it can be useful (eg: you have a collection of pictures as base for your texture - but afterwards you want to optimize the uv)

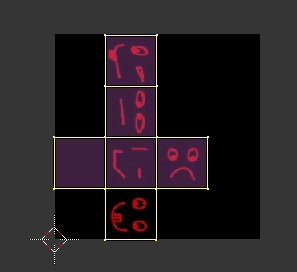
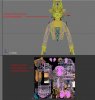
first we start with a finished model with UV and texture


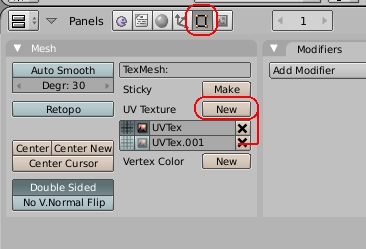
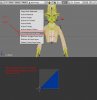
as next step we add a second uv layer to the model


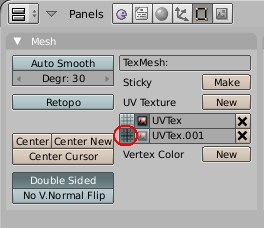
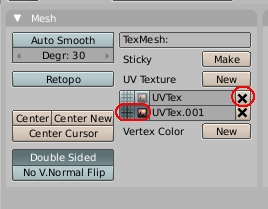
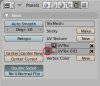
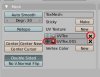
afterwards we set the new uv layer as active uv layer, while the original one is still used for rendering


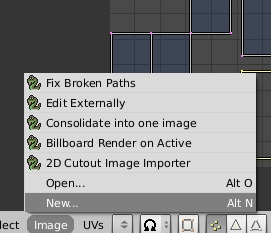
after we created the new uv, we add a new texture.


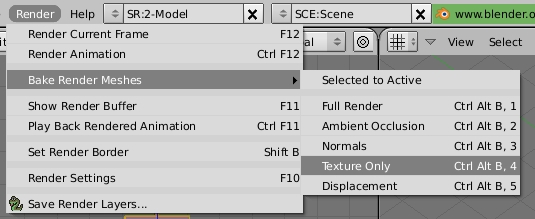
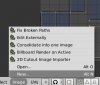
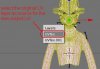
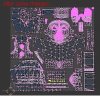
now we simply use the bake render meshes - texture only option


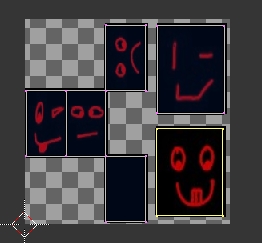
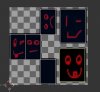
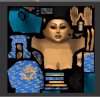
the resulting texture


which can be saved


and the new uv layout can be used for the model itself


Ciao
The_Coyote
 

Attachments

  • text_uv.jpg
    text_uv.jpg
    19.9 KB · Views: 4,413
  • add_second_uv.jpg
    add_second_uv.jpg
    47 KB · Views: 4,384
  • change_workable_uv.jpg
    change_workable_uv.jpg
    38.5 KB · Views: 4,331
  • new_texture.jpg
    new_texture.jpg
    34 KB · Views: 4,333
  • select_bake_render_texture.jpg
    select_bake_render_texture.jpg
    74.8 KB · Views: 4,315
  • save_texture.jpg
    save_texture.jpg
    24.9 KB · Views: 4,245
  • remove_original_uv.jpg
    remove_original_uv.jpg
    33.8 KB · Views: 4,281
  • result.jpg
    result.jpg
    30.7 KB · Views: 4,300
Blender creates the texture after the new uv, afterwards you can save the texture (tbh i always use bake render atm to scale my textures from the working resolution to the final resolution).

But in this tutorial you start with an texture and and UV (imagine you have a big photo of an object). As one example, in the first step you could unwrap your model to fit the uv to a photo, afterwards you could create a second uv to have a better place usage on your uv (or change the position on the uv). Using baking you could create your final texture using bake render.

I didn´t found real use for it so far (i don´t use photos for my textures), but i thought someone could use it. I played around a bit with this option because i thought i could be used as easy texture merge method for models and leaderheads, but wasn´t really sucessful so far (i thought i had used it one time in the past for this purpose, but wasn´t able to reproduce the steps)

-------------------------------------------------------------------------------
Edit: finally found the missing function, so here are some additions how to use texture baking to merge a multi texture model:

I used Ekmeks Wu v.2 to as example - you can find the download link in Ekmeks leaderhead thread

first, after the import of the model, i merged all body parts (and for the record, missed the eyes - so it´s only an example, no complete optimized final version). In pic1 you see the merged model and the now chaotic looking UV, the merged model has 5 materials and more than 1 texture


As next step add a new UV layer to the merged model and make the new layer the active layer, how is decribed in the OP. The new UV layer has no unwrap information so far. And because creating the entire UV from scratch for the new UV layer isn´t that funny the entire texture baking would be without an option to copy the UV from the original layer to the new one quite senseless. Luckily Blender has this option (<- this was the missing function). Select all faces in edit mode (not sure if this is needed, but at least it doesn´t harm), press Ctrl + C and select the option shown in the pic


Now select the original UV as source layer for the new UV layer


Now the entire unwrap information from the model has been copied to the new layer


after playing a bit the the UV to remove the overlapping areas and some other adjustment to fit the unwrap to the available space, the UV looked


After adding the texture in the UV window (like described in the OP), usage of the bake texture


resulted in this texture


After saving the texture (as bmp, the dds was created using paint.net), i removed all old materials from the model and added a new one with the new texture. I also changed the name of the UV layer (removed the .001 from the name - i think this step is necessary). As last step i exported the leaderhead. The exported nif (not game ready!) is attached as reference.

Also, using the nrml, env_mask, spec textures as diff texture is also possible to merge this texture from different souce models exactly the same way like described above. And of course it´s also possible to add some lights to the scene and make a full render.
 

Attachments

  • 3.jpg
    3.jpg
    26.4 KB · Views: 4,169
  • 2.jpg
    2.jpg
    67.8 KB · Views: 4,231
  • 1.jpg
    1.jpg
    98.5 KB · Views: 4,198
  • 4.jpg
    4.jpg
    36.7 KB · Views: 4,164
  • 6.jpg
    6.jpg
    46.9 KB · Views: 4,173
  • 7.jpg
    7.jpg
    40.5 KB · Views: 4,202
  • Wu_tex_demo.zip
    866.2 KB · Views: 215
  • 5.jpg
    5.jpg
    95.5 KB · Views: 4,193
Also, using the nrml, env_mask, spec textures as diff texture is also possible to merge this texture from different souce models exactly the same way like described above. And of course it´s also possible to add some lights to the scene and make a full render.

holy :wow: I'll give this a shot. great find coyote. especially for normal + spec. so I assume that the process is the same for them except you have to choose the normal as the main texture. right?
 
more or less it (creating this textures) should be an additional gain of the process. After the creation of the merged diff texture (directly after you saved the texture, before you remove the old materials), exchange the diff texture in the old materials with the spec, norm, etc and repeat the texture baking. (disclaimer: i havn´t tested this so far, but iirc the texture defined in the materials is used as base for baking) After you created all textures, remove all old materials and add the new material for the new merged texture

the norm could need a special threatment afterwards, i´m not sure if black parts are allowed in a norm texture, therefore it could be possible that this parts have to be edited afterwards.
 
Coyote,

I'm getting something weird. The baking is working fine but when I export the model it returns to the original UV layout AND then blender forgets the baking and goes back to the original UV layout! I did separate the parts and even got rid of the original materials - do you whats the reason?
 
iirc i only had this issue if i didn´t removed the old texture layer and set the new layer as active and used for rendering (and not renaming the new UV layer to UVTex gave an error while exporting)

if you did this, could you please attach the file so that i could have a look (but it will be not before the weekend that i have the time for it)

Ok I'll remove the old layer. My other thought was thta maybe the other textures (NRML, SPEC, etc) were forcing it.
 
Top Bottom