This is a temporary tutorial till Deliverator has the time to make a proper one. I have tried to put together all his tutorial's into one and take out all the stuff that is no longer relevant thanks to his NexusBuddy 2.0. By doing this I hope to get more people converting units over. Thankyou Deleiverator for all the hard work you have done to make converting possible.
What you'll need...
This zip file with the files used in the tutorial as well as a Civ 5 mod containing the completed conversion.
1. Blender 2.49, PyFFI, Blender Nif Scripts and Nifskope - follow the order of installation in the instructions. Civ5 3DModel Edit Toolpacks Part 1-6
2. A paint package that supports DDS texture file import/export such as Paint.NET.
3. Latest NexusBuddy 2.0 and Blender scripts.
4. Latest civ 5 template. Download Delivertor’s templates or make your own with this tutorial.
You may also need PakBuild to unpack any Civ 4 art you might want to convert (a lot of big mods pack their art too):
Stage 1 - Blender - Making a single mesh with a single material and texture
First up...
Blender User Interface Basics and Hotkeys:
To get a unit from Civ 4 into Civ 5 we need to convert it from the NIF file format via the BR2 file format to the GR2 file format.
The high level approach is this:
A) Import the NIF without animations.
B) Join weapons, etc to body. In the case of the Zulu I used the club and shield are already in the right positions relative to the body and skeleton. This means when I Join them (Ctrl-J) to the body they are in the correct position for animation already. NO LONGER NEEDED - MAKE A MULTIMESH UNIT INSTEAD
C) Make your single texture using the Bake Texture method. NO LONGER NEEDED - MAKE A MULTIMESH UNIT INSTEAD
D) Assign weapons, etc to bone Vertex Groups. This is what is meant by "rigging". NO LONGER NEEDED - MAKE A MULTIMESH UNIT INSTEAD
E) Rename vertex groups to be the same as your Civ 5 template.
Note for step B, If you're weapons aren't in the correct position you can use G to Move and R to Rotate them in the 3D View - I find it easier to do this in Edit Mode (TAB).
Note steps B - D are only needed if your unit is not one single mesh and needs to be.
A) Import the NIF without animations
In the attached ZIP file there is a subfolder nifskope_clean that contains the Zulu Ibutho unit from Total Realism all ready for Stage 1, so you can play along at home!
First, split your Blender window into two with the left hand side showing the 3D View and the right showing the Scripts view. There should be guides around on how to do this if you're stuck. Optional - I also like a third window on the left showing the Outliner view.
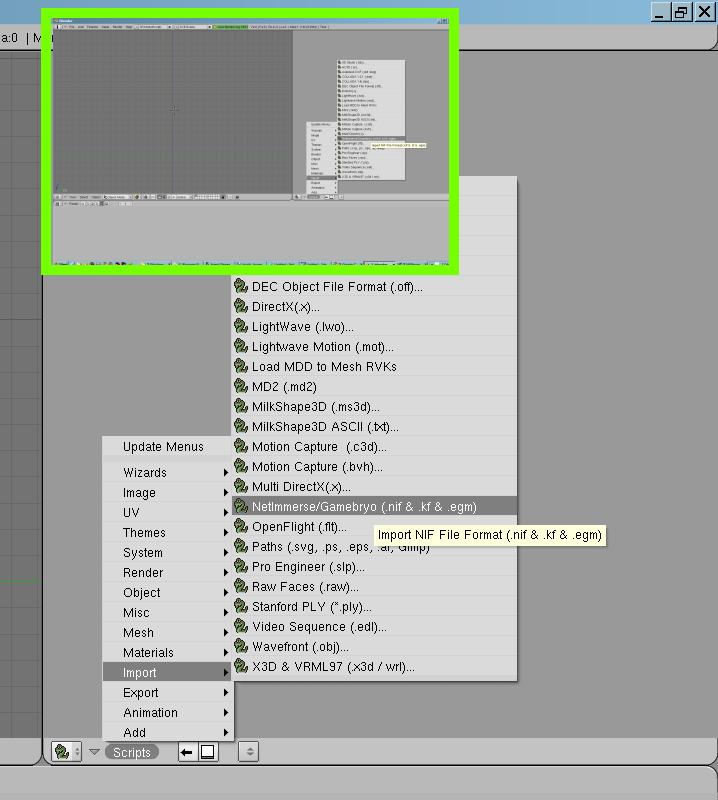
In the Scripts window go to Scripts > Import > Netimmerse / Gamebryo to import the file ibutho_nifskope_clean.nif from the attached ZIP.
Import using these specified options with the exception of Import Extra Nodes which it is better to leave on.

Note: no animation and I don't use Use the Force!
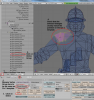
The unit loaded up into Blender:

With focus over the 3D View, press Numeric Keypad 1 to get Front View. Now switch to Texture View as shown.

Slight problem, our texture appears to be black in parts. This is easily fixed. Right click to select the body of the unit. Remove the vertex color by using the X in the location shown here:

You should see the texture appear. Repeat this for the feathers on top of the head - the texture is black anyway so it's hard to see the difference.
B) Join meshes into a single mesh - NO LONGER NEEDED - MAKE A MULTIMESH UNIT INSTEAD - I HAVE LEFT HER FOR REFERENCE INCASE IT MAY BE NEEDED
C) Make your single texture using the Bake Texture method - NO LONGER NEEDED - MAKE A MULTIMESH UNIT INSTEAD - I HAVE LEFT HER FOR REFERENCE INCASE IT MAY BE NEEDED
D) Assign weapons, etc to bone Vertex Groups (This is what is meant by "rigging") - NO LONGER NEEDED - MAKE A MULTIMESH UNIT INSTEAD - I HAVE LEFT HER FOR REFERENCE INCASE IT MAY BE NEEDED
E) Rename vertex groups to be the same as your Civ 5 template.
Open up the Outliner view and check the structure of the unit. Press TAB to enter Edit Mode and make sure no vertices are selected then follow instructions on picture. The Civ 4 Vertex Group names will most likely start with BIP but will need to have their names changed to be exactly the same as their equivalent Civ 5 names in your template. Most are easy to tell what name matches with what name but if you get stuck compare individual Vertex Groups in Edit mode to see which one is the closest selection.

Deselect all and Repeat steps 2 – 5 for every Vertex Group. If you have more than one mesh they will need to be assigned to vertex groups as well (you don't need to assign vertexes to every group but need a minimum of 2 assigned).
Stage 2 – Apply mesh to Civ 5 template
1) Start up two separate instances of Blender. In the first, open your civ5 template .blend file. In the second, your civ4 unit .blend file from Stage 1 (if it’s not already open).
2) In the blender instance that has your imported NIF, right click on the mesh in the 3D window so that only it is selected and not the skeleton. Now we are going to use the Copy and Paste script to copy the mesh into the other Blender instance.
For the Copy and Paste script to work you need to save your file as a .blend first - so press Ctrl-S or use the File menu to save it. Once you've done that in Scripts window go to Scripts -> Objects -> Copy and Paste Objects then select Copy object(s) to buffer. (If the option to Copy and Paste Objects isn't there then either you have installed the attached scripts or you need to restart Blender)

3) Now in the other Blender instance where we loaded civ5_minuteman_template.blend, in the Scripts window go to Scripts -> Objects -> Copy and Paste Objects then select Paste object(s) from buffer. A small copy of your Civ 4 unit should appear.
Now before you do anything else, join the newly pasted mesh with the larger mesh - you may have to use Shift-click to multi-selected in the Outliner window. Ctrl-J will join the two meshes together. This is to fix the paste mesh in place in terms of position and rotate - if you try and do anything to it without doing this the rotation and position usually jumps. You can then go into Edit Mode use the Material selector to select only the parts of the mesh you pasted in and press P to separate them again. Now you have two separate objects again which is easier to work with for the next step.

4) Now we need to match our pasted mesh to the position of the one that came with the template. First, to scale the model to the correct proportion it is useful do the following, (i) Snap the Cursor to the origin using Shift-S and Snap Cursor to Grid. (ii) Switch the Pivot to 3D Cursor as shown below. Now you can use S to scale and the model with scale from the floor up rather than from its centre point.


(In the screenshots I didn't split the mesh into two again as described in Step 4 - I thought of that idea later)
Now it is a question of trying to match the mesh accurately to the pose of the template. Some tips for doing this.
i) Use Numpad 1, 3 and 7 keys to check things from all angles. Often the alignment will look fine from one angle but needs fixing in another. Remember you can use G,X or G,Y or G,Z to move all or parts of a mesh along a particular axis.

ii) You can use 3D Cursor pivot to rotate parts of the mesh around a specific point - this is useful to rotate of arms around shoulder sockets, legs around hips or to fix the rotation of ankles as shown:

iii) Positioning hands really accurately is important if there are going to be holding weapons or something else:

5) Once you've matched the position of the mesh, you can delete the templete mesh leaving just you new one. Ctrl-J join the mesh back with weapons if needs be. Then go through the Vertex Group names and make sure there are no names that refer to Civ 4 bones. If merging your new mesh has added to this list then just delete the surplus nodes. If you don't then your BR2 export will probably be scrambled.
6) If you are happy with your new unit press ‘CRTL+A’ and select ‘Scale and Rotation to ObData’ then save. Go to your scripts and export to BR2.
7) Make a copy of the .gr2 file you are using the skeleton from - giving it a new name e.g. warrior_target.gr2.
8) Open the copied file in Nexus Buddy 2 and select Overwrite Meshes from BR2. Select the .br2 files you exported from Blender. This will keep the skeleton in the .gr2 completely unchanged but will completely replace the meshes with the data from the .br2 file. It doesn't matter if the .br2 file has more meshes than the original .gr2 had - it will still add them into the file. Following this, you will have a .gr2 with the original units skeleton but with your meshes from Blender.
9) Use Nexus Buddy 2 to fix up your materials and textures - you'll probably need to remove the existing materials first before creating new ones.
What you'll need...
This zip file with the files used in the tutorial as well as a Civ 5 mod containing the completed conversion.
1. Blender 2.49, PyFFI, Blender Nif Scripts and Nifskope - follow the order of installation in the instructions. Civ5 3DModel Edit Toolpacks Part 1-6
2. A paint package that supports DDS texture file import/export such as Paint.NET.
3. Latest NexusBuddy 2.0 and Blender scripts.
4. Latest civ 5 template. Download Delivertor’s templates or make your own with this tutorial.
You may also need PakBuild to unpack any Civ 4 art you might want to convert (a lot of big mods pack their art too):
Stage 1 - Blender - Making a single mesh with a single material and texture
First up...
Blender User Interface Basics and Hotkeys:
Spoiler :
3D View:
Zoom - Mouse Wheel
Rotate Camera - Middle Mouse Button + Drag
Front View - 1 (Numeric Keypad - if you don't have one on your keyboard you can change the options to use normal number keys)
Side View - 3
Top View - 7
Shift + any of the previous three reverses the view so Shift + 1 is Back View and Shift + 7 is Bottom View
TAB switches between Object Mode and Edit Mode
General Blender Hotkeys:
G - Move selection (remember as Goto) (move mouse then LMB when done)
R - Rotate selection (move mouse then LMB when done)
S - Scale selection (move mouse then LMB when done)
A - toggles Select All/Deselect All
X - Delete selection
G followed by X, Y, Z - Move selection along specified axis
S followed by X, Y, Z - Scale selection along specified axis
S followed by a number - Scale by multipler .5 for half, 2 for double.
S followed by X, Y, Z followed by a number - Scale by multiplier along specified axis.
R followed by a number - Rotate the specified number of degrees.
Ctrl + LMB Drag in a loop - Lasso Select
B then LMB Drag - Box Select
M followed by X, Y, Z - Mirror selection in specified axis
Shift + D - Duplicate (Clone) selection
Object Mode:
Right Click to select an object
Right Click to select an object, then Shift-Right Click another to select another object to join it to, then Ctrl-J will join the objects into a single object.
Edit Mode:
Ctrl-P: Se(P)arate selection as new object.
To get a unit from Civ 4 into Civ 5 we need to convert it from the NIF file format via the BR2 file format to the GR2 file format.
The high level approach is this:
A) Import the NIF without animations.
B) Join weapons, etc to body. In the case of the Zulu I used the club and shield are already in the right positions relative to the body and skeleton. This means when I Join them (Ctrl-J) to the body they are in the correct position for animation already. NO LONGER NEEDED - MAKE A MULTIMESH UNIT INSTEAD
C) Make your single texture using the Bake Texture method. NO LONGER NEEDED - MAKE A MULTIMESH UNIT INSTEAD
D) Assign weapons, etc to bone Vertex Groups. This is what is meant by "rigging". NO LONGER NEEDED - MAKE A MULTIMESH UNIT INSTEAD
E) Rename vertex groups to be the same as your Civ 5 template.
Note for step B, If you're weapons aren't in the correct position you can use G to Move and R to Rotate them in the 3D View - I find it easier to do this in Edit Mode (TAB).
Note steps B - D are only needed if your unit is not one single mesh and needs to be.
A) Import the NIF without animations
In the attached ZIP file there is a subfolder nifskope_clean that contains the Zulu Ibutho unit from Total Realism all ready for Stage 1, so you can play along at home!
First, split your Blender window into two with the left hand side showing the 3D View and the right showing the Scripts view. There should be guides around on how to do this if you're stuck. Optional - I also like a third window on the left showing the Outliner view.
In the Scripts window go to Scripts > Import > Netimmerse / Gamebryo to import the file ibutho_nifskope_clean.nif from the attached ZIP.
Import using these specified options with the exception of Import Extra Nodes which it is better to leave on.
Note: no animation and I don't use Use the Force!
The unit loaded up into Blender:
With focus over the 3D View, press Numeric Keypad 1 to get Front View. Now switch to Texture View as shown.
Slight problem, our texture appears to be black in parts. This is easily fixed. Right click to select the body of the unit. Remove the vertex color by using the X in the location shown here:
You should see the texture appear. Repeat this for the feathers on top of the head - the texture is black anyway so it's hard to see the difference.
Now, at present the unit is using four texture files scout_128.dds, zulu_impi.dds, morningstar.dds and modernmerchant_128.dds. We need to combine these into one so that we can have a single mesh with a single texture.Note: I have only come across this Vertex Color thing very rarely.
Note: There is more than one way to achieve a single texture, but I'm going to use the Bake Texture method here (Thanks to the Coyote for the tip-off). There is another method - manually joining existing textures together which I'll go through another time. See this post for the general idea on the other method.
B) Join meshes into a single mesh - NO LONGER NEEDED - MAKE A MULTIMESH UNIT INSTEAD - I HAVE LEFT HER FOR REFERENCE INCASE IT MAY BE NEEDED
Spoiler :
Now, we need to join all our separate objects into one.
Right-click to select the Club, hold down Shift and then right click the body object, Ctrl-J to join the two. It is important that you select the Club first to join the Club to body rather than the other way around. Press A to Deselect All when your done.

Now repeat this for Shield, Spear, the Features on the head and the two earring things, joining them one by one to the body.
Once you've got everything in one object, press TAB to enter Edit Mode. Everything should have yellow vertices highlighted including the feathers and earings.

Right-click to select the Club, hold down Shift and then right click the body object, Ctrl-J to join the two. It is important that you select the Club first to join the Club to body rather than the other way around. Press A to Deselect All when your done.
Now repeat this for Shield, Spear, the Features on the head and the two earring things, joining them one by one to the body.
Once you've got everything in one object, press TAB to enter Edit Mode. Everything should have yellow vertices highlighted including the feathers and earings.
C) Make your single texture using the Bake Texture method - NO LONGER NEEDED - MAKE A MULTIMESH UNIT INSTEAD - I HAVE LEFT HER FOR REFERENCE INCASE IT MAY BE NEEDED
Spoiler :
Make sure you are in Edit Mode. Now, switch the right-hand panel in Blender to show the UV/Image Editor as shown:

Next, click this to create a new UV texture layer. The unit will go white but don't worry.

The new UV texture layer should be set as the Active as shown (the grid icon) the original one should stay as the rendering one (the picture icon).

Still with everything selected in the 3D View press Ctrl-C and then choose the following options:

This copies the UV layout from UVTex to UVTex.001 your new texture layer.
You should see the mess in next screenshot in the UV window. This is the current UV mapping for the unit. It basically tells the graphics engine how to apply a 2D texture to a 3D mesh.

Because we are combining several textures into one, we have the problem that a lot of elements are overlapping. We need to fix this first this before we can bake our texture.
We still have our six separate materials which we can use to select the separate elements of the unit. Switch to the second material (the morningstar one used for the Club) using the small arrows shown below, press A to make sure everything is deselected in the 3D View and then press the select button for that material. Now the UV window shows only the mappings for the Club:


Now, back in the 3D View, deselect all (A) and use the small right arrow to move to the next material which should be the shield.
In the UV Window to select All then G and move everything to the top of the square this time. We are just moving the UV for each element out of the way so there is no overlap and we can see what we're doing.
For the spear (4th material) move to the right of the square in the UV, skip the feather because that's OK where it is. For the earing (6th material) put it beneath the square somewhere.
The UV view should now look something like this with no overlap.

Now we have a nice jigsaw puzzle to fit these elements in back into the UV mapping. Use Lasso select, together with S to scale, R to rotate and G to move selections in the UV window until you've fit everything in. Note: the club mapping that we stuck to the right of the square can be made quite a lot smaller - like to about an eighth of one side of the square. You can use mouse wheel to zoom into the UV view and the middle mouse button drag to pan - just like in the 3D View.

Here's my completed jigsaw - you'll probably do a better job - it doesn't matter if you've arranged it differently provided there's no overlap and a least a small amount of space between each piece of the mapping.

Now for the cool bit. Select Image > New in the UV window. Set the width and height to both be 256. This will create a plain black image. In the top Blender menu select Render > Bake Render Meshes > TextureOnly. Blender has created our single new texture file for us, based on the UV layout work we just did. How cool is that!

Now go to Image > Save As... in the UV Window and save it as a TGA - convert to DDS when convenient.
Next, delete UVTex at the bottom using the X and rename UVTex.001 to UVTex.

Next, click this to create a new UV texture layer. The unit will go white but don't worry.
The new UV texture layer should be set as the Active as shown (the grid icon) the original one should stay as the rendering one (the picture icon).
Still with everything selected in the 3D View press Ctrl-C and then choose the following options:
This copies the UV layout from UVTex to UVTex.001 your new texture layer.
You should see the mess in next screenshot in the UV window. This is the current UV mapping for the unit. It basically tells the graphics engine how to apply a 2D texture to a 3D mesh.
Because we are combining several textures into one, we have the problem that a lot of elements are overlapping. We need to fix this first this before we can bake our texture.
We still have our six separate materials which we can use to select the separate elements of the unit. Switch to the second material (the morningstar one used for the Club) using the small arrows shown below, press A to make sure everything is deselected in the 3D View and then press the select button for that material. Now the UV window shows only the mappings for the Club:
Now, press A in the UV Window to select all then G and move everything to the left of the square like this:Note: The hotkeys for the UV window are pretty much the same to the Edit Window you can use G to Move, R to Rotate, S to Scale, etc. The only difference is there is only an X and Y axis if your want to restrict your movement or scaling in one direction. R followed by 90 can be used to rotate stuff 90 degrees. Ctrl + LMB Drag to lasso select is a must for UV editing as well.
Now, back in the 3D View, deselect all (A) and use the small right arrow to move to the next material which should be the shield.
In the UV Window to select All then G and move everything to the top of the square this time. We are just moving the UV for each element out of the way so there is no overlap and we can see what we're doing.
For the spear (4th material) move to the right of the square in the UV, skip the feather because that's OK where it is. For the earing (6th material) put it beneath the square somewhere.
The UV view should now look something like this with no overlap.
Now we have a nice jigsaw puzzle to fit these elements in back into the UV mapping. Use Lasso select, together with S to scale, R to rotate and G to move selections in the UV window until you've fit everything in. Note: the club mapping that we stuck to the right of the square can be made quite a lot smaller - like to about an eighth of one side of the square. You can use mouse wheel to zoom into the UV view and the middle mouse button drag to pan - just like in the 3D View.
Jigsaw fun...Originally Posted by Jaythekiller
I found a tiny trick to complete the UV layer jigsaw :
Better than Lasso select you can use the "UV island select mode"
It allows you to select the different parts of the jigsaw easily (you just have to click on a bit and it's selected)
Here's my completed jigsaw - you'll probably do a better job - it doesn't matter if you've arranged it differently provided there's no overlap and a least a small amount of space between each piece of the mapping.
Now for the cool bit. Select Image > New in the UV window. Set the width and height to both be 256. This will create a plain black image. In the top Blender menu select Render > Bake Render Meshes > TextureOnly. Blender has created our single new texture file for us, based on the UV layout work we just did. How cool is that!
Now go to Image > Save As... in the UV Window and save it as a TGA - convert to DDS when convenient.
Next, delete UVTex at the bottom using the X and rename UVTex.001 to UVTex.
D) Assign weapons, etc to bone Vertex Groups (This is what is meant by "rigging") - NO LONGER NEEDED - MAKE A MULTIMESH UNIT INSTEAD - I HAVE LEFT HER FOR REFERENCE INCASE IT MAY BE NEEDED
Spoiler :
Now we need to go through the five materials other than the main body, and make sure they are rigged to the unit skeleton.
In the 3D View, deselect all using A and select only the second material again - the Club (the morningstar material).
In Blender you rig parts of a mesh to Bones by assigning vertices to Vertex Groups. In this example, we have the Club selected to rig it to the right hand bone (BIP R Hand) we just select the Vertex Group BIP R Hand and then click Assign (see screenshot below).
Deselect all, go to the material 3 and select. This will select the shield. Switch to Vertex Group BIP L Hand and click Assign. Assign the Spear (material 4) to left hand also, and materials 5 and 6 (the features and earrings) to BIP Head.

Press TAB to enter object mode and delete all but one of the materials.

TAB again to enter Edit Mode. Press A twice so that all vertices are selected and press the Material - Assign (rather than the Vertex Group - Assign we have been usign). This makes sure the whole model is using the same material which we can assign to our new texture.
In the 3D View, deselect all using A and select only the second material again - the Club (the morningstar material).
In Blender you rig parts of a mesh to Bones by assigning vertices to Vertex Groups. In this example, we have the Club selected to rig it to the right hand bone (BIP R Hand) we just select the Vertex Group BIP R Hand and then click Assign (see screenshot below).
Deselect all, go to the material 3 and select. This will select the shield. Switch to Vertex Group BIP L Hand and click Assign. Assign the Spear (material 4) to left hand also, and materials 5 and 6 (the features and earrings) to BIP Head.
Press TAB to enter object mode and delete all but one of the materials.
TAB again to enter Edit Mode. Press A twice so that all vertices are selected and press the Material - Assign (rather than the Vertex Group - Assign we have been usign). This makes sure the whole model is using the same material which we can assign to our new texture.
E) Rename vertex groups to be the same as your Civ 5 template.
Open up the Outliner view and check the structure of the unit. Press TAB to enter Edit Mode and make sure no vertices are selected then follow instructions on picture. The Civ 4 Vertex Group names will most likely start with BIP but will need to have their names changed to be exactly the same as their equivalent Civ 5 names in your template. Most are easy to tell what name matches with what name but if you get stuck compare individual Vertex Groups in Edit mode to see which one is the closest selection.
If the unit has no Vertex Groups you will need to create and assign them (long painful process). Bernie14 has a good tutorial on how to do this.Note: some people prefer to do this step in NifScope, so if you are more comfortable with that method check out Deliverator’s tutorial.
Deselect all and Repeat steps 2 – 5 for every Vertex Group. If you have more than one mesh they will need to be assigned to vertex groups as well (you don't need to assign vertexes to every group but need a minimum of 2 assigned).
Stage 2 – Apply mesh to Civ 5 template
1) Start up two separate instances of Blender. In the first, open your civ5 template .blend file. In the second, your civ4 unit .blend file from Stage 1 (if it’s not already open).
2) In the blender instance that has your imported NIF, right click on the mesh in the 3D window so that only it is selected and not the skeleton. Now we are going to use the Copy and Paste script to copy the mesh into the other Blender instance.
For the Copy and Paste script to work you need to save your file as a .blend first - so press Ctrl-S or use the File menu to save it. Once you've done that in Scripts window go to Scripts -> Objects -> Copy and Paste Objects then select Copy object(s) to buffer. (If the option to Copy and Paste Objects isn't there then either you have installed the attached scripts or you need to restart Blender)
3) Now in the other Blender instance where we loaded civ5_minuteman_template.blend, in the Scripts window go to Scripts -> Objects -> Copy and Paste Objects then select Paste object(s) from buffer. A small copy of your Civ 4 unit should appear.
Now before you do anything else, join the newly pasted mesh with the larger mesh - you may have to use Shift-click to multi-selected in the Outliner window. Ctrl-J will join the two meshes together. This is to fix the paste mesh in place in terms of position and rotate - if you try and do anything to it without doing this the rotation and position usually jumps. You can then go into Edit Mode use the Material selector to select only the parts of the mesh you pasted in and press P to separate them again. Now you have two separate objects again which is easier to work with for the next step.
4) Now we need to match our pasted mesh to the position of the one that came with the template. First, to scale the model to the correct proportion it is useful do the following, (i) Snap the Cursor to the origin using Shift-S and Snap Cursor to Grid. (ii) Switch the Pivot to 3D Cursor as shown below. Now you can use S to scale and the model with scale from the floor up rather than from its centre point.
(In the screenshots I didn't split the mesh into two again as described in Step 4 - I thought of that idea later)
Now it is a question of trying to match the mesh accurately to the pose of the template. Some tips for doing this.
i) Use Numpad 1, 3 and 7 keys to check things from all angles. Often the alignment will look fine from one angle but needs fixing in another. Remember you can use G,X or G,Y or G,Z to move all or parts of a mesh along a particular axis.
ii) You can use 3D Cursor pivot to rotate parts of the mesh around a specific point - this is useful to rotate of arms around shoulder sockets, legs around hips or to fix the rotation of ankles as shown:
iii) Positioning hands really accurately is important if there are going to be holding weapons or something else:
5) Once you've matched the position of the mesh, you can delete the templete mesh leaving just you new one. Ctrl-J join the mesh back with weapons if needs be. Then go through the Vertex Group names and make sure there are no names that refer to Civ 4 bones. If merging your new mesh has added to this list then just delete the surplus nodes. If you don't then your BR2 export will probably be scrambled.
6) If you are happy with your new unit press ‘CRTL+A’ and select ‘Scale and Rotation to ObData’ then save. Go to your scripts and export to BR2.
7) Make a copy of the .gr2 file you are using the skeleton from - giving it a new name e.g. warrior_target.gr2.
8) Open the copied file in Nexus Buddy 2 and select Overwrite Meshes from BR2. Select the .br2 files you exported from Blender. This will keep the skeleton in the .gr2 completely unchanged but will completely replace the meshes with the data from the .br2 file. It doesn't matter if the .br2 file has more meshes than the original .gr2 had - it will still add them into the file. Following this, you will have a .gr2 with the original units skeleton but with your meshes from Blender.
9) Use Nexus Buddy 2 to fix up your materials and textures - you'll probably need to remove the existing materials first before creating new ones.
")
")