Here's my attempt at writing a tutorial:
This tutorial is written spesifically for the unit "Ranger" by Kinboat. With some modifications it can also be applied to other units as well.
I have used the software tools GIMP and Flicster. In GIMP you'll need to activate the Colormap-tab in the Toolbox.
Also the tool "Select by color Tool" may need some fine-tuning to make it select exactly what you want it to (the "Tool options" dialog). I use it with "Antialiasing", without "Feather edges", Threshold 15 and "Select by": Composite. Other settings may even work better.
1. First I had a look at the unit and it's colormap. This revealed that the colors of the cape/hood was fairly distinct and did not appear on other parts of the unit - this makes it a LOT easier. Also, the cape/hood is clearly visible in all the unit's directions, so I chose this as the target area for civcolors.
2. Open the flic in Flicster and export it to storyboard with colormap 4 (the green one for aztecs in vanilla game). This is beacuse the part I want to add civcolors to is in a greenish hue.
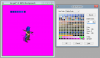
3. Open the storyboard in GIMP and save the colormap as for instance "Ranger_green" or something easy recognisable.
4. Use the "Select by color tool" and mark the cape. Holding down [Shift] while clicking will add that color hue to the selection rather than make a brand new selection. [CTRL] will de-select the colors you are clicking.
5. You can also add single pixels, but this is an extraordinary time-consuming method! When you are satisfied with the selection, choose the "Hue - Saturation tool": Colors -> Hue-Saturation (without de-selecting anything - you can of course crop the selection and paste it to a new layer for further adjustments there).
6. Increase the lightness so it matches the green in the civcolor-part of the colormap (the first 16 indexes). I believe around 25-28 increase should be about right, but you'll probably find out the optimum level by try and error.
7. De-select all areas and convert the storyboard to RGB (Image -> Mode -> RGB).
8. Convert it back to indexed, but specify that a custom palette should be used - namely the one you previously saved "Ranger_green". Remember to UNCHECK the box "remove unused and duplicate colors"! Otherwise the colormap will be totally messed up. GIMP will now assign the colors in the storyboard to the nearest match in the colormap. If you have adjusted the green cape right, the nearest matches should be the indexes reserved for civcolors.
9. You can tell GIMP to overwrite the existing file, making it available to Flicster (which of course are still open in storyboard-mode).
10. In Flicster refresh the storyboard and check that it looks OK in different civcolors and unit directions.
11. Export the storyboard (with original palette) to a different name (no need to overwrite the original file in case you want to make further attempts).
The flc-file should now be ready to use, and after doing similar modifications of all flc's for that unit, it should be ready for (civ III) in-game action!
Hope this was understandable and helpful. Just ask if you found something to be unclear/confusing.
Regards Sigurd
@Vuldacon: Didn't mean to "compete" with you - I just didn't see your post until after I posted my own reply.
") . I used Flicster and Gimp since you mentioned that you used those programs. It's not perfect, but is this along the lines you were thinking? If it was, I can try to describe the method for you. I had to re-learn myself a bit, since it's been ages since I last did this (and a couple of Windows-versions as well).
. I used Flicster and Gimp since you mentioned that you used those programs. It's not perfect, but is this along the lines you were thinking? If it was, I can try to describe the method for you. I had to re-learn myself a bit, since it's been ages since I last did this (and a couple of Windows-versions as well).