nodrownboy
Chieftain
- Joined
- Oct 27, 2005
- Messages
- 12
IMPORTANT! I've not yet figured out how to get created pieces into the game. I discuss this a little more at the bottom of the post. This guide will show how to actually generate the pieces, but not how to get them into the game.
What are Terrain Pieces?
Terrain Pieces are purely aesthetic objects, used mostly for multi-tile hills. Basically, they allow some variation in the appearance of terrain to keep everything from looking too tiled. In the case of hills, a two hex hill would allow a hill that looks like one continuous hill but crosses two hexes, rather than always having two identical hills taking up the center of each hex. Most mods that make major changes to terrain will want to be able to modify and add Terrain Pieces.
I haven't seen much information regarding the Terrain Editor except for a few people blindly scratching at the surface and quitting in frustration shortly after. This guide will hopefully be a start for some people to get into this editor as I'm still missing a key component to the puzzle.
The first two sections deal with converting and editing the heightmaps for the terrain pieces. The remaining sections all relate to the Terrain Editor itself.
NOTE: Terrain Editor is quite unstable. It seems to crash frequently when trying to open a terrain piece, or it will simply fail to open any pieces without restarting. Thankfully I've not yet seen it crash while actually working on a piece.
1. A usable heightmap file
The height maps for terrain pieces are found under the sid meier's civilization v\Assets\terrain\pieces folder. These files are formatted differently from the base terrain heightmap files, while both .dds files, these are A16B16G16R16. This format does not appear to be widely supported in image editors, and therefore we need to convert these files to something more accessible. To accomplish this, I installed the DirectX SDK from Microsoft . The only piece of the SDK you need to install for this is the Utilities. Once you have it installed follow these steps:
a) Copy the heightmap file(xxxxx_h.dds, not the BLEND files) you want to modify to a working directory elsewhere on your computer. It's best to always keep files you are modifying separate from the base files for the game.
b) The utilities add a right-click entry in Windows Explorer for dds files called "Convert to File Format", this is the easiest way to convert the files. Do this with the copy of your file.
-or-
The slower way is to open the DirectX Texture Tool, and select Format->Change Surface Format.
c) Assuming you are using the right-click format option, simply change the
Pixel Format to DXT5 or other format your Image Editor can read.
Due to compression issues we also want to upscale the image when we convert as well. I've found 4x the size to work pretty well. So 512x512 goes to 2048x2048.

d) Click OK and accept overwriting the file. You now have an editable heightmap
2. Edit the heightmap
I'm using GIMP with an added dds file plug-in to edit the heightmap
a) Open the converted heightmap file. You do not want to load the mipmaps.
b) You'll be looking at what looks like a picture that is just alpha background

c) To fix this, go into the layer dialog(windows->dockable dialogs), right-click on "main surface", and then "Add Layer Mask..."
d) Initialize the layer mask to "Transfer Layer's Alpha Channel".
e) You'll now see two boxes in the "main surface" layer, right-click on it again and select "disable layer mask".
f) Now you have the proper heightmap.

g) Next, we'll make a change to the heightmap. First, make sure you click on the left box in the layer to make that active.
h) Next add a noticeable feature to the heightmap, I added a dark circle in mine to make a quick and ugly crater.

i) Once you are satisfied, save the file, make sure you follow the prompt to export the image again.
j) Now, follow steps 1b and 1c again to convert the file back, changing Pixel Format back to A16B16G16R16 and downscaling the size back to the original(128x128 or 512x512)
3.Exploring The Terrain Editor
a) Load the Terrain Editor from the Civilization 5 tab in Nexus.
b) At first glance, the tool is very daunting, but we'll go through each step using it, which should make a lot more sense.
c) To load a pre-existing piece, set the dropdowns under Terrain Pieces to a terrain type and Continent you'd like to view. The view below should then populate with a list of appropriate pieces. Double click on the piece you want to load.
The first number following the name indicates the number of hexes the terrain piece actually uses in game. So Afri_Desert_Hill_1_3.dds is a 1 hex Desert Hill with the African continent style. Snow_Hill_3_2.dds is a 3 hex Snow Hill applicable to all continents

d) Next, select Hex Grid from the top toolbar to get a constant light hex view.
e) To see why the hexes matter, switch into Hex Mode in the top toolbar.
f) You now have much darker hex lines. Try clicking into one of the hexes.
g) If you clicked into a hex with a visible feature, the Hex Properties should show the terrain type with the Blocking checkmark checked. Otherwise, you'll either see Generic with no Blocking checked, or the terrain type without Blocking.
h) The Blocking box determines what hex types are actually paid attention to by the game when deciding what terrain piece to display.

4. A New Terrain Piece
a) Make sure to copy your file back to the Assets\terrain\pieces folder you got it from, renaming it to avoid overwriting a game file.
While the Terrain Editor lets you pull a heightmap from any location originally, it doesn't appear to actually save that path, and therefore expects the heightmap to be in the folder it saves the terrain piece to.
b) Select New Terrain Piece in the Terrain Editor.
c) Set Terrain Type and Continent Type to those of the heightmap(probably the ones you copied the base heightmap from).
d) Set Piece Size based on your heightmap size. Small is one hex using a 128x128 size. A large piece is multi-hex using the 512x512 heightmap.
e) Use the '...' button under Heightmap Name to browse for your modified heightmap.
f) I believe Piece Name needs to have the same base name as the heightmap. My Afri_Desert_Hill_3_test_H.dds becomes Afri_Desert_Hill_3_test

5. Editing the Piece
a) First thing to do, is to get to the Terrain Type and Continent you created the piece under in Terrain Pieces. Select the .csv file of the piece you created
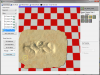
b) You should now see the loaded heightmap covered in a checkerboard pattern.
The below image demonstrates the artifacts you get when not upscaling during the heightmap conversion process.

c) The first thing we want to do is paint some terrain onto the piece.
d) Set your brush to the largest size.
e) On the right side of the screen are some boxes with some very ugly static inside. These are the available terrain textures. Select your continent and select each box to find the right terrain type.

f) Once you have that selected, make sure you are in Pain Mode and start painting the terrain on the image over everything you'll possibly want included in the piece. If the terrain doesn't actually show up when you are painting at this step, save the piece, exit Terrain Editor and restart. When you open the piece again, the terrain should start to show up.

g) After the terrain is set, switch to Hex Mode. Here is where you'll set up the terrain type for the hexes on the piece that you want to use. Make sure to also set those to Blocking.
h) Now switch to H Blend Mode. This generates the height blend map. What that means is you'll paint the parts of your piece that you want to have actually show up to what is set via your height map. On hills you'd want to fill the primary parts of the hill completely, and then taper that off a bit along the edges of the feature.

i) Finally switch to T Blend Mode. This is the texture blend map. It works similarly to the height blend map and will usually end up looking very similar. Fill in the areas where you want your terrain texture to be most visible.

j) Set the priority of the tile. Most existing pieces are set to Medium or High
k) From here, make sure to save the Piece and if you want, right-click on the csv in the editor and hit "Publish"
From here, you'll ask how to get this to show up in the game, and the short answer is I have no idea how to do that! The best I can figure is that the contents of the terrain\pieces folder is somehow compiled into the TerrainPiecesLibrary.fxsb file. Unfortunately, I have no idea what the format for that file is and I'm hoping this is where the community will be helpful.
What are Terrain Pieces?
Terrain Pieces are purely aesthetic objects, used mostly for multi-tile hills. Basically, they allow some variation in the appearance of terrain to keep everything from looking too tiled. In the case of hills, a two hex hill would allow a hill that looks like one continuous hill but crosses two hexes, rather than always having two identical hills taking up the center of each hex. Most mods that make major changes to terrain will want to be able to modify and add Terrain Pieces.
I haven't seen much information regarding the Terrain Editor except for a few people blindly scratching at the surface and quitting in frustration shortly after. This guide will hopefully be a start for some people to get into this editor as I'm still missing a key component to the puzzle.
The first two sections deal with converting and editing the heightmaps for the terrain pieces. The remaining sections all relate to the Terrain Editor itself.
NOTE: Terrain Editor is quite unstable. It seems to crash frequently when trying to open a terrain piece, or it will simply fail to open any pieces without restarting. Thankfully I've not yet seen it crash while actually working on a piece.
1. A usable heightmap file
The height maps for terrain pieces are found under the sid meier's civilization v\Assets\terrain\pieces folder. These files are formatted differently from the base terrain heightmap files, while both .dds files, these are A16B16G16R16. This format does not appear to be widely supported in image editors, and therefore we need to convert these files to something more accessible. To accomplish this, I installed the DirectX SDK from Microsoft . The only piece of the SDK you need to install for this is the Utilities. Once you have it installed follow these steps:
a) Copy the heightmap file(xxxxx_h.dds, not the BLEND files) you want to modify to a working directory elsewhere on your computer. It's best to always keep files you are modifying separate from the base files for the game.
b) The utilities add a right-click entry in Windows Explorer for dds files called "Convert to File Format", this is the easiest way to convert the files. Do this with the copy of your file.
-or-
The slower way is to open the DirectX Texture Tool, and select Format->Change Surface Format.
c) Assuming you are using the right-click format option, simply change the
Pixel Format to DXT5 or other format your Image Editor can read.
Due to compression issues we also want to upscale the image when we convert as well. I've found 4x the size to work pretty well. So 512x512 goes to 2048x2048.
d) Click OK and accept overwriting the file. You now have an editable heightmap
2. Edit the heightmap
I'm using GIMP with an added dds file plug-in to edit the heightmap
a) Open the converted heightmap file. You do not want to load the mipmaps.
b) You'll be looking at what looks like a picture that is just alpha background
c) To fix this, go into the layer dialog(windows->dockable dialogs), right-click on "main surface", and then "Add Layer Mask..."
d) Initialize the layer mask to "Transfer Layer's Alpha Channel".
e) You'll now see two boxes in the "main surface" layer, right-click on it again and select "disable layer mask".
f) Now you have the proper heightmap.
g) Next, we'll make a change to the heightmap. First, make sure you click on the left box in the layer to make that active.
h) Next add a noticeable feature to the heightmap, I added a dark circle in mine to make a quick and ugly crater.
i) Once you are satisfied, save the file, make sure you follow the prompt to export the image again.
j) Now, follow steps 1b and 1c again to convert the file back, changing Pixel Format back to A16B16G16R16 and downscaling the size back to the original(128x128 or 512x512)
3.Exploring The Terrain Editor
a) Load the Terrain Editor from the Civilization 5 tab in Nexus.
b) At first glance, the tool is very daunting, but we'll go through each step using it, which should make a lot more sense.
c) To load a pre-existing piece, set the dropdowns under Terrain Pieces to a terrain type and Continent you'd like to view. The view below should then populate with a list of appropriate pieces. Double click on the piece you want to load.
The first number following the name indicates the number of hexes the terrain piece actually uses in game. So Afri_Desert_Hill_1_3.dds is a 1 hex Desert Hill with the African continent style. Snow_Hill_3_2.dds is a 3 hex Snow Hill applicable to all continents
d) Next, select Hex Grid from the top toolbar to get a constant light hex view.
e) To see why the hexes matter, switch into Hex Mode in the top toolbar.
f) You now have much darker hex lines. Try clicking into one of the hexes.
g) If you clicked into a hex with a visible feature, the Hex Properties should show the terrain type with the Blocking checkmark checked. Otherwise, you'll either see Generic with no Blocking checked, or the terrain type without Blocking.
h) The Blocking box determines what hex types are actually paid attention to by the game when deciding what terrain piece to display.
4. A New Terrain Piece
a) Make sure to copy your file back to the Assets\terrain\pieces folder you got it from, renaming it to avoid overwriting a game file.
While the Terrain Editor lets you pull a heightmap from any location originally, it doesn't appear to actually save that path, and therefore expects the heightmap to be in the folder it saves the terrain piece to.
b) Select New Terrain Piece in the Terrain Editor.
c) Set Terrain Type and Continent Type to those of the heightmap(probably the ones you copied the base heightmap from).
d) Set Piece Size based on your heightmap size. Small is one hex using a 128x128 size. A large piece is multi-hex using the 512x512 heightmap.
e) Use the '...' button under Heightmap Name to browse for your modified heightmap.
f) I believe Piece Name needs to have the same base name as the heightmap. My Afri_Desert_Hill_3_test_H.dds becomes Afri_Desert_Hill_3_test
5. Editing the Piece
a) First thing to do, is to get to the Terrain Type and Continent you created the piece under in Terrain Pieces. Select the .csv file of the piece you created
b) You should now see the loaded heightmap covered in a checkerboard pattern.
The below image demonstrates the artifacts you get when not upscaling during the heightmap conversion process.
c) The first thing we want to do is paint some terrain onto the piece.
d) Set your brush to the largest size.
e) On the right side of the screen are some boxes with some very ugly static inside. These are the available terrain textures. Select your continent and select each box to find the right terrain type.
f) Once you have that selected, make sure you are in Pain Mode and start painting the terrain on the image over everything you'll possibly want included in the piece. If the terrain doesn't actually show up when you are painting at this step, save the piece, exit Terrain Editor and restart. When you open the piece again, the terrain should start to show up.
g) After the terrain is set, switch to Hex Mode. Here is where you'll set up the terrain type for the hexes on the piece that you want to use. Make sure to also set those to Blocking.
h) Now switch to H Blend Mode. This generates the height blend map. What that means is you'll paint the parts of your piece that you want to have actually show up to what is set via your height map. On hills you'd want to fill the primary parts of the hill completely, and then taper that off a bit along the edges of the feature.
i) Finally switch to T Blend Mode. This is the texture blend map. It works similarly to the height blend map and will usually end up looking very similar. Fill in the areas where you want your terrain texture to be most visible.
j) Set the priority of the tile. Most existing pieces are set to Medium or High
k) From here, make sure to save the Piece and if you want, right-click on the csv in the editor and hit "Publish"
From here, you'll ask how to get this to show up in the game, and the short answer is I have no idea how to do that! The best I can figure is that the contents of the terrain\pieces folder is somehow compiled into the TerrainPiecesLibrary.fxsb file. Unfortunately, I have no idea what the format for that file is and I'm hoping this is where the community will be helpful.