I know that you're quite capable at graphics stuff, ShiroKobbure, and I don't want to insult you by overexplaining, but I'll make it a little comprehensive for anyone else that might be reading this.
")
I suppose it would be the same way for newer versions of Photoshop. Mine is pretty old. I use Photoshop Elements 6, but here's the steps I use...
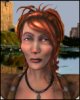
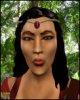
1. Create a combined picture of 3 renders, the Happy, Neutral, and Angry face of the LH, in full quality and millions of colours. You could probably use just one expression, but I use all 3 in case the lighting had changed or something became visible as the character moved expressions. In my attached pic I'd reduced the size of the image, just so that I could crop the sample pic to lower the attachment size. I usually create a pic that's 3 times the width of the standard LH 240x200.
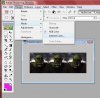
2. As in pic 1, select Image --> Mode --> Indexed Color...
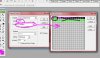
The Indexed Color Dialog Box appears, as in Pic 2.
3. Select 256 Colors, and Forced: Custom, which will bring up the Forced Colors dialog box.
4. In the attached pic, I have several Forced Colors. I just crossed them out because I didn't want to delete them for the example and have to reenter them later, as I use those for unit creation, which I'm doing now. All you need to do for a LH is have 2 transparency colours at the beginning of the palette. Bright Pink (FF00FF) will do for both, or Bright Green, or anything not used in the LH. You can create a transparency colour in the palette in Animation Shop, but I prefer to ensure a couple of colours here in Photoshop, just to make sure of no chance of LH transparency errors later. If you already have lots of "Forced Colors", as I do in the pic, and you only want 2 (which you do for the LH, because you want to leave as much room in the palette for colours from the picture, so you want to delete all the others), it's a bit of a pain. You can't just click on them in the Forced Colors dialog box and they disappear. Instead I think you have to do something like, instead of hitting Forced: Custom in the Indexed Color Dialog Box (as in step 3, above), select first Forced: None on a different RGB pic, and hit ok, which resets the Forced Colors to nothing, then they won't exist when you go to Forced: Custom for your real pic, and you can just click on the first 2 palette spots to select your pink colours.
5. So yeah, just create 2 forced colours, hit "OK" for everything, and then it creates a 256 colour palette for your indexed image. Just go back to the menu, select Image --> Mode --> Color Table, and when the Color Table Dialog Box shows up, there's an option to Save your palette, which is the one you load as a custom palette in Animation Shop.
Doesn't totally remove LH pixelation, especially when there's a lot of colours in a LH, but it reduced it better and does and better job than Animation Shop does on its own.


 Thank you very much.