Gen. Rommel
Wüstenfuchs
Transparency Texturing Tutorial For Poser Figures
Since Micaelus asked me some questions regarding transparency settings on figures with the intent of achieving certain looks, I decided to make a tutorial so that anybody else with similar questions could simply look it up here in the future. This tutorial will hopefully help even the hardest learner!")
Basically, you can tell figures to turn invisible, or not. However, you can also specify whether or not only certain areas of the figure are to turn invisible. This method is, in my opinion, one of the most important in getting figures to look a certain way, and can effectively help to make or break a unit. If used properly, a resourceful nit-maker can create various illusions that completely expand the possibilities of how to use figures to get units the way that is desired. I'll explain the process step by step, and with the help of images. The unit used as reference is my Prussian Line Infantry (1740).
1. Open your copy of Poser.
----
2. Go to the material room. You'll find a tab at the top of your Poser program titled Material. Clicking this will open the material room interface.

----
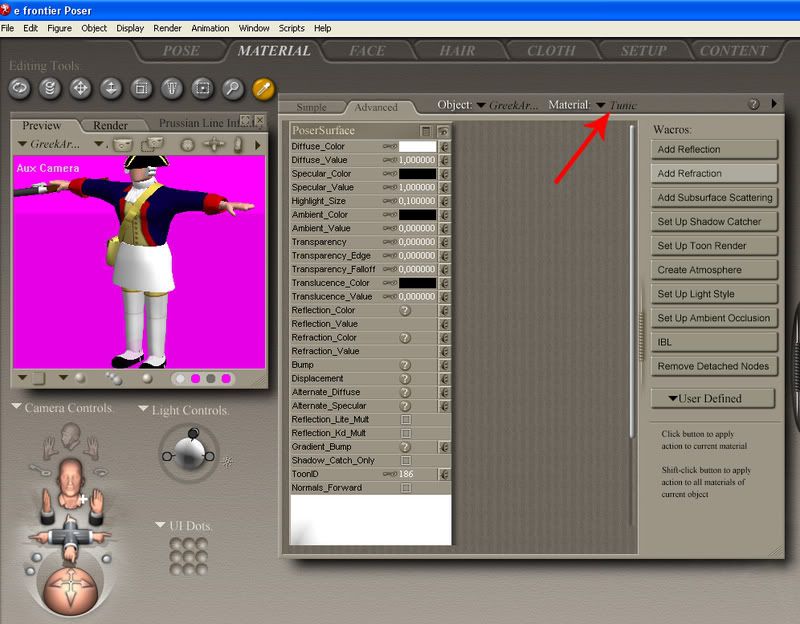
3. As you can see, the Greek Armor tunic (by Kinboat) is still untextured. The look that I'm going for is that of an old musketman's coat. To do this, we're going to need to attach a texture to the figure to get the desired look. Click on Material in the right corner and select Tunic. Refer to the red arrow to see what I mean.
----
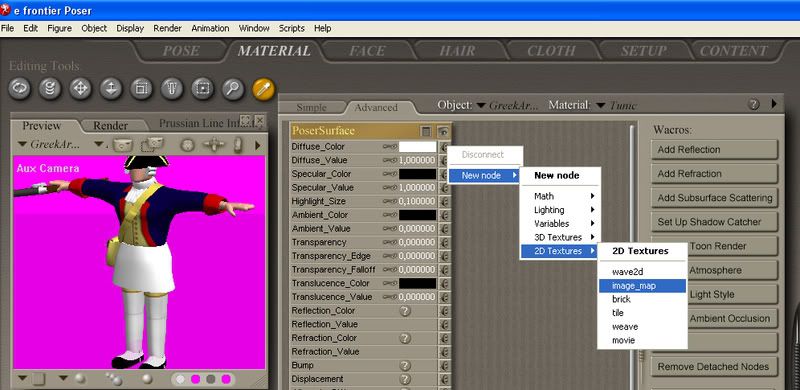
4. The next step will simply entail attaching a texture to the figure in question. Either you already have a ready texture to apply, or you have to create it yourself. For the sake of this tutorial, I already have a created texture. If you don't know how to create a texture, I would look up a tutorial dealing with that. Follow the hierarchy as shown in the image to attach a texture.
----
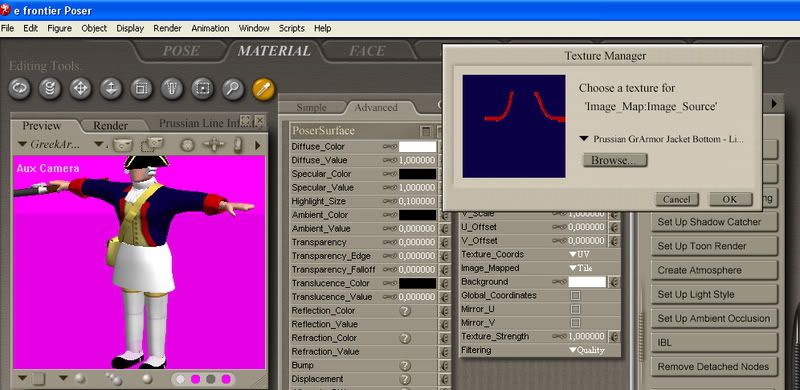
5. A small window will pop up once you've clicked on image_map. At the top of the window, the first line will be called Image_Source. Click on the None next to this and you will be asked to choose the image to attach. This is essentially when you attach the texture of the figure. Click on the Browse button and find the texture you would like to use. Here's the one I'm using.
----
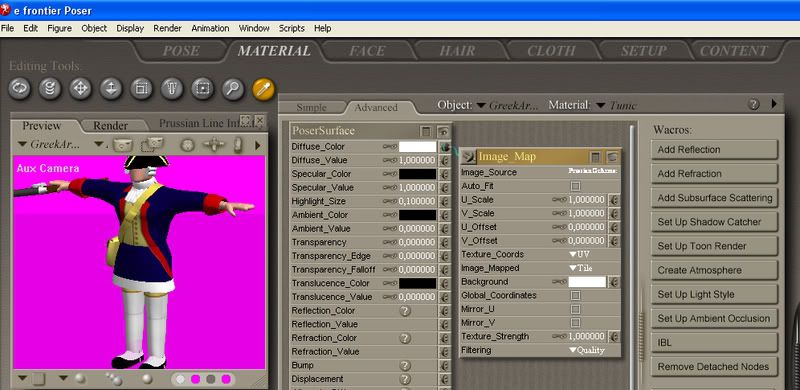
6. Once you click okay, the texture will be applied to the figure, and you will see what the figure now looks like. As you can tell, the texture is definitely going in the right direction, however, if the front were gone, it would definitely look more convincing, and more like a coat for that matter. This is basically where the transparency texturing comes into play.
----
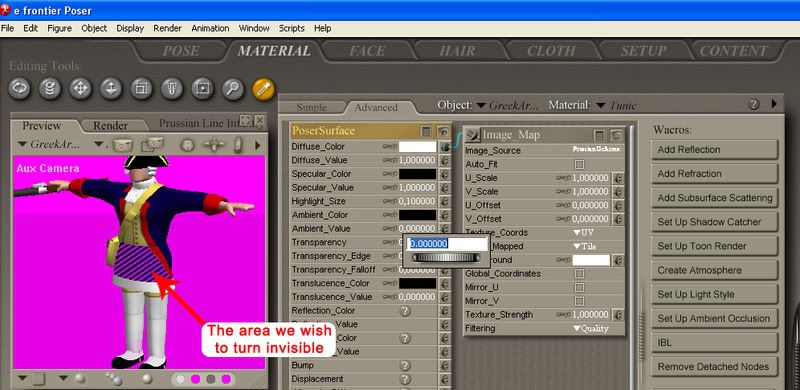
7. If you look around a bit on the Poser Surface window, you will find an option called Transparency. By clicking on the value to the right of this option, you will enable a small scroll which allows you to change the transparency setting of the figure. If you play around with this a bit, you will see that scrolling all the way right will change the value to 1.000000. This makes the figure completely disappear. However, we want to make only part of the figure disappear, namely the front that's between the two red seams of the texture.
----
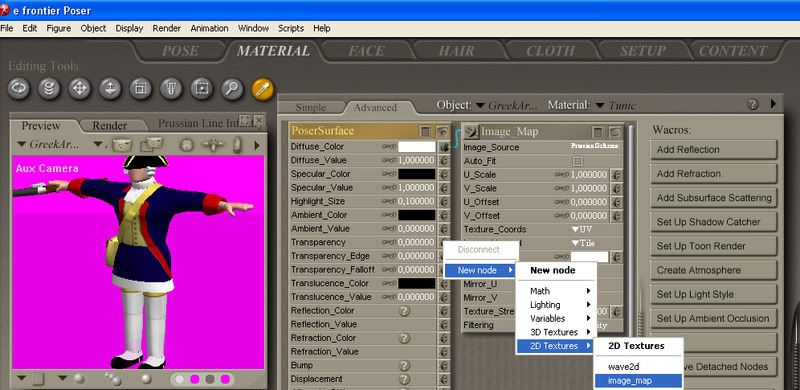
8. To let the figure know which areas you want to keep visible and which one's you want to remove, you need to attach another texture map to the figure. In essence, this second texture map consists of two colors only: white and black. White signifies which areas are to remain visible, while black turns everything invisible. Just as was done with the normal texture, you're going to follow the hierarchy and find a texture map suited for the transparency option.
----
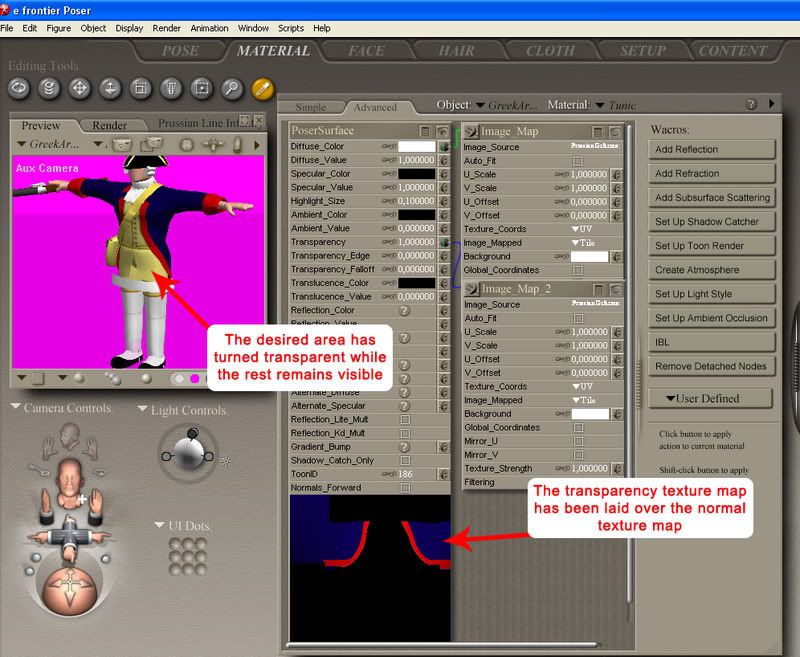
9. Just as in step 5, you will search your hardrive for the proper texture map. Below you can see an example of a transparency texture map. As afore mentioned, everything that is white will remain visible while the black area will completely disappear. But when you click okay, you will see that nothing changes yet.

----
10. To help this make sense, consider that both of the texture maps that you have loaded thus far are laid over each other, meaning the transparency texture map is laid on top of the normal one. Thus, the area on the normal texture map that is covered by the black area on the transparency texture map is turned invisble. Once you have attached a transparency texture map onto the figure, the effects will only be viewable if the value of the Transparency option is again increased to 1.000000. Do this and you will see that the area that is black disappears while the rest remains visible. This gives the look of the tunic not looking like a kilt anymore but rather as the bottom portion of the musketman's coat that extends downwards.
----
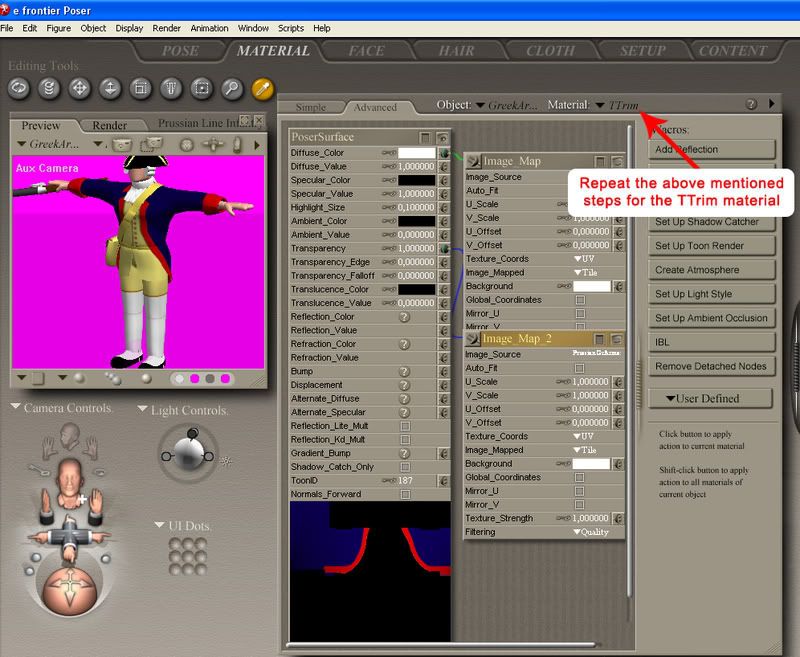
11. In the example of the musketman, you're going to need to repeat steps 3-10 for the TTrim, which is the bottom element of the tunic (the part of the tunic that is still white and untextured). Once done, the effect will be as follows.
And that's all there is to it! If practiced enough, this will become second nature to any aspiring unit-maker, and take my word for it when I say that it becomes a very effective method of creating certain looks. The plethora of units you can create through the help of transparency settings is immense, so I encourage anybody having trouble achieving a particular appearance to try this method.
I hope this tutorial was informative and I hope to see some more units posted around the forum!
Since Micaelus asked me some questions regarding transparency settings on figures with the intent of achieving certain looks, I decided to make a tutorial so that anybody else with similar questions could simply look it up here in the future. This tutorial will hopefully help even the hardest learner!
Basically, you can tell figures to turn invisible, or not. However, you can also specify whether or not only certain areas of the figure are to turn invisible. This method is, in my opinion, one of the most important in getting figures to look a certain way, and can effectively help to make or break a unit. If used properly, a resourceful nit-maker can create various illusions that completely expand the possibilities of how to use figures to get units the way that is desired. I'll explain the process step by step, and with the help of images. The unit used as reference is my Prussian Line Infantry (1740).
1. Open your copy of Poser.
----
2. Go to the material room. You'll find a tab at the top of your Poser program titled Material. Clicking this will open the material room interface.
----
3. As you can see, the Greek Armor tunic (by Kinboat) is still untextured. The look that I'm going for is that of an old musketman's coat. To do this, we're going to need to attach a texture to the figure to get the desired look. Click on Material in the right corner and select Tunic. Refer to the red arrow to see what I mean.
----
4. The next step will simply entail attaching a texture to the figure in question. Either you already have a ready texture to apply, or you have to create it yourself. For the sake of this tutorial, I already have a created texture. If you don't know how to create a texture, I would look up a tutorial dealing with that. Follow the hierarchy as shown in the image to attach a texture.
----
5. A small window will pop up once you've clicked on image_map. At the top of the window, the first line will be called Image_Source. Click on the None next to this and you will be asked to choose the image to attach. This is essentially when you attach the texture of the figure. Click on the Browse button and find the texture you would like to use. Here's the one I'm using.
----
6. Once you click okay, the texture will be applied to the figure, and you will see what the figure now looks like. As you can tell, the texture is definitely going in the right direction, however, if the front were gone, it would definitely look more convincing, and more like a coat for that matter. This is basically where the transparency texturing comes into play.
----
7. If you look around a bit on the Poser Surface window, you will find an option called Transparency. By clicking on the value to the right of this option, you will enable a small scroll which allows you to change the transparency setting of the figure. If you play around with this a bit, you will see that scrolling all the way right will change the value to 1.000000. This makes the figure completely disappear. However, we want to make only part of the figure disappear, namely the front that's between the two red seams of the texture.
----
8. To let the figure know which areas you want to keep visible and which one's you want to remove, you need to attach another texture map to the figure. In essence, this second texture map consists of two colors only: white and black. White signifies which areas are to remain visible, while black turns everything invisible. Just as was done with the normal texture, you're going to follow the hierarchy and find a texture map suited for the transparency option.
----
9. Just as in step 5, you will search your hardrive for the proper texture map. Below you can see an example of a transparency texture map. As afore mentioned, everything that is white will remain visible while the black area will completely disappear. But when you click okay, you will see that nothing changes yet.
----
10. To help this make sense, consider that both of the texture maps that you have loaded thus far are laid over each other, meaning the transparency texture map is laid on top of the normal one. Thus, the area on the normal texture map that is covered by the black area on the transparency texture map is turned invisble. Once you have attached a transparency texture map onto the figure, the effects will only be viewable if the value of the Transparency option is again increased to 1.000000. Do this and you will see that the area that is black disappears while the rest remains visible. This gives the look of the tunic not looking like a kilt anymore but rather as the bottom portion of the musketman's coat that extends downwards.
----
11. In the example of the musketman, you're going to need to repeat steps 3-10 for the TTrim, which is the bottom element of the tunic (the part of the tunic that is still white and untextured). Once done, the effect will be as follows.
And that's all there is to it! If practiced enough, this will become second nature to any aspiring unit-maker, and take my word for it when I say that it becomes a very effective method of creating certain looks. The plethora of units you can create through the help of transparency settings is immense, so I encourage anybody having trouble achieving a particular appearance to try this method.
I hope this tutorial was informative and I hope to see some more units posted around the forum!


")