Deliverator
Graphical Hackificator
(This was originally posted elsewhere by @ChimpanG.)
RETEXTURING ASSETS (BASIC)
I'll just cover the basics of retexturing existing assets here. Most people will likely use this process for units, but it's the same process for buildings too. It should be noted that new textures can only be applied to new assets (as far as I'm aware) so this should come after you've created one of those.(edited)
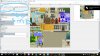
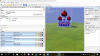
So let's say you want to retexture one of the existing building assets in game to make it your own. I might as well use the Royal Library as an example. First you locate your asset in the asset previewer. In my case, it was the 'DIS_CTY_PALACE_RNA' asset, that I believe is supposed to be used for Egypt and Nubia (but for some reason isn't). This model will have a material file associated with it, so click on the base geometry set (the one without the PIL or CON suffix) and it'll list the materials associated with that geometry. It should be clear but in the cases it isn't, check the entry in 'worked' state that kinda follows the same naming scheme as the asset as that'll probably the one you're looking for.

Double click it and it'll open the associated material file in a new tab. It should show you all the texture maps that are associated within that material file. You may want to keep this tab open for reference later on because we're going to create a new material with the same setup. For now though, the texture you want is the one attached to 'BaseColor' so find the DDS for it in your pantry under textures, grab a copy of it and stick it on your desktop to play with (don't move it into your ModBuddy directory or you'll get an error when you create the texture). Might as well rename the DDS file at this point to be honest so give it something unique.

I have only ever used Photoshop for this so I'll be running through my method for that, but I'm sure it's probably easy enough to translate this process in GIMP. Okay, so open your freshly-named DDS file in photoshop. It'll probably be a weird colour because DDS files are BGR, not RGB (or something like that) so just add an adjustment layer - channel mixer I think it's called - and in the blue channel, set red to +100 and blue to 0, and then in the red channel do the opposite. This should now show you the colours of the texture that you see in game.


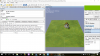
From there you can add a new layer and paint anything you like (or even create a tint map for your model if you wish, but I'll go into that bit after). When you're happy with your changes, just save the dds file and name it something unique. Back inside the Asset Editor you can create a new texture file, so create a new document > texture. Set the Class Name to 'Generic_BaseColor' and ideally name it the same as your dds file. Now import the dds you just made via "Source File Path". Don't worry about changing anything else. The resulting file should look something like this. Save.

Next, you'll want to create a material that we can attach this texture to. So create a new document > Material. Set the Class Name to 'Landmark' for buildings, 'Unit' for units and so on. Basically whatever asset you're retexturing, use the same class name that its material has set up against it. That material asset we kept open in a tab earlier, here is where we reference it, so just attach the same textures but be sure to set your own texture up against the BaseColor. The result should look something like this. Save.

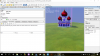
Now open your asset (as noted at the beginning of this guide, it should be a new asset, not an existing one from the base game) and replace the base game materials (the ones you double-clicked on earlier) with your new material. Hit save and the asset editor should reload the asset with the new texture. If you get a big red exclamation mark, you've gone wrong somewhere. In my experience, it's likely down to the part where you add textures to the material, so go back and double-check that.

Assuming it has all gone to plan, you should now have a retextured asset showing up in your preview window. IMPORTANT: Now, there's a chance you'll be retexturing a building asset to replace another's space on the tile, like how I'm replacing the library model with this palace retexture as discussed in the previous guide (pinned) so you'll want to add this new asset to the hero_buildings.xlp as a new building so that you can swap out whatever you've attached (via the attachment points, in my case the original palace model) with your new retextured asset.(edited)
In the case of retexturing units, the process is largely the same except you don't need to do this last part ^ (because you're not attaching units to a tilebase). However, I will delve into Tint Maps on units a little as a quick addendum to this.
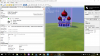
Basically, that stage where you're painting over stuff in Photoshop. Create a layer and paint 100% white (HEX #FFFFFF) over the parts of the armor you want to be able to recolour with tints inside the asset editor. Before you save the DDS, add a layer underneath the white parts and make it 100% black. This will be your TintMap. (In the screenshot, I've created a TintMap on the Infantry armour texture to use for the Katipunero). Repeat the import process of the texture and when you get to the material stage where you add in all the textures, add your new TintMap texture against TintMask. When you later get to the stage where you're setting up your units.artdefs / unitbins stuff, having this tint map will allow you to create multiple variations of the same asset and have the game deploy them at random.

Alternatives to Photoshop
Paint.NET - Save .dds files in format A8B8G8R8.
Gimp 2 - Save .dds files uncompressed.
RETEXTURING ASSETS (BASIC)
I'll just cover the basics of retexturing existing assets here. Most people will likely use this process for units, but it's the same process for buildings too. It should be noted that new textures can only be applied to new assets (as far as I'm aware) so this should come after you've created one of those.(edited)
So let's say you want to retexture one of the existing building assets in game to make it your own. I might as well use the Royal Library as an example. First you locate your asset in the asset previewer. In my case, it was the 'DIS_CTY_PALACE_RNA' asset, that I believe is supposed to be used for Egypt and Nubia (but for some reason isn't). This model will have a material file associated with it, so click on the base geometry set (the one without the PIL or CON suffix) and it'll list the materials associated with that geometry. It should be clear but in the cases it isn't, check the entry in 'worked' state that kinda follows the same naming scheme as the asset as that'll probably the one you're looking for.
Double click it and it'll open the associated material file in a new tab. It should show you all the texture maps that are associated within that material file. You may want to keep this tab open for reference later on because we're going to create a new material with the same setup. For now though, the texture you want is the one attached to 'BaseColor' so find the DDS for it in your pantry under textures, grab a copy of it and stick it on your desktop to play with (don't move it into your ModBuddy directory or you'll get an error when you create the texture). Might as well rename the DDS file at this point to be honest so give it something unique.
I have only ever used Photoshop for this so I'll be running through my method for that, but I'm sure it's probably easy enough to translate this process in GIMP. Okay, so open your freshly-named DDS file in photoshop. It'll probably be a weird colour because DDS files are BGR, not RGB (or something like that) so just add an adjustment layer - channel mixer I think it's called - and in the blue channel, set red to +100 and blue to 0, and then in the red channel do the opposite. This should now show you the colours of the texture that you see in game.
From there you can add a new layer and paint anything you like (or even create a tint map for your model if you wish, but I'll go into that bit after). When you're happy with your changes, just save the dds file and name it something unique. Back inside the Asset Editor you can create a new texture file, so create a new document > texture. Set the Class Name to 'Generic_BaseColor' and ideally name it the same as your dds file. Now import the dds you just made via "Source File Path". Don't worry about changing anything else. The resulting file should look something like this. Save.
Next, you'll want to create a material that we can attach this texture to. So create a new document > Material. Set the Class Name to 'Landmark' for buildings, 'Unit' for units and so on. Basically whatever asset you're retexturing, use the same class name that its material has set up against it. That material asset we kept open in a tab earlier, here is where we reference it, so just attach the same textures but be sure to set your own texture up against the BaseColor. The result should look something like this. Save.
Now open your asset (as noted at the beginning of this guide, it should be a new asset, not an existing one from the base game) and replace the base game materials (the ones you double-clicked on earlier) with your new material. Hit save and the asset editor should reload the asset with the new texture. If you get a big red exclamation mark, you've gone wrong somewhere. In my experience, it's likely down to the part where you add textures to the material, so go back and double-check that.
Assuming it has all gone to plan, you should now have a retextured asset showing up in your preview window. IMPORTANT: Now, there's a chance you'll be retexturing a building asset to replace another's space on the tile, like how I'm replacing the library model with this palace retexture as discussed in the previous guide (pinned) so you'll want to add this new asset to the hero_buildings.xlp as a new building so that you can swap out whatever you've attached (via the attachment points, in my case the original palace model) with your new retextured asset.(edited)
In the case of retexturing units, the process is largely the same except you don't need to do this last part ^ (because you're not attaching units to a tilebase). However, I will delve into Tint Maps on units a little as a quick addendum to this.
Basically, that stage where you're painting over stuff in Photoshop. Create a layer and paint 100% white (HEX #FFFFFF) over the parts of the armor you want to be able to recolour with tints inside the asset editor. Before you save the DDS, add a layer underneath the white parts and make it 100% black. This will be your TintMap. (In the screenshot, I've created a TintMap on the Infantry armour texture to use for the Katipunero). Repeat the import process of the texture and when you get to the material stage where you add in all the textures, add your new TintMap texture against TintMask. When you later get to the stage where you're setting up your units.artdefs / unitbins stuff, having this tint map will allow you to create multiple variations of the same asset and have the game deploy them at random.
Alternatives to Photoshop
Paint.NET - Save .dds files in format A8B8G8R8.
Gimp 2 - Save .dds files uncompressed.
Last edited: