About Avatars
Last edited on March 7, 2005
I know there are a lot of CivFanatics out there that are willing to help with a personalized avatar. All you need do is ask! I am one of those people! I will post some of my work below, and hope that others ready, willing and able to help will do the same, or at least YELL out that they are willing to help!
Now, lets see if I can answer some of the FAQs in avatar making. (If I have missed anything please feel free to ask!)
What is an avatar?
An avatar is that little picture you see under many peoples username when posting on the forum.
Choosing a Graphic of Custom Avatar
There are a few things to consider when deciding on the type of avatar you want. Heres the CFC rules
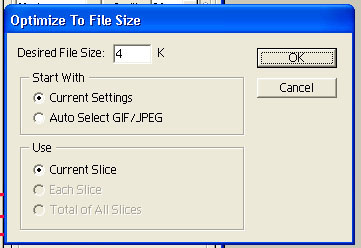
You can also put a picture, or avatar, under your name. There are hundreds of Civish avatars for you to choose from. If you have 30 posts AND have registered for 30 days, you can give yourself a custom title and a custom (non-animated) avatar. The dimension limit of custom avatars is 70x70 pixels and size limit is 4 KB.
This is really is up to ones personal taste. While most of us creators can work with just about anything, you need to keep in mind the forum rules!
You agree, through your use of this service, that you will not use this forum to post any material which is knowingly false and/or defamatory, inaccurate, abusive, vulgar, hateful, harassing, obscene, profane, sexually oriented, threatening, invasive of a person's privacy, or otherwise violative of any law. You agree not to post any copyrighted material unless the copyright is owned by you or by this forum.
Other things you should consider are:
Size and loss of detail
Because of the dimension limit some detail can be lost in the resizing. This is very important to remember, as while things may look good in a larger graphic it may not look as nice when resized. For example, well look at an example avatar I made for Wildfire
Original Graphic

Resized Graphic

As you can see the text is considerably smaller and hard to read in the resized version. Now if I were to remove the swords on this graphic, very little is lost in resizing.

The idea being, the more large details you add to your graphic, more of the small details you will lose when resizing it. My line of thinking Keep it simple
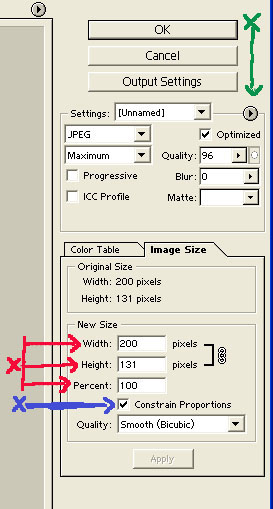
How do I resize my avatar?
In MicroSoft Paint
For Photoshop
If you use another program and can write up a "how to resize" tutorial I will gladly add it to this page!
Transparency
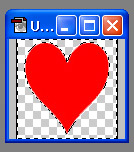
Transparency basically means that there is no background color in the image. Think of it as a design drawn on a piece of glass. The design is there but there is no color behind it. Lets look at an example:
Without Transparency
With Transparency

Now some graphics will look rather nice with a transparent background. Others just do not. For example, the shields above, both look good, with or without a background color. BUT look at the graphics below, while it looks good with the background color, when taking away that background (or making it transparent) too much is lost.
With background
Without background (or transparent)

The reason this happens is that some of the outer edges of the graphic itself are very light in color. Because there is not a darker color in the background it does not stand out. Though one CAN make lighter into darker outlines, it does take quite some time to do, and often doesnt produce the desired effect (IMHO). On this forum (IMO) the outer lines of the graphic should be of a darker color if transparency is used.
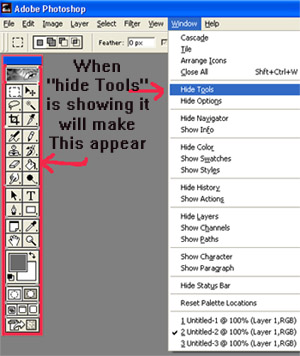
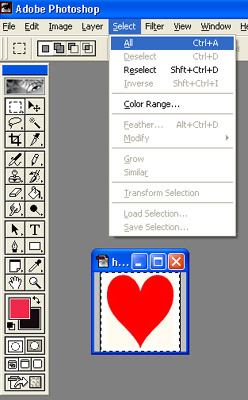
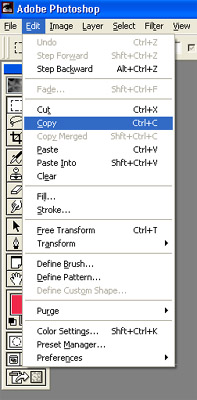
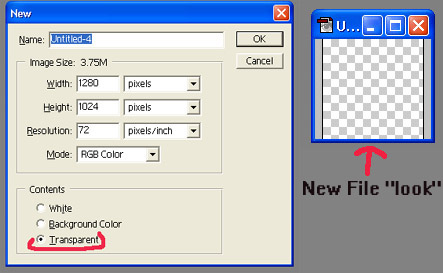
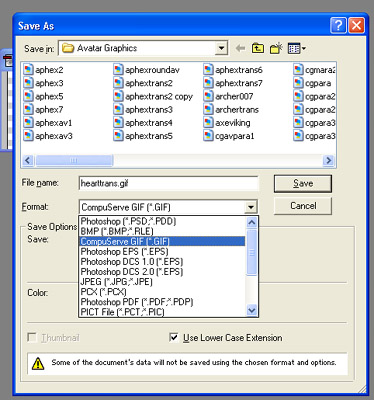
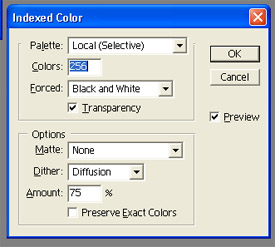
How do I make a graphic transparent?
Photoshop transparency Tutor
Paint Shop Pro 4 transparency tutor. (Thank you CivGeneral!)
Irfan view transparency tutor (Thank you Paalikles!)
Anti-aliasing Your Transparent Avatars-By Plexus
Merging separate Graphics
Okay, so you have graphic A and graphic B and youd like them merged? This is possible with MOST graphics, but sometimes some details can be lost when doing this, especially around the edges of the graphic. Also, it looks better when you "scale down" an image size than "scale up" as "scaling up" looks "pixelized" or "blocky". So if you only have a larger graphic(s) that will be fine for most "creators"
What information does the creator need before making my avatar?
Well I cant speak for all creators but I will list some of what I think are important need to knows.
*Do you have a particular design in mind? (This is the most important, leave this one open and you may find some creative licensing being used, which you may not like)
*Are there certain colors you would prefer? (Likes and dislikes)
*Do you want any wording? (remember this can be tricky if you want other details as well. AND longer names will be harder to fit in that 65x65 box
*Do you have sample graphic(s)? (i.e. do you have two separate graphics you would like made into one?)
*If you do have samples please attach or link them in your avatar request. This makes it much easier for the creator.
*Would you like a transparent background? Or no? Or it doesnt matter?
*Basically give the creator as much information about the desired avatar as possible. While we may like the way something looks you many not.
Do I have to acknowledge the creator in my signature?
While it is nice if you acknowledge who made your avatar via a small thank you in your signature, it is not required, though this does help others know who made the graphic. A lot of times just using the avatar we created is thanks enough! Well leave the choice up to you
Always remember those that are willing to help are sure to actively work with you, until you get to an Avatar that you like.
Good luck! And have fun!
How do I "apply" the avatar someone has made me?
Applying Custom Avatar (from graphic off this website)
Applying Graphic that is stored on your computer
"Stormbind's Official free downloads"
Creator's willing to help you with your avatar, and examples of their work!
Lyonesse
Raijer
Gogf
Plexus
Kdar
Mistfit
CivGeneral
Vancouver2010
Raen UPDATED!
ybbor UPDATED!
shadowdude
LLXerxes
Chukchi Husky
Reno UPDATED!
Collections
All of the following collections can be found here!
Civ Leaderheads
Tiki Collection
Final Fantasy Collection
Kill Bill Collection
Sitting Ducks Collection
"Cool Eye's" Collection
X-Men Collection
SGOTM Collection
"This Land" Collection
Pokemon Collection
NFL Logo's Collection
Star Trek Collection
NHL Logo's Collection
Basic Flag Collection
The Simpson's Collection
Lord of the Rings Collection UPDATED!
Star Wars Collection
Civ Advisors Collection
Visual Paradox Collection
Abstracts and Backgrounds
MLB Collection
Rome Total War Collection
Good to be in D.C. Collection
Album "Art" Collection UPDATED!
"Girlz" Collection
Civ 3 Governments Collection
Cartoon Network Collection
South Park Collection
Rise of Nations Collection
Sega Collection
Elves Collection
Holiday Collection
Civ Pop Heads Collection
Red Alert 2 Collection
Studio Ghibli Collection ADDED!
Scenery Collection ADDED!
Evangelion Collection ADDED!
TV Animation Collection ADDED!
"Cult" Films Collection ADDED!
NEWLY ADDED!
Studio Ghibli Collection by Reno
Scenery Collection by Reno
Evangelion Collection by Mistfit
TV Animation Collection (Pinky and the Brain) by Mistfit
"Cult" Films Collection by nonconformist
UPDATED!
ybbor's Creator Page
Reno's Creator Page
raen's Creator Page
Album "Art" Collection
Lord Of the Rings Collection Mistfit's additions added
Please note that there are a TON of graphics in this thread (and in the "Old About Avatar's and How to get one" thread), if you don't mind "surfing" a bit.
If you are a "Creator" and have added your name to the "Creator List" please be assured that your "examples" are still out there!
If you are a "Creator" and haven't yet "submitted" your examples, please just PM me with several samples of your work and a bit of information about you (what programs you use etc.) and I will get you added to the list ASAP.
I hope setting up this "Avatar Website" (with the help of the greatest hubby in the world) will make things a bit easier to find! Please check it out!
Lyonesse's Avatar Help Pages
Avatar Thread Supplement Page explained
Last edited on March 7, 2005
I know there are a lot of CivFanatics out there that are willing to help with a personalized avatar. All you need do is ask! I am one of those people! I will post some of my work below, and hope that others ready, willing and able to help will do the same, or at least YELL out that they are willing to help!
Now, lets see if I can answer some of the FAQs in avatar making. (If I have missed anything please feel free to ask!)
What is an avatar?
An avatar is that little picture you see under many peoples username when posting on the forum.
Choosing a Graphic of Custom Avatar
There are a few things to consider when deciding on the type of avatar you want. Heres the CFC rules
You can also put a picture, or avatar, under your name. There are hundreds of Civish avatars for you to choose from. If you have 30 posts AND have registered for 30 days, you can give yourself a custom title and a custom (non-animated) avatar. The dimension limit of custom avatars is 70x70 pixels and size limit is 4 KB.
This is really is up to ones personal taste. While most of us creators can work with just about anything, you need to keep in mind the forum rules!
You agree, through your use of this service, that you will not use this forum to post any material which is knowingly false and/or defamatory, inaccurate, abusive, vulgar, hateful, harassing, obscene, profane, sexually oriented, threatening, invasive of a person's privacy, or otherwise violative of any law. You agree not to post any copyrighted material unless the copyright is owned by you or by this forum.
Other things you should consider are:
Size and loss of detail
Because of the dimension limit some detail can be lost in the resizing. This is very important to remember, as while things may look good in a larger graphic it may not look as nice when resized. For example, well look at an example avatar I made for Wildfire
Original Graphic
Resized Graphic
As you can see the text is considerably smaller and hard to read in the resized version. Now if I were to remove the swords on this graphic, very little is lost in resizing.
The idea being, the more large details you add to your graphic, more of the small details you will lose when resizing it. My line of thinking Keep it simple
How do I resize my avatar?
In MicroSoft Paint
For Photoshop
If you use another program and can write up a "how to resize" tutorial I will gladly add it to this page!
Transparency
Transparency basically means that there is no background color in the image. Think of it as a design drawn on a piece of glass. The design is there but there is no color behind it. Lets look at an example:
Without Transparency
With Transparency
Now some graphics will look rather nice with a transparent background. Others just do not. For example, the shields above, both look good, with or without a background color. BUT look at the graphics below, while it looks good with the background color, when taking away that background (or making it transparent) too much is lost.
With background
Without background (or transparent)
The reason this happens is that some of the outer edges of the graphic itself are very light in color. Because there is not a darker color in the background it does not stand out. Though one CAN make lighter into darker outlines, it does take quite some time to do, and often doesnt produce the desired effect (IMHO). On this forum (IMO) the outer lines of the graphic should be of a darker color if transparency is used.
How do I make a graphic transparent?
Photoshop transparency Tutor
Paint Shop Pro 4 transparency tutor. (Thank you CivGeneral!)
Irfan view transparency tutor (Thank you Paalikles!)
Anti-aliasing Your Transparent Avatars-By Plexus
Merging separate Graphics
Okay, so you have graphic A and graphic B and youd like them merged? This is possible with MOST graphics, but sometimes some details can be lost when doing this, especially around the edges of the graphic. Also, it looks better when you "scale down" an image size than "scale up" as "scaling up" looks "pixelized" or "blocky". So if you only have a larger graphic(s) that will be fine for most "creators"
What information does the creator need before making my avatar?
Well I cant speak for all creators but I will list some of what I think are important need to knows.
*Do you have a particular design in mind? (This is the most important, leave this one open and you may find some creative licensing being used, which you may not like)
*Are there certain colors you would prefer? (Likes and dislikes)
*Do you want any wording? (remember this can be tricky if you want other details as well. AND longer names will be harder to fit in that 65x65 box
*Do you have sample graphic(s)? (i.e. do you have two separate graphics you would like made into one?)
*If you do have samples please attach or link them in your avatar request. This makes it much easier for the creator.
*Would you like a transparent background? Or no? Or it doesnt matter?
*Basically give the creator as much information about the desired avatar as possible. While we may like the way something looks you many not.
Do I have to acknowledge the creator in my signature?
While it is nice if you acknowledge who made your avatar via a small thank you in your signature, it is not required, though this does help others know who made the graphic. A lot of times just using the avatar we created is thanks enough! Well leave the choice up to you
Always remember those that are willing to help are sure to actively work with you, until you get to an Avatar that you like.
Good luck! And have fun!
How do I "apply" the avatar someone has made me?
Applying Custom Avatar (from graphic off this website)
Applying Graphic that is stored on your computer
"Stormbind's Official free downloads"
Creator's willing to help you with your avatar, and examples of their work!
Lyonesse
Raijer
Gogf
Plexus
Kdar
Mistfit
CivGeneral
Vancouver2010
Raen UPDATED!
ybbor UPDATED!
shadowdude
LLXerxes
Chukchi Husky
Reno UPDATED!
Collections
All of the following collections can be found here!
Civ Leaderheads
Tiki Collection
Final Fantasy Collection
Kill Bill Collection
Sitting Ducks Collection
"Cool Eye's" Collection
X-Men Collection
SGOTM Collection
"This Land" Collection
Pokemon Collection
NFL Logo's Collection
Star Trek Collection
NHL Logo's Collection
Basic Flag Collection
The Simpson's Collection
Lord of the Rings Collection UPDATED!
Star Wars Collection
Civ Advisors Collection
Visual Paradox Collection
Abstracts and Backgrounds
MLB Collection
Rome Total War Collection
Good to be in D.C. Collection
Album "Art" Collection UPDATED!
"Girlz" Collection
Civ 3 Governments Collection
Cartoon Network Collection
South Park Collection
Rise of Nations Collection
Sega Collection
Elves Collection
Holiday Collection
Civ Pop Heads Collection
Red Alert 2 Collection
Studio Ghibli Collection ADDED!
Scenery Collection ADDED!
Evangelion Collection ADDED!
TV Animation Collection ADDED!
"Cult" Films Collection ADDED!
NEWLY ADDED!
Studio Ghibli Collection by Reno
Scenery Collection by Reno
Evangelion Collection by Mistfit
TV Animation Collection (Pinky and the Brain) by Mistfit
"Cult" Films Collection by nonconformist
UPDATED!
ybbor's Creator Page
Reno's Creator Page
raen's Creator Page
Album "Art" Collection
Lord Of the Rings Collection Mistfit's additions added
Please note that there are a TON of graphics in this thread (and in the "Old About Avatar's and How to get one" thread), if you don't mind "surfing" a bit.
If you are a "Creator" and have added your name to the "Creator List" please be assured that your "examples" are still out there!
If you are a "Creator" and haven't yet "submitted" your examples, please just PM me with several samples of your work and a bit of information about you (what programs you use etc.) and I will get you added to the list ASAP.
I hope setting up this "Avatar Website" (with the help of the greatest hubby in the world) will make things a bit easier to find! Please check it out!
Lyonesse's Avatar Help Pages
Avatar Thread Supplement Page explained


")


")
 )
)


