Hello, everybody. I swam by briefly during GOTM 34, and now I'm back again (probably just as briefly).
Looking over the maps and tactics people used (yes: spoilers; I am disqualified, and will not be submitting), I was struck by how much really good territory there is around. Sir Pleb is always a pleasure to watch, and I liked his RCP3, but I'm never comfortable cramping myself that much (even when I know I'm going to be jumping my Palace).
I decided to try the standard SE opener, and build Warrior - Worker - Granary. In more detail, actions of the units were:
Build War, Wrk, Granary, War, Settler x10 ... interrupted (see below)
Wrk1 E-Irr, Rd, S-Irr, Rd, SW-Chop, Irr, Rd
War scouted NE, then clockwise along mountains
Wrk2 SW-Chop, S-Chop, Irr, Rd
War2 was used for MP
Using 3 chops really pushed out the Granary fast, and I was able to sneak out a second Warrior before the factory was ready. I thought it was a great start. But then ....
Interrupted
On the turn the first settler was completed (Pop -> 7), I got hit with disease.

The settler did get produced, but Pop dropped to 4, and then to 3 the next turn. I made the best of a bad situation by pumping out 2 more Warriors -- useful for scouting, which I was still light on. It really set me back to lose 2 pop to disease before I had even placed my second city, though.
RCP 5
Early scouting showed what I already knew to be true: there was a huge supply of really nice city sites at RCP 5. The hill NE was mentioned before (makes a 6-turn factory). The cow/deer/beaver NW also make a 6-turn factory, only requiring 2 chops to prep for irrigation ... and has tons of forest nearby to assist in building the second granary. The spot SW at the base of the river had access to beaver, and also multiple nearby forest chops to assist with building a barracks. All of this (and more) was at RCP 5, so I decided to focus on a strong initial 9 cities and expand from there.
The best laid plans
Contact with the enemy interrupted my plans even before the first settler had gotten out of the gate, however. The Roman border was spotted SE of me, and I felt pressure to claim my SE location to avoid him ruining my RCP 5 designs.
The first settler plunked down 5 tiles SE of the capital, in range of two floodplains. Workers had moved in that direction as soon as the border was spotted, and irrigated fields were waiting.
Plans for a second granary in the NW were further interrupted when I managed to trade for Iron Working. My second (delayed by disease) settler raced East to claim the Iron, and my third settler moved to the RCP 5 spot due east and a touch SE to close the border against further Roman advances along the coast. Thanks to roads, Arbela and Susa went up on the same turn.
Capital + 3 cities, and I still hadn't touched the NW. If only the Romans hadn't been so close!
I was now in a quandary. As nice as that second factory NW would have been, I didn't seem to have the workers to spare for it. I decided to use my workers more efficiently and focus on irrigating floodplains / mining BG / connecting the iron.
Looking back, I think I could have prioritized the NW factory, and used my capital to turn out 2 workers for specifically that purpose.
The way it went, however, I placed my fifth settler NE on the hill (accessing two irrigated FP and a mined/roaded BG), and used the sixth settler to plant my barracks location SW (at the base of the river). The Iron would be connected soon, and I felt I should have the barracks ready (just in case).
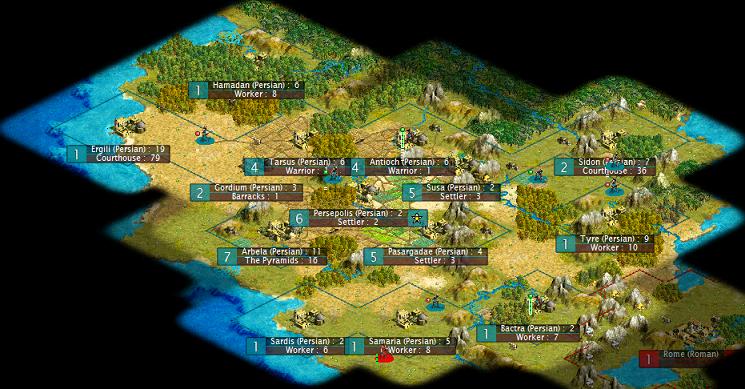
The screenshot from 1525 shows the board just after I placed my seventh city. Note that I have Embassies with both neighbors; I also have Rite of Passage with Rome (who was briefly Gracious when I created my Embassy there

).
Did something go right?
The diplomatic/tech aspects of the strategy seemed to work like a charm, unlike the mangled build order.
I determined that I didn't want to fight until I was a Republic, and that meant I wanted Embassies quickly. I decided to focus on my Pottery and then rush straight for Republic, coming back to Ironworking if necessary (it wasn't; I traded for it).
I researched the following, all on max:
Pottery
Alphabet (I actually ended up trading for this at the last minute, but only because I wanted to improve relations with Rome.)
Writing (I think this was involved in the trade for Iron Working.)
Code of Laws (I was hoping Japan would come up with Philosophy I could trade for; he didn't.)
Philosophy (I think this took 6 turns!)
I had 6 turns left on Republic when QSC ended. Rome never attacked me, and he never even tried to extort me.

I don't know if that's because I didn't have anything to extort, or if he was a little afraid of me. I never had as much military strength as he did, but boy, did I have GNP!
 QSC Stats
 (Again: this is disqualified. I just did it for fun, not to turn in.)
17 cities
27 population
1 barracks
1 granary
0 settlers
12 workers
13 warriors
6 turns to go on Republic
Need Math, Construction, Currency, and Polytheism
I will note that I handicapped myself by
not taking the goody hut in the East. The only disease I got (through 1000BC, where all my settlers were complete and I was pumping out workers) was the one right at the beginning. I let the enemy come to me, I researched Alphabet instead of rushing out to trade for it, and I generally think this is a representative result for RCP5 on this map (perhaps even a little weak).
Republic in 6 turns + Anarchy, Roman RoP wears out in 9, Iron connected, 13 warriors waiting to be upgraded .... GA before 600BC, with 45ish population to enjoy it.


![[ptw]](/images/smilies/ptw.gif "PTW Icon [ptw]") Predator
Predator
") If you give a bit of money, it's only a loan anyway. You'll get it all back on the next trading round. As for the tech, you want the AI to research for you. And if it makes them happy, that's a bonus. I gave away Writing at a discount and Math outright to open up research of the techs higher up the tree. OTOH, maybe I have no idea what I am talking about and was just lucky
If you give a bit of money, it's only a loan anyway. You'll get it all back on the next trading round. As for the tech, you want the AI to research for you. And if it makes them happy, that's a bonus. I gave away Writing at a discount and Math outright to open up research of the techs higher up the tree. OTOH, maybe I have no idea what I am talking about and was just lucky 
") Next turn, Rome built the Pyramids and started the Great Library. Yum! I decided to let Rome complete the Library before finishing him off. Who knows? It might be of some use if a suicide galley found the other continent(s). No reason not to turn him into an OCC first though
Next turn, Rome built the Pyramids and started the Great Library. Yum! I decided to let Rome complete the Library before finishing him off. Who knows? It might be of some use if a suicide galley found the other continent(s). No reason not to turn him into an OCC first though 

 In the next few years, skirmishes brought me a few more slaves. Then in 370BC, Caesar offered peace in exchange for two towns. I took it. We then traded Currency for Construction straight up and both countries entered the Middle Ages. I drew Feudalism as my free tech. Not ideal.
  I started settling SE on furs, researching pottery and preparing the settler factory. I discovered the neighbors, traded techs, research was on and off, sometimes saving gold, sometimes researching techs as trade tokens.