Well, I'm sorry I can't help with Gimp2. But, for Photoshop, I can give a couple tips:
1. Always try to find the largest image (highest resolution) you can for something. When you find something on Google, for example, select "More Sizes" to see if there's anything bigger.
2. Always edit things in a non-destructive manner when possible: duplicate layers, use adjustment layers instead of direct adjustments, layer masks instead of erasing, etc. You also want to be able to toggle things on and off and experiment. Another example, if you're applying shadows and shading, create a new layer rather than applying it to an existing one.
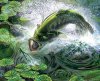
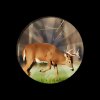
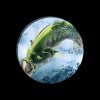
3. Use a clipping mask. Turn your background image into a layer. Create a new layer underneath it and draw a perfect circle shape. Now right-click on your original image and select "Create Clipping Mask". Now your overall image will always be circular in shape and you can still move the original image around and transform it to line things up. Also, make sure to lock the original image and duplicate it to start altering it.
Also, if needed, you can apply new layers to the clipping mask stack by simply holding Alt and clicking on the line between layers on the list (the cursor will transform).
4. When your image is ready, or if you feel like doing it earlier, use Image > "Trim" to erase all the extra transparent pixels around your clipping mask circle and create a tight, neat overall image and canvas size (it should be square, with your circular image fitting inside it, unless you have a fancy icon where the image pops-out of the border).
5. I try to do a very minimal amount of manual brushwork since I don't own a Wacom tablet yet. My gaming mouse and glass SteelSeries mouse surface are pretty precise, but it still doesn't compare to the ability of using a pen in hand! So, I rely a lot on automatic effects. The two filter effects I use often are Stylize > Diffuse and then Blur > Surface Blur. The surface blur you have to play around with so you don't overdo it. I think I usually use the same number for both fields, and usually don't go any higher than 25 and 25.
6. Vibrance and Contrast. You'll want to play around with these to make the image look a bit more "cartoony", especially the vibrance. Other adjustments that may be useful are Shadows/Highlights, Hue/Saturation, Photo Filter, and Levels.
7. To get those lines in the background, you can simple Google "radial rays" or "sunburst" and then apply your own colors to the image. Also, make sure to apply a Gaussian Blur to it to soften-up the lines. You can also a apply a layer style to it using a Gradient Overlay and choose one of the colors on the sunburst and make the other gradient color transparent.
8. Stroking paths. This is sometimes handy when you want to apply a steady soft stroke to something. For example, a slight darkening of the sky around the circular border for more dramatic effect, or around the base. You can do it by hand, but it'll probably come out uneven. Anyway, you make your selection and then select the "Paths" tab next to the Layers and Channels tabs. Click on the button that says "Make Working Path from Selection" near the bottom. Now you have a Path. Select whatever kind of brush color, size, and fuzziness you want and then select the Path. Click on the button near the bottom, "Stroke Path with Brush" and it'll use your brush evenly and pefectly along the path line.
9. The "glow". Duplicate a layer and then apply a mask to it so that only the main object is shown. Using layer styles, apply an Outter Glow to the object and mess around with the controls until you like what you see. If needed you can also turn that layer style into its own layer and then make adjustments to it there like masking areas of glow that you don't want (like around the bottom edges of the object, or lower sides).
10. Another handy trick is the "Merge Visible Layers" shortcut. Ctrl-Alt-Shift-E. This'll create a flattened snapshot image on a new layer of all the layers that are currently visible (just make sure you have a visible layer selected and not a disabled one when you enter the command).
11. Selections. Whenever you've finished making a difficult, detailed selection of an object, save it! Choose Select > Save Selection and then give it a name if you like. Now you can reload the selection whenever you need it. Also, when creating detailed selections, quick mask is handy. Either press "Q" or press the bottommost button on the tools bar. Now using black, white, and shades between you can paint, use paint buckets to fill an area, and even use gradients to create selections. Black deselects and white adds to the selection; grays between them feather/fade the selection. Press "Q" again and you'll be back in normal mode with your quick mask adjustments reflected in the selection.
----- Some DDS tips
1. Resizing. If you want a single image atlas, just open up the full 256 atlas file, rename it, and then choose Image > Canvas Size. Enter in both fields 256 and make sure "Relative" is unchecked. Anchor the adjustment by clicking on the top left square, the arrows will change and point inwards to the corner. Now you have a perfectly sized, single atlas. If you want a 2x2 atlas, just do the same but for the values enter 512 (256 x 2).
2. When you place your image into the atlas you've created (File > Place) and have to resize it, enter 172px and make sure the "chainlinks" are selected to maintain the ratio. This is for "unfancy" icons that are circular. If you have one that "pops-out", you may be able to enter 172px in either the width or height if nothing is protruding out of them and the other dimension will scale to suit. (The transform is usually set to a percent, "px" makes it use pixels instead. You can use other things here too like "in" for inches, for example.) 172 x 172 pixels usually fits well within the 256 atlas.
3. Instead of opening up another atlas for the smaller sizes and doing everything over, just resize the 256 atlas. Choose Image > Image Size and make sure it's set to pixels. And, for example, just enter in 128 and you'll have your 128 atlas ready to be saved as a DDS. Also, always work your way down from largest to smallest.
------
If anybody else has any tips for Civ icons, I'd love to hear them too, please share them!
The Dodge command that chrome-rome mentioned was something I've never used before nor paid much attention to. I just tried it out and I wish I knew about it sooner! D'oh!

EDIT: Bummer... nobody has anything they want to share.

 ). If you are using Photoshop, get very, very familiar with Smart Blur (Filters-Blur-Smart Blur), as that can help make your images look more civ-like. You should also get familiar with the dodge tool; this is the effect that adds the "shine," if applied correctly. And finally, use