SaibotLieh
Emperor
- Joined
- Sep 25, 2009
- Messages
- 1,589
Introduction
Since I've gathered some knowledge about unit/leaderhead creation and custom animation creating now I think it's time to share some of this knowledge by writing some tutorials. Please note that I don't claim to present the best solution for the tasks at hand here, most of the stuff I learned by looking into the material that is already present and trial and error, and I would advise everybody to do the same. As long as you work only with copies, you can't break anything after all.
Further always remember that there are a lot of other tutorials out there, in this forum as well as in the whole of the internet. I just want to highlight The Coyote's NifSkope and his Animate with Blender and Nifscope tutorials because they helped me the most and if you don't understand something here, these tutorials might help you further.
As a last note, since you are interested in modifying animations, I take it that you already have some experience with unit/leaderhead as well as with Blender and NifSkope. Otherwise, you should think about gathering those first, because it will make the following much easier to understand.
Edit: I used Blender 2.49b and NifSkope 1.13 for this tutorial. As MightyToad pointed out, some of the steps might be different / work not at all with other versions.
Exchanging the effect of a unit
Effects are all the nifty things that are visibile for a short time during an animation, for example the flint spark of the musketman or the rifle blast of the infantry belong to this category. Also projectiles belong to the effects. A list of all available effects can be found in the Civ4EffectInfos.xml. I'll demonstrate how to exchange these effects by giving the infantry model a laser attack effect. For this, I open the infantry_md_rangedstrike.kf with NifSkope. Then, I search in the NiTextKeyExtraData Text Key list for a fitting entry. It can be found at 0.3 seconds and reads "Effect:RIFLEBLAST_MODERN:EFFECT_RIFLEBLAST_MODERN". The first part (Effect:RIFLEBLAST_MODERN) defines at which note the effect should happen. If you look at the infantry.nif, you can find that note to be placed at the end of the rifle, as it should be. The second part (EFFECT_RIFLEBLAST_MODERN) defines which effect should happen. I change the entry to "Effect:RIFLEBLAST_MODERN:EFFECT_INVASIONSHIP_LASERFIRE_BIG" and are done exchanging the effects. But to give the new attacking animation a fitting sound, I further change the next entry "SOUND:AS3D_UN_RIFLE_FIRE,AS3D_UN_RIFLE_COCK" to "SOUND:AS3D_UN_SDI_LASER" (read more about modifying sound effects here). And with this, I've finished the exchange.

If the desired effect is to small/big or acts in the wrong direction, one can modify it by modifying the respective node in the unit's nif. The scale changes the size of the effect, the rotation influences the direction and the translation the place the effect happens.
Removing the animation of a bone
Removing the animation of bones from an existing animation is quite simple. Let's remove the animation of Catherine's right arm in her greeting sequence. To do so, I open the catherine_greeting.kf in NifSkope and search the Controlled Blocks for the entries of "b_clavicle_R", "b_bicep_R" and "b_forearm_R". These entries tell me which Interpolators belong to these bones (112, 115 and 118 in the case at hand).

The easiest way to deactivate these bones is to rename the entries in the Controlled Blocks list. For example, I could doubleclick on the Txt symbol left of the "b_clavicle_R" entry in the detailed view of the Controlled Block with the same name, then change the entry to "deact_b_clavicle_R" and save the kf file. Now the Controlled Block is bond to a non-existing bone and "b_clavicle_R" has no animation info anymore.

However, if the interpolator is a "NiTransformInterpolator", there is an better way. Go to the respective "NiTransformInterpolator" and remove its "NiTransformData" child node and your are set.

In this node the animation information for different time values is safed. Without this entry, the bone will just go to the position given in the "NiTransformInterpolator" directly and then stand still for the rest of the animation sequence. This way, the bone start with a more natural position and the kf file will not be cluttered with useless animation commandos for non-existing bones.
A "NiBSplineCompTransformInterpolator" interpolator cannot be altered in this way, just use the first methode for quick changes. If you want to go the second way with this interpolator, you can either replace it with a "NiTransformInterpolator" in which you put in the starting animation position manually or you can import-export the animation with Blender. This will turn all "NiBSplineCompTransformInterpolator" into "NiTransformInterpolator". Just replace the "NiBSplineCompTransformInterpolator" in the original kf file with the respective "NiTransformInterpolator" then.
Adding and animating a bone to an existing skeleton
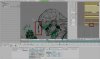
When creating a new unit/leaderhead for an existing animation set, you might stumble upon the need to animate some parts that have no animation yet. To give an example I'll work with, I will animate the head jewelry (Bindi) of my Mangammal leaderhead for the greeting animation. Of course, the same technique can be used for units as well. Mangammal uses the Mansa Musa animation set, and since Mansa has no head jewelry, he has no animation for it. We will change that now.
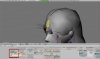
The first step is to add the necessary bone to the skeleton and weight to the mesh. For this, I import the leaderhead into Blender. After the import process is finally finished, I select the mesh with the bindi, go into the Edit Mode and select the vertices that shall be influenced by the newly-to-create bone. Next I create a new Vertex Group by clicking the "New" button in the "Vertex Groups" menu, call the new group "b_bandi" and give the selected vertices a 1.0 weight for this group. Also I remove the "b_head" weight for this vertices, except for the uppermost. Giving the vertices at the edge between two groups a weight in both groups often helps to smooth out the edge in the animation.

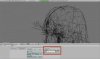
Now I also have to add the new bone to the skeleton. For this I change to the Wireframe Draw Type, select the skeleton in the Object Mode and change into the Edit Mode. Here I select the "b_head" bone and duplicate it by pushing "shift+d". The new bone is selected automatically and can be moved to the place the "b_bandi" bone shall be find its place. I further rotate and rescale the bone to fit to the bandi. Then I rename the bone to "b_bandi" and make it a child of the "b_head" bone. At a last step I make sure that the end of the bone that is connected to the parent bone (the one with the dotted line) is at the point that want to use as the crucial point later.

Now the first part with Blender is completed. To check if the bone works with the mesh one can change into the "Pose Mode" and move the bone around a bit. The weighted mesh should follow the movement. After that, the leaderhead is saved under a working title.

The next step is to nifswap the modified mesh to the original leaderhead. However, NifSkope won't let you paste the NiSkinInstance since the original leaderhead lacks the newly introduced "b_bandi" bone. Find this bone in the Blender export and import it to the respective place in the original leaderhead. Then make sure that the Flag of the new bone is 22 if it has no childs and 6 if it has any childs. Further check if the parent bone of it has a Flag value of 6. If you are working with a unit, you'll also have to add the new bone entry to the "NiMultiTargetTransformController" Target list. Now the nifswap shall be no problem anymore.

Next I import the modified leaderhead together with the greeting animation into Blender again.

Here I change into the "Animation Section".

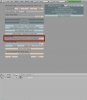
Next I select the skeleton and change into the "Pose Mode" and display the "Action Editor" in the right window.

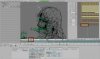
In this window, you can see all the bones that have at least one animation order (each diamond represents one order, if diamond are connected, it means that both contain the same information). You might also notice that some of the bones are displayed green while others are grey. All the green bones have an entry in the Action Editor window, all the grey ones have not. Therefore, also the "b_bandi" bone is grey. This I'll change now by starting the "Animation Record", selecting the "b_bandi" bone and rotating it for about 50°. Now a new entry appears in the Action Editor window.

Of course the bandi shall not start in the greeting animation in this position, so I rotate it back to its old position. The animation diamond remains however. Now, with the bone still selected, I copy the current pose of the "b_bandi" bone with the option of the same name in the "Pose" menu. With this option, the position of all selected bones is saved.

Next I move the green line in the Action Window to the time the bandi shall start moving independently from the head. Here I past the saved pose, creating another diamond in the process. Next I move to the time step at which the bindi will reach it farest point from the head and rotate the "b_bandi" bone to match the movement. Again a diamond is created.

The same I do now for the rest of the animation. Always remember that you have to define how long a bone should remain in a certain position the same way I did at the start by creating the second diamond. Also it is important to have a animation diamond (better two) at the end of the animation span. Otherwise the meshes influenced by the bone will turn invisible after the last animation order (and that is only the best case scenario). When all animation is done, the result can be tested by moving the green line around again. After that, the animation is exported and the Blender work is done.

The new animation file can now be check with NifSkope. Now the last step is to import the new animation information into the original animation file. I do this by open both animation files with NifSkope. In the exported file I search in the Controlled Blocks for the "b_bandi" bone and copy its "NiTransformInterpolator" into the original animation file.

In the original animation file I create a new Controlled Block by raising their number by one and refresh the Controlled Blocks list with the green double-arrow. For the interpolator of this new block I use the copied "NiTransformInterpolator", for the String Palette the local "NiStringPalette" is used, the other entries are filled in using the exported file as template. Then the file is saved, and the process of creating a new animation is finished.
Since I've gathered some knowledge about unit/leaderhead creation and custom animation creating now I think it's time to share some of this knowledge by writing some tutorials. Please note that I don't claim to present the best solution for the tasks at hand here, most of the stuff I learned by looking into the material that is already present and trial and error, and I would advise everybody to do the same. As long as you work only with copies, you can't break anything after all.
Further always remember that there are a lot of other tutorials out there, in this forum as well as in the whole of the internet. I just want to highlight The Coyote's NifSkope and his Animate with Blender and Nifscope tutorials because they helped me the most and if you don't understand something here, these tutorials might help you further.
As a last note, since you are interested in modifying animations, I take it that you already have some experience with unit/leaderhead as well as with Blender and NifSkope. Otherwise, you should think about gathering those first, because it will make the following much easier to understand.
Edit: I used Blender 2.49b and NifSkope 1.13 for this tutorial. As MightyToad pointed out, some of the steps might be different / work not at all with other versions.
Exchanging the effect of a unit
Effects are all the nifty things that are visibile for a short time during an animation, for example the flint spark of the musketman or the rifle blast of the infantry belong to this category. Also projectiles belong to the effects. A list of all available effects can be found in the Civ4EffectInfos.xml. I'll demonstrate how to exchange these effects by giving the infantry model a laser attack effect. For this, I open the infantry_md_rangedstrike.kf with NifSkope. Then, I search in the NiTextKeyExtraData Text Key list for a fitting entry. It can be found at 0.3 seconds and reads "Effect:RIFLEBLAST_MODERN:EFFECT_RIFLEBLAST_MODERN". The first part (Effect:RIFLEBLAST_MODERN) defines at which note the effect should happen. If you look at the infantry.nif, you can find that note to be placed at the end of the rifle, as it should be. The second part (EFFECT_RIFLEBLAST_MODERN) defines which effect should happen. I change the entry to "Effect:RIFLEBLAST_MODERN:EFFECT_INVASIONSHIP_LASERFIRE_BIG" and are done exchanging the effects. But to give the new attacking animation a fitting sound, I further change the next entry "SOUND:AS3D_UN_RIFLE_FIRE,AS3D_UN_RIFLE_COCK" to "SOUND:AS3D_UN_SDI_LASER" (read more about modifying sound effects here). And with this, I've finished the exchange.
Spoiler :
If the desired effect is to small/big or acts in the wrong direction, one can modify it by modifying the respective node in the unit's nif. The scale changes the size of the effect, the rotation influences the direction and the translation the place the effect happens.
Removing the animation of a bone
Removing the animation of bones from an existing animation is quite simple. Let's remove the animation of Catherine's right arm in her greeting sequence. To do so, I open the catherine_greeting.kf in NifSkope and search the Controlled Blocks for the entries of "b_clavicle_R", "b_bicep_R" and "b_forearm_R". These entries tell me which Interpolators belong to these bones (112, 115 and 118 in the case at hand).
Spoiler :
The easiest way to deactivate these bones is to rename the entries in the Controlled Blocks list. For example, I could doubleclick on the Txt symbol left of the "b_clavicle_R" entry in the detailed view of the Controlled Block with the same name, then change the entry to "deact_b_clavicle_R" and save the kf file. Now the Controlled Block is bond to a non-existing bone and "b_clavicle_R" has no animation info anymore.
Spoiler :
However, if the interpolator is a "NiTransformInterpolator", there is an better way. Go to the respective "NiTransformInterpolator" and remove its "NiTransformData" child node and your are set.
Spoiler :
In this node the animation information for different time values is safed. Without this entry, the bone will just go to the position given in the "NiTransformInterpolator" directly and then stand still for the rest of the animation sequence. This way, the bone start with a more natural position and the kf file will not be cluttered with useless animation commandos for non-existing bones.
A "NiBSplineCompTransformInterpolator" interpolator cannot be altered in this way, just use the first methode for quick changes. If you want to go the second way with this interpolator, you can either replace it with a "NiTransformInterpolator" in which you put in the starting animation position manually or you can import-export the animation with Blender. This will turn all "NiBSplineCompTransformInterpolator" into "NiTransformInterpolator". Just replace the "NiBSplineCompTransformInterpolator" in the original kf file with the respective "NiTransformInterpolator" then.
Adding and animating a bone to an existing skeleton
When creating a new unit/leaderhead for an existing animation set, you might stumble upon the need to animate some parts that have no animation yet. To give an example I'll work with, I will animate the head jewelry (Bindi) of my Mangammal leaderhead for the greeting animation. Of course, the same technique can be used for units as well. Mangammal uses the Mansa Musa animation set, and since Mansa has no head jewelry, he has no animation for it. We will change that now.
The first step is to add the necessary bone to the skeleton and weight to the mesh. For this, I import the leaderhead into Blender. After the import process is finally finished, I select the mesh with the bindi, go into the Edit Mode and select the vertices that shall be influenced by the newly-to-create bone. Next I create a new Vertex Group by clicking the "New" button in the "Vertex Groups" menu, call the new group "b_bandi" and give the selected vertices a 1.0 weight for this group. Also I remove the "b_head" weight for this vertices, except for the uppermost. Giving the vertices at the edge between two groups a weight in both groups often helps to smooth out the edge in the animation.
Spoiler :
Now I also have to add the new bone to the skeleton. For this I change to the Wireframe Draw Type, select the skeleton in the Object Mode and change into the Edit Mode. Here I select the "b_head" bone and duplicate it by pushing "shift+d". The new bone is selected automatically and can be moved to the place the "b_bandi" bone shall be find its place. I further rotate and rescale the bone to fit to the bandi. Then I rename the bone to "b_bandi" and make it a child of the "b_head" bone. At a last step I make sure that the end of the bone that is connected to the parent bone (the one with the dotted line) is at the point that want to use as the crucial point later.
Spoiler :
Now the first part with Blender is completed. To check if the bone works with the mesh one can change into the "Pose Mode" and move the bone around a bit. The weighted mesh should follow the movement. After that, the leaderhead is saved under a working title.
Spoiler :
The next step is to nifswap the modified mesh to the original leaderhead. However, NifSkope won't let you paste the NiSkinInstance since the original leaderhead lacks the newly introduced "b_bandi" bone. Find this bone in the Blender export and import it to the respective place in the original leaderhead. Then make sure that the Flag of the new bone is 22 if it has no childs and 6 if it has any childs. Further check if the parent bone of it has a Flag value of 6. If you are working with a unit, you'll also have to add the new bone entry to the "NiMultiTargetTransformController" Target list. Now the nifswap shall be no problem anymore.
Spoiler :
Next I import the modified leaderhead together with the greeting animation into Blender again.
Spoiler :
Here I change into the "Animation Section".
Spoiler :
Next I select the skeleton and change into the "Pose Mode" and display the "Action Editor" in the right window.
Spoiler :
In this window, you can see all the bones that have at least one animation order (each diamond represents one order, if diamond are connected, it means that both contain the same information). You might also notice that some of the bones are displayed green while others are grey. All the green bones have an entry in the Action Editor window, all the grey ones have not. Therefore, also the "b_bandi" bone is grey. This I'll change now by starting the "Animation Record", selecting the "b_bandi" bone and rotating it for about 50°. Now a new entry appears in the Action Editor window.
Spoiler :
Of course the bandi shall not start in the greeting animation in this position, so I rotate it back to its old position. The animation diamond remains however. Now, with the bone still selected, I copy the current pose of the "b_bandi" bone with the option of the same name in the "Pose" menu. With this option, the position of all selected bones is saved.
Spoiler :
Next I move the green line in the Action Window to the time the bandi shall start moving independently from the head. Here I past the saved pose, creating another diamond in the process. Next I move to the time step at which the bindi will reach it farest point from the head and rotate the "b_bandi" bone to match the movement. Again a diamond is created.
Spoiler :
The same I do now for the rest of the animation. Always remember that you have to define how long a bone should remain in a certain position the same way I did at the start by creating the second diamond. Also it is important to have a animation diamond (better two) at the end of the animation span. Otherwise the meshes influenced by the bone will turn invisible after the last animation order (and that is only the best case scenario). When all animation is done, the result can be tested by moving the green line around again. After that, the animation is exported and the Blender work is done.
Spoiler :
The new animation file can now be check with NifSkope. Now the last step is to import the new animation information into the original animation file. I do this by open both animation files with NifSkope. In the exported file I search in the Controlled Blocks for the "b_bandi" bone and copy its "NiTransformInterpolator" into the original animation file.
Spoiler :
In the original animation file I create a new Controlled Block by raising their number by one and refresh the Controlled Blocks list with the green double-arrow. For the interpolator of this new block I use the copied "NiTransformInterpolator", for the String Palette the local "NiStringPalette" is used, the other entries are filled in using the exported file as template. Then the file is saved, and the process of creating a new animation is finished.
Attachments
-
 tutorial_01.jpg188.7 KB · Views: 6,436
 -
 tutorial_02.jpg273 KB · Views: 6,464
 -
 tutorial_03.jpg251.9 KB · Views: 6,026
 -
 tutorial_04.jpg223.5 KB · Views: 6,160
 -
 tutorial_05.jpg111.9 KB · Views: 6,022
 -
 tutorial_06.jpg125.5 KB · Views: 5,957
 -
 tutorial_09.jpg374.5 KB · Views: 6,096
 -
 tutorial_08.jpg370.7 KB · Views: 5,837
 -
 tutorial_07.jpg370.4 KB · Views: 5,892
 -
 tutorial_10.jpg364.9 KB · Views: 5,926
Last edited:


")
