Puppeteer
Emperor
This is me replaying an isolated start to help learn more about how opening moves affect later play. (While also showing off a couple of recent mods I've been working on: a color-coded turnlog template and an accessory map viewer / "Google Maps for Conquests".)
This is the map from the Joining Initial Worker to Capital thread. I picked a start to try out a different starting strategy and noticed it was an isolated island start but didn't play beyond at the time.
Earlier this month I rerollled the map as Regent difficulty as a challenge and demo to a player asking about isolated start strategy. In that thread I posted turnlogs and screenshots. I did well I think, but some things didn't quite turn out as I planned, and I want to see how different early choices affect the game.

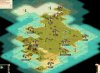
Ever wish CivIII had Google Maps? Take a look at this, the state of my island in 1000 BC (If you only see black, zoom out or pan up and right. If it's not crystal-sharp after zooming, click the "Webkit Redraw" button)
With the starting scout it only takes about 10 turns for me to be nearly sure I'm on an isolated island start, so I'm going to begin the game researching Alphabet at minimum as I normally would these days, and then in turn 10 I will "realize" I have to self-research until I get Map Making and meet other civs, which almost certainly means 100% research bee-lining for Map Making. I will also "discover" the other continents in the same order as my last play-through. Aside from that I will play with all my map spoiler knowledge. (Edit: Also, I will settle in place. With spoiler knowledge I might try to place 3 or 4 cities on this 2-tile lake, but I'm not going change my first-city placement based on spoilers.)
The strategy I was trying to demonstrate was to maximize research by building up the capital and core cities' population to research to Map Making faster as the expense of rapid expansion. I know there's a food bonus near the capital and planned on a settler/worker pump that would settle the island and then add workers to the capital and core cities, so my capital produced one settler and then its job was to grow and research. The research worked, but I was woefully behind on settling my island, claiming off-home-island locations, producing workers, and I never had the opportunity to join a worker to any city before I knew the world, and when I knew the world I was the tech leader Monarchy of the Mongols and did not have the production capacity to immediately start my invasions of conquest. So, as a Mongol goes, epic failure to be prepared.
Also, I liked my overall city placement plan, but I settled them in a somewhat stupid order after the first one.
I want to get to Map Making at least as quickly without lacking for workers, cities or population, and I want to be ready to start warring when I know the world and finish my trades-to-the-top of the tech chart. For this game that means the capital will make at least two settlers before concentrating on growth, and the second city will pop at least one settler before building a granary, and I want at least enough workers to keep roads under the core city working citizens.
I'm starting to realize I try too hard with curraghs. Every time I get a curragh to a new continent I have a galley a couple of turns behind it. Most of my curragh resources would have been better spent on workers. Curraghs aren't for discovering continents; they're for scouting nearby islands or going around big inlets to make contact more quickly. In fact, given my spoiler map knowledge I might skip curraghs altogether this game.
Another edit: I will also build a scout first; with spoiler knowledge I might have built a warrior or archer first instead. If I pop a settler or city from a hut I will disband or abandon it since my purpose is to compare strategies, and adding a free settler or city will affect the comparison too much. I might take different worker actions starting turn 1; improving the BGs is less important than getting the deer chopped and irrigated and maintaining roads for quick settler placement and commerce bonuses.
This is the map from the Joining Initial Worker to Capital thread. I picked a start to try out a different starting strategy and noticed it was an isolated island start but didn't play beyond at the time.
Earlier this month I rerollled the map as Regent difficulty as a challenge and demo to a player asking about isolated start strategy. In that thread I posted turnlogs and screenshots. I did well I think, but some things didn't quite turn out as I planned, and I want to see how different early choices affect the game.
- Epic C3C, no mods
- Seed 1496780
- Standard Size
- Roaming Barbs
- Continents 70% Water
- Normal Climate, Temperate, 5 Billion Years
- Mongols player civ, random AI civs, standard settings minus Culturally linked starts
- Regent difficulty
- AI Aggression normal
Ever wish CivIII had Google Maps? Take a look at this, the state of my island in 1000 BC (If you only see black, zoom out or pan up and right. If it's not crystal-sharp after zooming, click the "Webkit Redraw" button)
With the starting scout it only takes about 10 turns for me to be nearly sure I'm on an isolated island start, so I'm going to begin the game researching Alphabet at minimum as I normally would these days, and then in turn 10 I will "realize" I have to self-research until I get Map Making and meet other civs, which almost certainly means 100% research bee-lining for Map Making. I will also "discover" the other continents in the same order as my last play-through. Aside from that I will play with all my map spoiler knowledge. (Edit: Also, I will settle in place. With spoiler knowledge I might try to place 3 or 4 cities on this 2-tile lake, but I'm not going change my first-city placement based on spoilers.)
The strategy I was trying to demonstrate was to maximize research by building up the capital and core cities' population to research to Map Making faster as the expense of rapid expansion. I know there's a food bonus near the capital and planned on a settler/worker pump that would settle the island and then add workers to the capital and core cities, so my capital produced one settler and then its job was to grow and research. The research worked, but I was woefully behind on settling my island, claiming off-home-island locations, producing workers, and I never had the opportunity to join a worker to any city before I knew the world, and when I knew the world I was the tech leader Monarchy of the Mongols and did not have the production capacity to immediately start my invasions of conquest. So, as a Mongol goes, epic failure to be prepared.
Also, I liked my overall city placement plan, but I settled them in a somewhat stupid order after the first one.
I want to get to Map Making at least as quickly without lacking for workers, cities or population, and I want to be ready to start warring when I know the world and finish my trades-to-the-top of the tech chart. For this game that means the capital will make at least two settlers before concentrating on growth, and the second city will pop at least one settler before building a granary, and I want at least enough workers to keep roads under the core city working citizens.
I'm starting to realize I try too hard with curraghs. Every time I get a curragh to a new continent I have a galley a couple of turns behind it. Most of my curragh resources would have been better spent on workers. Curraghs aren't for discovering continents; they're for scouting nearby islands or going around big inlets to make contact more quickly. In fact, given my spoiler map knowledge I might skip curraghs altogether this game.
Another edit: I will also build a scout first; with spoiler knowledge I might have built a warrior or archer first instead. If I pop a settler or city from a hut I will disband or abandon it since my purpose is to compare strategies, and adding a free settler or city will affect the comparison too much. I might take different worker actions starting turn 1; improving the BGs is less important than getting the deer chopped and irrigated and maintaining roads for quick settler placement and commerce bonuses.
 When does that happen? Apparently only when I vow to destroy them.
 I want to place my city on time, will sacrifice scout to distract barb.
") .
.