OCC: One City Challenge with Norway

Minou

King
Joined
Apr 19, 2013
Messages
845
One City Challenge: T254 Violent Science Victory with Norway (Deity, Standard Continents)

After enjoying a peaceful OCC game with China, here is a violent game with Norway. As expected, the victory time was faster (26 turns in this case) thanks to pillaging. However, due to some poor decisions that led to extreme war weariness and a surprisingly close brush with defeat, this time is probably almost 20 turns worse than it would have been with better play.

Part 1: Opening Moves (T1-30)

The early game goals are going to be different this game compared to the peaceful China game, as we will skip most wonders and instead focus on getting up an army for some pillaging.

Spoiler :


n1.jpeg

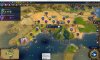
Here’s the start. With Piopiotahi, this spot is an obvious great one for a normal game but in OCC it has a few drawbacks. We will be stuck with lots of desert and ocean tiles, and the natural wonder itself will mean 3 unworkable tiles. This would never matter in a normal game, but being limited to one city unworkable tile hurts in OCC. Not complaining of course - the early culture bonus is more than worth it.

n3a.jpeg

Here is our city, founded T3 after moving the Settler southeast onto the coastso we can build Longships right away. Founding right next to Piopiotahi is great because it gives the city a free 2c/2g base yield, and allows us to also work the wonder-boosted Cattle tile immediately for faster growth. The Warrior pops a hut for a Scout the same turn the city is founded, and the Scout meets Kumasi - the early culture rate is going to be insane this game! First build will be a Builder to improve the Cattle and Marble.


The early game goes very well, as we already have the Astrology boost from the opening and our Scout finds a “new continent” quickly. Code of Law arrives super early at T6. The Warrior clears a camp of for MT boost T8, while the Scout pops a hut for Craftsmanship boost (a waste since the Builder would have secured it soon anyway) the same turn. A third hut yields 40g, and a fourth provides an Envoy on T17 and a fifth provides a Trader on T27.

Kumasi becomes our vassal on T15 thanks to the first contact envoy, an easy quest (Writing boost), and the Mysticism envoy. They instantly provide 1DF per turn for a nice extra source of income and more critically a supply of Horses, since we have none in our own borders. Between the DF sales and the bonus gold from Piopiotahi, we can levy 5 Warriors from Kumasi on T16 for an early pillaging war against Germany.

The Ancient Era military is rounded out by a Slinger who scores the Archery boost T23 and two Longships, rapidly pumped out with Maritime Industries and Norway’s shipbuilding boost. They head east and west into the open ocean to go meet more city states and hopefully do a few coastal raids. Thanks to all the bonus culture from Piopiotahi Amani is recruited super early on T22, followed by Pingula on T32.

The Warrior and Scout quickly make contact with Germany and Cree, the two other Civs on the continent. Neither of these neighbors is ideal. Germany will likely go after some of the local city states which means we will have to liberate them later, and Cree spams Mekawap improvement which are no good for pillaging. There are also three other City States on the continent, Armagh (met T15), Auckland (T22), and Mexico City (T25).

N29.jpeg

Auckland is very exciting to meet, since we have 12 water tiles in the our third ringborders - Amani heads there immediately!

Domestically, the biggest issue for the Ancient Era is Housing. Since we moved off the river the capital only has 4 base housing, and so we bump up against the Housing cap quickly before getting a Granary up T35. The one Wonder we really need in the early game is Oracle. With our military needs met by the levy, the One City starts building the Oracle on T29. Thanks to the two Industrial city states and running Autocracy a few turns, the wonder is completed in just 17 turns.


Attachments

  • n3.jpeg
    n3.jpeg
    1.3 MB · Views: 237
Part 2 First Wars and Longship Travels T30-50

With two levied armies it is time for some pillaging! The plan is for Auckland’s forces to hit the small Maori colony that was founded in the northeast and Kumasi’s forces to hit Germany. Sadly, the whole operation turns out as a bit of a failure…

Spoiler :


The Auckland army made one major contribution in clearing a camp to complete a quest for Mexico City. Immediately after, the Cree (who actually had Friendship signed at this point) send some envoys to cancel the levy. This is a major set-back as Maori had at least three quarries to pillage and no defense in sight

n35a.jpeg

With the loss of the Auckland levy, our lone Scout puts the whole northern front on his back, pillaging for a nice 90g/27c yield and then miraculously escaping a defending Chariot. He later steals a Builder, and then sneaks back onto a mine for a nice 108g+38s pillage. With Science at ~6spt, this is a half dozen turns boost in one shot.


Germany on the other hand defeated our attack passively by having nothing to pillage! On T35 they had multiple workers, but somehow only one improvement (a farm no less) and one district (a Holy Site).

n35.jpeg

All three German Builders just stood around doing nothing for centuries, so our Warriors had nothing to pillage. Ultimately, all the war yields is 108f from two pillages, and some experience from meaningless Warrior-Warrior battles.

Meanwhile on the domestic front, Political Philosophy rolls in on T38, along with a Monument purchase to boost culture to 15cpt. A Classical Golden Age begins on T45, and we make the somewhat unorthodox choice of Exodus of the Evangelists, not for religion spread but to actually secure a religion. Not having a Holy Site up, we are in danger of losing out on a Great Prophet and the 4GPPpt will insure against that outcome. The Oracle is completed on T46, sped in part by running Autocracy and Corvee - between having few high production tiles, Cree cancelling Suzerain status over Auckland, and having nothing to chop this was a hard thing to pull off in time.

N50.jpeg

The two roving Longships coincidentally both spot land on T47. To the west we meet Palenque and to the east Fez. This is fantastic news. With two Science city states in the game we are locked for the full Kilwa bonus, and Fez is particularly great as will soon be revealed.

N50a.jpeg

Continuing along the coastlines, the Longships encounter Brunei Bandar, the Netherlands, and England. Still, aside from the science city states, the open seas the expedition is a minor disappointment so far, as neither ship has found a single tile to pillage.
 
Part 3 Religion and the Start of the Four Thousand Year Longship Raid (T51-83)

Thanks to Exodus, we secure a religion on T54 and use the Feed the World belief to make up for our food shortfall. Meanwhile our two Longships start a pillaging campaign that will last 3 millennia.

Spoiler :


At home, the Holy Site finally completes (being long delayed by the Oracle push). Our second district will be a Harbor, which gets under way on T52. Normally a Campus would make more sense, but the Lighthouse is badly needed for food and housing. Some extra gold from our Kumasi-boosted trade route and sale of Turtle to Germany (after peace is signed) goes to buy a Shrine. On T53 we can switch into Classical Republic for more housing and happiness and send the free envoy from Military Tradition to re-gain Suzerain status of Auckland, putting the capital in pretty good shape again. The Campus completes on T68, growing Kumasi’s bonus by another 2c/1g. Pingula gains the science an culture promotions on T66 and T72.

Great People start to roll in. We pass on Hypatia, who is normally great but is very weak in OCC, and then grab Aryabhaya on T81 who grants boosts for Military Tactics, Military Engineering, and Apprenticeship - fairly nice since we can’t waste a tile on an Aqueduct and would prefer not to cut down the forest on the hill for a third mine. We also score GM Zhang for another precious Trade Route. With all the extra faith from pillaging, there is plenty left over to recruit a Classical Great Writer for another envoy to Fez.

On T54 a Great Prophet arrives. Since we got an early one, Feed the World is still around. An unusual choice, but perfect for this low food campaign. Taking Gurdawa as well means that we won’t miss Temple of Artemis (at least for the food, happiness will be another story). With the purchase of a Stave Church as well the capital is looking really nice with fast food growth and increasingly strong water tiles. The original plan was to add Crusade (to pre-spread to make pillaging safer) and Cross-Cultural Dialogue. Unfortunately, Crusade was scooped up by the time an Apostle could be spared and our fourth belief ends up being the much less useful Monastic Isolation.

N73.jpeg

Feed the World and the Lighthouse are keeping our city growing despite the very food-poor terrain and lack of fresh water.


In other religious developments, a captured Builder sailing around the icy north randomly popped the Relic Chains of the Apostle from a hut. Germany sent a wave of Missionaries towards the capital around T75, forcing us to declare war to destroy them and protect our new faith. Finally and most importantly, Amani arrived in Fez on T72 capturing Suzerain status. Our Missionaries converted Granada (discovered by a scouting Longship in T64) in order to gain a quest envoy and also a sweet140s.

n59.jpeg

Finally, our Longships happen upon some pillagable land in England and start raiding with impunity, bringing in tons of extra faith and little science. Since the Longships basically can’t be touched and the overseas AIs pose no threat to us at home, we also declare on Netherlands for a single tile pillage. However, a stupid mistake (forgetting to slot the Raid card for the first 5 coastal raids) costs us a little bit of loot.

By T68, the two Longships have pillaged every tile available and rest up during a truce waiting for the districts and tiles to be repaired for another round. Indeed over the course of this game one of England’s two coastal Holy Sites were probably pillaged about 15 times each if you count each building separately. The east Longship also meets Ngarzagamu, an amazing city state for OCC war game. It is tempting to levy them and attack Maori from the inland side, but too risky without more envoys.

More conflicts erupt for different reasons. A second Maori war allows us to loot 74c (this time from the coast of their mainland) and keep racing through the Civic tree. The Netherlands attack Fez causing some alarm with no units nearby to help defend them. Despite the warring, Cree miraculously agrees to sign an Alliance on T79 allowing us to secure the Diplomatic Service boost.


Attachments

  • n58a.jpeg
    n58a.jpeg
    1.3 MB · Views: 143
Part 4: The Race for Two Wonders (T85-T104)

Over the 20 turn stretch from T85 to T104, all efforts focus on two wonders, Mausoleum at Halicanarsis and Kilwa Kasawi. The first step is completing Apprenticeship for a small boost to our mines and sending another envoy to Auckland to regain the production bonus to the sea tiles. Unfortunately, Cree constantly streams envoys to Auckland (despite having zero ocean tiles and no Industrial Zones in their entire empire), breaking our hold over and over again.

Spoiler :


The Mausoleum arrives on T93, making for some very beautiful water tiles. This provides a nice springboard, since 7 turns later we will have enough faith to recruit GE Isidore and he will have a bonus charge thanks to the Mausoleum. Thanks to that, we can basically build Kilwa in four turns! The wonder arrives T104 instantly providing +15% science, culture, and building bonuses.

We also get up a Campus and Commercial Hub around this time. Even though we won’t get another Trade Route since we already have a Harbor, the Commercial Hub is the best option for the fourth district as it will instantly generate 6GM points thanks to Pingula and Oracle and also fulfills a city state quest from Kumasi. During this time spare gold goes into starting an overseas pillaging force of Horseman, as our Horse reserves have been building up for a while.

N88.jpeg

Here, the first wave of overseas Horseman are sailing west. The city state interface shows we have invested lots of envoys in Kumasi, Fez, and Auckland but only managed to hold onto one of them as Suzerain.

n104 kilwa.jpeg

Isidore of Miletus is one of the most useful Great People in OCC games. Kilwa is so important, and the AI tends to rush to Machinery for Crossbows and thus often builds it around T100. Without Isidore it can be extremely difficult to get the Wonder in time.

Besides the start of the Wonder races, T85 marks the start of the spread of Crab Time, with Exodus of the Evangelists as our Medieval Golden Age Dedication. Missionaries head out and start spreading religion for a couple hundred in science bonuses thanks to Fez. A Religious Alliance with Germany is also set up to eventually provide the +10 religious combat bonus. However, the first religious push comes to a crashing halt for two reasons. On T91 as Fez falls to the Netherlands, necessitating a delay so we don’t waste opportunities for the first conversion science bonus. Things get even more troubling when Germany rushes us with an army of Apostles and actually converts the capital! Luckily, we have enough religious units to re-convert it, but the temporary loss of Feed the World grinds growth to a halt for a few turns.

Apostles add the Cross-Cultural Dialogue and Monastic Isolation beliefs. Actually, the latter is a disappointing fall-back. Crusade was the original goal here and would have allowed us to spread a swath of +10 combat terrain across the Cree lands before invading to pillage. Sadly, one of the AIs snatched up the belief while we were devoting all our pillage faith to Great People.

In the early AD years Germany manages to convert our capital to Catholicism! Normally, that Courser would simply slay the heretic Apostles but we have an Alliance going. Luckily, enough religious units are on the map to re-convert the city though it will be a close call because they cannot heal in the now unfriendly Catholic land around the capital…

In other domestic developments, Pingula finally receives the Grants promotion at the late date of T90, since we delayed Government Plaza in favor of other districts and suffered from slow growth early in the game. However, Great People points are not at such a premium in war games since pillaging can bring in several hundred faith in a singe turn. The fighting over who is Suzerain of Auckland annoyingly continues with yet another back and forth with Cree. We finally hook up the Citrus, having delayed Irrigation all the way to T98. Last but not least we swap into Monarchy: extra Military policies are useful since we want to run Raid for the rest of the game and the housing from walls is especially useful since we remain short on Housing.

While Isidore is amazing, we can pass over a few other Great People to save faith, including Great Admirals Chola and Leif Erickson and Great Scientist Abu Al-Qasim, as we would prefer other more useful ones. The latter pays off as we quickly get the chance to grab Hildegard of Bingen on T103, who works very nicely with our +4 adjacency Holy Site and the Scripture policy to add 8spt. With faith rolling in from pillaging Horsemen and Longships overseas, we can also grab Great Scientist Omar Khayyam right afterwards. Since there are so many boosts that are impossible to get naturally in OCC, Great Scientists who offer 3 boosts are of extra value. Khayyam boosts Exploration, Siege Tactics, and Printing - a great roll of the dice since we have no Niter for Bombards and can never get two Universities!

On the downside, Niter is revealed on T97 but there is not a single source in our borders or in ANY of the city states, pretty much cutting us off from Muskets and Bombards for the whole game. Such is the roll of chance in OCC….

 
Part 5 The Pillaging Economy (T105-T125)

By T100, science from pillaging has started to overtake our domestic science rate. The two original Longships manage a few costal raids but are often idle as they have sacked the entire shoreline of the other continent. Horseman take over, using their speed and when possible the Depredation promotion to ransack the Cree lands on the home continent and the rich flatlands of Russia and Kongo.

Spoiler :


n115.jpeg

Horsemen in position on the first turn of the Cree pillaging war. Unfortunately walls turn them back after some small gains.

n119.jpeg

While the two far-off Longships ran out of pillaging opportunities, this one was driven off by a surprise swarm of Quadriemes.

n101.jpeg

A Warrior is busily pillaging the fertile Russian lands. The first Horseman is heading in as well, having just made landfall to the east

Russia’s land (and Kongo’s beyond to the east) is so sprawling it is easy to rush in and pillage tiles within range of city defenses and then escape. All and all, this is vastly easier terrain to raid than Germany with their narrow mountain passes, and Cree with their close packed cities and numerous Encampments creating killing fields for careless units. By T120, Horsemen begin being recalled to friendly territory for upgrades to Coursers.

Our fifth district comes online rapidly after Kilwa is completed, with an Encampment built on T108 using the 30% bonus from Veterancy and 15% district building bonus from Kilwa. The Encampment and its buildings will add more production and housing (both in short supply), along with a boost from building the Armory (purchased T116) and the massive savings on unit purchases thanks to Ngarzagamu.

n117.jpeg

The envoys from Kilwa allow us to claim Suzerainship of Ngazargamu, a particularly nice City State for this game as we plan on almost exclusively purchasing military units while devoting production to districts, wonders, and projects.190g Horsemen are such a value. Almost all of our Traders are idled during the peak wartime, because Kumasi is the only friendly city in range. Having all but city state on our continent out of reach for much of the game really hurt Kumasi’s value.

A few more key buildings like University (T114) and Market (T118) are purchased and the Shipyard constructed with Veterancy (T121). The Great Scientist Chatelet is also recruited, boosting Industrialization, Steam Power and Astronomy (the last one is the nicest since we are driving for more envoys from Colonialism). We made one mistake on the Great Person front, missing the chance to purchase Bi Sheng with faith. We would have won the race based strictly on GE points, but an AI scoops him up on T124 and with growth slowing again the ability to start another district would have been really nice.

The capital near the end of the first major wave of Horseman pillaging. With the Auckland back in the fold and the Shipyard up, those ocean tiles are really starting to look nice. Despite weak food production from tiles, Feed the World is keeping growth going. Housing remains a constant concern, and we are just about to reach the soft cap again despite adding 3 housing in the last few turns from University, Barracks, and Armory. Note the dynamo Holy Site powered by natural wonder adjacency, Scripture, and Hildegard of Bingen.

n123.jpeg


Attachments

  • n126.jpeg
    n126.jpeg
    1.5 MB · Views: 158
Part 6: A Close Shave! (T126-T150)

This period would be the darkest time in the game, with our empire teetering literally one attack away from annihilation!

Spoiler :


At the start of this era, the main issue was religion, not war. A Normal Renaissance age dawned on T125, the same year our first Spy Brynjar is trained. Our city was converted to Catholicism a second time, but once again saved by our own Apostles.

n ally.jpeg

Even though Germany had massive diplomatic penalties against us (-40), they surprisingly signed an Alliance. It was very useful to open up routes for our idle Traders and start earning food with the Wisselbank card. Long term, the goal is to get this Alliance to level 2 Religious for the incredibly powerful +10 power to Missionaries and Apostles.

n131.jpeg

This Alliance would end up being a short term problem as Germany once again took the opportunity to send in a surprise swarm of Apostles and convert the capital to Catholicism a second time! For a second time, our Apostles are rapidly recalled to free Minou City from the yoke of Catholicism. This was a particularly dangerous situation as they have no where to heal and so must avoid combat while approaching to spread Crab Time back to the city.

Meanwhile, pillaging continued unabated, with Privateers joining the fray. More resistant to ranged defenses, the Privateers took over close-in coastal pillaging and supported levied land troops with their own ranged fire, while the Longships continued to raid uncovered outposts.

n138.jpeg

A small expeditionary force with Great General Joan of Arc finally arrived to liberate Fez from the Netherlands on T138, but would take about ten turns to fight through the Netherlands defenders.Here, a privateer helps clear the landing zone for the troops rushing to free Fez.

n126.jpeg

Some envoys from Civics headed to Palenque, returning the 15% Kilwa bonus (lost when Fez was conquered) and providing some levied Swords to attack England’s interior.

Not much happened domestically except for the construction of Petra (T138) to boost those remaining desert tiles (five at first, though three would be built over by game’s end) and at long last the Industrial Zone.

n135 catholic.jpeg

Despite the desert-heavy landscape, Petra (being completed here) ended up not being terribly useful as by the end of the game the Sheep and Oasis tiles were the only desert tiles not built over for districts or Wonders.

Incredibly, the game almost ended on T150! While most of our Cavalry were out pillaging, the Cree rushed in with a mass of Knights and Pike and Shot, supported by some ranged units. The capital looked perfectly safe on T141, and then two Crossbows appeared out of the fog and shot down a Horseman. Cree Knights then took out a Courser and Cavalry the next turn, and a second Courser the turn after. As the Cree units started pillaging, it still looked like the city defenses would easily hold them back while more units came online. Then, the Cree made a move that put the game in jeopardy. A Bombard slid into an old fort our Military Engineer had constructed for a boost and afterwards was completely forgotten. This allowed the Bombard to withstand attacks extremely well and blast the walls of Minou City away. Here is how the three turns near the edge of defeat played out:

n148dark.jpeg

With the city below 100HP and under siege things looked desperate. The Encampment managed to kill the Knight 1W of the capital, and the Cavalry followed up and took out the Pike and Shot 1NW of the capital to lift the siege. The Courser then rode out and hit the Crossbow, but failed to kill it. Thanks to the Encampment two units could be purchased, a Crossbow in the Encampment and a Cavalry in the capital (critical for raising the city defense). With gold running low, we had to actually sell a Relic to Peter to purchase the Cavalry!

n149dark.jpeg

The next turn the Cree Bombard and Crossbow (which narrowly survived last turn) hit the capital pushing it into the red zone The redlined Pike and Shot that was NE of the city and Musketman that was in the sea last turn both attack the city, dying but dropping it to 45HP. Miraculously (and stupidly) the healthy Bombard and Musketman and the injured Knights that started the turn to the east of the city head east to attack Kumasi. It seems certain that if these 4 units pressed in Minou City would have fallen. After this reprieve, our own Crossbow took out the Cree Crossbow and our Cavalry attempted to block all routes to the city by killing the Knight, but narrowly failed (hence both units standing there redlined). This means the Cree will get one last shot in which they can hit Minou City with the Bombard, suicide the Knight and try for it all with the Pike and Shot….

n150dark.jpeg

Ultimately, the attack fails as the units can’t overtake the Cavalry-boosted city defenses. Ultimately, the siege failed due to horrible AI tactics in the last two turns. The Crossbows and injured Cavalry clear the last Cree units from the battlefield and repairs to the pillaged districts begin.


Part 7 Aftermath of the Siege (T150-T155)

With the war over (Cree signed peace on T151 after their final unit was knocked off the field), the next six turns were devoted to rapid repairs. In one turn each, the Stave Church, Campus, Library, University, Commercial Hub, Industrial Zone, and Gurdawa come back online. Cree did manage to conquer Kumasi, but they revolt to a free city just a few turns later and then can be liberated. Somewhere out in Kongo, our spy fails a second time at stealing a tech boost.

Spoiler :


n155.jpeg

The veterans of the Siege of Minou City rush over to liberate Kumasi from anarchy on T155 (providing a nice 100DF haul).

 
Part 8 The Privateer Fleet Sails (T155-165)

With all of our districts and buildings repaired, the focus shifts to overseas coastal raids. All the gold and faith allow us to purchase a new military army with gold and a religious army with faith. Reformed Church and Wars of Religion provide some extra firepower for the effort.

Spoiler :


The real story over this period is pillaging! Led by the Privateer fleet and with Cavalry also rampaging thought the Netherlands and England, our troops loot 6310g, 4075f, 1418s, and 1531c in a mere ten turns.

Pillaging is literally powering the whole economy at this stage, as we are down to just 5.6gpt of domestic income due to all the military support costs. The gold plus Ngarzagamu lets us rapidly replenish our army with some disgustingly cheap Cavalry (less than 800g each), which can be purchased 2 per turn thanks to the Encampment buildings, plus and some cheap Pike and Shot Corps for the Mobilization boost. We also buy some buildings that were neglected while the siege was sapping resources, including a Workshop, and place a breathtaking Neighborhood on the coast which will net the Conservation boost, desperately needed Housing (boosting us from 17/16 to 17/22), and 600g thanks to the Public Transport card.

More Science pours in as GS Galileo finds a nice spot to activate for 1250s and Missionaries convert a slew of cities for another 720s thanks to the recently liberated Fez. The Science and Culture boosts let us fly through Scientific Theory, Metal Casting, Ballistics, Steam Power, Economics, Reformed Church, Natural History, Scorched Earth, Mobilization in this ten turn segment. As a small bonus, our Spy Brynjar finally succeeds in a Steal Tech mission (third time’s a charm), making off with the Rifling boost.

n163.jpeg

Thanks to the fancy new +6 Housing Neighborhood on the small island, Feed the World and Wissenbank, Minou City is growing again at +38.4 food per turn.


Part 9 Warring, Weariness, and Spycraft T166-190

Pillaging continues unabated, but war weariness begins to accumulate. One big disappointment during this final stretch before the Space Race is that there turns out to be no Niter, Aluminum or Oil either in our lands or in ANY of the city states borders, meaning we will be unable to upgrade Tanks and Helicopters. This is actually a fairly big setback because it will eventually make pillaging very difficult and also make it much harder to liberate city states for the International Space Agency science bonus or raze cities for the Warlords Throne bonus. The long-delayed Government Plaza comes online T181 followed 3 turns later by Warlord’s Throne, though due to the lack of strategic resources we ultimmately managed to raze only one or two cities.

Spoiler :


We gave saved up enough faith to recruit the Great Engineer Filippo Brunelleschi, who is used to complete Ruhr Valley on T166. It’s not the most impressive Ruhr as we only have two mines and one quarry, but since the wonder is basically free with the Great Engineer and adds 20% overall production, why not? This marks the start of a new era with the symbolic passing of the 100h production mark.

A second milestone occurs as an Apostle Evangelizes the Cross-Cultural Dialogue belief. Since the spread of Crab Time has just gotten under way un earnest, it adds a mere 7.7spt for now but this will grow rapidly as our Apostles march forth.

A third milestone is more of a formality, as an Industrial Golden Age begins. None of the dedications are very exciting, so we take Reform the Coinage which at least gives a nice +42gpt. Heartbeat of Steam would barely provide and extra production since our Campus has only 1 adjacency.

At home, a second Military Engineer appears and sails east to lay down an airstrip for the Rapid Deployment boost and the Great General Rani Lakshmibai is used to generate a free Cavalry - we have plenty of gold to buy them but Horses are a limiting factor since we have to rely on Kumasi to supply them.

On T171, with our army rebuilt, it is time to launch a re-invasion of the Cree. This one meets with mixed results as a few hundred gold, faith, and science are pillaged but numerous units are lost to Cuirassiers and ranged attacks (missing out on Crusade really hurt here).

At the same time the Cavalry that have been perpetually pillaging through the new continent hit Kongo again, with our second Spy Thrya creating a Listening Post to raise Visibility and give them a little extra strength to battle Kongo’s Cavalry and Crossbow guards. Eventually Kongo guns down a Cavalry who got greedy for more gold than was really needed (should have retreated to heal), spurring a peace deal which is very profitable as they offer Toys, Silver and Tobacco pushing us from -1 happiness to +2 happiness.

One defensive struggle breaks out as well, when Maori and then Netherlands attempt to conquer Fez. Although only Norwegian Field Cannon is on hand to defend, it mows down outdated units with grim efficiency, so the prime city state stands with ease.

War weariness however is starting to become a massive problem and happiness crashes to -6 ten turns later. In retrospect, exposing Privateers and Cavalry to ranged attacks hurt our economy very badly a large part of the late game, even though the units themselves were most undamaged. An Anti-Tank Crew Corps for example would shrug off triple hits from a City Defense, Encampment and Crossbow while pillaging, but those attacks were really starting to pile on war weariness points.

Domestically, it makes sense to drop in a second Neighborhood (T172) north of Petra and the oasis for the Sanitation boost and another 5 Housing. A Research Lab can be purchased T174. The biggest advance comes from Oxford completing on T176, providing a nice haul of the techs Advanced Flight and Rocketry (thought the latter was already half done), and more importantly +20% to science.

On the Great Person front, we lose Darwin without ever having a chance at him. After Newton is recruited, an AI takes James Young, and then a second AI claims Darwin between turns before we even get to see he is up.

Espionage started to pick up a lot around the T175 mark. A drawback turned into an opportunity when Pingula gets neutralized by an enemy Spy on T177. Since he will be out of commission for 10 turns, this is the perfect time for Liang to make a quick appearance and sponsor some Fisheries. Our own Spy 1 Brynjar completes another successful mission, this time stealing 616g and escaping on foot. In less welcome Spy news, Spy 2 Thyra is killed trying to steal a tech boost. Her replacement, Spy 3 Knute shifted to counterspying duty after Pingula was neutralized. Positioned in the Government Plaza so he can cover the adjacent City Center and Spaceport at the same time, Knute helped foil and capture multiple enemy Spies over the remainder of the game.

n166.jpeg

Pillaging continues. Just 2 Cavalry did a complete wrecking job on England, who mostly lacked walls for ranged defense and had outdated units like Knights walking around. This Cavalry with Depredation can pillage for 222f FOUR times in a single turn, grinding down this fully built-up Holy Site.


n174.jpeg

Kongo represents a bit tougher terrain. Note the hilly, single tile pass through the long mountain range to the west. The coast is rocky to the south too, meaning the invading force had to land one tile west of the Copper and slowly march though the pass. Once past that bottleneck though, Kongo’s land is pretty widespread and flat, allowing Cavalry to take advantage of speed to raid districts and retreat before being taken down by defenses - even this one that at a glance looks trapped escapes and heals thanks to mounted units ignoring ZOC. While raiding, the Cavalry at last find the 12th city state, Muscat, who were conquered by Kongo and unfortunately never liberated due to the lack of Niter.

n170.jpeg

The Alliance with Germany really pays off as it has been boosting growth and now on T171 hits Level 2, boosting Chemistry and powering up our Apostles. Having one friendly AI has also been a boon to happiness as we would be at 0 naturally at this population but thanks to purchasing Chocolate, Jade, and Wine are at +3, providing the +10% production and +20% growth boosts.

n195.jpeg

The brief neutralization of Pingula provided a perfect opening for Liang. She arrived after five turns and some Builders laid down a set of Fisheries on T182 and T183. Those once desolate water tiles (shown here after the additional boost from Plastics) are now outperforming the land!

n190.jpeg

Thanks to two promotions, this lone Field Cannon was able to consistently one-shot Crossbows. With a little help from the Ngazargamu Encampment and Fez’s own ranged defenses, both Maori and later Netherlands were held off.


Attachments

  • n167.jpeg
    n167.jpeg
    1.4 MB · Views: 141
Part 10: End Game: Science, Liberation, and Lasers (T190-T254)

As T190 dawns we are close enough to International Space Agency that it is time to start liberating the less useful city states, or at least trying to - it will be tough to battle late game AIs with Urban Defenses without any Artillery, Bombers, Tanks, or Helicopters.

Spoiler :


The first target is Armagh. With efforts to re-spread religion by Apostle combat largely over (we want all first spreads to be via charges for the Fez bonus), it is time to end the long alliance of convenience with Germany and free Armagh. An advantage is that we can declare Liberation or Colonial Wars here to slow down war weariness accumulation a bit.

n196.jpeg

Two Privateers were detailed to bomb down the Armagh walls before an Anti-tank Crew (our most powerful resource-less unit) frees the city. At first an Ironclad chases the Privateers off, but then it mysteriously steams north and the city is freed on T196.

Annoyingly, Fez is attacked yet again and falls on T199 - this time our single Field Cannon expeditionary force was overwhelmed by mounted units. This is a major setback. Even though we have converted most of the world already, Fez disappearing strips us of 6spt from our 6 envoys as well as the extra +15% bonus from Kilwa. A liberation force immediately dispatches, but it was poor planning to not have had a few more troops there to begin. At any rate, Fez is free again by T204. Of course, 15 turns later Palenque gets captured, and the Kilwa bonus drops back to 15%. Palenque is actually liberated T230 by an AI, but annoyingly that means our envoys are reset to 0, creating a major drag on tech rate.

War weariness peaks at -10 around T200, driving happiness to -3. At this stage, it makes sense to call off all the wars for war weariness relief - we can always re-declare 10 turns later. Unfortunately, this plan is shot to bits on T203 when three different emergencies are called by the World Congress, dragging the entire world except for Kongo and England into war against us...

n237.jpeg

Cree and Germany send a stream of units and we have no choice but to kill them lest they pillage our districts, meaning more war weariness piles up quickly and we end up treading water at 0 happiness instead of working at Ecstatic as planned.

With so many units arriving, we actually need to slot Their Finest Hour. Eventually, we pay out about 3000g to Germany for peace, not because of any threat but to avoid weariness from the next 6 combats about to occur otherwise.

n200.jpeg

War Weariness is piling higher and higher as our pillaging units absorb ranged defense shots and counters and a cluster of units fights violently to free Fez. Here we have reached -10 even after temporarily ending the pillaging wars in Russia/Kongo/England and the liberation war against Germany. A bunch of policies is barely keeping things afloat. On the city state panel, we are doing a fairly middling job of gathering everyone into the fold for International Space Agency. We have five under control, while four city states including Fez are still occupied. Every time we send an envoy to La Venta or Ngazargamu an AI responds by sending two of their own (11 are sunk into Ngazagamu to no avail!). Containment will eventually let us take them on T215. Granada was met very late in the game and looks out of reach completely.


Domestically, a Theater Square finally goes up on T192, with instant purchases of an Amphitheater, Archaeology Museum, and Archaeologist. This adds a little culture but more importantly allows us to excavate an artifact for the Combustion boost. Pillaging units are bringing so much science that both Combustion and Electricity are completed the next turn. We can add a Seaport too - although it is probably not even necessary, it’s a psychological boost to see even more gold on those ocean tiles. Plastics adds another food to fishing boats on T195, really pushing those ocean yields!

A true rarity, the Water Park arrives on T218 to further help with war weariness. With a Ferris Wheel purchase we finally break through to +1 happiness for the first time in about two dozen turns. The Aquarium adds a tiny but of science - it is more for the fun of stacking on the yields to the Turtle Reef tiles than actual use.


n218.jpeg

Satellites reveal a hut deep in the icy north. A captured Builder heads over and pops the hut for a Governor Title. That would have been incredible in T18, but on T218 it is sadly meaningless.


By this state, our borders have expanded beyond the workable radius of the city. Unfortunately there is not a single forest, deer, or stone to chop in the fourth ring. Nevertheless, improvements in the fourth ring still yield power so an idling Builder starts laying down a patch of Solar Farms which will eventually be needed for Laser Projects.

On the Great Person front, we recruit a second wonder-building Great Engineer (Eiffel) who goes ahead and constructs the Bolshoi Theater (yielding Totalitarianism and Class Struggle). Getting to Communism instantly is nice, and boosts us past 200spt for the first time. Avar Aalto is also recruited just to reveal the next GE, since the AIs are accumulating GE points very slowly. Bad luck on the Great Admiral front as Grace Hopper ends up being swiped by an AI. We end up taking Einstein to boost Nuclear Physics. Great Merchant Rockefellar does show up, but only on T219, too late to actually help with building up some Tanks/Bombers. Last of all Great Engineer Goddard showed up very late, but unfortunately he does not help with Laser projects so serves no purpose by the time he arrives.

Spy 1 Brynjar continues to conduct offensive operations, managing to steal the Robotics boost and yet again escape on foot. Constantly being detected has slowed him the entire game, but luckily he has never been captured. With no more tech boosts available to steal, Brynjar then joins Knute at home on defense. He settles into the Commercial Hub to guard against treasury raids, as well as helping guard the adjacent Spaceport. Knute ends up capturing a Spy trying to neutralize Pingula on T217 and earning the Quartermaster promotion to further solidify our late game espionage firewall.

The Space Race gets under way officially on T201 with the completion of the Spaceport, and the Royal Society goes up three turns later. With gold flooding in from pillaging, the strategy is to buy a Builder every turn to complete the first three space projects via Royal Society, while actual projection goes into Campus Research Grants. The Satellite goes into orbit T209. The Moon Landing completes on T214, which instantly completes Globalization and lifts us to 246spt thanks to ISA (would be much higher if not sandbagged by war weariness). The Mars Colony is established on T221, and then Smart Materials arrives on T225. At this stage the end of the tech tree comes into focus.

n227.jpeg

The late game tech tree locks like this. Unfortunately four total Future Era techs are needed to get to the Offworld Mission.

The Exoplanet Expedition launches T229 (had to sell some artifacts to get enough money for the last two Builders to help speed it along). From this point on we keep up the pillaging to speed the last few techs and ensure gold is flowing in for Builders to help speed Laser projects. Offworld Mission opens up the door for Terrestrial Laser projects on T241. Thanks to help from Royal Society we can run one project every other turn (sadly there was a grand total of one forest available to chop due to the desert land). Lasers complete on T243, T245, T247, T249 and T251 - though the last one was too late to actually speed the Spaceship any more. Something odd happened on T253, when the Spaceship went from 46/50 turns to 49/50 turns despite moving at 6 light years per turn. At any rate, the Spaceship arrives on T254 for the win.

n241.jpeg

One of the original Longships survived all the way to the end of the game. This single unit brought in close to 10,000 combined gold/faith/science/culture.

n254.jpeg

Minou City on the last turn of the game. Seasteads have added to further bump the ocean tiles. It kept the game entertaining to see these tiles become insanely rich thanks to Auckland and Piopiotahi. The strongest tile, the Turtle south of the wonder, is providing 5 food, 6 hammers, 7 gold, 4 science, 3 culture, and 1 faith (plus 1 Amenity and 0.5 Housing). Five Solar Farms and two Windmills are more than enough to power the Lasers since we have a massive stockpile of Coal to burn to supplement them. Indeed, burning all that coal ended up flooding the small island to the southeast and damaging our Neighborhood.


Attachments

  • n216.jpeg
    n216.jpeg
    1.6 MB · Views: 159
Summary

As predicted, the violent Norway victory was much faster than the peaceful Chinese Victory. Even though our domestic science rate was slower, pillaging accounted for over 22,000 science! By rough estimation, this means 40% of all science came from pillaging. This both overestimates and underestimates the true value of war.

Spoiler :


Positive side of War:

1. Pillaging also provided about 50,000 gold, 30,000 faith, and 18,000 culture, speeding us through the Civics tree and allowing us to purchase many buildings and Great People

2. Warring meant we could liberate Kumasi, Armagh, and most importantly Fez, which allowed us to re-gain their Suzerain bonus and an additional +15% science from Kilwa.

Negative side of War:

1. Units cost production and maintenance gold, sapping production that could have gone to buildings or projects and cancelling out a chunk of that 50,000g.

2. Not having any friends for most of the game caused us to miss out on tons of gold from DF sales.

3. For most of the game, we missed out on Alliance benefits (which are pretty weak).

4. War weariness drove down happiness for much of the game.


Fez was incredible, providing 5200s total over the course of the game! With Science maxing out at 328spt, this saved us at least 15 turns in teching to the Exoplanet Mission.

Cross Cultural Dialogue also made an impact, but much less so than in the Peaceful China game, providing about 2500s. This was largely because the game ended much earlier.

By far the biggest mistake this game was letting war weariness get out of control. It really accumulated fast in later eras, dragging down science rate by ~100spt, as well as slowing production and growth for dozens of turns when it hit extremes of -6 happiness. In many cases, it would have been better to skip pillaging a tile when for example it would bring 2-3 ranges shots into play (even though they posed no threat to the pillaging unit) to keep happiness higher. That, combined with being more careful about defending city states, probably could have led to a victory time closer to T240.

 
Back
Top Bottom