• Our friends from AlphaCentauri2.info are in need of technical assistance. If you have experience with the LAMP stack and some hours to spare, please help them out and post here.

Tips on Unit Creation with Blender?

wekham

I-C-B-M
Joined
Sep 14, 2024
Messages
35
Hello everyone. Recently, since I'm learning more about 3d modeling and animation, I've decided to make some units for fun, and maybe use them in my scenarios or hope people use it. However, I have no idea how the unit FLC files work, and even less a unit's INI.

So, since I am planning to use Blender and GIMP to do all of this, what do I need to do? What's the process? Do I need more programs? And once I'm done animating, how do I turn them to FLC files? I would love to know.
 
At first try uploaded files. Achilles.blend it's a finished and animated Blender unit with a script which during rendering will export all 6 animations (default, attack, death, run, victory and fortify) to eight direction folders, you need to only change a highlighted path to the folder on your pc and start render... and then you will have all unit frames rendered for later process.
1726406621996.png


Nest step is to combine all rendered frames into storyboards, default, attack, death, run, victory and fortify. Sandris's Storyboard Builder will do that for you in few second. You need to browse folder with rendered frames and hit "create storyboard". SBB tend to crash if you have to many subfolders, so try to make short folder structure, like this: desktop\folder\unit frames\achilles
1726413877223.png


Next step is in Gimp. The storyboards I was talking about are rendered on pink background which is a colour assigned for transparency however if you want to have a quick unit palette for Flicster which produce FLC you need to render once again your unit but this time on grey background plus also change a dark blue civ colour to the same grey as background. From this grey storyboard you can extract 160 colours which you will need later for your palette.
In Gimp you need to combine 3 storyboard in one file as below:
1726407397705.png


Next step: convert combined storybaord to 160 colours, use default settings and press convert. Save a file as unit_grey.BMP
1728312766498.png
 

Attachments

  • achilles.zip
    achilles.zip
    2.5 MB · Views: 20
  • Sandris_SBB.zip
    Sandris_SBB.zip
    7.9 KB · Views: 11
  • 1726406860021.png
    1726406860021.png
    180.6 KB · Views: 25
  • 1726407601024.png
    1726407601024.png
    328.7 KB · Views: 72
Last edited:
Next step is to create a full color palette for your unit. You need a TilesetPal 1.1 and palette template - template pal.pal
Files in attachment.
1726407786150.png


Nest step: Open the TilesetPal, press(top bar) Palette>Merger>File>Load Palette
1726408054690.png


Untick Link Selection position and drag a square over colored tiles starting from top left corner to bottom right corner, then press button with right arrow
1726409363708.png


This will copy palette colours from template to internal palette window. Next step: click file>browse your unit_grey.BMP and open in TilesetPal, it should look as below, you will see 160 colours exported from your storybaords.
1726409385733-png.703487


Next: drag a square over your black tiles in internal palette window and press right arrow. This will transfer 160 colours from external palette window into internal palette window
1726409439749.png


Your internal palette should now have completed 256 colours essential for later process.
1726409459985.png


Draw a square over internal palette tiles and press left arrow>File>Save palette> as JASC palette file> Unit.pal
1726414304728.png

1726414385244.png
 

Attachments

  • TilesetPal 1.1.zip
    TilesetPal 1.1.zip
    166 KB · Views: 22
  • 1726408276422.png
    1726408276422.png
    320.5 KB · Views: 18
  • 1726408520207.png
    1726408520207.png
    339.5 KB · Views: 16
  • 1726408749192.png
    1726408749192.png
    461.4 KB · Views: 15
  • 1726408875320.png
    1726408875320.png
    428.4 KB · Views: 22
  • 1726409385733.png
    1726409385733.png
    189.8 KB · Views: 170
Last edited:
Next step is to prepare files for Flicster. FLICster1.0.0.17_FullSetup needs a patch FLICster1.0.0.18 to work correctly, otherwise will freeze during export or animation view. Files in attachment.

Open Flicster, press New and start creating flc files. Most of the setting you see here can be left default. You need to change frame size 16x16 to 180x180. That's the size of each render frame, this is set in blend file attached above. Use this size for all your flc files, attack, default, death, fortify, run, victory.
Next is frame count (default 1 )- this is set in Blender too, number of frames each animation have. Most of my foot units have number of frames as follows: attack 15, default 15, death 22, fortify 10, run 10, victory 15.
Next parameter you need to think of is Base file name which is self explanatory, you need to name each files as before attack, default, death, fortify, run, victory.

/Edit/ The last parameter you might think of is Default Delay (80ms). I use default setting for all flc animations 80ms except default animation where I use 125ms. The other creators had this different, so you can experiment here a little yourself.

1726410596539.png


When you finish this, each file can be exported as pcx image and saved in your unit folder. You will see there empty storyboards which later replaced with storyboards you created earlier from Blender rendered frames. You will also have flc empty files with the same names as pcx files.
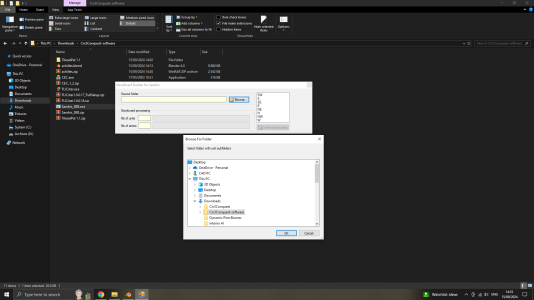
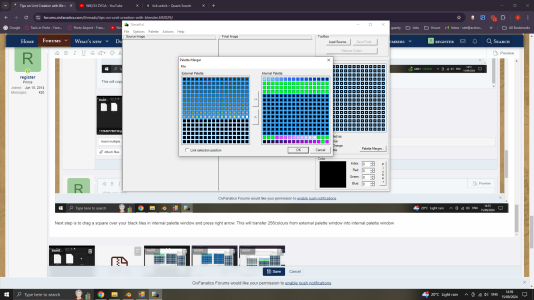
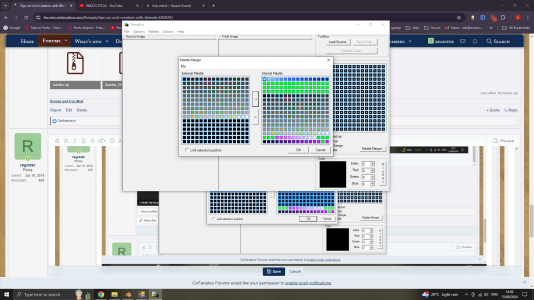
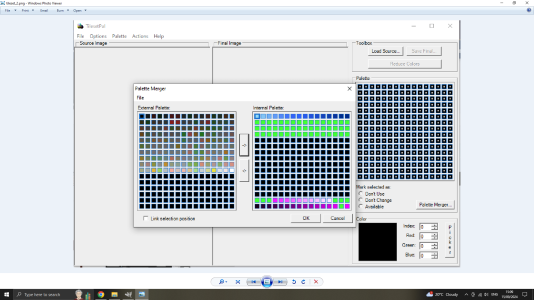
In attachment I added mine empty storyboards (pcx) plus flicser files set for export(template). Feel free to open it but only press File Information and Export. All other button will crash Flicster at this stage.
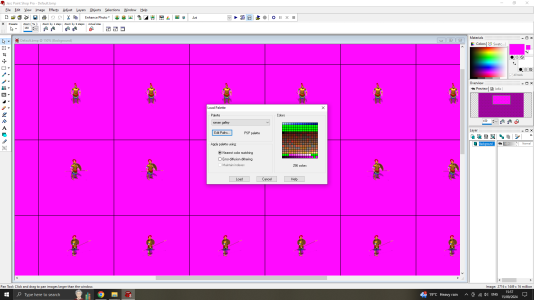
 

Attachments

Last edited:
When all this is done you need to install a software Jasc Paint Shop Pro 8 or any other version you can find online. I tried Gimp and Corel Photo Paint but I was struggling to apply the palette, so I'm using the older tool.

Drop the storyboards on pink background to Pain Shop Pro and open the palette menu
1726412229144.png


Choose Edith Path and browse the unit.pal palette you have created earlier, choose nearest colour matching and press load:
1726412438995.png


You unit will be slightly pixelated, this is happening because loaded palette decreasing the number of colours to use by Flicster to 256. Save the image, in my case I use default.bmp, as default.pcx - save this over empty default.pcx you exported earlier from Flicster. Repeat the process with remaining storyboards.
1726412702216.png
 

Attachments

  • 1726412334207.png
    1726412334207.png
    307.9 KB · Views: 21
Last edited:
Now, the last step should be quite rewarding :). If everything you have done until now was correct, then open the Flicster - File>Open> browse of an empty flc file you created earlier, default for instance, and if you saved your storbyoard with applied palette over default.pcx now in Flicster you should see your unit.
1726413186424.png


Export it as default.flc and repeat this with all other storyboards.

Hope everything is explained clearly enough and will help you to create your first unit :) Good luck!
 
Last edited:
Back
Top Bottom