Blue Monkey
Archon Without Portfolio
Working with PCX Palettes in GIMP
GIMP can be confusing about how to work with indexed colors as needed for C3 pcx files. Terminology is not necessarily consistent. Different parts of the process are in completely different menus. Here are some general explanations. There's a summary of the process at the bottom of the post.
This post is only about pcx – the static files such as civilopedia icons, terrain, and so on. Other types of files - such as unit animations - use a very different palette arrangement. Someone else (Vuldacon iirc) has written very detailed explanations of how to work with those palettes. Be very clear – what is written here is only about pcx.
I'm currently using GIMP version 2.8.16 on a Mac. Your UI may look slightly different from the screenshots depending on what version you use, but the basic actions are the same.
Terminology
About the use of “Green” and “Magenta”
As has been mentioned many times in many posts in many threads it is the location in the palette/colormap that determines what is invisible in-game – not the particular color. The standard game files use bright Green (RGB 0 255 0 ) and Magenta (RGB 255 0 255). The reason those two colors were used is because they are highly visible and rarely used for in-game content so it is very easy to tell what will be invisible. So most of us use the same for our files. Makes seeing what other people have done in creating graphic files easier. Same goes for understanding illustrations accompanying posted explanations and tutorials. For all of those reasons it has become common practice on the forum to write “green” and “magenta” as shorthand for “the colors in the last two slots of the palette which are reserved for what needs to be invisible in-game.” The explanation below follows the common practice in both text and pictures. But keep in mind any colors can be used. This comes in handy if your pcx includes pinks and greens that are close enough to those colors to be confusing.
You will see posts where people use “reserved color” to refer to the last two slots. In my own thinking and in writing this up I use “reserved” also to mean the two colors I want to make sure show up in the colormap, even if I have to change them around later.
“Colormap” vs. “Palette”
This can be a second source of confusion. Most of us casually use “palette” for what GIMP calls a colormap – the indexed (ordered) set of colors associated with a particular image. Gimp uses “palette” to refer to files which are saved separately from the image. But it occasionally uses “palette” when referring to manipulations of the colormap – confusing when learning what to do and how to do it.
Techniques
To change an RGB image to indexed:
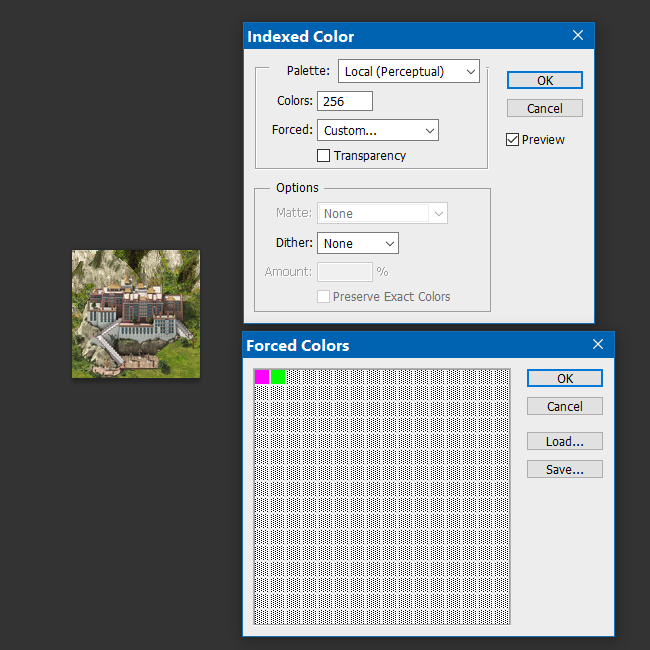
In the menu: Image > Mode > Indexed … brings up the dialogue window.
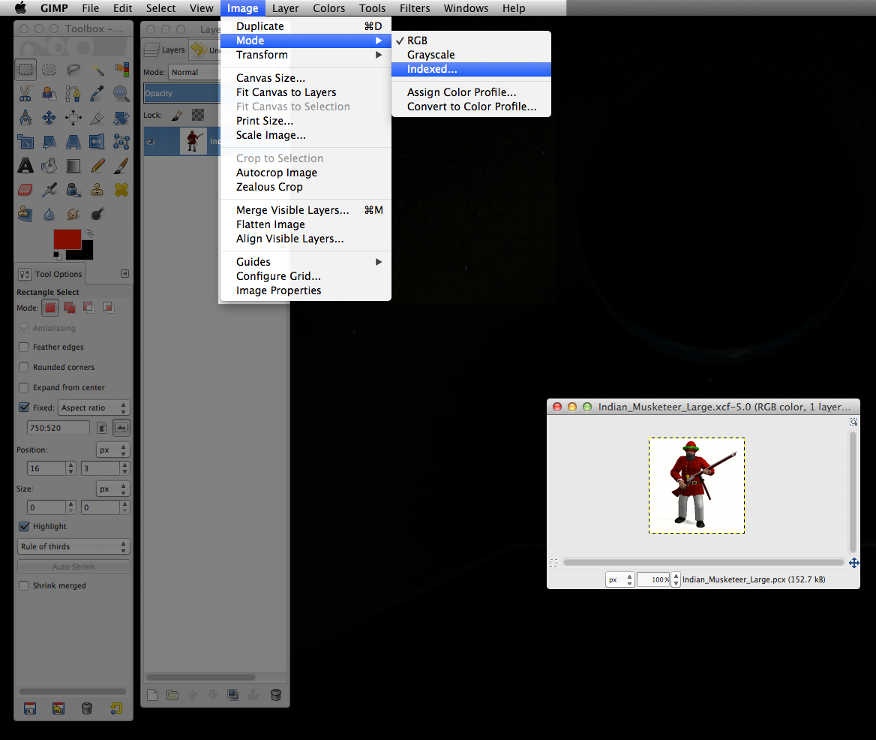
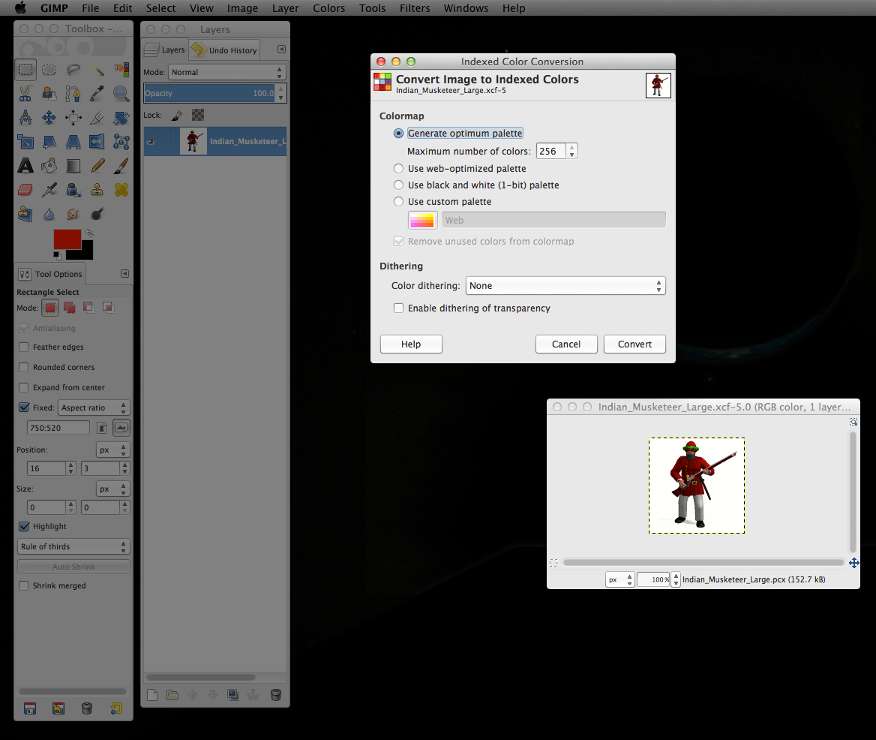
In the Conversion window choose optimum palette. This will generate a colormap unique to your graphic. Using pre-existing palettes is a whole other thing we won't get into here.
This step can be confusing because the actual colormap index is numbered 0-255 (256 different colors) but by default GIMP wants to make a palette with 255 colors.
 Make sure to increase the Maximum number of colors to 256. If you don't then the game engine may try to fill in those unused slots. You can end up with problems like green or magenta showing up in game because they are not in the last two slots.
In the same window you can set dithering – the specific mathematical technique that will be used to reduce the number of colors used. Don't worry about how that works – we just care about the results. Not every image gets best results with the same dithering technique. Experiment.

To get the Green & Magenta in the proper slots:
I'll explain in the section further down on reserving colors why I've added green and magenta dots to the image before indexing. For now just know that they help make things easier in the long run, and will be removed before saving the final pcx.
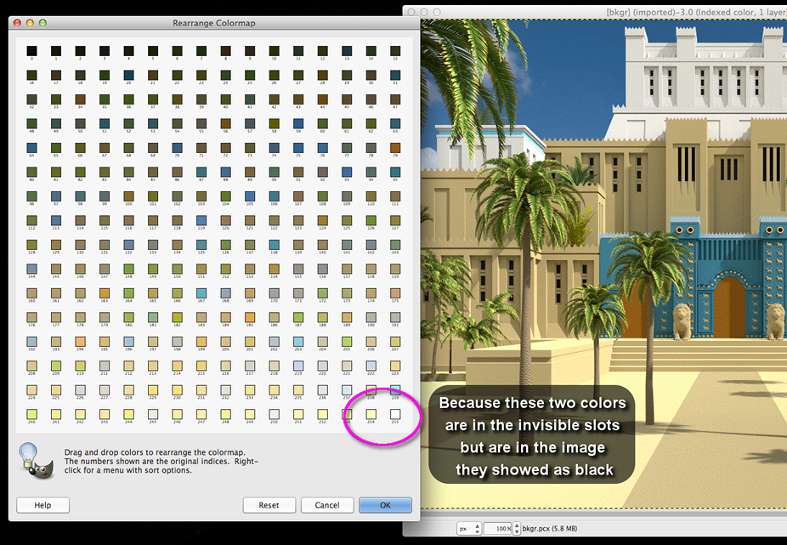
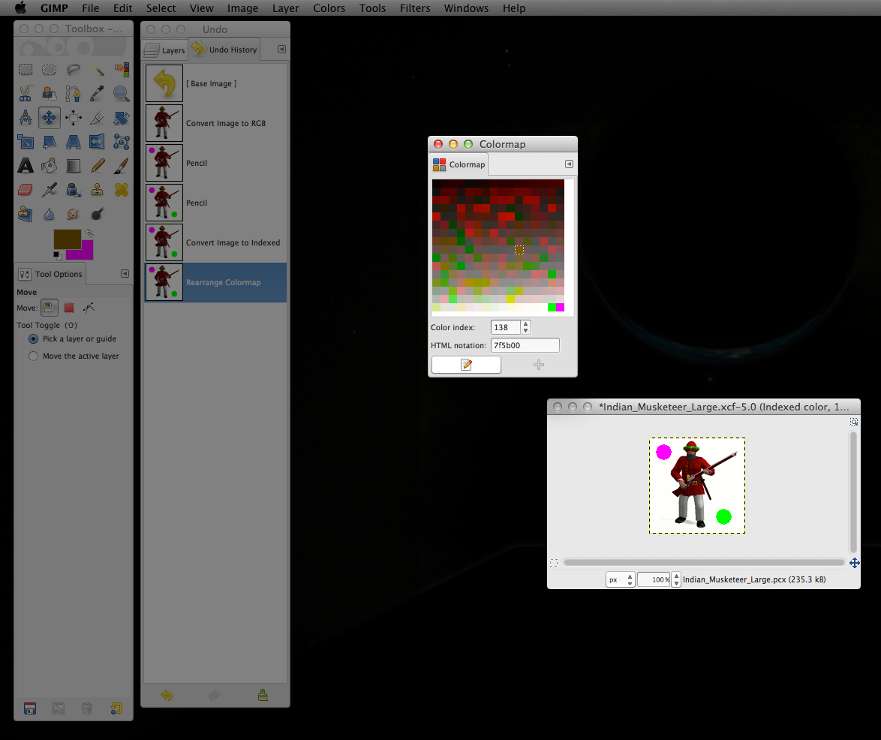
After you have indexed the image you can rearrange colors in the colormap.
This stage can be confusing because it's in a different part of the menu than changing the mode.
In the menu: Colors > Map > Rearrange Colormap … brings up the dialogue window.

Don't worry if the other windows disappear when the Rearrange dialogue opens. They'll come back when you close it.
The last two slots in the colormap are where the game engine looks for the “invisible colors”. It doesn't matter how all the other colors are arranged.
In the Rearrange window: just drag and drop the magenta and green to the last two slots. Don't worry about the little numbers under the color box. They will get changed automatically by GIMP when you close this dialog.
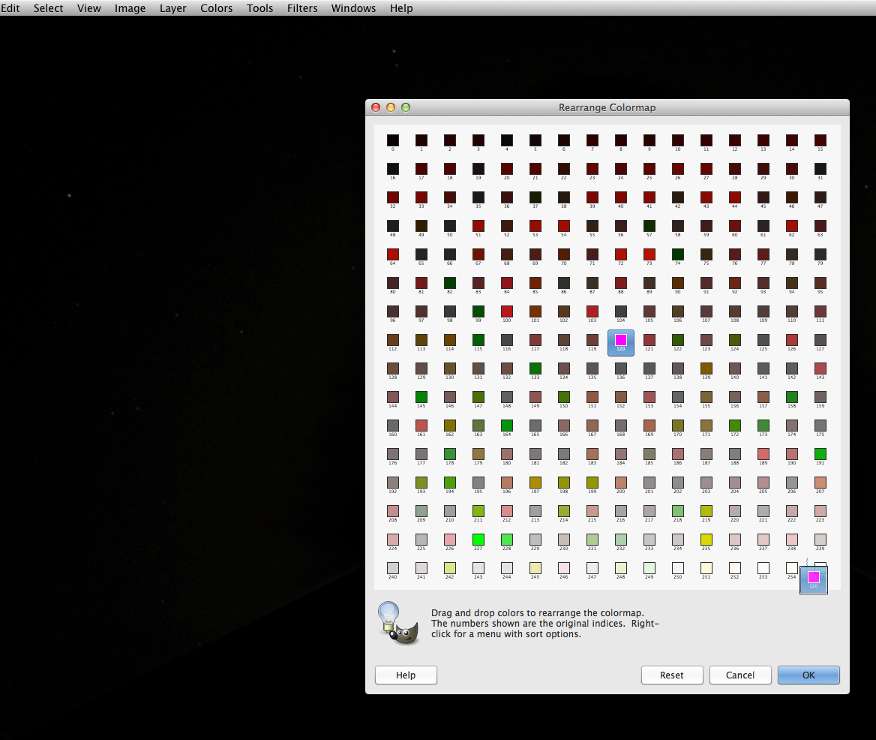
You can safely drag and drop any other colors you want as well. It won't change how your image looks. You're not moving pixels in the image or changing their colors, just changing where in the colormap the game engine will look for what to do with them. There's even a way to sort the whole colormap, but it isn't really useful for our purposes. Just make sure that green and magenta end up in the last 2 slots.
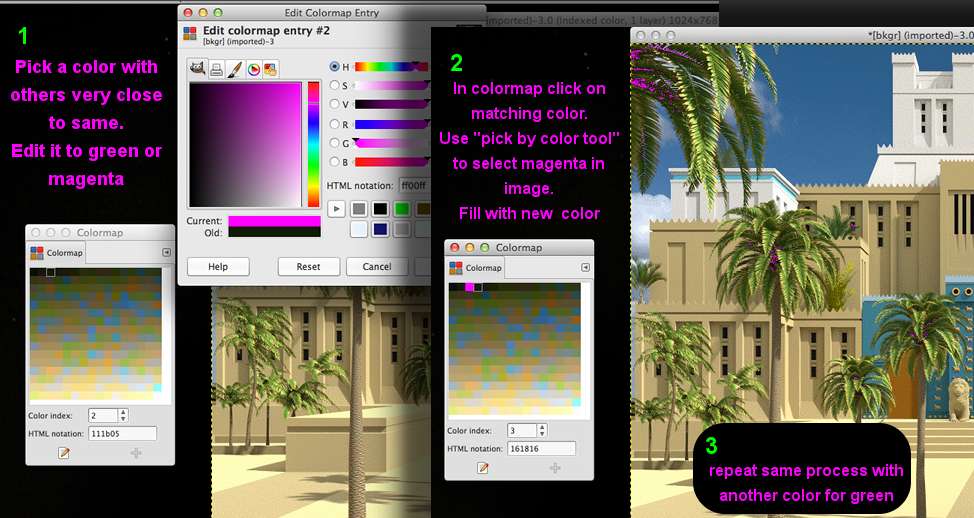
To change colors in the colormap:
This is useful if you want to have green and magenta as the invisible colors but they aren't in the colormap. It is also one way to adjust other colors to smooth out problems caused by the dithering.
Yet more confusion at this stage: you have to go to yet another part of the drop-down menus: Windows > Dockable Dialogs > Colormap brings up the dialog window.
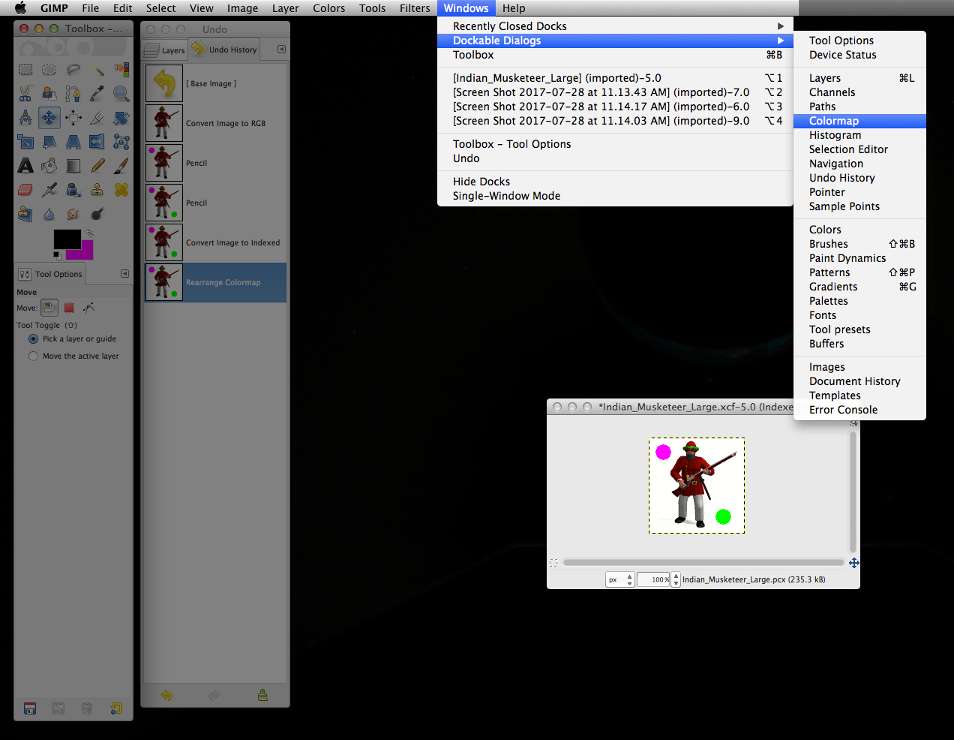
In the Colormap window select a color by clicking on it. Then click on the pencil icon.
This brings up a window very similar to the one you use for selecting colors in the Toolbox. Use whatever method works best for you to get the color you want.
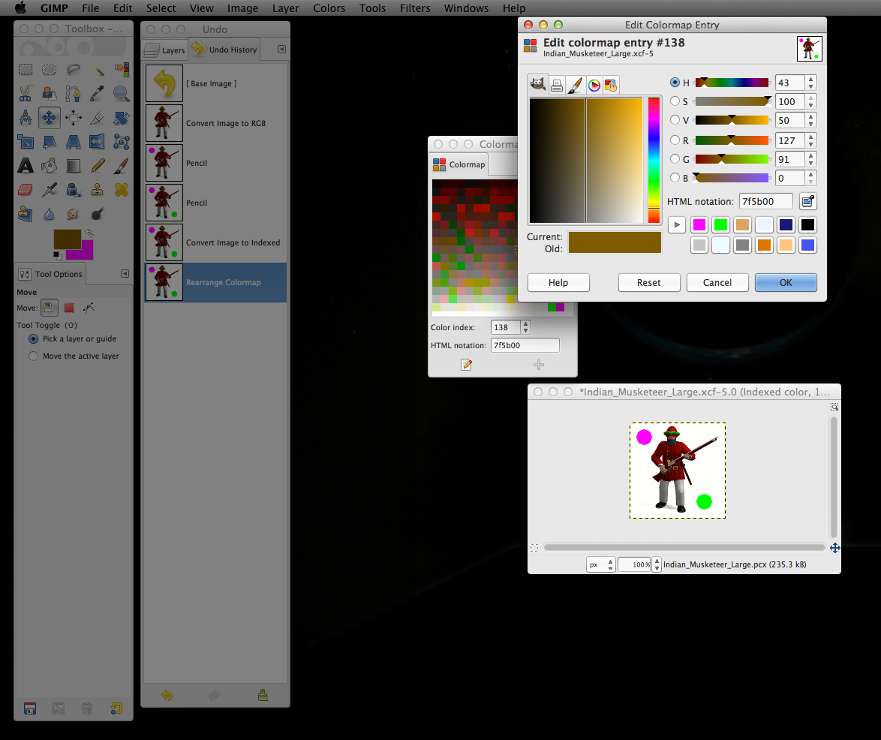
After you've changed the color click Okay. The Colormap window will still be open. So you can repeat the process to change as many colors as you want.
Ways to reserve or make room for green and magenta in the colormap:
This section is last in the order of explanation because it is optional. However, adding areas of color must be done before indexing.
If you try to correct the colormap by changing the last two colors you may end up with green or magenta in the actual image. This happens because you have edited a color that is actually in the image, and - as shown above - it doesn't make any difference where the color is in the colormap. There are different ways to avoid this.
One way to correct this is to pick a color very close to the one you want (that got changed to green or magenta). Then Select by Color, and Fill. But making sure every single pixel that is green or magenta gets changed can be very tedious. Or ...
If you've got a large area of the same color in your RGB image you can paint big fat dots of green and magenta before you change mode to indexed. Paint a solid area rather than one or two pixels to make sure they stay in the colormap when it is reduced. After it's indexed just go back and paint/fill the green & magenta to match the surrounding color. Or …
Maybe you can't or don't want to paint over part of your image. You can make a frame or border in the RGB image that will get cropped after indexing. This frame makes the image larger than the size you want. It gets cropped after you index – restoring the image to the size you actually want. But the colors in the part you've cropped away stay in the colormap even if they aren't present in the part of the image you keep. Or …
Sometimes if your image has very few colors you will end up with blank spots in your colormap just because there are not enough to make 256. Make part of the border a rainbow gradient. Or make a gradient between two of the dominant colors in your image. You can make these gradient borders much thinner than I've illustrated. Not all of the colors need to end up in the colormap. You don't want them to get chosen instead of an important color in the part of the image you will keep. Make sure there is still a large area of green and magenta in the border so that they will be reserved in the colormap.
Examples of four ways to get green and magenta into the colormap by including them in the image
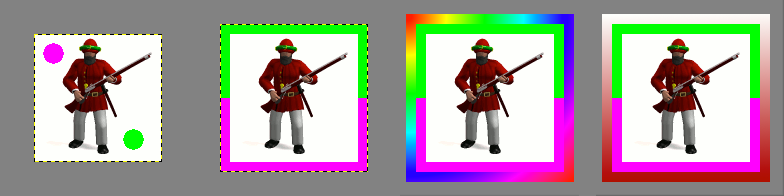
With any of these methods you may still end up with some green or magenta if the colors used in the image are close to those. In the example icon the green on his hat might cause a problem. You can always use other colors in your border that are not even close to the colors in the image. In the past I've used bright Blue and bright Yellow, for example. Bright colors that are very different from colors in the image are good choices because they are easier to spot. You can leave those two colors as the reserved ones and rearrange the colormap as needed. Or after you index just change those two colors to green and magenta.
If you do use the borders technique always make sure to crop the image down to the correct size before saving and using the pcx. If you forget to crop you will end up with unpredictable or at least unhappy results when you try to use it in-game.
Summary
- It's whatever colors are in the last two slots of the colormap that are invisible in game. We use and talk about green and magenta as the invisible colors only because they are what Firaxis uses in the original game files.
- In the menus: Image > Mode > Indexed brings up the dialog to convert RGB to indexed. Make sure to set maximum number of colors to 256. This dialog is also where to set how GIMP dithers (chooses which colors to keep).
- In the menu: Colors > Map > Rearrange Colormap … brings up the dialogue window to drag and drop green and magenta into the last two slots of the colormap.
- In the menu: Windows > Dockable Dialogs > Colormap brings up the dialog to edit particular colors. Click on a color, click the pencil icon at the bottom of the Colormap window, then change the color in the window that pops up.
- You can make sure green and magenta are reserved in the colormap by putting big areas of them in the image while in RGB mode and then repaint them after indexing. Or by using them as a border around the image which gets cropped after indexing.
While getting used to working with palettes lots of “opportunities” for questions are going to come up. Be sure to ask. The only difference between an expert and a novice is that the expert has already made most of the common mistakes and knows how to correct or avoid them.

Last edited:
 Lightbulb! By adding the color I wanted to the border I could make sure it was there in the final image without having to do any pixel by pixel work, or colormap editing.