Drill for mounted protection is pretty useless though. Many mounted units ignore first strikes, Flanking II also makes them ignore first strikes, and you'll generally be weaker than the mounted unit anyway, so you want to get better in strength to improve your odds, otherwise you'll lose most of the time. And Formation (+25% vs mounted) is available with Combat II, it comes one promotion before Drill IV and gives a much bigger bonus.
I also have the opinion that Drill IV and Combat IV don't represent the entire lines of Drill and Combat. You need to emphasize the lower levels of each line, since they are the most common.
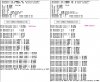
I'm afraid the R=A/D strength ratio as the only independent variable is not enough -- you actually need another dimension if you want really precise results, since the units' Hitpoints make things quite complicated but have a major effect, especially in the frequent mop-up-after-siege situations.
The picture shows the combat odds of a DrillIV Archer vs. a 50HP Maceman (D=4) compared to vs. a full strength Explorer (D=4).
Personally I believe that the designers buffed the Drill line with the extra protection from collateral damage for a good reason.
True. First strikes might still be useless though if the targeted mounted unit ignores them. Once you've decided that that unit will provide anti-mounted services and you got it to drill II + Formation, are you going for drill III (useless) and drill IV (+10% vs mounted) or for combat I (+10% strength) and combat II (+10% strength)? Or will you hope that the mounted unit that you won't even see coming in the opponent's territory won't be immune to first strikes? So I don't why you'd ever want to go for drill IV + Formation or why you'd want a drill IV unit to defend against mounted when you could easily get better defenders.
True. First strikes might still be useless though if the targeted mounted unit ignores them. Once you've decided that that unit will provide anti-mounted services and you got it to drill II + Formation, are you going for drill III (useless) and drill IV (+10% vs mounted) or for combat I (+10% strength) and combat II (+10% strength)? Or will you hope that the mounted unit that you won't even see coming in the opponent's territory won't be immune to first strikes? So I don't why you'd ever want to go for drill IV + Formation or why you'd want a drill IV unit to defend against mounted when you could easily get better defenders.
I usually wait to promote until just before attacking, other than for stack defenders. It's not all THAT uncommon that a mounted unit will be a target in a stack battle, either in the field sod to sod or in a city.
Rifles and muskets are the prime candidates for this. If they don't have muskets in force formation muskets will beat all medieval defending units.
I'm afraid the R=A/D strength ratio as the only independent variable is not enough -- you actually need another dimension if you want really precise results, since the units' Hitpoints make things quite complicated but have a major effect, especially in the frequent mop-up-after-siege situations.
The picture shows the combat odds of a DrillIV Archer vs. a 50HP Maceman (D=4) compared to vs. a full strength Explorer (D=4).
Personally I believe that the designers buffed the Drill line with the extra protection from collateral damage for a good reason.
I'm surprised how well drill 4 holds up except when the control combat odds are low enough that combat 4 will swing it over the 50% combat odds mark. Drill is good, but combat odds being non linear (semi-quadratic locally?) it tends to quickly outpace drill.
I'm afraid the R=A/D strength ratio as the only independent variable is not enough -- you actually need another dimension if you want really precise results, since the units' Hitpoints make things quite complicated but have a major effect, especially in the frequent mop-up-after-siege situations.
The picture shows the combat odds of a DrillIV Archer vs. a 50HP Maceman (D=4) compared to vs. a full strength Explorer (D=4).
Personally I believe that the designers buffed the Drill line with the extra protection from collateral damage for a good reason.
DanF, you're absolutely right and thanks for bringing my attention to it. The change in HP between the two situations causes a large change in the firepower as you call it.
If I call dA the firepower of the attacker, and dD the firepower of the defender (I call these d_A and d_D in the program output below) then...
For the 50HP mace it's dA = 14, dD = 27.
But for the 100HP explorer it's dA = 17 and dD = 23.
Both have the same ratio R, but as you noted the firepower leads to a large change in combat odds. Interestingly, since the probability of a successful hit each round is identical in both cases, the change in odds comes solely from the change in firepower.
Note in both these battles the probability of a successful hit from the attacker, P_A or PA is ~ 0.43. Since PD is larger at ~0.57 (the same as 1 - PA of course), the change in the defender's firepower has a greater effect on the change in results. In battles where PA > PD instead, you should see a drop in HP cause a drop in combat odds for the attacker.
Also, in this particular comparison, note the change in values that I call N_A and N_D. These are the number of hits it would take to kill the attacker and defender respectively. Here we see in one battle N_A = 4 and N_D = 4 (both equal), but in the other battle N_A = 5 and N_D = 6 (not equal). In cases where changing the HP does not cause a jump in the difference |N_A - N_D|, the change in odds would not be quite so dramatic, though probably still noteworthy.
I'll look into this a bit more and see if I can produce some more meaningful results.
For interest's sake, here's the data for the comparison you made...
I have to say Drill soley because of a Japan game where drill 5 samurais saved the game for the time. Combat 6 just would not have worked there. But I voted equal because that it is situational.
I also have the opinion that Drill IV and Combat IV don't represent the entire lines of Drill and Combat. You need to emphasize the lower levels of each line, since they are the most common.
The problem with doing much of the comparison at say C1 and D1 or even C2 and D2 is that you will probably find the combat promotions win reasonably convincingly. I find the question more interesting at the fourth promotion because Drill stacks up a lot better at that point.
D1 ~ 0.5 FS
D2 ~ 1 FS
D3 ~ 1 FS
D4 ~ 2 FS
If the Combat line had the same sort of progression up to C4, it would sort of look like:
Combat 1: +4.4% strength
Combat 2: +8.9% strength
Combat 3: +8.9% strength
Combat 4: +17.8% strength
Total at C4: +40%
(and I'm simplifying the maths here a bit because the odds do not change quite the same way with first strikes compared with strength increases)
If the Combat line were weighted this way, I would be willing to bet it would be worse off than Drill even in the early promotions, and also you would probably be prepared to sacrifice having slightly weaker earlier promotions for the potential to get the strong fourth promotion. So the gain from Combat promotions diminishes gradually, or at least stays relatively constant whereas the gain in Drill peaks dramatically at D4. D1 is so much weaker than D4 that by itself D1 is practically useless. Indeed if you look at my earlier post with C1 and D1 compared you'll see C1 wins pretty well (post #15 http://forums.civfanatics.com/showpost.php?p=7509214&postcount=15).
This is mostly why I asked specifically about D4 compared with C4 rather than the promotion lines themselves. If you could imagine you had a military city pumping out units with 4 promotions off the bat, which of the general promotions D4 or C4 would you give to your riflemen for example? If you must, assume you had to pick between the two lines and take no other promotions.
This is mostly why I asked specifically about D4 compared with C4 rather than the promotion lines themselves. If you could imagine you had a military city pumping out units with 4 promotions off the bat, which of the general promotions D4 or C4 would you give to your riflemen for example? If you must, assume you had to pick between the two lines and take no other promotions.
Well, as I stated in my previous post, the majority of units are probably produced with just a single promotion. Which means that your tests are only valid for a very specific situation.
Well, as I stated in my previous post, the majority of units are probably produced with just a single promotion. Which means that your tests are only valid for a very specific situation.
It's not all that difficult to get a city producing 5xp units from a fairly early stage. Assuming you specialize a city or two for unit production, you will be producing most of your units there. Units gain xp about twice as fast when they go along the drill line compared with the Combat line. If you are a Protective leader, and have a city producing 5xp units, these units typically only fight 2 to 3 battles before they have Drill IV, and that is at high odds (like greater than 85-90%). If non-protective it would be about 5-6 battles I guess, so it's definitely easier to do with Protective.
Of course these tests are only going to be valid for a specific situation. You can't find some evaluation function that tells you which is better overall, including all scenarios. I think it's fine to have an opinion on which one you think can be used with greater effectiveness or which you use more frequently.
When you use your units in combat appropriately, it's not hard to ensure your Drill troops aren't dying straight away. If you can sort of nurse them until they get to Drill 4 they become very powerful compared to Combat 4. No one is suggesting you promote each and every single troop to drill when available. I fully agree that Drill I is a fairly pathetic promotion by itself. If you send your drill 1-3 troops in at low odds (say less than 80% or so) then of course you will expect to lose a lot of them before getting to drill 4.
By the way, I have some more results on the way, specifically relating to the questions you asked. I just have to copy them over into CFC but that'll be tomorrow.
A sneak preview of the info I looked at:
Spoiler:
[removed because the information has now been posted]
EDIT... Really the poll was meant to be about Combat IV compared with Drill IV rather than the Combat line compared with the Drill line. One of the poll options (option C) sort of suggested thhe earlier promotions were relevant though, so I guess it's to be expected that the discussion has been mostly about the comparison between the lines of promotions rather than the fourth ones. My position at the moment is that Drill IV is a very strong promotion compared to 1 through to 3. In circumstances where you can reasonably expect to get to the fourth promotion, you can put yourself in a very strong position if you have Drill 4 troops mixed in with your other troops. Or if the units are good enough they can all be drill (like Cho-ko-nus which I'm using in my current game). I've also been trying to bring to the discussion the xp earning abilities of units and how these abilities change going along either of the promotion lines. However it seems most people are disinterested in xp. If milked properly you can pretty much double the xp you earn from a lot of the typical battles with drill troops. That doesn't quite double the number of GGs you get (just like +100% great person points doesn't double the number of great persons you get in a game) but it does give a very nice boost and having a few more GGs is never a bad thing. In fact you can use them to get the drill promotions even sooner from the factory. Anyway, ... more to come tomorrow /rant
There are two cases where the drill promotions can be great.
A) If you pick opposing units with a low number of hitpoints (say < 40 hitpoints), then the drill IV units will have a far higher chance of winning unscratched than the combat IV units because the drill IV units will often win purely with their first strike battle rounds. The drill IV units will have something like a 90% chance to win those battles unscratched while the combat IV units have a 40% chance to win those battles unscratched. Yes, both will easily win the battle, but one needs healing and the other doesn't.
This situation arises offensively in 2 main cases:
1) you use siege units to severely weaken city defenders and then mop up.
2) you use bomber units to severely weaken units and then mop up.
B) If you pick a fight where the drill IV units get a big bonus (big cultural defence bonus, forested hill) especially against siege units.
In this case, a stack of drill IV units will survive more defensive battles, partly because of the low damage they receive in normal battle, partly because of the low collateral damage they receive.
In close fights, I clearly prefer the combat promotions (especially the earlier combat I till III versions). A small edge in strength is very important when the fight is close since it means that the stronger unit needs to win less combat rounds than the weaker one which is very important in battle odds. The drill promotions don't change the strength ratio and thus don't have that big an effect in that case.
So I use combat units to protect my stacks in the field against attacks (by non-siege units) and I use combat units to destroy units (of the same age) that haven't been weakened.
So I like both promotions and I will use both. I guess I'll use the combat promotions more than the drill promotions, but I also use drill IV more than combat IV. It's usually later in the game when I can create higher promoted units that I will start using the drill promotions more.
If I use a unit for defense, I'll almost never promote along the combat lines, except to get to a specific counter (ie. I may give a musketman C1+2 and then formation to counter knights), but for defense only, I think it's hard to beat your classic CG3 (although if you get your 3 promotions off the gate, having one unit CG3/D1, and another unit D4 really works well as a combo).
Otherwise, if I'm promoting units, if I think can get up to D4, then I'll go drill (so say I build a unit with 7XP, and I'm protective, getting to within 3XP of D4 is worth it). If not, I'll probably just go combat, or if I'm talking again about muskets (the earliest unit that you can seriously consider for both your primary offensive unit and primary defensive unit in a rush), I'll usually use combat to get to my specific promotion (so C1/cover if I'm going after longbows, or C2/formation for beating knights).
I go for the combat path for attackers not because of the strength, but because of the versatility.
You will be missing out on Ambush, Amphibious, Blitz, Charge, Cover, March and Commando if you go down the Drill path. Early in the game, Cover is a big asset, and it's great to have amphibious as an option if your warring overseas before marines.
Then there's march, C3+march units outperform C4 and D4 in a war. Healing while moving? Add a Woodsman3 medic3 unit to your C3+March troops and they heal 50% EVERY TURN. Whether you've just taken a city and are defending it, or speedily attacking your next target march si great. Healing faster saves you tons of troops as well. Obviously this depends on your strategy, if you don't have a good medic unit, march won't be so big of a deal.
Commando is incredible too, in combination with nukes you can take out virtually any city in ONE turn with even a measly chariot. Two nukes, a 2 move unit with 6 xp and C2 and a GG. You get a C4 commando unit. 2 moves, using enemy railroads, any city you want to raze, you can. And on the first turn of war.
I voted it depends because it does Some units are more suited for CI and some units do no even have drill line of promos as an option.
Most of the time, I consider C IV kind of weak because it is very generic. Except for Mounted units like Knights, Cuirassiers, and Cavalry, I never give combat to any other unit. Even then, I prefer to give more specialized promotions like Shock, Formation (often War Elephants), and Pinch and only combat after that. The only reason I don't give drill to mounted is because I can't. If I could I would since they usually end up fighting technologically backwards units anyways and taking no damage would help.
Drill IV is a ridiculously powerful promo especially for Riflemen which are not vulnerable to mounted units to start with. +10% vs. mounted, -60% collateral, and tons of 1st strikes is great for mowing down a bunch of medieval units with minimal casualties. Protective civs can utilize the drill line of promos very well even for longbows or X-bows although they are less useful here imo. If you are fighting an opponent at tech parity, give your rifles CI/Pinch and then more combat promos. Maybe formation too...
Zara's Oromos are beasts!! You can easily get Drill IV out of the gate. They are not very vulnerable to mounties at all if you beeline them (which you should). You shouldn't be facing cuirassiers and with your +10% vs. mounted and defensive bonuses, your enemies' knights are not exactly as huge a threat as people make them out to be. In case the AI masses knights (i've never seen this - 10 or so is the max I've seen), just make a few CI + Formation Oromos or better yet a pikeman or two.
Later on in this post when you read the "Specific Comments" you should have these graphs available to look at. The pdfs have them in the same order that I mention them in the comments.
Introduction (to this post )
Since DanF alerted me to the fact that the combatant hitpoints has a significant impact on battle outcomes, I figured we should take a closer look at what happens for different unit healths. In other words, what happens when we look at unit health as the independent variable? For the first two experiments, I decided to keep attacker HP constant at 100HP. This is a reasonable thing to do because most players naturally heal their units to 100HP or very close to it before using them to attack. The AI also usually does this. Having damaged defenders is very common though; Every time you are using city attackers to attack units after the siege units have done some damage, you are attacking wounded units at say 60HP or 80HP - this depends on how much collateral damage you like to start your city attacks with.
I have seen some requests that more comparison is necessary for the earlier promotions in both the Combat and Drill lines. Therefore in the following two experiments I have included the four Drill promotions and the first five Combat promotions. The graphs for Drill promotions are coloured RED, and the graphs for Combat promotions are BLUE. The control graph, where neither Drill nor Combat promotions are on the attacker, is coloured BLACK. In the graphs of expected xp gains, I coloured the control red since it and all the drill promotions had exactly the same curve. (When keeping everything else constant, promoting along the Drill line from 1 to 4 produces zero change in the xp you earn. You could get 4xp for a 50% odds battle with no promotions, then promote to Drill 4 and have 79% odds and get the same amount of xp.)
Apart from the colouring, I have not individually labelled the separate Drill and Combat graphs. However it won't take much intuition on your part to figure out which corresponds to which. Something to keep in mind though: Combat 5 will be the best Combat promotion in each, so if you intend to compare Combat 4 with Drill 4 make sure you look at the correct line.
I'll now give a brief description of what the first two experiments are, and what motivations I had for doing them.
Experiment Descriptions
First Experiment: Equal base strengths
In this experiment, we take the very standard case where we let R=1. i.e. Equal base strength. R is the ratio of attacker's modified strength to defender's modified strength (A/D). These modified strengths take defense bonuses etc. into account but NOT unit health.
If you are attacking defenders where you have only a slight tech advantage, and the bonuses the defender gets roughly make up for that difference, then a ratio near 1.0 is fairly reasonable. For example, a mace attacking a fortified Combat 1 axeman on a hill would be R = 1.0.
Second experiment: Slight attacker disadvantage
To find a reasonable ratio for having the attacker at a disadvantage, and for an attacker that can possibly take Drill and Combat promotions, I went for a musket attacking a longbow.
To find a reasonable R value, I assumed the following battle setup:
Musket attacking a City Garrison 2 longbow, fully fortified in a hill city where the city 0% defense (like if we'd bombarded it down to zero already). The longbow defender in this case has 1 first strike, 45% from CG2, 50% from longbow being on a hill and in a city, 25% fortify bonus and further a 25% bonus for being on a hill. This adds up to 145% defense bonus.
A ratio of 9: (6 * 2.45) = 9:14.7. This gives R = ~0.612
SpoilerThat's funny :
Originally when I typed this it came up with a sad face
A ratio of 96 * 2.45) = 9:14.7. This gives R = ~0.612
How might this situation arise? Suppose you are attacking a city, have done some reasonble damage using your catapults and your city raider units, and are mopping up the remaining stragglers with your non-CR troops like musketmen. For example, there's a 60HP longbow left and your CR maces have all had their turn. You have 3 muskets left in your stack, so you can use one to take the city and the other two to immediately defend it. Both drill or combat promotions would be good for this first musket attacking. Assuming you decide on combat or drill, then you can use these results to look at what you'd do for the exact HP the longbow has.
Third experiment: Best four promotions for longbow defending
This time you are the defender. In this experiment we consider which combination of City Garrison, Drill and Guerilla promotions are best when you have a longbow defending a hill city.
Let us suppose the enemy has a CR2 maceman attacking this longbow. Since Combat is clearly inferior to CG and Guerilla promtions in this scenario, we will make the Drill comparison with these other promtion lines instead. We will try three combinations: D4, CG3/G1, and CG3/D1. Naturally you would expect CG promotions to be the most effective here. However I thought it was still interesting to consider which fourth promotion D1 or G1 would help the most. Further, I wanted to see how D4 stacked up against the two obvious better choices. If the ratio had been stacked even more heavily in the defender's favour then D4 would have performed better. However the situation I have set up would not be too unlikely and should give a good indication of how the three different combinations stack up with each other.
If you add up modifiers, remembering to subract the 45% from the mace's CR2 promotion, you get the following defender modifiers:
EDIT... Turns out I forgot about the +10% vs melee ability from the CG3 promotion. So the last two bonuses should be 160% and 140%. This would obviously affect the results more in favour of these two, and weaken D4. For now I won't go about fixing the details. Instead just suppose it is some non-melee unit with str8 and CR2!
Notes
Reminder: Though I have called these "experiments", these are strictly deterministic, exact results (up to machine accuracy). Since there are no simulations involved, I'm not at the mercy of my computer's random number geneator!
Discussion: Once again, there are certain unit healths where you see huge spikes in variables. For example, for the equal base strength case, there is a large drop in probability of attacker winning from 80-81HP. These are the cases I mentioned a few posts ago where the firepower of one of the units is being affected significantly enough that either N_A or N_D is changing (the number of hits required to kill the attacker or defender respectively).
Specific comments:
Experiment 1:
As expected, when considering attacker win probability (what we look at directly when we consider the odds before going into battle), C4 slightly trumps D4. D1 is pathetically close to the control. D2 and D3 are roughly comparable with C1 and C2. For damaged defenders (about 85HP or lower) there seems to be very little benefit going from C3 to C5. Also, as expected, at 100HP, the jump from the control to C1 is very large. This is because taking C1 immediately propels you over one of the "jump points". At 100HP, giving a drill promotion does nothing in the way of getting over the jump point, so if the defender is full health and the same strength the combat promotions are far superior.
Looking at P(unscathed), that is the probability of the attacker walking away from battle unharmed, we see a very clear result. Looking at this variable, D4 is unbelievable. As many people have noted from experience (including Roland a few posts earlier), Drill 4 is particularly powerful when there is a slight advantage because your troops will frequently survive unharmed - often twice as often as if you had C5. Technically in this case the advantage I speak of is due to unit damage - usually people are talking about an advantage in the base strengths of the units - and that makes this a slightly different thing consider.
Another thing to note with P(unscathed) is that there is very little increase from the control and going up to Combat 5. However going from the control through the drill promotions gives huge jumps.
Looking at Expected Attacker Hitpoints (I tend to write E[A HP]), we see some mostly unsurprising results. Again, going along the combat promotions does not increase the average attacker HP very much each time. From these data you might incorrectly jump to the conclusion that Drill IV is better than Combat 5 for unit survivability at certain values of defender HP. However this variable neglects the whole idea of unit healing. Your combat troops will usually take more damage but they are slightly more likely to survive compared with drill troops. Drill troops have the advantage of often being able to keep moving without healing, but die a bit more often as a result. I know some of you say you already knew and always did know this, but I like to back up anecdotal evidence with flat out numbers.
Again Drill 1 can be seen to be a fairly weak promotion by itself. Also, as expected, Drill 3->4 is a bigger jump than all of the Control through to Drill 3 jumps.
I can think of a case where using drill 4 is probably even better than Combat 5. If you are attacking a city from a good defensive position like a forest or forest hill, and you are not expecting your stack to survive for long (perhaps you are playing against a smart human player or you are taking as much advantage as you can of the brief opportunity you have to capture and raze the city), then promoting your troops to drill will not only give them a higher expected number of hitpoints from attacking the city, but a higher chance of being a much greater nuisance on the enemy's turn when he tries to attack your stack. Your units would not have a chance to heal because they just attacked (that is unless you have march - but that is a different matter).
Looking at expected attacker xp gain, we see similar results to my first post in this thread. Taking combat promotions diminishes the possibility of getting good xp, but at a rate which is reasonable given the higher probability of winning the battle. Once again, there seem to be sweet spots if you are trying to milk for xp. It's about 75HP for the defender if the attacker has only drill promotions (or no promotions). I should emphasise that milking for xp works a fair bit better when you use inferior units to attack superior but wounded units. In my earlier post (#49), attacking the damaged mace would on average yield 3.75 xp whereas attacking the 100HP explorer would yield only 2.7xp. This is solely beause of the increased probability of winning, not because you get higher xp from one of the battles. From both battles, you'd have gotten 5xp if you won.
Experiment 2:
Now one must be careful when interpreting the attacker win probability here. Since we are attacking at a less than optimal ratio R, we are mainly interested in the battles where the defender HP is very low. I'd suggest that over about 50HP the graph is mostly useless - I've only included it for completeness. You would never attack a very strong defender at full HP if you had less than 10% odds of a win unless it was for some tactical purpose or a siege attack etc. At 100HP, Drill 4 is only marginally better than Combat 1 but I should stop talking about that because it's hardly relevant. At defender HP values below 50, we start to see some good comparisons between drill and combat. As expected C1 outdoes D1 marginally. Remember D1 by itself is a very weak promotion. C2 is comparable with D2 and D3. There's a small range where both D2 and D3 outdo C2 but it's hardly worth noting. More interesting is the fact that D4 is sitting in snugly with C3, C4 and C5. It's starting too look like it's always best to use drill troops when defenders are very injured. As I said in my analysis of Experiment One, the best time to do this is when the attacking unit is inferior to the wounded defending unit.
Looking at P(unscathed), we see an even more significant strength of the drill promotions - drill 4 in particular. For example, with the defender at 35HP, your attacking unit will remain unscratched roughly 88% of ALL battles if it has Drill 4, and about 37% of the time with Combat 5. Also notice how when the defender HP are lower than about 20, the drill 4 unit pretty much is not only guaranteed a win but also a win unscratched. A combat 5 unit could still have as much as a 25% chance of coming out of battle needing healing. So once again, if you are cleaning up the wounded units, however uncommon it may be, it is definitely better to use the drill troops for this reason and also the xp milking reason.
There's nothing much remarkable about the data on Expected Attacker Hitpoints. Again, combat promotions give a gradual increase in the expected value, while drill promotions vary with D1 being nearly useless to D4 being a big jump from D3.
Expected attack xp gain? As usual, this graph can look a bit crazy. A reminder why there is so much irregularity here: In this expected value there are two sources of "jumps" - from the discreteness of the xp awarded and the small but critical changes in N_A and N_D when they occur. At high defender HP, the combat promotions shine mainly because more battles are won at those odds.
Experiment 3:
Interpreting these results will hopefully be a bit different to the first two experiments. Defender win probability:
It's probably not surprising to most of you that CG3G1 comes out strongest here. Since the odds for the defender are not stacked too high, the defender tends to benefit more from increases in strength rather than first strikes. Interestingly though, CG3D1 holds up quite well as an alternative. We'll see shortly that CG3D1 has some advantages that might be enough to make up for the small weakness it has against CG3G1 around the 75HP mark.
P(unsccathed):
Again be careful with these results. The top of this graph is only 40%. The odds are not that great of surviving unharmed. Also, unharmed here means taking no damage during battle (I probably picked a slightly awkward word to use eh? Starting and finishing at 43HP, for example, would count as coming out of battle unharmed) When the defender is a bit damaged CG3G1 tends to hold up better than CG3D1, but at full health CG3D1 tends to hold better (but only slightly). But again I emphasise this variable is not too important because of the scale here - these odds are very low and shouldn't affect tactical decisions on promotions by too much.
Expected defender hitpoints:
CG3G1 seems to be the clear winner here. But on the whole the three combinations are fairly similar. Usually expected hitpoints is where drill promotions are strong so it would appear drill is particularly weak here.
Expected defender xp gain:
First, a reminder that generally you get twice as much xp when attacking as when defending. When attacking it is int(4/R) but when defending it is int(2*R). So keeping that in mind makes the xp earning ability of this defender a bit less important. Almost always if a defender survives a battle he will earn 1xp. There are some exceptions however, and it appears this example highlights one of them. When the defender is a bit damaged (about 80HP) D4 substantially increases its xp earning ability. An interesting thing to point out here is how similar the shape of the D4 and control graphs are. Their slopes vary a bit here and there, but they have the same jump points which is why they look like they fit together. Other promotions which fiddle with the strengths have the effect of shifting these jump points to the left, as would be expected.
I'm happy to see that your first two test situations behave as I would have expected them to. I only did do some simplified mathematical analysis in my head, not something as detailed as you did here. So it's great to see a confirmation in these graphs.
My reasoning: if a unit needs only 2 more hits to be killed, then drill III and drill IV units are going to perform great because they will typically kill these units without even entering real combat, just with first strikes. You can see that in your graphs at around the 40 hitpoint mark (or 35 hitpoint mark when the opposing unit's base strength is higher). No matter what promotions the attacker will have, it will surely win. Only the drill III and drill IV units have a huge chance of winning unharmed while the units without drill promotions are likely to suffer some hits.
As said before, these situations arise when you attack a city with multiple siege units first or when you heavily bomb an enemy with bombers.
When you look at the graphs of your third situation, you need to realise that the great thing about using drill IV units to defend cities is not purely their chance to win the first battle, but mainly the fact that they don't take a lot direct or indirect damage (from collateral damage attacks). So the drill IV units are great when facing an enemy who is going to attack with siege units. You have a slightly smaller chance to win the first fight when compared to the city garrison III units, but the next fights, your defenders will have suffered far less collateral damage. Another effect is that usually siege units will have a lower base strength than the defenders especially when compared with the alternative city attack units and this would have a positive effect for the drill IV units when compared with the alternative city garrison III, guerilla units.
When attacking a city with a large defence bonus, you'd rather face 8 city garrison III, guerilla I units than 8 drill IV units.
a lot of work here... nice tool that you have here! I am still digesting the conclusions... I just wanted to point out that the two last ratios should be exchanged
This site uses cookies to help personalise content, tailor your experience and to keep you logged in if you register.
By continuing to use this site, you are consenting to our use of cookies.

")
")
 )
) 6 * 2.45) = 9:14.7. This gives R = ~0.612