- Joined
- Mar 17, 2007
- Messages
- 9,305
Years ago, I, probably like many other newcomers, was mystified by why I couldn't modify PCX files in Microsoft Paint and have them work correctly in Civ3. Well, good news, after years of searching, I have at last discovered a way of modifying PCX files in Paint and having Civ3 accept them!
Those familiar with Paint are probably wondering how to even save PCX files in Paint. That indeed has been removed from recent versions of Paint, but fortunately, the Windows 3.11 version supports it! So for this tutorial, you'll have to use the Windows 3.11 version of Paint. It works just fine on XP (32-bit only), and probably will work on Vista and 7 (32-bit only) as well.
How to get Paintbrush for Windows 3.11 onto Windows XP (skip if you already have it)
The trick to getting Paint to save PCX files in a format Civ3 will understand is the color depth of your monitor. If you just save the PCX files with your standard, 32-bit color monitor, you'll be in the same predicament I was in years ago, wondering why Civ3 crashed to the desktop with modified PCX files. Paint uses the color depth of your monitor to determine what color depth to use when saving PCX files, and Civ3 only supports 256-color PCX files, so you must have your monitor set to 256 colors to use Paintbrush to edit Civ3 PCX files.
So the first process is to change your monitor to 256 colors. Unfortunately this isn't that straightforward on most modern computers. So we'll use a picture tutorial. I'll be using Windows XP in the tutorial, but the process should be nearly identical in 98/ME/2000, and hopefully similar enough to follow along in Vista/7.
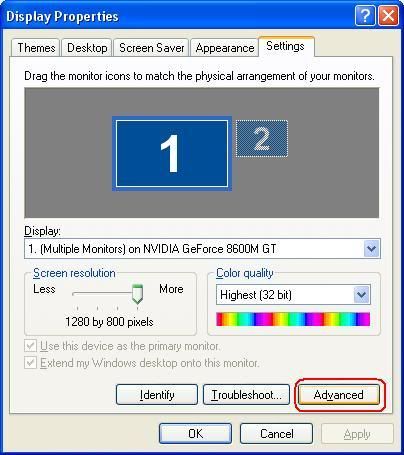
First, go to Display Properties (right-click on your desktop and select Display Properties). Go to the Settings tab, and click the Advanced button.
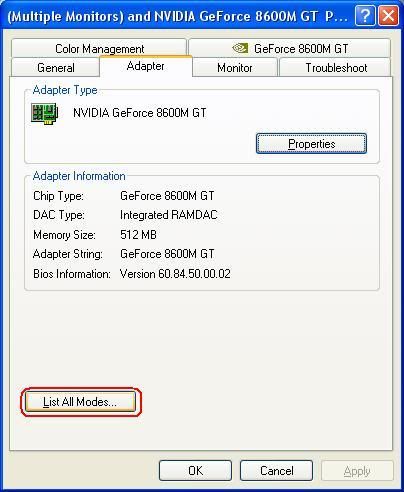
In the advanced settings window, choose the Adapter tab, and choose the List All Modes option.
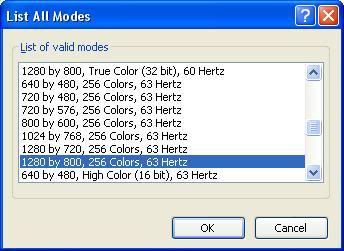
You'll get a list of all the display modes your monitor supports. The key is to select one with exactly 256 colors. Ideally this will be the native resolution of your monitor as well; I've selected 1280x800x256 as that's the best 256-color display for my monitor. The Hertz doesn't matter for the sake of PCX editing.
Now OK out of the dialogs, saying "Yes" when asked if you want to keep the new settings. You're ready to go into Paintbrush!
Go to wherever you saved PBRUSH.EXE from Windows 3.11, and double-click it to start. Go to File -> Open, and navigate to where the PCX file you want to modify is. Don't forget to use the drop down "List Files of Type" to select PCX Files (*.PCX) instead of the default "Bitmap files (*.BMP, *.DIB)".

Okay, the file is open! Make your changes! The View -> Zoom In option is handy here for precision modifications, although you have to remember to Zoom Out again before you can, for instance, save.
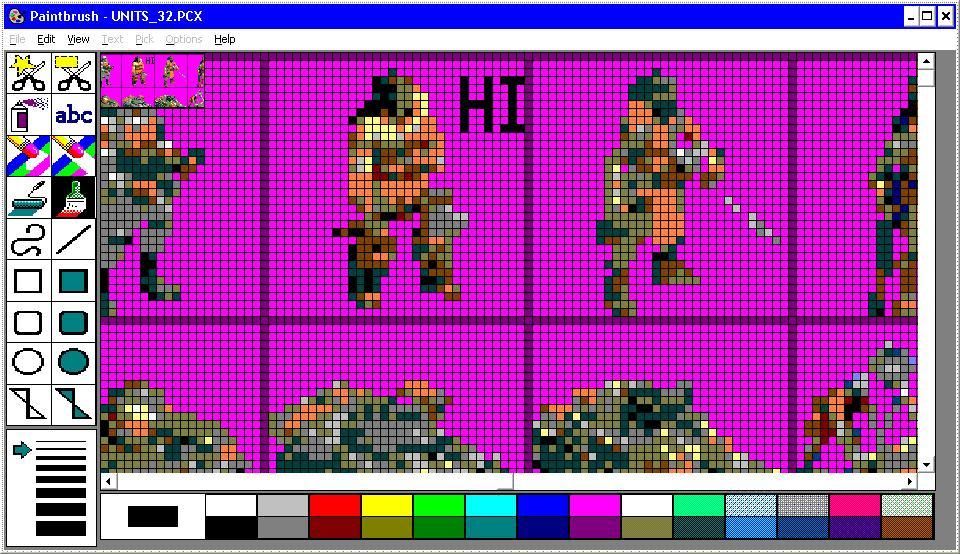
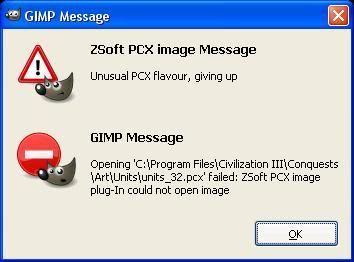
A nice simple modification. But will it work in-game? Without the color depth modification, Civ3 would crash to the desktop, and the GIMP would be bamboozled by the files and 'give up':
But not this time! It loads in-game!
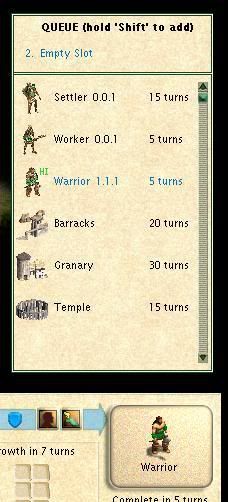
You'll notice that although the 'HI' addition most certainly shows up, the colors are off. The issue here is that Paintbrush is overwriting some of the palette colors with its brush colors. There is promise for overcoming this, as Paintbrush thoughtfully includes a "Get Colors..." option that can import a palette. Unfortunately, I've thus far been unable to find a program that can export a palette from a PCX file into the .pal format that Paintbrush understands, other than Paintbrush itself.
Still, if all you need is the correct shapes and forms, and you don't mind the colors being slightly off, you can now use MSPaint to do all your PCX editing!!!
Those familiar with Paint are probably wondering how to even save PCX files in Paint. That indeed has been removed from recent versions of Paint, but fortunately, the Windows 3.11 version supports it! So for this tutorial, you'll have to use the Windows 3.11 version of Paint. It works just fine on XP (32-bit only), and probably will work on Vista and 7 (32-bit only) as well.
How to get Paintbrush for Windows 3.11 onto Windows XP (skip if you already have it)
Spoiler Paintbrush on XP :
We'll assume you have a working Windows 3.11 install. If not, dust out the old floppies or consult eBay. You'll find PBRUSH.EXE in the C:\Windows folder. You'll need to transfer this over to XP. Choose your preferred method (floppy disc, e-mail, etc.), and get it over to XP. Then put it somewhere where you'll be able to find it later. Also copy PBRUSH.HLP if you think the Help might come in handy. If you are running Windows Vista or 7 (32-bit only), see this article for help on how to view .hlp Help files.
The trick to getting Paint to save PCX files in a format Civ3 will understand is the color depth of your monitor. If you just save the PCX files with your standard, 32-bit color monitor, you'll be in the same predicament I was in years ago, wondering why Civ3 crashed to the desktop with modified PCX files. Paint uses the color depth of your monitor to determine what color depth to use when saving PCX files, and Civ3 only supports 256-color PCX files, so you must have your monitor set to 256 colors to use Paintbrush to edit Civ3 PCX files.
So the first process is to change your monitor to 256 colors. Unfortunately this isn't that straightforward on most modern computers. So we'll use a picture tutorial. I'll be using Windows XP in the tutorial, but the process should be nearly identical in 98/ME/2000, and hopefully similar enough to follow along in Vista/7.
First, go to Display Properties (right-click on your desktop and select Display Properties). Go to the Settings tab, and click the Advanced button.
In the advanced settings window, choose the Adapter tab, and choose the List All Modes option.
You'll get a list of all the display modes your monitor supports. The key is to select one with exactly 256 colors. Ideally this will be the native resolution of your monitor as well; I've selected 1280x800x256 as that's the best 256-color display for my monitor. The Hertz doesn't matter for the sake of PCX editing.
Now OK out of the dialogs, saying "Yes" when asked if you want to keep the new settings. You're ready to go into Paintbrush!
Go to wherever you saved PBRUSH.EXE from Windows 3.11, and double-click it to start. Go to File -> Open, and navigate to where the PCX file you want to modify is. Don't forget to use the drop down "List Files of Type" to select PCX Files (*.PCX) instead of the default "Bitmap files (*.BMP, *.DIB)".
Okay, the file is open! Make your changes! The View -> Zoom In option is handy here for precision modifications, although you have to remember to Zoom Out again before you can, for instance, save.
A nice simple modification. But will it work in-game? Without the color depth modification, Civ3 would crash to the desktop, and the GIMP would be bamboozled by the files and 'give up':
But not this time! It loads in-game!
You'll notice that although the 'HI' addition most certainly shows up, the colors are off. The issue here is that Paintbrush is overwriting some of the palette colors with its brush colors. There is promise for overcoming this, as Paintbrush thoughtfully includes a "Get Colors..." option that can import a palette. Unfortunately, I've thus far been unable to find a program that can export a palette from a PCX file into the .pal format that Paintbrush understands, other than Paintbrush itself.
Still, if all you need is the correct shapes and forms, and you don't mind the colors being slightly off, you can now use MSPaint to do all your PCX editing!!!