Let's Play: Cooked Settings SV Run

Minou

King
Joined
Apr 19, 2013
Messages
845
For a long time I avoid all the "special" modes like Secret Societies since they make the game feel less historical to me. Recently I have been following the Hall of Fame discussions for Science Victory runs with all settings allowed and saw how fun these could be, so I decided to take a shot at a Science speed run with fully "cooked" settings. I will post each turn here to both chronicle my game and force myself to play carefully. For this run I have self-banned "city flipping" (giving away a city of letting it flip by loyalty just to pillage/reconquer/repair/repeat) and buying all the AIs DF cheap to re-sell for a ton of gold later. These feel too exploitive / tedious to me.

Anyway, here are the settings I choose and comments on them:

Civ: Hammurabi. I think he is the best for maximizing a speed run in general, plus he can unlock things like Industries faster and benefits even more from some Heroes like Hercules (free buildings make the free districts better) and Sinbad (gold can be used for some broken early upgrades like rapid Pike and Shot).

Difficulty: Deity - AIs are there to provide more cities, so give them more Settlers to start.

Size: Standard - I personally just don't like maps that feel too large, not sure if this is optimal though.

Speed: Standard

Disasters: Left it at 2. Seems like the best balance of a few extra yields versus annoying district damage / pop loss.

Modes: Secret Societies (early Governor Title, Old God Obelisks), Barbarian Clans (seems to greatly reduce risk of early barb disasters, plus chance to buy Eagle Warriors), Heroes and Legends (obviously awesome), Corporations (modestly useful mostly for Industries).

Map Type: Continents and Islands. Pangea seems like it could also be good, but I chose this map mainly to have more late game huts on islands for more chances to pop free techs and to secure Voidsingers if I miss out early. This map also seems to leave more late game barbarian clans that can be converted into extra City States or cleared for possible tech boosts (I am still not sure what the odds are for this and how it changes over the game).

City States: Pumped to 18 (max for Standard map). I selected 24 possibilities instead of 18, because this allows Barbarian Clans to turn into the remaining ones (otherwise the civilization feature will be disabled).
I took all 8 Science, 6 Culture (all except Vilnius and Mohenjo Daro), 4 Industrial (Johannesburg, Hong Kong, Brussels, and Buenos Ares), 2 Military (Akkad and Granada), 2 Religious (Chinguetti and Vatican City) and 2 Commercial (Zanzibar and Cahokia).

Resources: Abundant. This will make it harder to get Monopolies rolling, but I think a faster start matters more.

World Age: Standard, did not want TOO many mountains blocking movement.

Temperature: Standard. But not sure if there is any reason to prefer colder for more forests maybe?

Rainfall: Wet (more forests=more chops).

Sea Level: Standard.
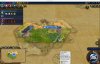
Start: Legendary.

Wonders: Selected Paititi, Ik-Kil, Ukuru, Torres del Paine, and Piopiotahi.

AIs: I find that with the standard 7 AIs you often don't have a close neighbor to rush. So, I bumped it to 11. I went for AIs with no defensive bonus or strong early unique units (except Gilgamesh). Here are my choices and reasoning:

Kristina: Tends to pay a lot of gold for DF.
Wilfred Laurier: Tends to pay a lot of gold for DF (or at least I think he does, haven't seen him in a few patches).
Seondeok: Builds lots of fast Campus, good to conquer/pillage.
Qin Shi Huang: Hopefully will build wonders to capture.
Robert the Bruce: Not 100% sure but he seems to build lots of Campus and I think pays for DF.
Mali: Builds early Commercial Hubs which are nice to pillage/Conquer
Saladin: Builder Holy Sites which are actually kind of rare after the patch.
Gilgamesh: Obviously to have one friend for life to trade with after everyone else hates me.
Dido: Figured since she starts with Writing she may build more Campus.
Pericles: Hopefully some Acropolis to conquer.
Victoria: Threw her in as a random vanilla AI and hope she will build Harbors.
 
As a side note, I am going to try and play the game in a vacuum and so will ignore advice here until the game is complete, but will be happy to reply to any questions along the way.
 
Untitled.jpeg
T1: I rolled a few maps and then was thrilled with this one. Without even seeing the landscape, this will be a great game because Himoko is hands down my favorite Hero to get early. She basically serves as another Amani, a free army, a bank (from DF sales), a builder (since you can get luxury and strategic resources off city states you control) a scout, and a Great General all at once. On top of that she guarantees an early Pantheon.

The map is also a winner as we start near Paititi, the best natural wonder in the game (the odds of this are of course higher when we lock it into the game and select Legendary start).

So Heroes and Legends mode is instantly ultra-helpful, as is Secret Societies since we get a free Governor Title due to a Hermetic Society invitation. We don't want to join that SS so we can save the envoy to hire Amani once we find a CS.
 

Attachments

  • Untitled 2.jpeg
    Untitled 2.jpeg
    1.1 MB · Views: 200
Last edited:
Untitled 2.jpeg
T2: It’s certainly worth a turn to move the Settler closer to the wonder. Minou City is thus founded on T2, directly on the Mercury. This gives us a luxury for sale right off the bat, plus a little more science. We can work the nice 3f/2c/3g Cattle to start and then will be happy to move onto the 2f/3h Deer since we want Himoko ASAP. To that end, we start a Monument as the first build.

Original Warrior meanwhile heads west and finds the volcano Mount Pinatubo and a small lake, and sad to say observes that 4 of the 5 wonder-boosted tiles are on Desert Hills. This will make them costly to work for a while since it will shut down growth. But, we could actually settle directly on the westernmost boosted tile since it is on fresh water and enjoy the extra culture and gold as a base boost. For now, let’s start work on AH and end the turn.
 
Untitled 3.jpeg

T3: Original Warrior defogs one of the 4c/6g wonder boosted tiles and its also flat desert. We can’t complain about this great start, but man would it be nicer with just a few grassland tiles instead of desert ones…
 
Untitled 4.jpeg

T4: Original Warrior continues NW and finally spots a non-desert wonder-boosted tile. That makes the tile the Warrior is standing on a prime spot for city 2. Perhaps we might want to get Petra in the capital too eventually, to make all these culture rich desert tiles workable. We will want to use the Settler lens with every move at this stage to look out for the borders of other Civs or City States.
 
Untitled 5.jpeg
T5: Original Warrior moves again but due to hills reveals just one hill forest tile to the north. However, the Settler lens indicates another city is located in that direction - hopefully a city state.

T6: The borders belong to Taruga, and we met them early enough to score a free envoy. The +1s helpfully shaves a few turns off AH and Mining, and the free envoy means we can gain control of them with Amani, who heads there immediately. Their quest is also a relatively easy Trade Route. The tile chooser also picks wisely, adding the Deer. Taruga does not do much early but can become very strong late in the game, especially under these settings. Since Babylon's -50% science penalty is additive with any bonuses, the +5% for each resource is actually stronger than it looks (e.g. if we had 100 raw science, we would end up with 100s - 45% = 55s, rather than 100s *50% * 5% =52.5s). With Abundant resources, many of our cities will likely have 10% of more putting Taruga above even Geneva when you consider we will lose many turns of Geneva's bonus from war.
 
Very nice that you do this. Will be good for learning and sharing knowledge. Good luck! =)
 
Untitled 8.jpeg


T7: Thanks to the Cattle, we hit 2 pop and can work the forest hill Deer, which doubles our production. Original Warrior reveals the final wonder-boosted tile, yet another desert. We could in theory found a third city next tot he newly revealed Spice and use it to grow to 2 quickly to then work the boosted desert tile, but that decision is well in the future. For now we are looking for huts and CS and pushing to get Himoko out there.

T8: Original Warrior meets Granada - someone else has already scored the first contact envoy, but their quest (train a Spear) isn't too hard. Granda is a fun CS- eventually we can build some nice +2s/+2c Alcazars next to the wonder, and an instant Alcazar can be very helpful popping the borders of a new city too. We hit CoL this turn thanks to Paitit and go right for Discipline/Urban Planning, further speeding Himoko. No need to waste time on God King since we can just use Himoko to grab 50f for our Pantheon. The Settler lens indicates there is also another city to the east besides Granada. Checking the Continent lens (which we should have done earlier) shows that Taruga sits on the Amasia/Antarctica border, so we should get the boost for FT, our next civic, when Amani arrives.

T9: The borders to the east turn out to belong to Mali, who have founded what is a truly **** city in the desert - of course the city is useful given Malis ability but it certainly not a tempting target for conquest. On the plus side they are only at -2 relations upon meeting, which we can get to +1 with a Delegation and hopefully avoid an early rush. They will only pay 5g/2gpt for our Mercury so we should hold it for now. With Writing completed by the meet, we can lock in a Campus at the cheap price of 63h. Mali does not know any other Civs, suggesting they could be close to the coast….
 
Untitled 9.jpeg

T10: Perhaps Mali should be more worried than us about being neighbors, becayse that 2-charge Builder walking unguarded up to our Warrior simply must be stolen! First we can sell Mali our Mercury for 45g, since we can get it right back after declaring. Honestly, this war is justified just to keep that Builder from making another useless farm. Building farms incessantly is one of the biggest weaknesses of the AI since they both end up with no production or amenities because of this foolishness and then besides that leave a bunch of healing packs outside their cities to invading armies. "Bob the Builder" will be much more valuable hooking up Marble and Mercury for us!
 

Attachments

  • Untitled 8.jpeg
    Untitled 8.jpeg
    1.2 MB · Views: 80
Untitled 10.jpeg

T11: Mali opts not to contest our thieving Warrior, instead moving their Warrior into Walata. So, the Builder heads to our capital - too bad we started with AH instead of Mining, as we would surely have taken the latter if we knew we would have a Builder early. Amani arrives, and the allied vision reveals Hattusa (Archer quest) and the edge of the west coast, plus a distant hut. We discover a second Hero, Sun Wukong for gaining Suzerain status plus a third (the Twins) for discovering a new continent. These are not Heroes we want right now, but at least this removes them from the pool upping our adds of Hercules and Anansi in our next roll. Hattusa is influenced by an umet Civ.

This turn, Mali also unsurprisingly takes the Desert Folklore Pantheon, which is fine with us as we would prefer Religious Settlements or failing that (which is highly likely) Lady of the Reeds and Marshes could be great in our capital.. Amani bounces right to Hattusa - Granada seems risky to levy right now since Mali already has 2 envoys there, plus Hattusa will reveal more of the map, reveal another Hero, and give us some Horses if we lack a natural source. Finally, the tile chooser adds the Marble, revealing a second behind it.

T12: A barb Scout alerts by the capital as Bob the Builder heads home, but he will be safely screened by Original Warrior.
 
Untitled 11.jpeg


T13: The barbarian Scout heads back south into the fog.

T14: AH completes, and we are fortunate to have a Horse in the second ring. Our Monument in also completed, adding 2c but much more importantly letting us start Devotion to Himoko.

T15: Since Mining is still ten turns off, a change of plans. Bob rhw Builder harvests Cow to get us close to, but not quite all the way, to 4 pop (we can always stick an Alczar on the tile the Cow was on). Then, he can use his last charge on the Horses. We can also buy the 1h/4c/6g hill to speed up progress to PP and get to 95g next turn to buy a Warrior from the newly met Owl Claw clan, which will in turn help us clear them out and if we are lucky complete BW along the way. FT is complete and we can go for EE next, skipping the boost since culture is running so fast.
 
Untitled 12.jpeg

T16: We purchase a from the Owl Claw Clan, and it spawns close enough that both the new Warrior and Original Warrior can slam the Slinger on the camp. We might actually want to farm the camp for BW and some gold instead of cleaning it right away. Meanwhile Amani arrives in Hattusa and we swap off the boosted desert tile to work the marsh and get up to 4 pop in the capital. In retrospect it would have been better to wait a few turns to harvest the Cattle - next time we will need to look up the food chart (it is annoying that the tooltip doesn't just show the exact amount of food needed for the each pop growth).

T17: Himoko arrives! She heads north to Taruga immediately. The purchased Warrior takes out the barb Slinger and meets Fez. Their quest is the easiest so far, Masonry. We should be able to handle that right away, though with culture coming in so fast its almost tempting to wait for Diplomatic League. Our next build will be a Builder to hook up some more resources and complete the Craftsmanship boost.
 
Untitled 13.jpeg

T18: Indescribably annoying to see a barb Scout in Himoko’s path! Hopefully it will flee the Taruga Warrior and thus not slow her too much. Our Warrior on the camp fortifies along with its partner as a Mali Warrior moves south - too risky to Raid the clan and risk getting taken out by a double team when the new barb unit spawns.
 
Untitled 14.jpeg

T19: After the Mali Warriors attacks 16-16, we hit it with the fresh Warrior. If it doesn’t promoted or retreat, it is toast next turn. Meanwhile that pesky Scout is still interfering but Himoko can at least move 2 tiles, putting her in range to reach Taruga with just one turn's delay if the Scout does not move east again…. The capital finally hits 4 pop, allowing us to work both wonder tiles plus both 2/3 tiles for 10.1cpt and 14gpt while also gettnig the Builder in 3 turns.
 
Untitled 15.jpeg

T20: Peace with Mali, our first war having yielded a Builder plus a little gold. We hit the jackpot when Himoko sends an envoy to Taruga and at 10% odds we reveal not only a Hero, but Anansi at that! Meanwhile, down south one Warrior raids the camp for 30g while the other scouts south looking for huts. Mali will now pay 36/2 for our Mercury. Not a great price, so let’s see if we spot another AI when Taruga falls under our control again next turn before inking a deal.
 
Untitled 16.jpeg

T21: Himoko’s arrival gives us control of Taruga again, revealing Caguana (clear barb camp quest) and England. England already has -17 relations with us because of our early war, but we can still sell them Mercury for 45/3. They are located pretty far north only know one other Civ, which is concerning in terms of suggesting our continent could be kind of empty - we want as much land to conquer as possible! To the south one Warrior smashes the newly popped Slinger as we work our way towards BW.
 
Untitled 18.jpeg

T22: Even though we already control Taruga, Himoko drops one more envoy in for 50f so we can get a Pantheon next turn. Conveniently, Mining and the Builder complete on the same turn, and the new Builder immediately hooks up our second Mercury, completing Wheel. We can sell this one to Mali to 66/3 - it would be nice to wait and see if we could get more lump sum gold, but with Mali at -28 relations that deal might be gone altogether next turn. One Warrior polishes off the Slinger and the other moves south into the ice and finds a hut. The next build will be the Campus for SWF boost, which will time out perfectly to let us chop Settlers with Magnus and Colonization in 6 turns.
 

Attachments

  • Untitled 17.jpeg
    Untitled 17.jpeg
    1.4 MB · Views: 85
Back
Top Bottom