SGOTM 13 - klarius

So:
- max writing
- 2 curraghs then settler on growth to 5 from kyoto
- curraghs south into the promised strait
- city 3 on grass ASAP and keep building curraghs at 3, 4 or 5 spt with an eye on max beakers
- be back in 10?

Other issues:
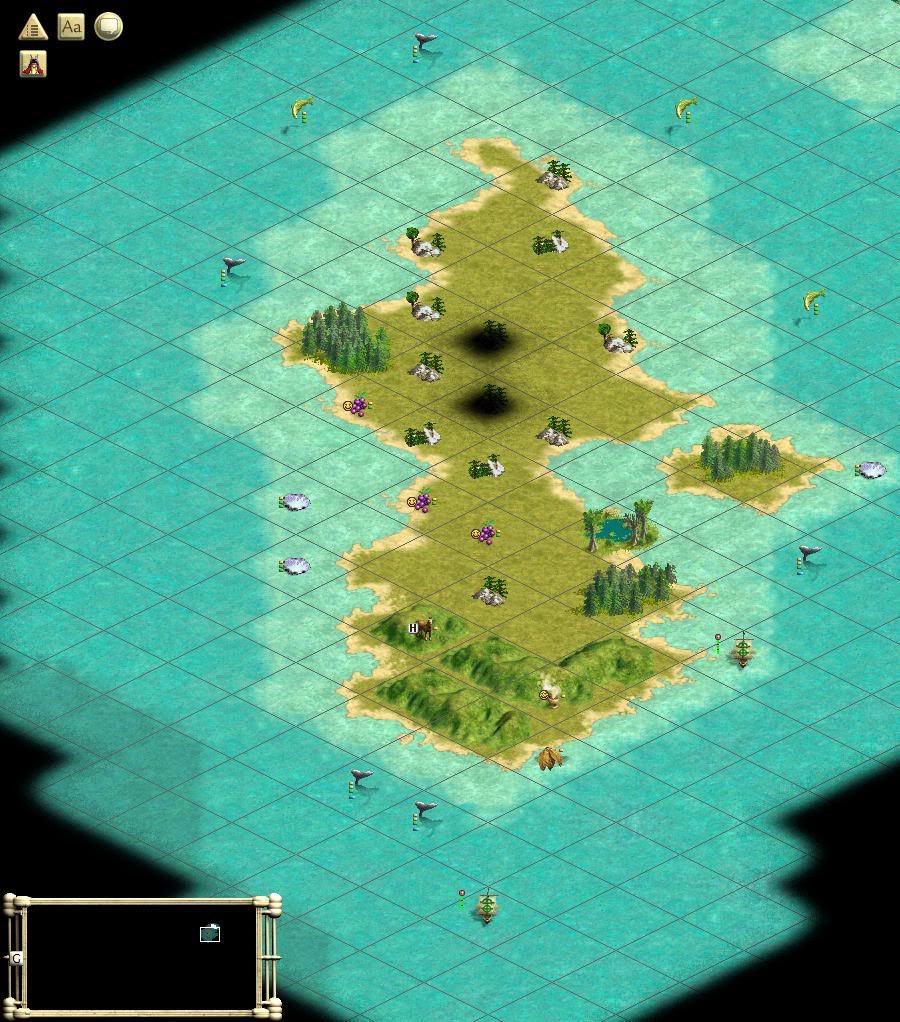
- should I take a slow wrap around our island with fortified curraghs on corners to try and find routes?
- do we want to grow the secondary towns and build MP's for them or just get a fast scientist?
- more shields worked means less gold but more curraghs. Do we gamble on shields to get us more gold benefits from more contacts or do we MM for a lot of beakers and keep towns #2 and #3 at 3spt ad vitam?

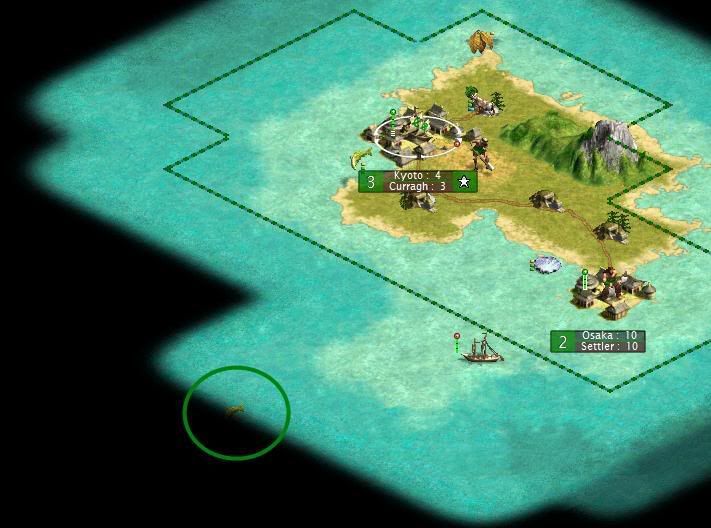
NO on kyoto building Settler, I agree with klarius we should set Osaka to build the Settler, change Scientist to work BG for 3 spt. We will grow Osaka and have settler in 10. Let Kyoto run according to plan, grow it to size 5 and let it work the tiles as suggested in klarius spreadsheet, using a scientist, fish, rocks/sea, cow and bg. Kyoto will give us a Curragh every third turn and 12bpt we shouldn't disrupt that with a Settler. I think. (?) It will take Kyoto 14 turns to get back to size 5 if we build the Settler there. We lose 49 beakers during this process. Osaka OTOH will lose 50 beakers over 20 turns. So the cost is almost the same but Osaka will have the Settler in 10 turns from now while Kyoto Settler will be 11 turns away. So we gain an additional 4 beakers from building it in Osaka.

And do not grow the middle town but run it with a scientist immediately. After Osaka has built Settler, grow it to size 2 again then set a scientist (6bpt compared to 4bpt with scientist at size1, the oyster makes it worth it). Run Osaka with wealth to balance Kyoto's Temple.

Town 2, Osaka will only produce 3spt while building a Settler, then it is back to Wealth with only Oysters worked. Town 3 will not work any tiles but only run a scientist.

What about research? Do we go Writing or Masonry- Writing for a chance to prebuild GLH in town 3 and actually grow that town?
 
Good point on Osaka for the settler. After the settler, running wealth in Osaka would be counter-productive since we trade 3 shields for 1 gold, or we lose the BG's food altogether. I'd run wealth from the single-scientist shack and let Osaka grow back to 3: BG, clam and scientist giving a curragh every 5th or a very slow pre-build that would be easy to time but hard to get.
 
No, we do not trade 3spt for 1 gold in Osaka when growing it back to size 2. Osaka works the Oysters for 2 beakers while growing not the BG. So we trade 1 spt for 1gpt when running it on wealth.

EDIT: Not sure if we should grow Osaka to 3 or use town 3 to prebuild for a GLH? But no matter what Osaka will work Oysters while growing to size 2 we do prefer the beakers over shields at this stage of the game. So wealth is OK when growing to size 2.

We really should think about the GLH, in the middle town we can alter tiles more freely than in the southern town. After adding a harbour in Kyoto we can let middle town work cow for additional shields from the hill/mountain. So my preference would be to eventually use middle town to prebuild in. But if you intend to play max 20 turns we will just have finished growing Osaka back to size 2 after your turns so those plans can be discussed later.
 
Alright, so we only pay 1 shield for that gold, that's alright. Not working the BG (if only for the 2 food) still doesn't fit in my mind but I can easily live with it if it's the consensus.

As for the tech question:

sg13_01.jpg


There's a fish down there so, unless Rik was particularly evil, we have a pass to something else. I'd set my hopes on meeting someone from whom we can trade masonry and skip ahead to writing, with this scenario.
 
Good point, lets keep our fingers crossed we meet someone soon and trade then.

Working the BG gives us 2 food, 2 shields and 1 gold/beakers.
Working the Oyster gives us 2 food and 2 gold/beakers.

We can get more benefit out of beakers than shields right now so the extra beaker from the oyster is worth much much more than 2 shields.

And it's nice to see the fish, hehe. Hope there is a friendly AI there willing to trade.


Good news: there barely is any ocean around us. This map is DEFINITELY rigged for GLH use. Also, we have an island of our own to use as soon as we have map making.

Bad news: this island has no neighbors on it.

Log:
Research on writing at 100%

Produced Curraghs out of Kyoto, a settler out of Osaka, Tokyo was just founded and does wealth.

The "equilibrium" state of our 3 cities will be:
- Kyoto: 12bpt, 6spt, 0gpt running curraghs (every 3) with 1 scientist
- Osaka: 7 bpt, 3spt, 0gpt running curraghs (every 5) with 1 scientist
- Tokyo: 4 bpt, 0spt, 1gpt running wealth with 1 scientist

Total 23bpt, roughly a curragh every other turn, 0g+0gpt. Masonry (228) will take 10 turns to research if we have to.

A pre-build for GLH from Kyoto will take 50 turns at "equilibrium" state of size 5, 6spt: rock-bg-cow-fish-sci. Research of Map making would take only 30 turns.

If we dump the scientist, we need to increase lux rate and lose 1b(lux)+3b(scientist), gain 1b(plains) so we change to 8spt and 9bpt Kyoto, 20bpt total for 20 turns. Then we work the hill (mined+roaded by then) for 10 spt and 20bpt total afterwards. We don't raise to 21bpt since the lux should affect Osaka by then and we'd lose a beaker from there as well, cancelling the hill's road beaker.

GLH will then take 34 turns to complete (20x8 + 14x10 = 300), Map Making 35 to research (20x20 + 15x20 = 700, 15 beakers overrun). I'd strongly favor the second option - at that point the overrun isn't the biggest issue out there.

If we build 2 warriors out of Kyoto, we can let Tokyo work 2 coasts: 20 turns of 3bpt but then 5bpt ad vitam, so we get a return on our investment in 40 turns which is before we finish researching MM. The scenario doesn't hold in Osaka since we'd need more than just MP's to keep it together at size 4 and we'd lose the extra beaker on lux tax.

It'd be interesting, however, to try and time it off with the time we start using the slider at 20% for Kyoto's pre-build. At that point the beaker would be eaten anyways so we have nothing to lose - substract 1bpt for 20 turns, add 1bpt for the other 15 of research for MM, we drop 5 beakers which is within our overrun margin and then we have more bpt for a while.

At any rate, we'll need to start using the slider as soon as we want to make a settler farm out of Tokyo. I guess we'll want Tokyo to work Osaka's BG in advance to getting maps so as to get a harbor pre-build.

Now we may or may not manage to contact anyone. If we meet someone and manage to extort masonry soon enough, somehow, we can pre-build GLH at equilibrium, change nothing to our MM and be happy about the whole thing.


>>> 1950BC Save <<<
 
looks like we need to use suicide curraghs. I suggest we use them to send them using ocean as the movement rate is 4 for ocean compared to 2/3. I would send them west and east from our small Island.

Are you guys sure that we can make it to the GLH. If we want it, we better start o grow the city that is supposed to build it. I can't see how we are going to ge that without faster contact as we need writing then masonry.
 
Boat rate was 2 in sea, I suppose that it'll be 2 in ocean as well. 1 curragh already died trying its luck south.

As for GLH, the rate at which we can build it depends both on how fast we can grab MM and how fast it can be pre-built. We've got a good setup right now and it would mostly slow us down if we started to let the capital grow.

Roster:
Wotan
Beorn
Northern Pike up
klarius
ahman
ThERat
 
Boat rate was 2 in sea, I suppose that it'll be 2 in ocean as well.
No it's 4 in ocean so one should try to use ocean for long suicide stints. Curraghs have 4 movement points.
Coast-sea-ocean is 3-2-1 movement cost. That gives the strange 2-2-4 tiles movement.
We should boldly attack the ocean directly west of Kyoto.
 
Well shoot, forgot about differential movement, should've sent the suicide curragh south-west to the ocean :blush:
 
Good job Beorn, nice island and well within reach when we have MM. So two scenarios open up, one is we go Writing-MM in order to get Galleys ASAP. They can safely traverse the sea between the two islands. Two, we go Writing-Masonry-MM, with a slight delay getting Galleys. I think I am in favour of a gamble and go for scenario 1.

But if we focus on getting the GLH over getting Galleys ASAP, I would like to submit a slightly different idea for the use of our three town.

I would focus on Tokyo as our prebuild town. Which would keep Osaka at size 2 with Oyster and Scientist. Allowing Tokyo to grow also give more options than letting Osaka grow. So if we are to build Curraghs in either of our two secondary towns I would doo it in Tokyo. My vote is to change Osaka to Wealth and Tokyo to Curragh. It is also a matter of less corruption in Tokyo should we decide to grow it further as I discuss below. So whatever plan we follow lets keep Osaka as a wealth town at size 2.

Tokyo would work BG until size 2 (3spt for 10 turns) then BG plus plains (4spt, 1 lost to corruption for another 20 turns). 30 turns and 110 shields we really need the palace prebuild for this so immediately after Writing is in we go for Masonry unless we have recieved it in a trade. After writing/masonry we need MM, and with MM in the works we time a Harbour in Kyoto. When that is finished we shift Kyoto to primarily work water tiles and allow Tokyo to work the BG too (speeding up growth to 5 through working the Cow and joining the Worker)
 
Definitely Tokyo is the town that should grow. We can at any time then peel off a worker in the capital to give the BG to Tokyo. Or even another worker and let Tokyo work the cow also in a final build phase.
But I doubt that we have a chance on GLH, if we have to self research MM. I don't see even pottery mentioned which we are also missing. So, if we don't have the lower techs by the time we have writing. I'm for switching horses and go for the GLib.
 
Okay another idea :crazyeye:.
We need contacts, or we will get nowhere. So go into a phase of severe curragh building.
Kyoto doesn't grow now, but gives the cow to Tokyo. Kyoto switches between mined plain and coast to trade a coin for a shield every three turns. Both Tokyo and Osaka build 5 turn curraghs. We would have to reduce the slider obviously and will delay writing, but if we get contacts that's for sure worth it.
An intermediate method is still give the cow to Tokyo, but Osaka stays on wealth. Tokyo should be able to grow in 7 turns and pull 5 shields then for also 3 turn curraghs (I don't think the 5th shield is corrupt in a nearby town on huge). Then we could give the cow back to Kyoto to grow.
 
I sort of agree that we have no chance to get the GLH the way things go. However, going for GLib does seem pretty unlikely too as I guess we all agree that we need MM before anything else. Or are you suggesting we go for writing -> literature while hoping to gain masonry from somewhere?

This game surely will be a dice roll for the lucky teams to get some contacts via suicide galleys :confused:
 
1950 (0): I don't like the idea of adding too many turns to our time to self-research Writing, so I'll go with Klarius's intermediate version of the consensus plan--Kyoto stops growing, Tokyo gets the cow and builds curraghs, and Osaka produces wealth.

Our curragh at risk in the south sinks.


1910 (1): We begin the process of switching Kyoto from the mined plain to a coastal tile every third turn.


1830 (3): Our first curragh sent into the ocean west of Kyoto sinks.


1725 (6): A second curragh sinks west of Kyoto.

Tokyo reaches size two and has no corruption at five shields, so it can function as a three-turn curragh pump as planned.


1675 (8): Our first curragh to survive an interturn at sea pushes eight tiles west of Kyoto, but discovers nothing.

Kyoto, having taken the cow back from Tokyo, grows to size five and assigns a scientist.


1650 (9): Our curragh in the western ocean, having survived again, spots land, though it can't reach coastal water this turn.

Osaka reaches size two and assigns a scientist.


1625 (10): Our exploring curragh survives its third IT at risk and reaches a thin peninsula. [party] :dance: There's no sign of other civs, though.

I moved two curraghs safely this round fully to explore the waters around our island and the southern island, since we hadn't done this. We didn't discover anything exciting, but it turns out that we can get curraghs launched into the open ocean just as efficiently heading east from Osaka as west from Kyoto. I assume that we should now start sending curraghs east rather than trying to reinforce our curragh which has reached safe water in the west, but I've left two curraghs with their movement, so as not to commit us before there's an opportunity for discussion.
 
great news on surviving this long run...what are the chances for non seafaring Civs to survive in ocean?

I agree to start sending curraghs east before we know what is really going on in the west.

What are we researching once we hit writing?
 
Chances of survival are 50/50, so this was a 4 turn run: 1 chance in 16 to make it.

I guess our research path will depend highly on whether we meet anyone by then. We definitely don't need granaries at this point so pottery has an awfully low value besides being a pre-req. I'm liking the GLB idea, though it would slow down our expansion to the beta island.
 
Ok, I got it.
Will try to find some people.
I still think we should try to get another curragh west.
Huge map is a lot for a lonely non-seafaring curragh.
I think to start masonry after writing and maybe buy it half way through (I doubt that we even meet 2 people before writing completes and then trading isn't any good).
 
Back
Top Bottom