Step-by-step Civ PIC modding with JCivED - Hobbit castle hut !

darkpanda

Dark Prince
Joined
Oct 28, 2007
Messages
844
Hi everyone,

Thanks to kirkham7's amusing idea in this JCivED post, I decided to write a step-by-step Civ PIC modding tutorial for Civilization I using JCivED.

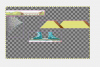
The goal of this tutorial is to replace the standard castle Hut (i.e. castle with no improvement) with the picture of a hobbit hole:

ORIGINAL CASTLE HUT: before.png

HOBBIT HOLE: hobbit_hole.jpg

Step 1: hobbit hole makeover

In this first step, we rework the original image of the hobbit hole so that it can have a nice render and fit in the original castle hut picture:

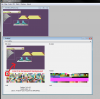
  • First we open the hobbit hole picture in a proper picture editing tool, such as Gimp (http://www.gimp.org/), and enable transparency by adding an alpha channel:

    alpha_to_hobbit_hole.png
  • This makes it possible for us to trim the parts of the hobbit hole that we want to us as replacement:

    trimming_the_hobbit_hole.png
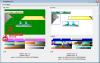
  • In addition, we replicate and flip the right side to the left side, in order to avoid some ugly picture cut-off on the left:

    mirroring the side.png
  • After the final touches, here's the final made-over hobbit hole we will use:

    finished look.png
 
Step 2: scaling and fitting the hobbit hole on the original castle hut

  • We analyze the original castle hut picture, stored in CASTLE0.PIC, by opening it in JCivED:

    2_1_CASTLE0.png
  • After exporting the 256-color version of CASTLE0.PIC from JCivED, we open it in Gimp:
    • Exported 256-color GIF: 2_2_CASTLE0.PIC_256.gif
    • In Gimp: 2_3_CASTLE0_in_gimp.png
  • We determine the pixel width of all parts:
    • Center: 50 pixels
    • Right: 17 pixels
    • Left: 16 pixels
    • Total: 50+17+16 = 83 pixels
  • This tells us how to scale and slice our hobbit hole and make it fit on the original castle hut:
    • Our made-over hobbit hole width is 248 pixels, so we scale it down to a width of 83 pixels, keeping aspect ratio:

      2_4_scaling_down_the_hole.png

    • We then cut its center, right and left parts, and paste them inside the exported CASTLE0 256-color GIF:

      2_5_tailoring_the_hole_2.png 2_6_customizing_castle0.png 2_7_customizing_castle0_2.png
  • And thus we obtain the CASTLE0 replacement GIF, ready for PIC conversion:

    2_8_customizing_castle0_3.png
 
Step 3: conversion to PIC

  • In JCivED, we open the PNG created at the last step (GIF would do as well):

    3_1_castle0_custom_in_jcvied.png
  • We then convert it to PIC format:

    3_2_converting_to_PIC.png
  • The key to a successful PIC conversion is to properly setup its color palette:
    • We will import the original CASTLE0.PIC's color palette, and select to cast the custom hobbit PIC pixels onto the CASTLE0.PIC's color palette:

      3_3_importing_palette.png
    • In effect, this means that each pixel form the custom hobbit hole PIC has its color reassigned from the CASTLE0.PIC palette; the reassigned color is chosen as the nearest to the pixel's original color, in order to minimize alterations from the custom picture
  • Last but not least, the re-colored PIC image must be saved as 'CASTLE0.PIC', and copied to the Civ directory... Now run Civ, and here is your customized hobbit castle hut !

    before_after.png


Edit: I also added the final custom View attachment CASTLE0.PIC.zip, zipped, for whomever would like to try it out.
 
Thanks so much for this, I was wondering why it didn't work for me the first time around - this definitely helps to understand how to create and replace the original pics from the game.

I think my next adventure will be to replace the castle in the game, once I can find some more free time. :)
 
xm3alk.gif


I swapped the hydro plant and power plant city screen icons (finally)
I also changed the colossus.

But... how do I turn this back into the .pic file?

I'm just getting started, so help me get started :)
 
If I'm not mistaken, just follow step 3 above (assuming you followed the first two steps, keeping the same dimensions). You open the gif/png you created, and then import the palette from the original file (keeping civ's color scheme). Once you do that, you can just convert to pic and save the file. All of the commands are under 'pic' in JCivED.
 
2jchd7p.jpg


I get it, but the picture never exports into the PAL file? I click the .gif file and PIC-> convert... but it stays black like the picture above.
The 'import palette' part is not the problem. I made one of the original .PIC - and imported it.
But before that, the new picture isn't loaded/converted.

what am I missing here?
 

Attachments

  • civ_870.png
    civ_870.png
    2.7 KB · Views: 913
Cool.

Here, the oracle is no longer a smoking bowl, but a guy in the mold of Shakespeare's theater and Isaac Newton's holding a smoking bowl.
The Colosseum, Colossus, Hoover Dam, University, icons have changed and the power plant and hydro plant are swapped (they were swapped in the original)

349ar9s.gif

I'm going to change the Great Library icon, because I think it's ugly. I mean, what is it?

View attachment SP299.rar
This is the file you need to replace in the Civ folder.

I've tried to change the wonders, in the background of the city screen, but the editor changes the background to dark green when I convert it from .gif to .PIC , so the picture isn't imposed properly....

zk4upv.jpg

i2rihi.gif
 
Would mind attaching the original GIF?

As you can see below in the original WONDERS2.PIC (but I believe you already guessed by yourself), the bright green background is actually considered by CIV as transparent color, because its palette index is 0:

attachment.php


When looking back at my tutorial (I did it quite some time ago already), it seems my custom GIF had alpha channel enabled, and all "see-through" pixels are transparent.

I used your screenshot to try it out (sorry if it's ugly, your screenshot is is JPEG):

Crude removal of background:

attachment.php


Convert to PIC:

attachment.php


Import palette from WONDERS2.PIC:

attachment.php


There is a thing to notice above: when you "Import Palette", you should import the original WONDERS2.PIC file itself as the palette file, since it contains its own color palette.
 

Attachments

  • transparent_bg_wonder2.pic_001.png
    transparent_bg_wonder2.pic_001.png
    15.6 KB · Views: 915
  • transparent_bg_wonder2.pic_002.png
    transparent_bg_wonder2.pic_002.png
    86.5 KB · Views: 912
  • transparent_bg_wonder2.pic_003.png
    transparent_bg_wonder2.pic_003.png
    59.8 KB · Views: 929
  • transparent_bg_wonder2.pic.png
    transparent_bg_wonder2.pic.png
    38.6 KB · Views: 894
(I've attached the original gif in the previous post)

Well, that's the problem.
The editor turns the green background into the dark-green background on converting. I don't know why, and I can't change it.
But the palette keeps the bright green as the color 0.
 
(I've attached the original gif in the previous post)

Well, that's the problem.
The editor turns the green background into the dark-green background on converting. I don't know why, and I can't change it.
But the palette keeps the bright green as the color 0.

When you export WONDERS2.PIC as a 256-color GIF, JCivED creates a GIF with transparent background.

Then you need to edit this GIF with a picture editor that supports transparency.

What's your picture editor?

Typically, Windows' MS-Paint does NOT support transparency, it discards the transparency information ("alpha" channel) and only keeps the color channels (this is why when opening in MS-Paint, you still see the green background, when it should be invisible).

However GIMP does support transparency.
I believe that Paint.Net does too.
 
That tackled the problem. Very cool.
I got it to work.
FINALLY after 22 years the Pyramids are plural.
The Hoover dam is bigger.
Oh and I did a little something with the Colossus... ;)

Attached is the file to replace in the civ folder. Just unrar and replace. Just save the original somewhere else.

View attachment WONDERS2.rar

Thanks.
 
Back
Top Bottom