TUT:Complete Guide to Creating Units in 3ds Max

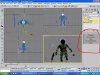
You need to apply the Skin modifier to your model first. The you can switch into "edit envelope" mode within the modifier to access a variety of tools for editing vertex weights from the rollouts in the toolbar.

I did that. I applied the skin modifier, I added the bones to the skin modifier, I opened the edit envelopes and selected vertex. But there is no icon or tool in the modifier named Weigh Tool or any Weight Properties.

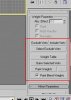
Could anyone just tell me where the button should be? A large wrentch button would be kind of hard to miss.
I just don't have any toolbar with any simbols relating to weight. Even when I enter Edit Envelopes and select vertex. What toolbar is it (name)?
 
There ought to be one; There is definitely a "Weight Properties" rollout within the Skin modifier. The Tool you are looking for might be represented by some unexpected icon - i dont remember of head - so check what the mouse over tool tips tell you.

Edit: It's a "wrench" icon.
 
There ought to be one; There is definitely a "Weight Properties" rollout within the Skin modifier. The Tool you are looking for might be represented by some unexpected icon - i dont remember of head - so check what the mouse over tool tips tell you.

No there is not.
Rollouts are the drop down sections within the modifier right?
I only have: Parameters, Mirror Parameters, Display, Advanced Parameters and Gizmos.
Could you please tell me where to find this rollout? (screanshot would be appretiated)
 
Sounds right, you are looking in the right place. There must be "Weight Properties" tho - i am looking right at it.
I got Max 8, but the interface was kept very consistent over the years...
 
Sounds right, you are looking in the right place. There must be "Weight Properties" tho - i am looking right at it.
I got Max 8, but the interface was kept very consistent over the years...
I am sorry if I sound anoyed, I am angry at my max, not you but:
Realy?
And yes, I do have vertex selected.:(

Any idea what to do now? Anyone?
 

Attachments

  • Realy.jpg
    Realy.jpg
    217.7 KB · Views: 247
That's odd. Still it must be there. The VW routine is specific to the modifiers, so it just has nowhere else to go ! Have you tried opening these rollouts and actually looking what's inside ? Maybe it's part in one of the other rollouts on your interface. If anything else fails, open maxes online help, go to the index and search for weight tool. It should point you to where it has gone.

I learned way back on Max4, had used 6 inbetween and am at 8 now... I have no specific memory, where that particular tool was in older versions, but the interface never changed a lot. There might have been slight adjustments, new features were included of course, but old stuff did not went nowhere...

Of course I have, I am not that stupid.
And no, it does not exist in there eather.
 
Of course I have, I am not that stupid.
Didn't mean to say that. I am just really sure it must be there... But i don't have exactly the same Max version as you... So :dunno:
Is there a "Wight Table" button ? It used to be on the same Rollout/Panel ?

Also try looking in the Quad-menu - i never used it to access this specific tool, but it's context sensitive, so you might get lucky there...
I know, it's just Max-Rage:(
Yes, I do have "Wight Table" and a few other options, but not the one I need.
And yes, I have tried all the buttons one by one.:(
 

Attachments

  • AllIHave.jpg
    AllIHave.jpg
    29.1 KB · Views: 194
Now i am really surprised... On my interface, the Weight Tool button is right next to the Weight Table one. Maybe it was left out in max7 for some odd reason :dunno:

Anyway... You can assign VW using Weight Table as well. It's a bit more hassle (It's also more flexible).
You can just enter numarical values in the fields there. Can mark multiple rows to edit many vertices at once. There should be filters to display only selected vertices too.

How do I know what number to assign to each vertex? It's not in the turtorial and I have newer worked with skins before.
 
The number is the same you would assign using the Wight Tool - it's the same thing, just different interface.

Generally speaking - if a vertex has weight 1 under a certain bone, it moves the same as the bone does. Weight less than 1 mean, that the bone only has partial influence...
So if the Bone moves - just for example - 10 units to the left, a Vertex with 0.5 weight under this bone will only move 5 units to the left... Etc.

It's a lot easier on mechanical units - like tanks, where most parts are rigid (influenced fully by a single bone) while on the soldier in your screenshot you will probably need multiple influences on some verts. For example an arm - the Verts in the upper arm are influenced by the upper arm bone, the forearm by forearm bone, but the verts near ellbow joint might need partial influence by both Fore- and UpperArm bones to make the movement look natural.

There is another tool - usually preferable on organic models - you can edit envelopes, instead of assigning weights directly. A envelope is kind of a ballon around the bone - Verts inside the ballon are influenced by the bone. Intersecting envelopes give you multiple influences.

Take a look at the Chokonu or Pret from the Example files released by Firaxis.

Overall it's a somewhat hard to cover in a single post. You should look for Tutorials on simple animation/rigging - Max usually comes with a full set of tutorial you can access via the Help menu. If you never worked on something like this before, you might want to start with something easier - say a Tank.

Edit: to get a feeling for it, backup your file, then move some bones around - for example bend the arm or a leg (Dont edit the mesh directly, just move the bones). Then, with bones in bent position, try assigning different weights to some verts - it's interactive, so you will see the changes. Play around untill you have the basic idea on how it interacts.
 
Thanks, I shall try.
And sadly, max 7 is the only version that comes without turtorials.

Just a question, how do I assign an envelpe to a vertex/model part?
 
And sadly, max 7 is the only version that comes without turtorials.
It seems, stuff, that Max 7 comes without, starts to pile up... Odd... Then again, there is that urban myth about the odd versions (3, 5, 7,...) being crappy... :lol:

The envelope is allways there - it's part of a Bone. By default all VW are just assigned via envelope (which is created from the size of the bone object, when you include that bone in the Skin modifier. That default shape and size is of course not exactly what you want, most of the time...).
By assigning some weights manually (via Weight Tool or Table) you override the envelope (for that specific vertexweight).

To edit a envelope - with the skin modifier selected in the stack and "Edit Envelope" mode active - you select a bone (in the list within the modifier tool panels) you should see the envelope displayed around the bone as kind of wire, roughly implying ellipsoid shape. You can drag the joints of the wires, to make it bigger or move it.

Note: When working on the skin, it's usually best to Select all the bone Objects ("h" gives you selection list) and Hide them (from quad menu -> hide selected). You will still see a representation of the bones relevant properties (position and envelope), when the skin modifier is selected on the stack, but there will be less clutter in the screen.
 
Wait, envelopes are suposed to exist with the bones?
I imported the skeleton of the Infantry model from vanila civ and after I deleted the actual mesh, I assigned the apropriate bones to my new mesh via skin, but it did not generate envelopes.
 
Apply skin modifier -> Add apropriate bones to the list
I did this already (for the 10^23th time) and now I clicked edit envelopes and selected "envelopes" instead of "vertex" but the options look the same. And there are no visible envelopes (red box things) that used to exist with the original infantry mesh.

This turtorial is obviusely incompartable with max7. :(
 
Oh i see.

Yes, envelopes are supposed to exist with the bones (or being created, when you assign a bone to a skin)...

There might be however some screwiness in play here, in connection with the import process (as said previously, an envelope is initially created from the bones size... And these imported bones seem to be kind of Dummies with no real size...)

Try this:

Import the Civ model you want to use as base. Make sure you enable "Import Skeleton" and "Import Skin".

Make sure your mesh (the IG guard guy) is about the same size/position by scaling/moving him.

Now select the imported Civ4 mesh - it should have a Skin modifier on it.
Click on "+ Editable Mesh" in the stack (under the skin modifier) and go to the "Edit Mesh" mode. There should be a Button called "Attach" in the vertical toolbar... (There will be a whole lot of buttons, so it might take some time finding it...). Click Attach (it should get highlighted...)
Click on the IG mesh to attach it.

What you did now (once you found all the controls... Not at home, so no screenshots till monday sorry...) is: you merged both meshes into a single object - thus "sharing" the original imported settings from the Civ4 bones to the IG Guy.

Now, while still in the "Edit Mesh" sub object mode, select and remove all the parts of the imported Civ4 mesh. This will let you keep the original skin settings on your new mesh.
 
It seemed to work, the model responds to the bones. You are the man :king:
Just a q, the mesh is strangely elongated in the torso region, I take it it is becouse of the shape of the skeleton, but all my efforts to reposition/resize the bones have been in vain.
 
Are you planing to animate the model a new ? Or going to use the existing Infantry animation ? Asking, because in the later case, moving the bones will not achive nothing, since they position will be overriden again by the animation.

It's hard to say something definitive without seing it.

A thing you can do i.g. is to edit the mesh "unter the skin" - if you select the "+ Editable Mesh" in the stack, go to any Sub-Object level there (Vertex usually makes the most sense), then you can do some tweaking to the mesh, to counteract the distorsion, by moving some vertices/parts. All the movement from bones applied via skin is relative...
So if the skined mesh looks stretched, try making it look stubby "under the skin", etc.

There are limits to this method however - i.g. it only works well on light distorsions.

Another alternative is to try playing around with VW / envelopes. It might look stretched, because to much influence from some unexpected bone is pulling some of the verts up.

Now when you got a working armature... Select the verts around the distorsion, open the Weight Table and try changing the Weights and look how the mesh reacts. It takes a while to get a feeling for this, but it's experience, that might help you on further projects as well...

Just dont't forget to backup the files on regular basis, allways keeping more than one backup. Because screw ups do happen. And most of the time its much faster to revert to a recently saved, working backup, than to revert the "bad" changes (i.e. if you aren't even 100% sure, what the "bad" change was...).
 
Thanks, shall try.
 
Back
Top Bottom