[TUTORIAL] Converting Units from Kohan II

Deliverator

Graphical Hackificator
Joined
Feb 12, 2008
Messages
4,813
Location
London, UK
Conversions so far...

This is going to be a fairly hefty tutorial on converting units from Kohan II for use in Civ IV. It will cover a lot of ground and the same skills learned here may be used to edit existing vanilla animations and create custom ones of your own. Even if you don't have 3DS Max, then you may learn something from this and I'll try and show how to acheive the same sort of things in Blender. The reason for using Max is basically because Gamebryo version 10.1.0.0 animations do not import into Blender at all even with the most up-to-date Nifscripts. Also, Blender seems to have more of tendency to screw animations up on import.

Required software:
+ 3DS Max
+ Nifscripts for 3DS Max
+ NifSkope
+ KonverterFM
+ Blender
+ Nifscripts for Blender
Note: At time of writing I have am using the following software versions: Python 2.6, PyFFI 2.1.3, Blender 2.49, Blender NIF Scripts 2.5.2. It is advisable to update PyFFI, Blender and Blender NIF Scripts fairly regularly as new features are added and bugs fixed.

Background reading:
The Coyote's Animation Tutorial - there is helpful info in the associated thread too
The Coyote's NifSkope Tutorial

Civilization IV Animation Basics

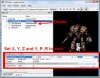
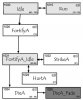
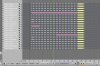
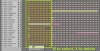
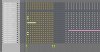
First take a look at the JPGs in the attached Motion_Flow_Diagrams.zip. These are included in the Civ 4 PAK files, and give an overview of the separate animations for each unit type.

Looking at cut down diagram below, the number in brackets in the bottom left of each box is the number of frames allowed for that animation - some are a fixed value and some give a range so you can choose within that how long you want the animation to be. The number in the top right of each box is the eventcode for that action. Each box corresponds to a KF animation file for a given unit, the KFM file lists which eventcodes trigger which KF file. The KFM file may be edited using KonverterFM.

Spoiler :
attachment.php

The minimum number of animations you actually need for a reasonably functioning unit is 8. Here's a handy reference chart for them:

Code:
Animation           Frames         Eventcode           Loop?         Sound?
Idle                60-120         1000                YES           NO
Run                 16-20          1010                YES           YES
FortifyA            15             1020                NO            YES
FortifyA_Idle       60-90          1021                YES           NO
StrikeA             21             1022                NO            YES
HurtA               21             1023                NO            YES
DieA                25-35          1024                NO            YES
DieA_Fade           30             1025                NO            NO
Other Optional Animations:
Spoiler :
Code:
FidgetA             60-120         1001                NO            YES
FidgetB             60-120         2001                NO            YES
FidgetC             60-120         3001                NO            YES

FortifyB            15             2020                NO            YES
FortifyB_Idle       60-90          2021                YES           NO
StrikeB             21             2022                NO            YES
HurtB               21             2023                NO            YES
DieB                25-35          2024                NO            YES
DieB_Fade           30             2025                NO            NO

FortifyC            15             3020                NO            YES
FortifyC_Idle       60-90          3021                YES           NO
StrikeC             21             3022                NO            YES
HurtC               21             3023                NO            YES
DieC                25-35          3024                NO            YES
DieC_Fade           30             3025                NO            NO

The only other ones I bother with for Melee units are the nice-to-have Fidget animations and combat variations - Fortify/Fortify_Idle/Strike/Hurt/Die/Die_Fade variations B and C which are eventcodes 2020-2025 and 3020-3025.

The Kohan II animations map reasonably well to the CivIV ones with some gaps:
Code:
Kohan II          Civ IV
Idle        ->    Idle
Jog/Walk    ->    Run
            x     Fortify (make from Idle and IdleMelee combined)
IdleMelee   ->    Fortify_Idle
Melee       ->    Strike
            x     HurtA (make by hand)
Die         ->    Die
            x     Die_Fade (make from final position of Die)
Fidget      ->    Fidget

In some cases, the Kohan II Cast animations can be used as Strike animations.

The main reason we have some work to do is that the Kohan II animations are in an old Gamebryo format (version 10.1.0.0) and, more importantly, the ones that map up nicely are not the correct duration for Civ IV so we have to make them the right length.

Chapter 1 - Converting our first animation

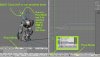
The entire set of Kohan II units can be downloaded here. We're going to use the Juggernaut unit in the Gauri folder as our example.

1A: Converting the NIF

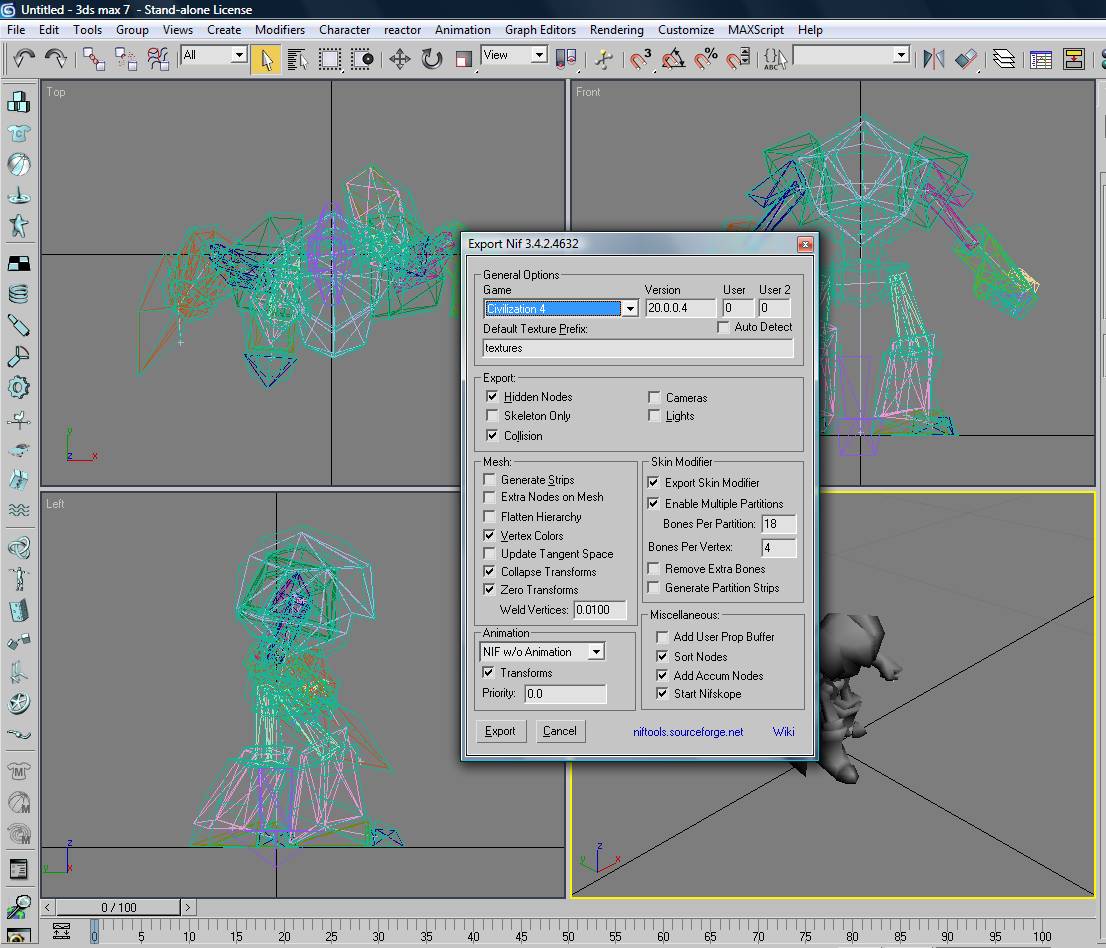
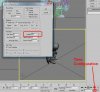
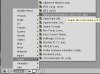
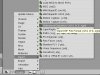
1. File > Import > Select Netimmerse/Gamebryo > Select the file Juggernaut.nif. Options as below:

Spoiler :
attachment.php

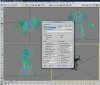
(If the Juggernaut is not standing with the stance you seen in the next screenshot with one foot forwards, try restarting Max and repeat the above.)

2. File > Export > Select Netimmerse/Gamebryo (if not already) > select output directory > juggernaut.nif. (You can uncheck Start NifSkope if you prefer)

Spoiler :
attachment.php

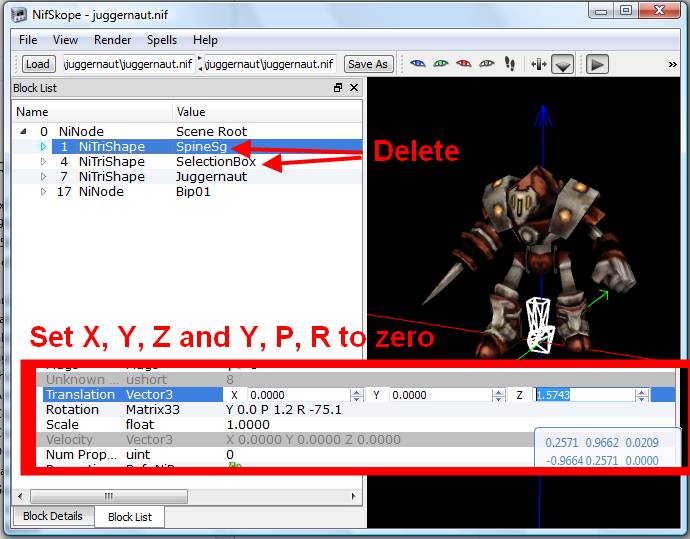
3. Open the exported NIF in NifSkope for a bit of tidy-up work. Delete SpineSg and SelectionBox TriShapes. Next, on the Bip01 node set all Translations (X,Y,Z) and Rotations (Y,P,R) to zero - don't worry that this puts the model in a strange position - the animations will fix that. Save the NIF with a new name like juggernaut_nifskope_cleaned.nif. (It is a good idea to never overwrite when you do a NifSkope edit as it is easy to screw stuff up)

Spoiler :
attachment.php

1B: Make a Run animation by shortening the Walk animation to 20 frames

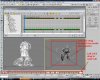
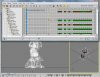
4. File > Import > Select Netimmerse/Gamebryo > Select the file JuggernautWalk.kf (all three checkboxes checked)

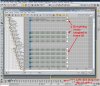
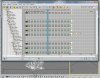
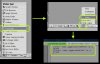
5. Left-click drag over the model to make the animation show up on the key track at the bottom, then open Graph Editors > Track View - Dope Sheet.

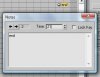
6. In the Dope Sheet > right click in the left hand pane > Select only Modifiers and Materials in the Auto Expand submenu. If you don't see a track called Notes in the Dope Sheet then close it and re-open.

Spoiler :
attachment.php

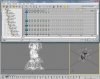
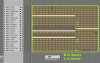
7. Outside of the Dope Sheet in the key track below the viewports left click drag to select all the key frames. Everything there and in the Dope Sheet should turn white to indicate that it is selected. Then in the Dope Sheet Ctrl+Left-Click-Drag over on the end note to add that to your selection.

Spoiler :
attachment.php

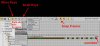
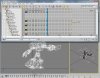
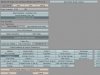
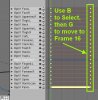
8. Unselect the magnet Snap Frames icon and select the Scale Keys icon. Making sure the vertical blue time line is on the leftmost frame, drag any key on the far right so that it lines up with frame 20 at the bottom.
Note that in the Dope Sheet a full block key indicates that an animation key is snapped perfectly to a frame - a thinner block indicates that an animation key is occuring between frames.

Spoiler :
attachment.php

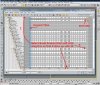
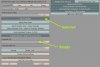
9. In the main screen key track left click drag over only the final frame (again you may need to Ctrl+Left-Click drag over the end note. In the Dope Sheet switch the magnet Snap Frames icon back on and tweak the final frame so that it snaps to frame 20.

Spoiler :
attachment.php

10. File > Export > Netimmerse/Gamebryo > Type juggernaut as the file name > Same options as before except for Animation select Multi KF w/o NIF.

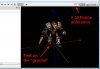
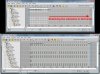
11. Now we can check whether our first converted animation has come out OK. Open juggernaut_nifskope_cleaned.nif in NifSkope go to Spells > Animation > Attach .KF and locate the animation you exported from Max - it will be called something like juggernaut_Bip01_JuggernautWalk.kf.

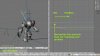
12. If you've done everything correctly the animation should be 0.667 long (At 30 fps a frame is 1 / 30 = 0.0333333 seconds long, so a 20 frame animation should be 20 x 0.03333 = 0.667), the Juggernaut should be walking smoothly and flat to the XY plane.

Spoiler :
attachment.php

One animation down... but there's plenty more. :D
 

Attachments

  • ktut1.jpg
    ktut1.jpg
    35.2 KB · Views: 1,332
  • ktut2.jpg
    ktut2.jpg
    144.8 KB · Views: 1,347
  • ktut3.jpg
    ktut3.jpg
    63.8 KB · Views: 1,325
  • ktut5.jpg
    ktut5.jpg
    67.8 KB · Views: 1,325
  • ktut6.jpg
    ktut6.jpg
    231.2 KB · Views: 1,354
  • ktut9.jpg
    ktut9.jpg
    30.4 KB · Views: 1,326
  • ktut8.jpg
    ktut8.jpg
    236.8 KB · Views: 1,349
  • ktut7.jpg
    ktut7.jpg
    240 KB · Views: 1,337
  • Motion_Flow_Diagrams.zip
    Motion_Flow_Diagrams.zip
    532.4 KB · Views: 167
  • motionflow_mini.jpg
    motionflow_mini.jpg
    36.8 KB · Views: 1,352
Last edited:
Chapter 2 - Idle Animations

In Chapter 1, we took the 30 frame Kohan II Walk animation and made it into a 20 frame Run animation suitable for Civ IV.

Having learned how to do this and got to grips with the Dope Sheet, the Idle animations should be pretty easy. The only difference is we need to make Idle and IdleMelee longer to create our Idle and FortifyIdle anims. We'll increase Idle from 30 frames to 90 and IdleMelee from 15 frames to 90. These figures are just what I've found works well by trial and error with this particular unit.

The technique is exactly the same as for the Walk animation. The only thing you may need to tweak is the Time Configuration so that there is more time to play with. Setting the length here has nothing to do with the length of the exported animation - that is entirely dependent on the start and end notes in the Dope Sheet. So if we set the Length to 95 the exported animation will still be 90 frames if that is where the end note is.

Spoiler :
attachment.php

attachment.php

Again, you'll probably want to check your exported animations in NifSkope.

Next up, it's...

Chapter 3 - Strike Animations - Part 1

3A: Combat Animation Overview

First, let's talk a bit about combat animations. The Fortify position is effect the "home" position for the combat animations. The FortifyIdle, Strike and Hurt animations will start and end in this position, and the Die animation will begin in this position.

The Strike and Hurt animations in Civ 4 should be a fixed 21 frames. The Strike anim of the attacker and the Hurt anim of the defender will play at the same time in perfect sync. The moment of impact, where the blow connects with the target should be halfway through the Strike/Hurt animation around the 10th or 11th frame.

The Strike animation starts in the Fortify position at Frame 0; around Frame 10 or 11 (halfway through) should be the apex of the strike, for example. when the sword swing is at its apex or a punch is connecting with the face of the target; by frame 21 the Strike animation should be back in the home Fortify position.

The Hurt animation starts in the Fortify position at Frame 0; before Frame 10 or 11 the unit has not been hit yet so should just be bracing itself, moving only very slightly; around Frame 10 or 11 (halfway through) should be the point of contact when the unit starts to react to being struck; by frame 21 the Hurt animation should be back in the home Fortify position.

The Die animation starts similarly to the Hurt animation, but should be 25 to 35 frames long. It starts in the Fortify position at Frame 0; before Frame 10 or 11 the unit has not been hit yet so should just be bracing itself, moving only very slightly; around Frame 10 or 11 (halfway through) should be the point of contact when the unit starts to react to being struck; the unit then flies back to land in a heap or what the death animation is; finishing usually lying on the ground in frame 25 to 35. The Die Fade animation starts and ends in the "lying dead" position - you can make the unit gradually fade away to complete transparency in this animation if you wish.

3B: Converting the Strike Animation

So, let's start by convert the Melee1 Kohan II animation to Civ 4 timings. The technique is only marginally more compex than for the Walk and Idle animations. Start by importing the model again so everything is nice and clean (It might be a good idea to save the animation free model as a separate MAX save for ease). Next, import the Melee1 animation as before.

Scrolling through the animation, locate the "apex" of the strike, where the blade would be hitting the target. This seems to be around frame 14. This would make sense as it is about halfway through the 30 frame Kohan melee animation. Now, we need to squash the animation before this apex point so that it finishes around frame 10-11. So, making sure Snap is off again and selecting Scale Keys, grab the first section and scale it so that the Strike apex ends around frames 10-11 like so:

Spoiler :
attachment.php

Next use Move Keys to move the keys so there it more or less follows on from the first section, i.e. so the spacing between keys looks reasonably even or natural:

Spoiler :
attachment.php

Now, we need scale down this second section of the animation so that it end at frame 21. You need to move the current time marker (the blue line in my version of Max) to frame 10 first as this will be the pivot point of the scaling. Then just scale the remaining part of the animation so that it ends as close to frame 21 as you can get. Then switch Snap back on, select the last frame in the track at the bottom and make sure we everything is nicely snapped to frame 21, just like we did for the Walk and Idle anims.

Spoiler :
attachment.php

attachment.php


You'll notice that I cunningly screwed up and forgot to select the all-important end note when doing my scaling. Fortunately, this gives me a chance to tell you an easy way to fix this. Just right click the end note and you can set the frame to 21 using this little dialog box:
Spoiler :
attachment.php


Check that you animation plays smoothly over the now 21 frames, then export as before using Multi KF w/o NIF. Check your export animation in NifSkope. It should be 0.7 seconds long with the apex of the Strike being around 0.333 and 0.366 seconds.

Another one done - that's four out of the eight animations we need - halfway! :D

For Melee2, we have a problem. When we import the animation it has become a strange kind of headbutt with the arms swinging behind. Kind of cool you may think, but it is not the animation we want. To fix this we are going to have to use a brand new workaround I've found while writing this tutorial and get our hands dirty with Blender animation editing.
 

Attachments

  • ktut10_stretchidle.jpg
    ktut10_stretchidle.jpg
    221.2 KB · Views: 1,263
  • ktut9a_time.jpg
    ktut9a_time.jpg
    75.9 KB · Views: 1,271
  • ktut_strike1.jpg
    ktut_strike1.jpg
    161.2 KB · Views: 1,225
  • ktut_strike3.jpg
    ktut_strike3.jpg
    171.9 KB · Views: 1,212
  • ktut_strike2.jpg
    ktut_strike2.jpg
    163.3 KB · Views: 1,238
  • ktut_strike4.jpg
    ktut_strike4.jpg
    194.4 KB · Views: 1,228
  • ktut_strike5.jpg
    ktut_strike5.jpg
    12 KB · Views: 1,198
  • blender_layout.jpg
    blender_layout.jpg
    38 KB · Views: 1,152
  • kbtut_complete_melee2.jpg
    kbtut_complete_melee2.jpg
    97.5 KB · Views: 1,133
Chapter 4 - Using Blender to get a working Melee2/StrikeB

4A: Preparation in 3DS Max

First, start with our animation-free model. Then import the JuggernautIdleMelee.kf animation. Next import the JuggernautMelee2.kf, but uncheck Clear Animation while doing so. Now, we should have one long animation which begins with the IdleMelee animation for the first 15 frames or so, and then beginning the proper Melee2 animation with the Juggernaut smashing the ground with both hands (well, hand and blade-thing). All good.

Now, we are going to export this compounded animation, but we need to export it as a single NIF file with embedded animation. To do this select the option Nif with Animation under Animation in the Export dialog.

Before we load our compound NIF into Blender to extract and edit the Melee2 animation, we need to clean our exported NIF in NifSkope - see Step 3 of Chapter 1. With the junk removed and translations and rotations zero'ed off on the Bip01 node we are set for Blender.

4B: Blender Animation Editing

Note: At time of writing I have am using the following software versions: Python 2.6, PyFFI 2.1.3, Blender 2.49, Blender NIF Scripts 2.5.2. It is advisable to update PyFFI, Blender and Blender NIF Scripts fairly regularly as new features are added and bugs fixed.

Start up Blender. I'll try to assume little/no knowledge of Blender. (If you are completely new to it, I really recommend the Super3boy Blender tutorials on Youtube - I learned a lot from them. Personally, I've always used Blender for modelling, rigging and animation - there's a lot I just don't know how to do in Max.)

Spoiler :
Blender Hot-Keys

General:
Tab: Edit/Exit Edit Mode for selected item
A: Select/De-Select All
G: Move
S: Scale
D: Duplicate
B: Box Select
Middle Mouse Button: Scroll window
Ctrl-U: Save User Preferences (Default layouts, etc)

3D View:
Middle Mouse Button Drag: Rotate View
Shift+Middle Mouse Button Drag: Move View
Numpad 1 - view from front
Numpad 3 - view from side
Numpad 7 - view from top


This is the window layout I have for animation. You can remove all the default custom layouts and create your own. You can switch between layouts using Ctrl-Left and Right arrow. Be sure to sure layouts when you are done tweaking using using Ctrl-U - otherwise they won't be remembered when you reopen Blender.

Spoiler :
attachment.php

First, we need to import the NIF we just exported from Max. Use the options shown below:

Spoiler :
attachment.php


attachment.php

Now, let's check the Text Editor for Anim notes as shown:

Spoiler :
attachment.php

This data is the direct equivalent of setting the position of the start and end notes in Max. It helpfully tells that JuggernautIdleMelee starts on frame 1 and ends on frame 16, while JuggernautMelee2 starts at frame 17 and ends a frame 47.

Now to get to work...

1. The Blender equivalent of Max's Dope Sheet is called the Action Editor and it is what will use a lot in this section. We first need to remove first 16 frames which are the IdleMelee bit. With focus over the Action Editor, press A which toggles Select All/Select None.

Spoiler :
attachment.php

2. Now press B for the Select Box -> Select everything in the first 16 frames -> Press X to Erase and Confirm.

Spoiler :
attachment.php

Next, select Frame Step from the Auto Snap Keyframes dropdown. Press G to enter Move Keys mode. Finally, move the mouse to the left so that the remaining animation begins on Frame 1.

(I'm used to having Frame 1 as the first frame in Blender whereas in Max the first frame was Frame 0. It's not a big deal - I'm sure you can have zero as the first frame in Blender as well. For some, reason I've always kept it as the default starting at Frame 1 - this way you do need to remember to add one to your total frame count to get the final frame number - in the case of this Strike animation that will be 21 + 1 = 22.)

4. Right click the skeleton in the 3D View (it should go pink).
> Press Tab to enter Edit Mode.
> Switch to Pose Mode.
> Press A so that all bones are selected - the bones names in the Action Editor should go white.
> Over the Action Editor, with the gress time marker on Frame 1, press I to insert Keyframes - Choose Only Selected Channels. These steps ensure that the bones all have their positions and rotations set at the beginning of the animation. You can see that Bip01 Neck doesn't really have any animation which is probably why the import into Max was screwy for this one.

Spoiler :
attachment.php

5. Now we have got rid of the MeleeIdle bit and are left with the original Kohan II Melee2 animation. Next, we are going to do what we did in Max for the Melee1 animation for the Melee2 animation in Blender. (The apex of the Strike in this case is around frame numbers 15/16)
> Set Auto Snap Keyframes to None
> Press B and select everything from frames 1-15
> Press S to enter Scale Keys mode, the position of the mouse before you press S should be to the right of the selection and the green time marker should be at Frame 1
> Move the mouse to that the selection finishes around frame 11
> Press A to clear the selection
> Press B and select the remaining section of the promotion
> Press G and move the frames so that they follow on nicely from the first section
> Move the green time marker to Frame 11
> Press S and scale the selection so the last frame as close to frame 22 as you can get
> Press A to deselect all
> Press B and select only the last frame
> Select Nearest Frame from the Auto Snap Keyframes dropdown
> adjust the final frame (using the G key) so that it is snapping to frame 22
> finally press D to duplicate the current selection (the last frame) and drag the mouse a few frames to the right before clicking to drop them - this is just to fix any potential export issues we might get.

You should now see that we have effectively performed the same operation we did in Max for Melee1 in Blender for Melee2.

Spoiler :
Squashing the first section:

attachment.php


Action Editor when complete:

attachment.php

6. Before we export the animation we need to pull up the Text Editor and the Anim entry again. Clear out the existing text completely and enter this instead:
Code:
1/start eventcode=2022
22/end
This text controls the start and end of the exported KF file. In a similar way to the end note over-ruling Max's own start and end settings, this Anim text over-rules Blender's start and end settings when you export a KF. The eventcode is the one for StrikeB if you refer to the Motion Flow diagrams from the first post - this eventcode seems to not be essential, but the vanilla anims have it so I usually add it. You can type it in NifSkope if you forget.

7. Bring the Scripts Window back up and Export the KF file using the options shown below.

Spoiler :
attachment.php

attachment.php

8. Open up your original Juggernaut nif in NifSkope. Load in the animation you just exported from Blender. All being well you should have 0.7 second animation of the Juggernaut thumping the ground with both hands.

Spoiler :
attachment.php

If you've made it this far WELL DONE :goodjob: - I'm confident if you got through this then you can get through everything else that still needs doing.
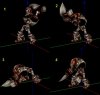
This blender workaround can also be used for Fidget animations that do not behave. The only difference is when creating the compound animation NIF in Max, import the Idle animation first, followed by the Fidget1/2 animation.

This process is also used to make our Fortify animation.
 

Attachments

  • kbtut_complete.jpg
    kbtut_complete.jpg
    41.9 KB · Views: 1,157
  • kbtut_delete_first_bit.jpg
    kbtut_delete_first_bit.jpg
    110.9 KB · Views: 1,166
  • kbtut_fix_beginning.jpg
    kbtut_fix_beginning.jpg
    135.2 KB · Views: 1,182
  • kbtut_export.jpg
    kbtut_export.jpg
    37.3 KB · Views: 1,222
  • kbtut_exp_opts.jpg
    kbtut_exp_opts.jpg
    83.9 KB · Views: 1,230
  • kbtut_imp_opts.jpg
    kbtut_imp_opts.jpg
    69.3 KB · Views: 1,169
  • kbtut_import.jpg
    kbtut_import.jpg
    38.4 KB · Views: 1,224
  • kbtut_squash_first_bit.jpg
    kbtut_squash_first_bit.jpg
    83.5 KB · Views: 1,181
  • kbtut_text_editor.jpg
    kbtut_text_editor.jpg
    47.6 KB · Views: 1,169
  • kbtut_action_editor.jpg
    kbtut_action_editor.jpg
    158.8 KB · Views: 1,145
Chapter 5 - Fortify and Hurt animations in Blender

In this chapter, we'll create our Fortify and Hurt animations and introduce the Blender concepts of the Ipo Curve Editor and animating from scratch.

5A: Preparation in 3DS Max

Next, we are going to use a similar process to what we used for the Melee2 to make our Fortify animation. During the Fortify animation (which is a very quick 15 frames), our unit should transition from the Idle pose to the FortifyIdle pose. The compound animation NIF technique we just used gives us a way to take poses from two different animations and use them to make a new one. This is a really useful thing to be able to do, in particular for making a Fortify animation.

First, up back in 3DS Max:
1. Start with our animation-free model again.
2. Import the JuggernautIdle.kf animation with Clear animation checked.
3. Import the JuggernautIdleMelee.kf, but uncheck Clear Animation before doing so.
4. Export the NIF using the Animation setting "NIF with Animation".
5. Clean our exported NIF in NifSkope - see Step 3 of Chapter 1.

So now we have made an animated NIF with one long animation featuring both the Idle and IdleMelee poses, and it will be quick to turn that into a Fortify animation in Blender.

5B: Fortify animation in Blender

1. Load in the NIF we just made into Blender, making sure Animation is selected.
2. Switch to the Action Editor. Conveniently, the first frame in this sequence is the home Idle position and the last frame in the sequence is the home IdleMelee/FortifyIdle position. This means if we simply cut away everything in between we should have a nice smooth transition between the two straight away. (Both Blender and Max automatically interpolate between animation keys using a quadratic method to create smooth movement) So, cut away all the intermediate frames using B to box select and X to delete.

Spoiler :
attachment.php

3. Next using B to box select the ending frames, then G to move them to Frame 16 as shown. (We are making a 15 frame animation so frames 1 to 16)

Spoiler :
attachment.php

4. If we play the animation we have a small problem. Most of the model moves smoothly from the Idle pose to the Fortified pose, but the right arm whips around a complete 360 degrees. We can fix this using the Ipo Curve Editor which is a great tool for fixing these kind of strange behaviours. First, switch the 3D View to Pose Mode and select the Bip01 Clavicle.R bone (see screenshot below) which is the bone responsible for the crazy arm swing. Now open up the Ipo Curve Editor and switch it to Pose Mode as well. These curves represent the movement of the Bip01 Clavicle.R over the course of our 15 frames of animation. The crazy arm swing is caused by the fact that one of the rotation tracks is transitioning from around -1 to around +1. This is easily fixed here.

1. In Ipo Curve Editor right click on the blue line.
2. Press TAB to enter edit mode for that curve.
3. Right click so that the point at -1 on Frame 1 is selected. It should highlight yellow.
4. Use G to move that point vertically so that it is in line with the point to the right as shown in the second screenshot below.

Spoiler :
Before fix:

attachment.php


After fix:

attachment.php

Now, if we play our animation the Juggernaut should transition from the Idle pose to FortifyIdle smoothly over 15 frames (Frames 1-16). :D

5. Open up the Text Editor and select Anim as before. Clear out the current entry and put:

Code:
1/start eventcode=1020
16/end

Export the KF, and check in NifSkope. We should have a nice smooth fortify animation lasting 0.5 seconds. :goodjob:

5C: Hurt animation in Blender

[IN PROGRESS]
 

Attachments

  • kftut_ipo2.jpg
    kftut_ipo2.jpg
    96.2 KB · Views: 1,154
  • kftut_ipo1.jpg
    kftut_ipo1.jpg
    114.4 KB · Views: 1,121
  • kftut2.jpg
    kftut2.jpg
    44 KB · Views: 1,122
  • kftut1.jpg
    kftut1.jpg
    112.8 KB · Views: 1,151
Chapter 6 - Die and Die Fade animations

Chapter 7 - Making our KFM file and finalizing the NIF and KF files

THE END!
 
Yeah, it would be good to know if you can follow the first part. If you can get that far, it will encourage me to carry on... :)
 
Awesome, i followed the first post perfectly, and it worked! its extremely easy to follow! i look forward to the rest :D

(no onto post 2 of the tutorial hehe)

EDIT: dude, the idle and fortify part of the tut was easy too :D you are a machine with explaining this stuff :) :goodjob:

EDIT2: hehehe ive even started converting the Golshan and it seems to be working :D
 
Cool. The Fidget anims follow exactly the same process so you might what to do those too. I'm not sure what number of frames you'll want to convert them to, but they'll probably need slowing down. Check the motion flow diagrams for what length the Civ 4 Fidget animations should be.

I'll get the Strike animation written up soon. There are some bits I had to use Blender for, but I'll describe what I did.

BTW, If you're starting Golshan, don't worry if the glow planes around her get screwed up - they just need to be replaced with Billboard nodes which is doable.
 
The motion flow diagram says 60-120 frames - that is 2-4 seconds at 30 fps. I would try converting them to 90 frames like the idle anims and then see if they are too quick or too slow in your opinion. I'll add this to my text box summary.
 
ive got the golshan fidgets to work nicely, but the Juggernaut fidgets seem to be wierd:

Spoiler :

attachment.php


not sure if this peculiarity will sort itself out in game...
 

Attachments

  • juggs.jpg
    juggs.jpg
    159.4 KB · Views: 1,155
not sure if this peculiarity will sort itself out in game...

Well, what you see is generally what you get with this stuff. Sometimes animations come out funny on import. I think this is due to the fact that some animations don't move all the bones while other do, but I'm not sure. Don't worry, in the forthcoming section, I am going to demonstrate the workaround fix for this since the Melee2 animation suffers from the same issue. The workaround does use Blender so you may want to get that and the nifscripts installed if you don't have it already.
 
So, PL, you said the first bit was easy. Let's see if you can get to the end of Chapter 4. :)

I may need to add one or two more screenshots for the Blender section.
 
i can follow the melee1 animation, but im pretty lost at the blender part. i cant seem to get blender to be able to import nifs even with the nifscripts... it comes up with a python error and said i had to download some pyffi thing as well, which i did, and it still dosnt work. not sure whats goin on there.
 
Ooops. I forgot to cover importing even though I attached screenshots:

Spoiler :
attachment.php


attachment.php


Yeah, you need Python, PyFFI and the Blender scripts installed - here's the page which you've probably seen. The version of python you have installed may matter.

I have to go out now, but I'll go over the Blender section again soon and polish it up.

Edit: You can see from the second screenshot above the version of Blender, PyFFI and Nifscripts I am running.
 
ah... i downloaded nifscripts 2.4.9 because that was what i assumed went with blender version 249. perhaps you should specify which versions of each thing should be downloaded? :p

anyway, i managed to get my nif imported :) ill try continue on with the tutorial from there haha
 
Back
Top Bottom