Civ 6 seems to have switched to a PBR model for their texture work. PBR is a method of texturing that has become extremely popular in the game industry as a way to standardise the appearance of materials and in certain cases to achieve realism (Civ 6 is stylised yes, but taking the leaderscreens as an example, the materials feel realistic).
To those of us coming from a Civ 5, these means a different set of texture maps are required. So here's a quick to the maps used in PBR texturing. I'll be using the texture I made for Hadrian's Armour as an example.

BaseColor:
Often also called Albedo, it is simply the color of the material you are trying to represent. Gold is yellow, stone is grey, etc. Pretty simple. Something to note for people from civ 5 though. These the color should purely represent surface color. There normally is no need to include any shading detail on these maps as you might have done in civ 5.

The reason that shading info isn't needed anymore is because of Ambient Occlusion. Before this information used to be combined into the Albedo and Specular maps, but it is now handled separately. AO is a map that represents how much light the model would be exposed to if it were lit with even ambient light. Bake it out from Blender/Maya/3Ds or just use a pure white map.

Metalness:
How metal something is: in terms of the material that is. So gold is 100% metal (pure white), and paper is 100% not (pure black). Normally stick to only black and white with no grays. Sometimes metalness is used to simulate the look of certain fabrics, such as silk, which is what I'm doing here, hence the gray where the purple is in the Albedo.
How metal something is: in terms of the material that is. So gold is 100% metal (pure white), and paper is 100% not (pure black). Normally stick to only black and white with no grays. Sometimes metalness is used to simulate the look of certain fabrics, such as silk, which is what I'm doing here, hence the gray where the purple is in the Albedo.

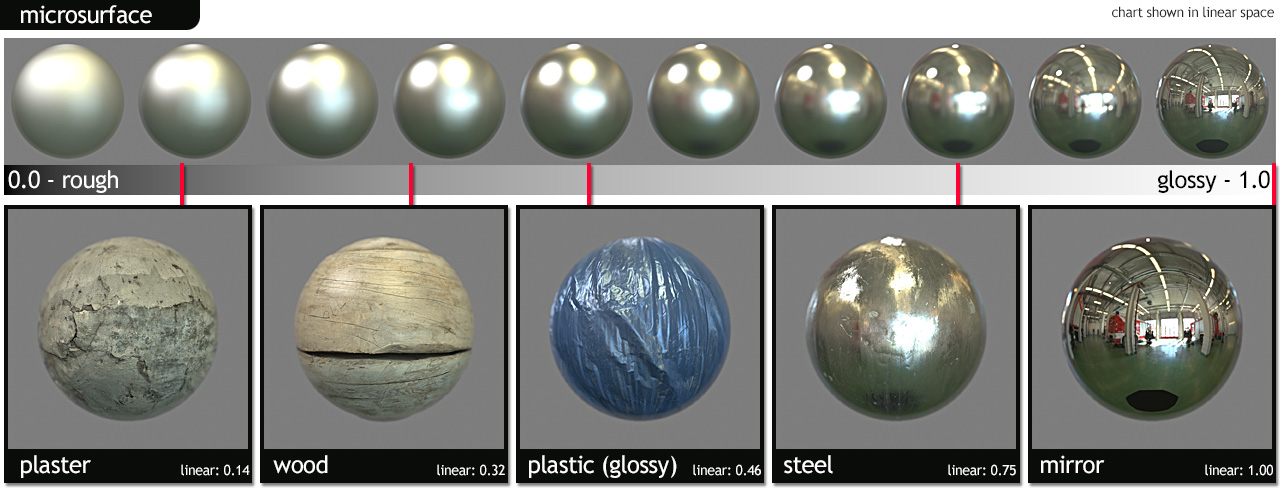
Glossiness:
Glossiness represents the smoothness of the microsurface of a material. So a chrome ball is completely smooth (white) and something like dirt is much rougher (black). So you can see my here armour is smoother than my cloth. I've attached a chart to give an idea of value ranges. Some of us may be more familiar with Roughness maps: simply invert that to get a Glossiness.
Glossiness represents the smoothness of the microsurface of a material. So a chrome ball is completely smooth (white) and something like dirt is much rougher (black). So you can see my here armour is smoother than my cloth. I've attached a chart to give an idea of value ranges. Some of us may be more familiar with Roughness maps: simply invert that to get a Glossiness.

Normal:
This represents smaller changes in the surface of material. Think dents, dings and small crevices. It's a theoretically more complex map to explain, but suffice it to say that it uses the RGB colors to store where the material should deviate from the actual geometric surface of the mesh.
This represents smaller changes in the surface of material. Think dents, dings and small crevices. It's a theoretically more complex map to explain, but suffice it to say that it uses the RGB colors to store where the material should deviate from the actual geometric surface of the mesh.

This seam in the armour hasn't been modeled. It's just done with a normal map.
This is a hard map to make by hand, and it's best to rely on other tools like: CrazyBump, Bit2Map, AwesomeBump (this is the free one), to generate it from a height map. For most cases in Civ 6, you should be able to get away with a map is is a solid 128,128,255 in color (representing a completely flat surface).
All this can end up being a little hard to do purely in Photoshop, but you shouldn't have a problem if all you're doing is models for buildings and units. If you do hope to eventually work on 3D leaderheads however (if and when we figure that out), you may want to look into tools used specifically for texturing 3D models, most notably Substance Painter and Quixel. I personally recommend the former.
If you're interested, here's an article that goes into much more detail on the ideas behind PBR. My intro here is essentially a condensed version of that, summarising a lot of stuff and leaving out the bits not relevant to Civ 6.
Last edited:
")


