Can I use MS Paint without it ruining the .pcx graphics?

Post a zip file with the original chopper pcx, the 3 resource pcx, and your template bmp. By original I mean the ones as they existed just before you started to combine them. Can't show you MS Paint techniques, obviously. But I can use them as visual examples and show you what is happening with the palettes as you combine them, step by step.

Alternatively, you can point me to an existing guide if you know I’m going to be able to follow it?
Going back to the guides I learned from is problematic. In transferring to the "new and improved" version of CFC a lot of links between threads were broken. At the same time - and for other reasons as well - a lot of images in old threads disappeared. Furthermore the search function on this new site is frustratingly difficult to get good results from. But I'll see what I can find.
 
Last edited:
Thanks Blue Monkey. I know this is pre-amateur level stuff and it must be annoying.

Download
Please stop apologizing. Or at least stop putting yourself down. You've more than earned the meager help we've been offering with all you've got linked in your signature. Besides, we all had to learn once upon a time. This is just paying it forward.

As I suspected, looking through available tutorials and about 20 threads where similar questions came up didn't find anything that looks useful. Missing images, explanations too specific to old versions of particular graphics editors, that sort of thing.

Hopefully I'll have some generalized info on pcx palettes posted later today.
 
It’s also kind of messing with me only being able to communicate through text.
Yes, I agree completely. If we were in the same room you'd have got it in less than hour i'm sure. I did in-house support at a university for many years - graphics, software in general, and more technical hardware related stuff. I always preferred face to face so everybody knew what was really going on. On the phone is bad enough, waiting hours or days for text responses can be frustrating & confusing on both ends.

I've got some annotated screenshots assembled now. Writing up a clear post may take another hour or two. Assuming i don't get interrupted by anything else - like the cat deciding to jump on the bookshelves and knock everything down :D
 
A Bit About Palettes
Trying to be clear without getting into technical details that can be unnecessarily confusing ...

Basically images can be in one of two different color modes - RGB or Indexed. RGB stands for red, green, blue. In this context RGB means that the image can have millions of colors. Indexed means there is a limited palette.

An indexed image is limited to some specific number of colors - 256 colors in the case of the Civ3 pcx files. "Indexed" means that each color is assigned a numbered slot in the palette. "Put color #127 in this part of the picture" is sort of what the software is doing when it compares the image to the palette. The 256 color slots in the pcx palettes are numbered 0-255 (this has to do with the way the software handles numbers and how programmers think). So when we talk about the last two slots we're talking about whatever colors are indexed to 254 & 255.

Civ3 uses slots 254 & 255 for whatever needs to be transparent in the game. It doesn't matter what colors they are: "Make everywhere in the picture that is color #254 invisible". If you look at one of the terrain files (for example) you'll see lots of green and magenta. The Civ3 designers / programmers decided to put bright green and magenta in slots 254 & 255 because those two colors very rarely get used in any of the game images. They are bright and contrasty so it's easy to spot what will be invisible in the game.

Because Firaxis set up Civ3 that way we usually talk about green and magenta. But it's very very important to remember that "green & magenta" is a just shorthand way of saying "the colors used for transparency that are in either slot 254 or 255 of the indexed palette associated with this particular image". This will start to make more sense if we look at the specific images you were using. Because I work in GIMP you'll see references to "colormap". For our purposes that means the same thing as when people talk about a palette here in the C&C forum.


All three of these images are using the same colors for transparency as the original Firaxis files. Most creators here at CFC do this so that anyone else can see right away what we are doing when they look at our files. But it's not a requirement. look at the Chopper file -


I don't want to get too technical, but it's important to note that if there were more blacks somewhere else in the palette then you could have black in the image anyway. The problem with that is that it can be difficult while editing an image to be sure whether or not you are using the "transparent" black.

The software is dealing with numbers, not visual colors. we usually talk in terms of RGB numbers here on the forums - how much red, green, and blue are in that particular color. 0,0,0 would be pure black. 1,0,1 would probably look the same to our eyes, but to the game it's a different color. If your palette has 0,0,0 in more than one slot things can get very confusing for the program as well as you. So we always try to have colors in the last two slots that are very different from anything in the image itself as we want it to appear in-game.

Here's the colormap (palette) for your template:


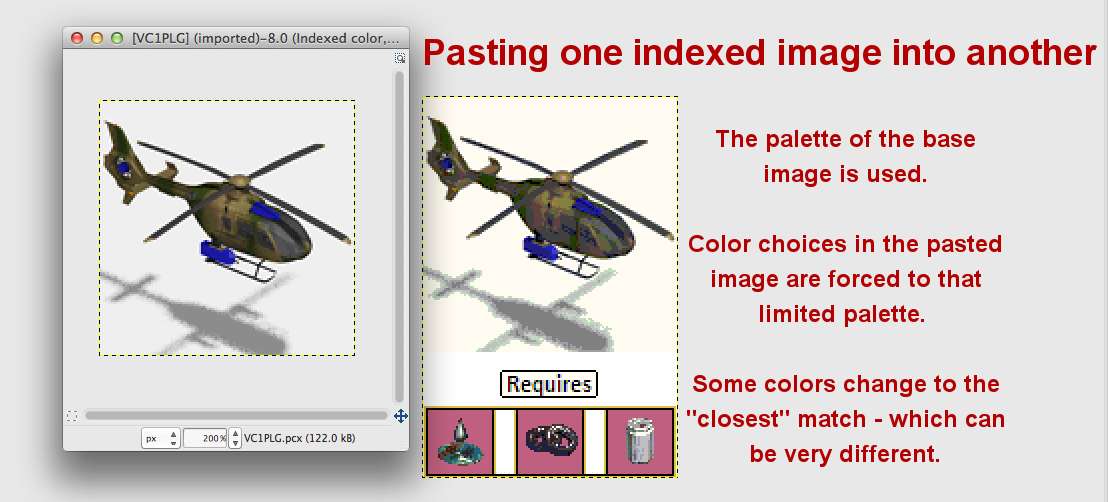
So now we've got 5 images. Each has it's own unique palette. And - assuming all the greens and magentas are truly identical - there are 5 or 6 different colors in the two transparency slots. So what happens when we try to combine the 5 indexed images? Out of those possible choices for the last two slots which ones get selected? More broadly, what happens to all the colors from the various palettes? The answer is simple. The palette of whichever image is used as the base (that all the other images are pasted into) is the one that gets used.


Whatever program you are editing these images in will try to match colors to some extent, but at some point it may fail & you'll end up with something unpredictably ugly. With these five images the blue and white from the template end up as the transparent colors. Which means anywhere those two colors are in the pasted images will end up being invisible in the game. Probably not what you would have wanted.

The solution is to use a base image that is in RGB mode. In this case changing the template image to RGB mode before the other images are pasted into it. After they are pasted in, the composite image needs to be changed to 256 color indexed mode. Otherwise Civ3 can't use it.


Reducing from RGB to 256 colors means that the software is trying to pick whatever it thinks are the best colors to keep. The composite image didn't actually have green and magenta anywhere in it. So they aren't in the indexed palette. Civ3 is going to think that whatever two colors happened to end up in the last two slots are meant to be used for transparency.

This is why it's probably better in the long run to have a template saved in RGB mode with two colors already in it that are meant from the very beginning to be transparent in-game.


It's important to start with a template that is in RGB mode. With millions of colors available it's extremely unlikely that the images you paste in are going to be visually degraded. After everything is in place then you can change the mode to 256 colors before you save it as a pcx.


Even though green and magenta are still there after changing modes they are not in the last two (transparency) slots. The colormap (palette) needs to be edited so that they are. All of these steps can be done in GIMP. But from what Bluemofia has said and others have said in other threads some programs can't do the palette editing & you would need to do so in another program.

Some people prefer to go ahead and reduce to 256 colors without bothering about the transparency slots, and then edit the palette to change those colors to green and magenta afterwards. In my experience, because I have no control over what colors the program puts into slots 254 & 255 there can sometimes be a lot of cleaning up to do wherever those two colors are used in the image. Other people will recommend forcing the editor to reduce to 254 colors instead of 256. Then you would have to actually edit the palette to add two colors at the end. I've found it better in the long run to include green and magenta somewhere in the image whenever possible before changing modes. With a 'pedia icon - for example - a big dot of each in that white space will make sure magenta & green end up in the palette. Then you can easily go back and paint those dots to match the rest of the background. And the palette itself might need two colors rearranged, but at least they are all already there.

This is just the way that has worked most efficiently for me over the last 8 years or so. Once you understand enough about palettes to experiment with and develop your own work flow you may find a procedure that is better for you. Especially if you are working with a different set of programs than I use.
 
There may be some typos or grammatical errors in there. If anything is confusing or unclear please say so. Even if it all makes sense, if I did a good job writing it up then there should be further questions sparked by reading through it. Please continue to question and comment :)
 
the cat deciding to jump on the bookshelves and knock everything down :D
Ha. My puppy is busy destroying everything at the minute

I’ve downloaded and installed GIMP.
Loaded GIMP
‘Opened’ the background PNG image you sent. (The file is already in RGB mode)
‘Opened as Layers’ each .png image and placed them in the desired areas one at a time.
This is where I got stuck
Spoiler :
upload_2018-1-5_14-16-3.png
I don’t know how to deselect a layer/image to change the composite image to a 256 colour indexed mode. I’ve identified how to swap them through Image>Mode>RGB/Indexed.

I'm also not sure where to access the colour map; I assume it’s Colors>Map>Rearrange Colormap but it looks different to yours. And I can’t drag-and-drop anything to the last box; only the second and third to last ones.

Note: I’m impressed; you’ve made it look quite professional.
 
Last edited:
Well a few different comments in response to your post, not in any particular order, none of them necessarily connected:

  • Most importantly, I get it about needing specific directions, in detail. I'm the same way - step by step instructions to follow the first few times. Having taught everything from kindergarten (as a public school teacher) through middle school (at a private school) through Master's level grad seminars, including teaching teachers, I've learned a bit about how the brain works, & about learning styles. Pretty much everybody here starts ignorant. Teaching someone "how to fish" is fun - at least for me. Not frustrating at all since you're forthcoming about what you don't know :)
  • The version of the template I posted wasn't really meant to be used. It is just a visual example of the kind of thing you might create for yourself. You are certainly welcome to use it.
  • The colormap is accessed in two different places depending on what you want to do. Please see the thread linked to below for explanation and instructions. It's the same thread Bluemofia posted a link to.
  • A note on dragging & dropping in the colormap - I have the same trouble as you. Just drag & drop to the next to the last slot. Then drag the color that is in the last slot somewhere else.
  • I'm impressed that you downloaded GIMP. You will see some visual differences in the windows, menus, etc. if you are working in a Windows version. I'm on a Mac. But where to find things, what they're called and how they work should be the same.

So on to your specific situation:
  1. Paste the unit & resource images as layers in the template image - you've already done this.
  2. Get all the layers moved around to where you want them - you've already done this.
  3. Turn the multiple layers into one layer - fuller explanation below.
  4. Change from RGB to 256 color mode *
  5. Make sure that the colors you want to be transparent in-game are in the last 2 slots of the colormap.*
  6. File > Export (GIMP's term for saving in anything but GIMP's internal file format) as a pcx.

* These two steps are explained in this thread. Bold Text indicates a major section of the explanation. Underlined text indicates the beginning of the directions for a distinct procedure. Just find the one you need to do and follow the step by step directions in that section. The summary at the bottom of that post has shorter versions of the directions for each of the procedures. Each is a separate bullet point.

Turning multiple layers into one layer (Step 3 of the procedure listed above)
Spoiler :

Turning multiple layers into one layer (Step 3 of the procedure listed above)
  • You don't necessarily need to deselect any area or layer to do this.
  • GIMP gives you two choices for how to do this. Either one accomplishes the same thing for our purposes. you only need to do one or the other, not both:

Method 1
  1. Image > Flatten Image. Meaning in the "Image" menu choose "Flatten Image".

OR

Method 2
  1. Image > Merge Visible Layers
  2. This opens up a little window. You want the final result to be the size & shape of the template layer. so click the third choice - "clip to bottom layer". Then click on "Merge".
You should now have an image with a single layer. You are ready for Step 4 - changing from RGB to 256 color mode.
 
Last edited:
I wanted you to have the explanation as soon as possible after I read it. So I haven't included any pictures this time. If you understand it without the pictures let me know. If the pictures are necessary that's ok also. I can add them in, but turning raw screenshots into annotated images is several hours work.

also, please let me know if the directions for Step Two have too much personality :)

Bet you didn't know you are a co-author. :D Once you and I have worked out how to word everything, i'll turn the important things from both threads into a coherent tutorial in its own thread.
 
Last edited:
You edited your post while I was writing up the response. :lol: Hope everything still makes sense & is responsive to your needs.

EDIT: At this point I may not see any response until tomorrow. i'll be busy with my fieldwork. A lot of times I get so involved I don't even hear the email announcement :)
 
Last edited:
I felt I owed you an explanation for why I couldn’t follow your well-structured guide and got a little self-conscious when I reread what I posted.
I hate touchscreens and intuitive software so I’ve backdated to Windows 7; Apple products and Windows 10 love to “help”.

When I reloaded GIMP, it didn’t let me move the layers. I thought I was going to ask (wringing my cloth cap) “how do you move it again”. Fortunately, Google told me to look for the ‘Move Tool’ in the ‘Toolbox’ or press ‘M’ on the keyboard. That’s something easily overlooked when you’re used to everything being automatically drag-and-drop.

For some reason I can’t see the Help, Restart, Cancel and OK buttons at the bottom of the Rearrange Colormap window. I can’t resize the window or move it to access them. I can only assume that the OK button is activated when I hit Enter (which I didn’t know at first).

The first revised attempt looked much better but had problems when it loaded in Civ. The bright green and magenta was still visible and magenta spots appeared around the helicopter. I suspected those spots were transparent white with the background magenta showing through but it would be transparent for that (separate and properly indexed) image.
Cropped screenshot A
upload_2018-1-6_6-24-23.png


My second attempt was successful after I knew about the buttons in the Rearrange Colormap window. I hit Enter after rearranging instead of exiting (as you do for Custom Rules in the Firaxis game editor).
Cropped screenshot B
upload_2018-1-6_6-24-37.png


You’re a pretty good teacher; your students will be glad they had you.

Spoiler Supplementary :
It was AnthonyBoscia’s technique of not including a resource in the first slot (where possible) to prevent the over-link bug that spurred me to make the alteration the Unit_LG.pcx files. It would be nice if you got his support so you could include his technique, the template and your graphics work in a tutorial.

I want, if it’s possible to make these additional changes.
  • Move the labels ‘Advances’ and ‘Requires’ down to the resources section
  • Move the ‘Resources’ label and the resource icons off the page by changing their coordinates (so they’re not visible)
  • Edit the Civilopedia background to match the new format
  • Add as many ^ symbols in the Civilopedia as it takes to enter text just below the stats section (keeping hyperlinks)
I have stats (like rebase, airdrop, HP etc.) that I would like to blend into the auto-stats now we have space.
Spoiler What I have now :
upload_2018-1-6_6-49-58.png
Spoiler What I’m proposing :
upload_2018-1-6_6-50-56.png

If it’s successful, you can also add it to your tutorial.

Thank you for your help, and thank you for being patient with me.

Bluemofia, your help is appreciated, I just found Blue Monkey’s method easier to do.
 
Last edited:
You are very welcome.

Those results look good enough that you should post a thread with the template and some explanation of how you use it.

GIMP has a peculiar interface - peculiar in the sense that it's distinctly its own. Takes some getting used to. Fortunately there's an active online GIMP community, including an online manual in addition to forums. Lots of articles on various sites with step by step instructions for a variety of special effects. Lots of books as well. GIMP is a powerful program and actually fairly simple to use with some practice.

I'm confident you'll be making custom interfaces in no time :)
 
I’d have to say that you’re the co-author and mention AnthonyBoscia’s role. I couldn’t legitimately take all of the credit considering all the help you’ve put in.
There's a big difference between coming up something different such as differently sized 'pedia icons with more information and just bringing together in one place information about palettes that was already available in the forums. One is creative work. The other is just helping creators focus on new ways to make C3 better rather than wasting time learning things the hard way. Just sayin'.
 
Top Bottom