Deliverator
Graphical Hackificator
Updated 11th February 2014
There are two ways of taking a Civ 4 unit graphic and bringing it into Civ 5:
A) Take Civ 4 unit mesh and rig it to a Civ 5 skeleton so that Civ 5 animations are used.
B) Do a full conversion converting the Civ 4 animations so that they work in Civ 4.
A is preferable in most cases because the quality of the resulting unit will be better. The list of event codes for Civ 4 and Civ 5 do not match up perfectly, and the timings are different even where the events match up. Any unit that has animations converted from Civ 4 will effectively have gaps for some Civ 5 events where no equivalent Civ 4 animation exists.
B is worth doing if there is no equivalent unit in Civ 5, for example there is no Lion unit graphic in Civ 5 so if I want to convert the Lion Unit I need to convert the animations from Civ 4.
This tutorial describes the process for B above, fully converting a unit with its animations from Civ 4 to Civ 5.
For option A - Wolfdog has put together a tutorial here and here for Blender 2.7x.
In this tutorial we are going to convert the Lion unit including its animations from Civ 4 to Civ 5.
All the files used during this tutorial are available here for reference.
You can also download the Lion unit made using this process here.
Software Tools Used
Nifskope
Blender 2.49b and the Blender Nif Scripts - follow the download instructions from here
Nexus - Old Version with functioning 3D Viewer
Nexus Buddy 2
FBX Export script and BR2 Export script from Blender Scripts for Civ 5
PakBuild (http://www.civfanatics.net/downloads/civ4/utility/PakBuild.zip) to unpack any Civ 4 art you might want to convert (a lot of big mods pack their art too)
Steps:
A. Converting our Model from .nif to .gr2
1. First copy the files from the vanilla Civ 4 Lion unit directory to a working directory.

2. Next import lion.nif into Blender with the following settings. The Scale Correction value should be set so that the imported model is an equivalent size to the vanilla Civ V models if you want attached visual effects to be properly scaled. For more on this see the third post.

Send Bones to Bind Position should be de-selected and Apply Skin Deformation should be selected. This is to ensure that the mesh and skeleton are in the same positions in Blender as there are in the source NIF.
3. If we use Shift-Numpad-3 to view the Lion side-on and compare with the side view of lion.nif in Nifskope we should see the bones and mesh are in the same positions relative to each other. This is a good thing to check if we want the conversion of animations to work properly.


4. Now right click to select the skeleton in the 3D View. Now press Ctrl-A and select Scale and Rotation to ObData. Next right click the mesh and repeat Ctrl-A > Scale and Rotation to ObData. This ensures that any scale or rotation transformations are written into the mesh and skeleton data.

5. With the mesh still selected, right click the skeleton to select it. Then press Ctrl-P > Make Parent To and select Armature then Don't Create Groups. This ensures the Lion mesh is parented to the skeleton in the right way.

6. Export the updated Lion as a NIF - I used the name lion_blend_clean.nif with the following settings:

You can now check that the exported NIF file looks OK in Nifskope. This is the NIF we will use when converting our animations.

7. Now save your Blender session as a .blend file. This can be used as a template for rigging other meshes to the Lion's animations if we wish in the future.
8. Export the model to both FBX and BR2 formats. The FBX file will provide the skeleton for our finished unit, while the BR2 will provide the mesh. This is done because the FBX into BR2 randomly corrupts mesh data whereas the BR2 mesh import is reliable.

The FBX settings should be as shown:

I used the predictable filenames lion.fbx and lion.br2.
9. Open lion.fbx that we just exported in Nexus Buddy 2. Now under the Advanced tab pick Overwrite Meshes from BR2 and select lion.br2. Once the overwrite is complete you can click view to view the .gr2 file in Granny Viewer. The Lion is rotated forward by 90 degrees about the X-axis, seeing as we have switched from Blender where Z-axis is up to Granny where Y-axis is up. However, this is fine as the converted animations will correct the rotation.
Why do the BR2 Overwrite? Well, if you're lucky and your model only uses a single mesh then you may get clean meshes when you import from FBX, but if you are unlucky or your model contains multiple meshes then the mesh data will almost certainly be corrupted. The BR2 overwrite is reliable for mesh data so you will get clean meshes even if your model contains many different meshes.


10. To complete our model .gr2 we only need to add a Material under the Edit Model tab, assign the Material to our mesh and assign textures. For the BaseTextureMap assign the vanilla lion.dds and for the SREFMap I've assigned a 4x4 pixel black square DDS that I made in Paint.NET. The SREFMap is the specular layer and controls how shiny and reflective parts of the model look. This is useful for metallic units but we want our Lion to be completely unshiny.


B. Converting the animations from .kf to .gr2
11. The step for converting each animation is as follows:
a) In Blender select File > New to clear the session.
b) Load the lion_blend_clean.nif together with the animation .kf file you want to convert. It makes sense to start with the Idle position lion_md_idle.kf.

Your import settings should look like this - don't worry if your Scale Correction is different:

c) Make sure the model and animation have properly loaded by quickly checking the 3D window then export to FBX format with the following settings:

The "Animation Rotation Fix - Rotate Y -90" option inserts an extra rotation key at the start of the animation for the skeleton root bone - in our case the bone "MD". This has the effect of rotating the animation 'back' 90 degrees and will mean that our finished unit appears upright in the game.
Give the FBX the name of the animation in question e.g. lion_idle.fbx.
Note: The Animation Rotation Fix will actually update the animation in your Blender session prior to exporting, but you can use Ctrl-Z to undo this after the export is done.
d) Click Open FBX in Nexus Buddy 2 and open the animation file.
e) Click Save Animation and save the animation as a .gr2 file.

These steps, (a) to (e) should be repeated for each animation file you need to convert. The only thing that will change each time is the source .kf file.
To get a basic set of animations for the Lion I repeated these steps for:
lion_md_idle.kf
lion_md_run.kf
lion_md_fidget.kf
lion_md_fortifya.kf
lion_md_fortifya_idle.kf
lion_md_strikea.kf
lion_md_strikeb.kf
lion_md_diea.kf
lion_md_diea_fade.kf
lion_md_hurta.kf
You could convert more of the reusable animations if you want. For example, there are two Die animations for most units A and B - I have only converted the A one here.

If we want we can test all our convert animations at once by opening our model .gr2 in GrannyViewer then selecting all the animation .gr2s and dragging and dropping them into GrannyViewer. Despite the fact that the unanimated model is face down the animations should be in the correct upright position.

C. Create FXSXML and test in Nexus 3D Viewer
12. Now that we've created all our .gr2 files we can create an FXSXML file and quickly test the model in Nexus 3D Viewer. After that it is a simple matter to create a mod and test our conversion in Civilization 5.
Looking at an .FXSXML file for an existing unit we can see the mappings between animation .gr2 files and individual event codes:
As far as I know there isn't a comprehensive list of Civ 5 animation event codes anywhere, but it should be fairly easy to work out looking at the vanilla files.
For our Lion conversion we have much fewer animations than this but we can re-use some animations for multiple event codes.
Here is the complete lion.fxsxml I created which you can use as a start point:
This file can simply created in any text editor. Name the file, for example, lion.fxsxml.
I'm not going into all the detail of what can be done with FXSXML and FTSXML files here - mostly because I've not investigated that much myself. If you want to add Lion sounds to the unit or custom effects such as smoke you would need to edit these further.
13. Now we can test out unit in Nexus 3D Viewer to make sure the animation is working correctly there. Our animation will look twisted in Granny Viewer because of the bone roll fix we did in step 7, but provided our animations look good in Nexus 3D Viewer they should be fine in game.
(a) Start up Nexus (make sure you are using the old SDK version otherwise the 3D Viewer won't work)

(b) Open the asset viewer and open the lion.fxsxml file. Click the green box with red arrow icon to open the 3D Viewer.

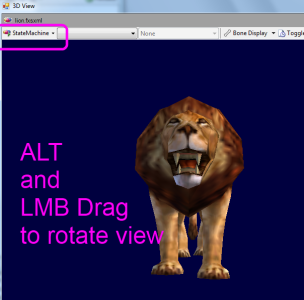
(c) Our Lion will be pointing downwards initially, but switch the top left drop down to State Machine it should appear in Idle pose in the correct orientation. LMB Drag can be used to rotate the view.

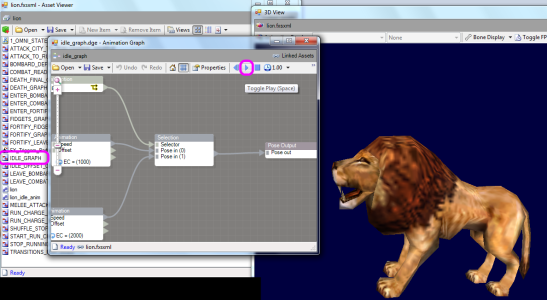
(d) If you double click on IDLE_GRAPH in the Asset Viewer window and then press play in the Animation Graph window you should see the Lion breathing nice and smoothly. The converted Idle animation is working nicely. Since all the animations are making the same way we can be pretty sure that if one animation works OK in the 3D Viewer they should all work.

D. Create a Mod and test in game
Now we are ready to create a simple Mod and test the unit in game.
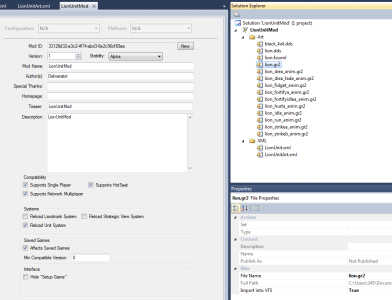
14. In ModBuddy create a new Empty Mod:

15. Copy your model lion.gr2 and all your animation .gr2s, the DDS texture files and your lion.fxsxml file to a folder called Art.
16. Select all the files and set Import to VFS to true for all of them. For more on why this necessary see here.
17. Make Reload Unit System is checked in your mod info.

18. Create a folder called XML. Now we need one XML file for the Unit and one for the Unit Art Defines.
The XML for vanilla units under sid meier's civilization v\Assets\Gameplay\XML\Units in your game install location.
The Art Defines XML for all vanilla units including the two expansions can be found here.
My LionUnit.xml looks like this:
This creates a simply unit that can be built in a single turn to test the graphics.
My LionUnitArt.xml:
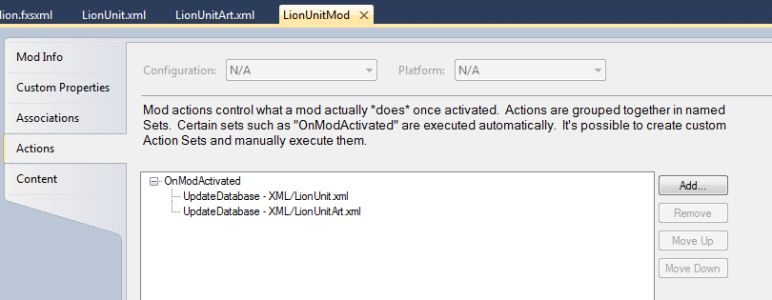
Under Actions in the Mod Info in ModBuddy make sure that your On Mod Activation - Update Database actions for your two XML files.
There are a lot of things that can be altered in the Art Defines to change the appearance of the unit. Existing 2D art assets are used as placeholders since the focus of this tutorial is the 3D assets.

19. Now Build LionUnitMod using the option under the Build menu. This will deploy the Mod so it can be played.
20. Start up Civilization 5. When you select Mods you should see LionUnitMod under the list of available Mods to load. Select the mod and start up a game. I usually start a game with Fractal map and Dual so that it starts quickly. Found a city and the Lion unit should be available to build. One turn later and you should be able to play with your converted unit!


There are two ways of taking a Civ 4 unit graphic and bringing it into Civ 5:
A) Take Civ 4 unit mesh and rig it to a Civ 5 skeleton so that Civ 5 animations are used.
B) Do a full conversion converting the Civ 4 animations so that they work in Civ 4.
A is preferable in most cases because the quality of the resulting unit will be better. The list of event codes for Civ 4 and Civ 5 do not match up perfectly, and the timings are different even where the events match up. Any unit that has animations converted from Civ 4 will effectively have gaps for some Civ 5 events where no equivalent Civ 4 animation exists.
B is worth doing if there is no equivalent unit in Civ 5, for example there is no Lion unit graphic in Civ 5 so if I want to convert the Lion Unit I need to convert the animations from Civ 4.
This tutorial describes the process for B above, fully converting a unit with its animations from Civ 4 to Civ 5.
For option A - Wolfdog has put together a tutorial here and here for Blender 2.7x.
In this tutorial we are going to convert the Lion unit including its animations from Civ 4 to Civ 5.
All the files used during this tutorial are available here for reference.
You can also download the Lion unit made using this process here.
Software Tools Used
Nifskope
Blender 2.49b and the Blender Nif Scripts - follow the download instructions from here
Nexus - Old Version with functioning 3D Viewer
Nexus Buddy 2
FBX Export script and BR2 Export script from Blender Scripts for Civ 5
PakBuild (http://www.civfanatics.net/downloads/civ4/utility/PakBuild.zip) to unpack any Civ 4 art you might want to convert (a lot of big mods pack their art too)
Steps:
A. Converting our Model from .nif to .gr2
1. First copy the files from the vanilla Civ 4 Lion unit directory to a working directory.
2. Next import lion.nif into Blender with the following settings. The Scale Correction value should be set so that the imported model is an equivalent size to the vanilla Civ V models if you want attached visual effects to be properly scaled. For more on this see the third post.
Send Bones to Bind Position should be de-selected and Apply Skin Deformation should be selected. This is to ensure that the mesh and skeleton are in the same positions in Blender as there are in the source NIF.
3. If we use Shift-Numpad-3 to view the Lion side-on and compare with the side view of lion.nif in Nifskope we should see the bones and mesh are in the same positions relative to each other. This is a good thing to check if we want the conversion of animations to work properly.
4. Now right click to select the skeleton in the 3D View. Now press Ctrl-A and select Scale and Rotation to ObData. Next right click the mesh and repeat Ctrl-A > Scale and Rotation to ObData. This ensures that any scale or rotation transformations are written into the mesh and skeleton data.
5. With the mesh still selected, right click the skeleton to select it. Then press Ctrl-P > Make Parent To and select Armature then Don't Create Groups. This ensures the Lion mesh is parented to the skeleton in the right way.
6. Export the updated Lion as a NIF - I used the name lion_blend_clean.nif with the following settings:
You can now check that the exported NIF file looks OK in Nifskope. This is the NIF we will use when converting our animations.
7. Now save your Blender session as a .blend file. This can be used as a template for rigging other meshes to the Lion's animations if we wish in the future.
8. Export the model to both FBX and BR2 formats. The FBX file will provide the skeleton for our finished unit, while the BR2 will provide the mesh. This is done because the FBX into BR2 randomly corrupts mesh data whereas the BR2 mesh import is reliable.
The FBX settings should be as shown:
I used the predictable filenames lion.fbx and lion.br2.
9. Open lion.fbx that we just exported in Nexus Buddy 2. Now under the Advanced tab pick Overwrite Meshes from BR2 and select lion.br2. Once the overwrite is complete you can click view to view the .gr2 file in Granny Viewer. The Lion is rotated forward by 90 degrees about the X-axis, seeing as we have switched from Blender where Z-axis is up to Granny where Y-axis is up. However, this is fine as the converted animations will correct the rotation.
Why do the BR2 Overwrite? Well, if you're lucky and your model only uses a single mesh then you may get clean meshes when you import from FBX, but if you are unlucky or your model contains multiple meshes then the mesh data will almost certainly be corrupted. The BR2 overwrite is reliable for mesh data so you will get clean meshes even if your model contains many different meshes.
10. To complete our model .gr2 we only need to add a Material under the Edit Model tab, assign the Material to our mesh and assign textures. For the BaseTextureMap assign the vanilla lion.dds and for the SREFMap I've assigned a 4x4 pixel black square DDS that I made in Paint.NET. The SREFMap is the specular layer and controls how shiny and reflective parts of the model look. This is useful for metallic units but we want our Lion to be completely unshiny.
B. Converting the animations from .kf to .gr2
11. The step for converting each animation is as follows:
a) In Blender select File > New to clear the session.
b) Load the lion_blend_clean.nif together with the animation .kf file you want to convert. It makes sense to start with the Idle position lion_md_idle.kf.
Your import settings should look like this - don't worry if your Scale Correction is different:
c) Make sure the model and animation have properly loaded by quickly checking the 3D window then export to FBX format with the following settings:
The "Animation Rotation Fix - Rotate Y -90" option inserts an extra rotation key at the start of the animation for the skeleton root bone - in our case the bone "MD". This has the effect of rotating the animation 'back' 90 degrees and will mean that our finished unit appears upright in the game.
Give the FBX the name of the animation in question e.g. lion_idle.fbx.
Note: The Animation Rotation Fix will actually update the animation in your Blender session prior to exporting, but you can use Ctrl-Z to undo this after the export is done.
d) Click Open FBX in Nexus Buddy 2 and open the animation file.
e) Click Save Animation and save the animation as a .gr2 file.
These steps, (a) to (e) should be repeated for each animation file you need to convert. The only thing that will change each time is the source .kf file.
To get a basic set of animations for the Lion I repeated these steps for:
lion_md_idle.kf
lion_md_run.kf
lion_md_fidget.kf
lion_md_fortifya.kf
lion_md_fortifya_idle.kf
lion_md_strikea.kf
lion_md_strikeb.kf
lion_md_diea.kf
lion_md_diea_fade.kf
lion_md_hurta.kf
You could convert more of the reusable animations if you want. For example, there are two Die animations for most units A and B - I have only converted the A one here.
If we want we can test all our convert animations at once by opening our model .gr2 in GrannyViewer then selecting all the animation .gr2s and dragging and dropping them into GrannyViewer. Despite the fact that the unanimated model is face down the animations should be in the correct upright position.
C. Create FXSXML and test in Nexus 3D Viewer
12. Now that we've created all our .gr2 files we can create an FXSXML file and quickly test the model in Nexus 3D Viewer. After that it is a simple matter to create a mod and test our conversion in Civilization 5.
Looking at an .FXSXML file for an existing unit we can see the mappings between animation .gr2 files and individual event codes:
Code:
<Animation file="Barbarian_EURO_Alpha_IdleA.gr2" ec="1000"/>
<Animation file="Barbarian_EURO_Alpha_FidgetA.gr2" ec="1040"/>
<Animation file="Barbarian_EURO_Alpha_IdleA_Trans_IdleB.gr2" ec="1020"/>
<Animation file="Barbarian_EURO_Alpha_IdleB.gr2" ec="2000"/>
<Animation file="Barbarian_EURO_Alpha_FidgetB.gr2" ec="2040"/>
<Animation file="Barbarian_EURO_Alpha_IdleB_Trans_IdleA.gr2" ec="2020"/>
<Animation file="Barbarian_EURO_Alpha_Fortify.gr2" ec="1500"/>
<Animation file="Barbarian_EURO_Alpha_Fortify_Idle.gr2" ec="1520"/>
<Animation file="Barbarian_EURO_Alpha_Fortify_Idle_Fidget.gr2" ec="1540"/>
<Animation file="Barbarian_EURO_Alpha_Fortify_Idle_Trans_Combat_Ready_Idle.gr2" ec="1560"/>
<Animation file="Barbarian_EURO_Alpha_Fortify_Idle_Trans_IdleA.gr2" ec="1580"/>
<Animation file="Barbarian_EURO_Alpha_Combat_Ready.gr2" ec="1600"/>
<Animation file="Barbarian_EURO_Alpha_Shuffle.gr2" ec="1450"/>
<Animation file="Barbarian_EURO_Alpha_Combat_Ready_Idle.gr2" ec="1620"/>
<Animation file="Barbarian_EURO_Alpha_Combat_Ready_Idle_Trans_IdleA.gr2" ec="1640"/>
<Animation file="Barbarian_EURO_Alpha_Run.gr2" ec="1400"/>
<Animation file="Barbarian_EURO_Alpha_Stop_Run.gr2" ec="1440"/>
<Animation file="Barbarian_EURO_Alpha_Stop_Run_IdleB.gr2" ec="2440"/>
<Animation file="Barbarian_EURO_Alpha_Charge_Run.gr2" ec="1120"/>
<Animation file="Barbarian_EURO_Alpha_Charge_Attack.gr2" ec="1140"/>
<Animation file="Barbarian_EURO_Alpha_AttackA.gr2" ec="1100"/>
<Animation file="Barbarian_EURO_Alpha_AttackB.gr2" ec="2100"/>
<Animation file="Barbarian_EURO_Alpha_Attack_City.gr2" ec="1160, 1180"/>
<Animation file="Barbarian_EURO_Alpha_Victory.gr2" ec="1800"/>
<Animation file="Barbarian_EURO_Alpha_Bombard_Defense.gr2" ec="1280"/>
<Animation file="Barbarian_EURO_Alpha_Bombard_Defense_Idle.gr2" ec="1285"/>
<Animation file="Barbarian_EURO_Alpha_Bombard_Defense_Idle_Trans_IdleA.gr2" ec="1290"/>
<Animation file="Barbarian_EURO_Alpha_DeathA.gr2" ec="1200"/>
<Animation file="Barbarian_EURO_Alpha_DeathA_Idle.gr2" ec="1220"/>
<Animation file="Barbarian_EURO_Alpha_DeathB.gr2" ec="2200"/>
<Animation file="Barbarian_EURO_Alpha_DeathB_Idle.gr2" ec="2220"/>
As far as I know there isn't a comprehensive list of Civ 5 animation event codes anywhere, but it should be fairly easy to work out looking at the vanilla files.
For our Lion conversion we have much fewer animations than this but we can re-use some animations for multiple event codes.
Here is the complete lion.fxsxml I created which you can use as a start point:
Code:
<Asset>
<Mesh file="lion.gr2"/>
<Animation file="lion_idle_anim.gr2" ec="1000, 1020, 1450, 1800, 2000, 2020, 1440, 2440" />
<Animation file="lion_run_anim.gr2" ec="1120, 1140, 1400" />
<Animation file="lion_fidget_anim.gr2" ec="1040, 2040" />
<Animation file="lion_fortifya_anim.gr2" ec="1500" />
<Animation file="lion_fortifyidlea_anim.gr2" ec="1520, 1540, 1560, 1580, 1600, 1620, 1640, 1285, 1290" />
<Animation file="lion_strikea_anim.gr2" ec="1100, 1160, 1180" />
<Animation file="lion_strikeb_anim.gr2" ec="2100" />
<Animation file="lion_diea_anim.gr2" ec="1200, 2200" />
<Animation file="lion_diea_fade_anim.gr2" ec="1220, 2220" />
<Animation file="lion_hurta_anim.gr2" ec="1280" />
<AnimGraph file="SHUFFLE_STOP_GRAPH.dge"/>
<AnimGraph file="START_RUN_CHARGE_SHUFFLE.dge"/>
<AnimGraph file="ATTACK_CITY_TO_RUN_CHARGE_SHUFFLE.dge"/>
<AnimGraph file="ATTACK_TO_RUN_CHARGE_SHUFFLE.dge"/>
<AnimGraph file="RUN_CHARGE_SHUFFLE_LOOP.dge"/>
<StateMachine file="1_OMNI_STATE_01.fsmxml"/>
<AnimGraph file="RUN_CHARGE_SHUFFLE_TO_SHUFFLE_RUN_CHARGE.dge"/>
<AnimGraph file="MELEE_ATTACKS.dge"/>
<AnimGraph file="FIDGETS_GRAPH.dge"/>
<AnimGraph file="IDLE_GRAPH.dge"/>
<AnimGraph file="STOP_RUNNING.dge"/>
<AnimGraph file="TRANSITIONS_FOR_IDLES.dge"/>
<AnimGraph file="FORTIFY_GRAPH.dge"/>
<AnimGraph file="COMBAT_READY_GRAPH.dge"/>
<AnimGraph file="FORTIFY_LEAVE_GRAPH.dge"/>
<AnimGraph file="ENTER_COMBAT_READY_GRAPH.dge"/>
<AnimGraph file="LEAVE_COMBAT_READY.dge"/>
<AnimGraph file="DEATH_GRAPH.dge"/>
<AnimGraph file="ENTER_BOMBARD_DEFEND_GRAPH.dge"/>
<AnimGraph file="BOMBARD_DEFEND_LOOP_GRAPH.dge"/>
<AnimGraph file="DEATH_FINAL_GRAPH.dge"/>
<AnimGraph file="LEAVE_BOMBARD_DEFEND_TRANS_IDLE_A_GRAPH.dge"/>
<AnimGraph file="ENTER_FORTIFY.dge"/>
<AnimGraph file="FORTIFY_FIDGET_GRAPH.dge"/>
<AnimGraph file="IDLE_OFFSET_CONTINUE_TRUE_GRAPH.dge"/>
<TimedTrigger file="FX_Triggers_Barbarian_EURO.ftsxml"/>
</Asset>
This file can simply created in any text editor. Name the file, for example, lion.fxsxml.
I'm not going into all the detail of what can be done with FXSXML and FTSXML files here - mostly because I've not investigated that much myself. If you want to add Lion sounds to the unit or custom effects such as smoke you would need to edit these further.
13. Now we can test out unit in Nexus 3D Viewer to make sure the animation is working correctly there. Our animation will look twisted in Granny Viewer because of the bone roll fix we did in step 7, but provided our animations look good in Nexus 3D Viewer they should be fine in game.
(a) Start up Nexus (make sure you are using the old SDK version otherwise the 3D Viewer won't work)
(b) Open the asset viewer and open the lion.fxsxml file. Click the green box with red arrow icon to open the 3D Viewer.
(c) Our Lion will be pointing downwards initially, but switch the top left drop down to State Machine it should appear in Idle pose in the correct orientation. LMB Drag can be used to rotate the view.
(d) If you double click on IDLE_GRAPH in the Asset Viewer window and then press play in the Animation Graph window you should see the Lion breathing nice and smoothly. The converted Idle animation is working nicely. Since all the animations are making the same way we can be pretty sure that if one animation works OK in the 3D Viewer they should all work.
D. Create a Mod and test in game
Now we are ready to create a simple Mod and test the unit in game.
14. In ModBuddy create a new Empty Mod:
15. Copy your model lion.gr2 and all your animation .gr2s, the DDS texture files and your lion.fxsxml file to a folder called Art.
16. Select all the files and set Import to VFS to true for all of them. For more on why this necessary see here.
17. Make Reload Unit System is checked in your mod info.
18. Create a folder called XML. Now we need one XML file for the Unit and one for the Unit Art Defines.
The XML for vanilla units under sid meier's civilization v\Assets\Gameplay\XML\Units in your game install location.
The Art Defines XML for all vanilla units including the two expansions can be found here.
My LionUnit.xml looks like this:
Spoiler :
Code:
<?xml version="1.0" encoding="utf-8"?>
<GameData>
    <UnitClasses>
        <Row>
            <Type>UNITCLASS_TEST_UNIT</Type>
            <Description>Test Unit</Description>
            <DefaultUnit>UNIT_TEST_UNIT</DefaultUnit>
        </Row>
    </UnitClasses>
    <Units>
        <Row>
            <Class>UNITCLASS_TEST_UNIT</Class>
            <Type>UNIT_TEST_UNIT</Type>
            <Combat>40</Combat>
            <Cost>1</Cost>
            <Moves>50</Moves>
            <CombatClass>UNITCOMBAT_MELEE</CombatClass>
            <Domain>DOMAIN_LAND</Domain>
            <DefaultUnitAI>UNITAI_ATTACK</DefaultUnitAI>
            <Description>Lion</Description>
            <Civilopedia>NONE</Civilopedia>
            <Strategy>NONE</Strategy>
            <Help>NONE</Help>
            <MilitarySupport>true</MilitarySupport>
            <MilitaryProduction>true</MilitaryProduction>
            <Pillage>true</Pillage>
            <ObsoleteTech>NONE</ObsoleteTech>
            <GoodyHutUpgradeUnitClass>UNITCLASS_SPEARMAN</GoodyHutUpgradeUnitClass>
            <AdvancedStartCost>10</AdvancedStartCost>
            <XPValueAttack>3</XPValueAttack>
            <XPValueDefense>3</XPValueDefense>
            <Conscription>1</Conscription>
            <UnitArtInfo>ART_DEF_UNIT_LION</UnitArtInfo>
            <IconAtlas>KAMEHAMEHA_UNIT_ATLAS</IconAtlas>
            <UnitFlagAtlas>KAMEHAMEHA_UNIT_FLAG_ATLAS</UnitFlagAtlas>
            <UnitFlagIconOffset>0</UnitFlagIconOffset>
            <PortraitIndex>0</PortraitIndex>
        </Row>
    </Units>
</GameData>
This creates a simply unit that can be built in a single turn to test the graphics.
My LionUnitArt.xml:
Spoiler :
Code:
<?xml version="1.0" encoding="utf-8"?>
<GameData>
    <ArtDefine_UnitInfos>
        <Row>
            <Type>ART_DEF_UNIT_LION</Type>
            <DamageStates>1</DamageStates>
            <Formation>Barbarian</Formation>
        </Row>
    </ArtDefine_UnitInfos>
    <ArtDefine_UnitInfoMemberInfos>
        <Row>
            <UnitInfoType>ART_DEF_UNIT_LION</UnitInfoType>
            <UnitMemberInfoType>ART_DEF_UNIT_MEMBER_LION</UnitMemberInfoType>
            <NumMembers>7</NumMembers>
        </Row>
    </ArtDefine_UnitInfoMemberInfos>
    <ArtDefine_UnitMemberInfos>
        <Row>
            <Type>ART_DEF_UNIT_MEMBER_LION</Type>
            <Scale>1.9</Scale>
            <Model>lion.fxsxml</Model>
            <MaterialTypeTag>CLOTH</MaterialTypeTag>
            <MaterialTypeSoundOverrideTag>FLESH</MaterialTypeSoundOverrideTag>
        </Row>
    </ArtDefine_UnitMemberInfos>
    <ArtDefine_UnitMemberCombats>
        <Row>
            <UnitMemberType>ART_DEF_UNIT_MEMBER_LION</UnitMemberType>
            <EnableActions>Idle Attack RunCharge AttackCity Bombard Death BombardDefend Run Fortify CombatReady Walk AttackCharge</EnableActions>
            <ShortMoveRadius>12.0</ShortMoveRadius>
            <ShortMoveRate>0.349999994039536</ShortMoveRate>
            <TargetHeight>8.0</TargetHeight>
            <HasRefaceAfterCombat>1</HasRefaceAfterCombat>
            <ReformBeforeCombat>1</ReformBeforeCombat>
        </Row>
    </ArtDefine_UnitMemberCombats>
    <ArtDefine_UnitMemberCombatWeapons>
        <Row>
            <UnitMemberType>ART_DEF_UNIT_MEMBER_LION</UnitMemberType>
            <Index>0</Index>
            <SubIndex>0</SubIndex>
            <WeaponTypeTag>METAL</WeaponTypeTag>
            <WeaponTypeSoundOverrideTag>SPEAR</WeaponTypeSoundOverrideTag>
        </Row>
        <Row>
            <UnitMemberType>ART_DEF_UNIT_MEMBER_LION</UnitMemberType>
            <Index>1</Index>
            <SubIndex>0</SubIndex>
            <VisKillStrengthMin>10.0</VisKillStrengthMin>
            <VisKillStrengthMax>20.0</VisKillStrengthMax>
            <WeaponTypeTag>FLAMING_ARROW</WeaponTypeTag>
            <MissTargetSlopRadius>10.0</MissTargetSlopRadius>
        </Row>
    </ArtDefine_UnitMemberCombatWeapons>
    <ArtDefine_StrategicView>
        <Row>
            <StrategicViewType>ART_DEF_UNIT_LION</StrategicViewType>
            <TileType>Unit</TileType>
            <Asset>SV_Spearman.dds</Asset>
        </Row>
    </ArtDefine_StrategicView>
</GameData>
Under Actions in the Mod Info in ModBuddy make sure that your On Mod Activation - Update Database actions for your two XML files.
There are a lot of things that can be altered in the Art Defines to change the appearance of the unit. Existing 2D art assets are used as placeholders since the focus of this tutorial is the 3D assets.
19. Now Build LionUnitMod using the option under the Build menu. This will deploy the Mod so it can be played.
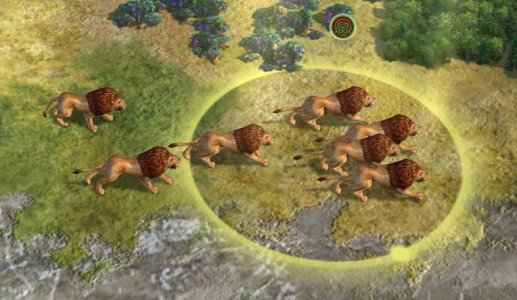
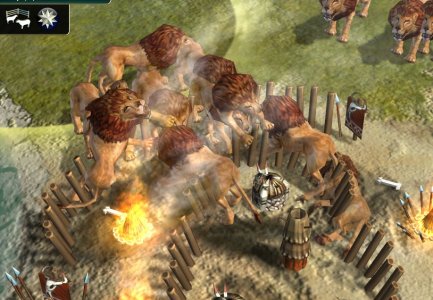
20. Start up Civilization 5. When you select Mods you should see LionUnitMod under the list of available Mods to load. Select the mod and start up a game. I usually start a game with Fractal map and Dual so that it starts quickly. Found a city and the Lion unit should be available to build. One turn later and you should be able to play with your converted unit!
Last edited:


")