tom2050
Deity
- Joined
- Oct 12, 2005
- Messages
- 5,516
Tuturial: Step by Step recolouring of a unit with Photoshop
BEWARE! LONG POST!
This shows how to recolour a unit that has NO CIV COLORS, and requires no seperate parts of the unit to be colored differently. This type of recolour is extremely easy to do, and requires absolutely NO MESSING AROUND WITH PALETTE COLORS OR RE-ADDING COLORS TO THE PALETTE. It's all automated for ease-of-use.
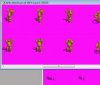
This example is of embryodead's Earth Elemental.
It takes me 15 mins at most to do a recolour of this type of unit from scratch (the whole unit, all flc's). once you get the hang of it, you can apply the exact same method to any unit of this type (NO CIV COLORS, recolour of the whole unit).
PROGRAMS NEEDED:
Flicster Version 1.0.1 (build 18)
A graphics editor such as Photoshop, GIMP, JASC, etc. This tuturial is for Photoshop, I may come back and add in information for other graphics editors.
TilesetPal 1.1 - used for Palette Mergers (see below)
------
TilesetPal is extremely useful, no more going back to the stupid palette and adding in dumb colors 1 by 1, which is so boring, it makes one not even want to think about thinking about doing a recolour. With this, you can easily copy and paste palette colors in any way you choose with a few clicks. Note: this program is not required, but highly recommended.
------------------------------------------------------------
For ease of keeping things organized, I will show exactly what I do step by step.
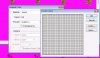
Open up your graphics program, and Flicster. Open up your EarthElemental unit folder (which contains the flc files), the PCX files are contained in a seperate file, you can copy and paste those into the EarthElemental folder.
To keep things organized, I make a new folder in the EarthElemental folder for each flc as such:

Open up each FLC in the EarthElemental folder and export it to it's appropriate folder. So export Earth_AttackA.flc to the EarthElemental/Earth_AttackA folder. Hit the Export button and you are done.

When it asks to Open a New FXM file, just hit NO. You can also close the FLC Info windows after you export them.
Go back to your EarthElemental folder, and open up the Earth_AttackA folder, you should have these files.

Open up the Earth_AttackA.pcx with your graphics editor.
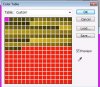
Open up the Palette/Color Table (in Photoshop it is Image -> Mode -> Color Table).
NOTE: DO NOT SAVE THIS IMAGE UNDER THE SAME NAME AFTER YOU HAVE MODIFIED IT. You need to use the original image later.
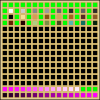
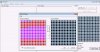
The first thing we are going to do is get rid of all colors except for the Shadow Colors of the unit. Here is the original Color Table:

As you can see, the shadow colors are in the top row (they can take up the first 2 rows)
. In Photoshop you can click and drag to get a selection of colors in table to change them all at once. Change all the unit colors (the brown colors) to the Magnenta Color (FF00FF), DO NOT CHANGE THE MAGNENTA COLORS in the top row!

The Color Table will look like this once you are done, and only the shadows will be left of the unit.

NOW, DO NOT SAVE THIS IMAGE AS Earth_AttackA.pcx... but do a File -> SAVE AS, and select a name such as Earth_AttackAShadows.pcx.
Now, we need to select all pixels on the screen EXCEPT for the Magnenta Pixels. In Photoshop, here is how you do this (other programs may vary).
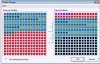
GO to the Select menu, then Color Range. It brings up this screen.

Make sure the selections are as shown. Select: Sampled Colors, Fuzziness: 0. The Eyedropper Tool should be selected, so point it at a Magnenta portion of the image and click. Then pick the 'Add to Sample'
  and point it at a Magnenta portion of the image and click.
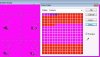
The selection will include all Magnenta pixels of the image, but no others (the Shadows). Go to the Select menu, and right-click Inverse. Now ONLY the shadow colors are selected. Leave this screen exactly as it is for now, we will use it later. You can save this again.

Now, back in the folder EarthElemental/Earth_AttackA, open up the Earth_AttackA.pcx file into your graphics program. This will open up the original image, since the other is saved as Earth_AttackAShadows.pcx.
Go to Image -> Mode -> Color Table to open up the Color Palette again. This time (similar to how we did before), Change all the Shadow colors (the magnenta colors) to the Magnenta Color (FF00FF).

This gets rid of all the shadows and leaves only the Unit colors (as shown below).

Now, same as before, go to Select -> Color Range, and with the Eyedropper Tool select a Magnenta portion of the image, then with the 'Add To Sample' tool select a Magnenta portion of the image. Go to Select -> Inverse (to inverse the selection); and now we have only the unit selected as shown below.

Now, we need to change the Image from an Indexed image to a RGB image, so go to Image -> Mode -> RGB Color; and it does it for us. Now we can modify the unit's colors to our heart's content.
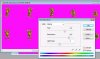
The easier and quickest way to do so is by adjusting Brightness, Contrast, Hue, and Saturation. In Photoshop, these are located in Image -> Adjustments -> Hue/Saturation; and Image -> Adjustments -> Brightness/Contrast.
Let's do this then... You can play around with the sliders and get whatever color you wish, let's make a Golden/Yellow Earth Elemental. Adobe has a Colorize option, which is very useful, other programs may have options similar to this. From the Hue/Saturation menu, I have set the Hue to +30, the Saturation to +60, and the Lightness to -7. And I come up with this.

We are halfway done!
Now to quickly create the correct Color Table (which we can use for all the rest of the Flc's).
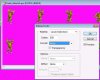
We need to change our image back to an Indexed Image, so go to Image -> Mode -> Indexed Color. You will see this screen, make sure Transparency is not selected, and nevermind the Palette selection.

If something is selected under Forced, change it to 'None', then change it to 'Custom'. This clears out any pre-loaded palettes that may be in there. Simply hit the 'OK' button, and 'OK' out of the Indexed Color dialog box.

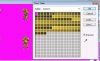
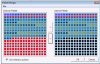
The image is now indexed with the colors that were in the image, in my case, there were 116 colors, yours might be different. We need to save this Palette now.. go to Image -> Mode -> Color Table again; and now we see the 116 colors that are in the index.

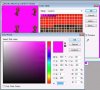
For all the other 'empty' boxes with no colors, select them all so we can fill them in with a color (this is needed so TilesetPal has no problems reading them). Use a color that is not used in the image, we will use Red (FF0000). So click the first empty box and drag all the way to the last box (selects them all), then enter FF0000 hex color code into the Color Picker box.


Save this Palette, click Save and save it as UnitPalette.act (Adobe Color Table file) in the EarthElemental Folder (other programs may use .pal files, which is fine). You can click 'Ok' out of the Color Table Dialog Box.
Now, go back to the Earth_AttackAShadow.pcx that you should still have up in your graphics program (we never closed it). Go to Image -> Mode -> Color Table... and Save this palette as ShadowPalette.act in the EarthElemental Folder. PHEW!
Once you get the hang of it, you can whoop all this out in a few minutes")
Now open TilesetPal. This program lets you easily merge palettes together in any way, shape, or form. This is highly recommended for Units with Civ-colors, and is also easier for non-Civ-color units, but not necessary (you can always put the colors into the Palette Box in your graphics program).
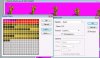
Click 'Palette Merger' or from the top menu, Palette -> Merger. Go to File -> Load Palette, and select the Palette ShadowPalette.act and open it.

Select the first 2 rows on the left side (External Palette) and click the right-arrow (->) located in the center of the Palette Merger screen. This brings those colors to the left side (Internal Palette).

Now go to File -> Load Palette, and select the Palette UnitPalette.act and open it. Now select all the unit colors as shown below in the External Palette. Uncheck the 'Link selected postion' box near the bottom. On the Internal Palette, start at the third row and select all the boxes until the unit colors on the left (External Palette) are selected.

Click the right-arrow (->) located in the center of the Palette Merger screen. This brings those colors to the left side (Internal Palette).

Now recheck 'Link selected position' box near the bottom. On the right side (Internal Palette) select all the cells you just copied over (the first 2 shadow colors, and the brownish unit colors), and hit the left arrow (<-) located in the center of the Palette Merger screen. This brings the colors over the External Palette... Now your Palette is complete!

Select File -> Save Palette and save the palette in the appropriate type. For Adobe, I saved as an ACT file in the EarthElemental folder and called it FinalPalette.act.
NOTE! Rarely, this program may not correctly save the colors correctly on the very bottom row (where some of the civ colors are located). If this happens, save as a BMP file, then in your graphics program, bring this BMP up and save the Palette from there to get it correctly.
Now we have a perfect Palette file to use for all of the animation files.
Go back to your graphics program (Photoshop).
Go back to the other image you should still have up, the Earth_AttackAShadow.pcx (with the Shadows selected). Hit Ctrl-C or Edit -> Copy to copy the shadow images. Then go back to the Earth_AttackA.pcx and Ctrl-V or Edit -> Paste to paste the shadows into the unit image.
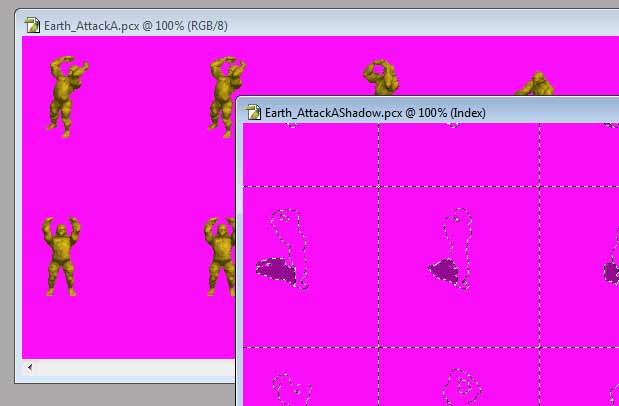

The Shadows are pasted back into the unit, and now we have a Yellow'ish Golden Earth Elemental! Yah!


We need to change our image back to an Indexed Image, so go to Image -> Mode -> Indexed Color. Photoshop may ask to Flatten Layers, select 'OK'. You will see this screen, make sure Transparency is not selected, and nevermind the Palette selection. Under the Forced selection, select None (to make sure no previous palette is loaded), then select 'Custom'.
In the Palette Forced Colors Box that comes up, all 256 spots should be empty. Click 'Load' and select the FinalPalette.act we just made.

And our Palette is there! Click 'Ok' and 'Ok' again to exit the Indexed Color Dialog Box.
Save the Earth_AttackA.pcx in your graphics program.
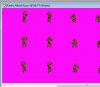
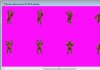
Now with Flicster, open the Earth_AttackA_StoryBoard.FXM that is in the EarthElemental/Earth_AttackA folder. ALWAYS CHECK the animation on the view animation tab, including with civ colors (N/A in this case) and especially in the Alpha Blend mode. If it does not show up right, then there is a palette problem which will need to be fixed.
This unit should be perfect though! And look something like this:

Go ahead to the Export tab, and hit export. The NEW recoloured FLC is now ready and in the Earth_AttackA folder.
1 FLC down, 5 to go!
Now for the rest of the FLC's, follow the same instructions, but the only difference, is that you can load the FinalPalette.act into the each pcx instead of creating a new palette (no need for new palettes, since the colors are mostly the same). Once you are done, Bravo!
I wrote this to be as detailed as possible, but it is much easier than it may seem. Once you play around with it, and do several times, you will get the feel for it pretty quickly, and you will be able to bust out a whole unit like this in under 15 minutes.
For units with Civ-Colors, the same pretty much goes, the only thing different to do is to include the bottom 4 rows of the palette in with the Shadows, and merge them over into the FinalPalette into the bottom 4 rows.
Tom
BEWARE! LONG POST!
This shows how to recolour a unit that has NO CIV COLORS, and requires no seperate parts of the unit to be colored differently. This type of recolour is extremely easy to do, and requires absolutely NO MESSING AROUND WITH PALETTE COLORS OR RE-ADDING COLORS TO THE PALETTE. It's all automated for ease-of-use.
This example is of embryodead's Earth Elemental.
It takes me 15 mins at most to do a recolour of this type of unit from scratch (the whole unit, all flc's). once you get the hang of it, you can apply the exact same method to any unit of this type (NO CIV COLORS, recolour of the whole unit).
PROGRAMS NEEDED:
Flicster Version 1.0.1 (build 18)
A graphics editor such as Photoshop, GIMP, JASC, etc. This tuturial is for Photoshop, I may come back and add in information for other graphics editors.
TilesetPal 1.1 - used for Palette Mergers (see below)
------
TilesetPal is extremely useful, no more going back to the stupid palette and adding in dumb colors 1 by 1, which is so boring, it makes one not even want to think about thinking about doing a recolour. With this, you can easily copy and paste palette colors in any way you choose with a few clicks. Note: this program is not required, but highly recommended.
------------------------------------------------------------
For ease of keeping things organized, I will show exactly what I do step by step.
Open up your graphics program, and Flicster. Open up your EarthElemental unit folder (which contains the flc files), the PCX files are contained in a seperate file, you can copy and paste those into the EarthElemental folder.
To keep things organized, I make a new folder in the EarthElemental folder for each flc as such:
Open up each FLC in the EarthElemental folder and export it to it's appropriate folder. So export Earth_AttackA.flc to the EarthElemental/Earth_AttackA folder. Hit the Export button and you are done.
When it asks to Open a New FXM file, just hit NO. You can also close the FLC Info windows after you export them.
Go back to your EarthElemental folder, and open up the Earth_AttackA folder, you should have these files.
Open up the Earth_AttackA.pcx with your graphics editor.
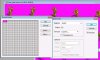
Open up the Palette/Color Table (in Photoshop it is Image -> Mode -> Color Table).
NOTE: DO NOT SAVE THIS IMAGE UNDER THE SAME NAME AFTER YOU HAVE MODIFIED IT. You need to use the original image later.
The first thing we are going to do is get rid of all colors except for the Shadow Colors of the unit. Here is the original Color Table:
As you can see, the shadow colors are in the top row (they can take up the first 2 rows)
. In Photoshop you can click and drag to get a selection of colors in table to change them all at once. Change all the unit colors (the brown colors) to the Magnenta Color (FF00FF), DO NOT CHANGE THE MAGNENTA COLORS in the top row!
The Color Table will look like this once you are done, and only the shadows will be left of the unit.
NOW, DO NOT SAVE THIS IMAGE AS Earth_AttackA.pcx... but do a File -> SAVE AS, and select a name such as Earth_AttackAShadows.pcx.
Now, we need to select all pixels on the screen EXCEPT for the Magnenta Pixels. In Photoshop, here is how you do this (other programs may vary).
GO to the Select menu, then Color Range. It brings up this screen.
Make sure the selections are as shown. Select: Sampled Colors, Fuzziness: 0. The Eyedropper Tool
The selection will include all Magnenta pixels of the image, but no others (the Shadows). Go to the Select menu, and right-click Inverse. Now ONLY the shadow colors are selected. Leave this screen exactly as it is for now, we will use it later. You can save this again.
Now, back in the folder EarthElemental/Earth_AttackA, open up the Earth_AttackA.pcx file into your graphics program. This will open up the original image, since the other is saved as Earth_AttackAShadows.pcx.
Go to Image -> Mode -> Color Table to open up the Color Palette again. This time (similar to how we did before), Change all the Shadow colors (the magnenta colors) to the Magnenta Color (FF00FF).
This gets rid of all the shadows and leaves only the Unit colors (as shown below).
Now, same as before, go to Select -> Color Range, and with the Eyedropper Tool select a Magnenta portion of the image, then with the 'Add To Sample' tool select a Magnenta portion of the image. Go to Select -> Inverse (to inverse the selection); and now we have only the unit selected as shown below.
Now, we need to change the Image from an Indexed image to a RGB image, so go to Image -> Mode -> RGB Color; and it does it for us. Now we can modify the unit's colors to our heart's content.
The easier and quickest way to do so is by adjusting Brightness, Contrast, Hue, and Saturation. In Photoshop, these are located in Image -> Adjustments -> Hue/Saturation; and Image -> Adjustments -> Brightness/Contrast.
Let's do this then... You can play around with the sliders and get whatever color you wish, let's make a Golden/Yellow Earth Elemental. Adobe has a Colorize option, which is very useful, other programs may have options similar to this. From the Hue/Saturation menu, I have set the Hue to +30, the Saturation to +60, and the Lightness to -7. And I come up with this.
We are halfway done!
Now to quickly create the correct Color Table (which we can use for all the rest of the Flc's).
We need to change our image back to an Indexed Image, so go to Image -> Mode -> Indexed Color. You will see this screen, make sure Transparency is not selected, and nevermind the Palette selection.
If something is selected under Forced, change it to 'None', then change it to 'Custom'. This clears out any pre-loaded palettes that may be in there. Simply hit the 'OK' button, and 'OK' out of the Indexed Color dialog box.
The image is now indexed with the colors that were in the image, in my case, there were 116 colors, yours might be different. We need to save this Palette now.. go to Image -> Mode -> Color Table again; and now we see the 116 colors that are in the index.
For all the other 'empty' boxes with no colors, select them all so we can fill them in with a color (this is needed so TilesetPal has no problems reading them). Use a color that is not used in the image, we will use Red (FF0000). So click the first empty box and drag all the way to the last box (selects them all), then enter FF0000 hex color code into the Color Picker box.
Save this Palette, click Save and save it as UnitPalette.act (Adobe Color Table file) in the EarthElemental Folder (other programs may use .pal files, which is fine). You can click 'Ok' out of the Color Table Dialog Box.
Now, go back to the Earth_AttackAShadow.pcx that you should still have up in your graphics program (we never closed it). Go to Image -> Mode -> Color Table... and Save this palette as ShadowPalette.act in the EarthElemental Folder. PHEW!
Once you get the hang of it, you can whoop all this out in a few minutes
Now open TilesetPal. This program lets you easily merge palettes together in any way, shape, or form. This is highly recommended for Units with Civ-colors, and is also easier for non-Civ-color units, but not necessary (you can always put the colors into the Palette Box in your graphics program).
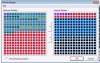
Click 'Palette Merger' or from the top menu, Palette -> Merger. Go to File -> Load Palette, and select the Palette ShadowPalette.act and open it.
Select the first 2 rows on the left side (External Palette) and click the right-arrow (->) located in the center of the Palette Merger screen. This brings those colors to the left side (Internal Palette).
Now go to File -> Load Palette, and select the Palette UnitPalette.act and open it. Now select all the unit colors as shown below in the External Palette. Uncheck the 'Link selected postion' box near the bottom. On the Internal Palette, start at the third row and select all the boxes until the unit colors on the left (External Palette) are selected.
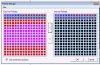
Click the right-arrow (->) located in the center of the Palette Merger screen. This brings those colors to the left side (Internal Palette).
Now recheck 'Link selected position' box near the bottom. On the right side (Internal Palette) select all the cells you just copied over (the first 2 shadow colors, and the brownish unit colors), and hit the left arrow (<-) located in the center of the Palette Merger screen. This brings the colors over the External Palette... Now your Palette is complete!
Select File -> Save Palette and save the palette in the appropriate type. For Adobe, I saved as an ACT file in the EarthElemental folder and called it FinalPalette.act.
NOTE! Rarely, this program may not correctly save the colors correctly on the very bottom row (where some of the civ colors are located). If this happens, save as a BMP file, then in your graphics program, bring this BMP up and save the Palette from there to get it correctly.
Now we have a perfect Palette file to use for all of the animation files.
Go back to your graphics program (Photoshop).
Go back to the other image you should still have up, the Earth_AttackAShadow.pcx (with the Shadows selected). Hit Ctrl-C or Edit -> Copy to copy the shadow images. Then go back to the Earth_AttackA.pcx and Ctrl-V or Edit -> Paste to paste the shadows into the unit image.
The Shadows are pasted back into the unit, and now we have a Yellow'ish Golden Earth Elemental! Yah!
We need to change our image back to an Indexed Image, so go to Image -> Mode -> Indexed Color. Photoshop may ask to Flatten Layers, select 'OK'. You will see this screen, make sure Transparency is not selected, and nevermind the Palette selection. Under the Forced selection, select None (to make sure no previous palette is loaded), then select 'Custom'.
In the Palette Forced Colors Box that comes up, all 256 spots should be empty. Click 'Load' and select the FinalPalette.act we just made.
And our Palette is there! Click 'Ok' and 'Ok' again to exit the Indexed Color Dialog Box.
Save the Earth_AttackA.pcx in your graphics program.
Now with Flicster, open the Earth_AttackA_StoryBoard.FXM that is in the EarthElemental/Earth_AttackA folder. ALWAYS CHECK the animation on the view animation tab, including with civ colors (N/A in this case) and especially in the Alpha Blend mode. If it does not show up right, then there is a palette problem which will need to be fixed.
This unit should be perfect though! And look something like this:
Go ahead to the Export tab, and hit export. The NEW recoloured FLC is now ready and in the Earth_AttackA folder.
1 FLC down, 5 to go!
Now for the rest of the FLC's, follow the same instructions, but the only difference, is that you can load the FinalPalette.act into the each pcx instead of creating a new palette (no need for new palettes, since the colors are mostly the same). Once you are done, Bravo!
I wrote this to be as detailed as possible, but it is much easier than it may seem. Once you play around with it, and do several times, you will get the feel for it pretty quickly, and you will be able to bust out a whole unit like this in under 15 minutes.
For units with Civ-Colors, the same pretty much goes, the only thing different to do is to include the bottom 4 rows of the palette in with the Shadows, and merge them over into the FinalPalette into the bottom 4 rows.
Tom

 ,until the point were TilesetPal was needed for the first time.

 I would like to continue ...
 BURN ,BABY ,BURN !!!


 TOM2050 !!!


")

 The thing with Civ colors is that sometimes units have non-civ colors that use the civ colors (colors other than the ones that change, like browns and the near blacks. For these you would have to add those culprits colors into the 160 unit colors (usually near the end of it, after the rest of the unit's colors are indexed). Because if a palette contains 2 of the same color, it will use the first one instead, and then you get around this problem (mostly).