Looks good DE. Next tech needs to be Mysticism so we have some basic border popping tools (and we want Hunting for the Elephants before we get AH anyways).
The health event basically gives us an excuse to stall our town growth to push out the settler. In fact, we need to do that because we have no other way of controlling growth until the anger disappears. A chop is definitely in the cards. We are short on warriors, so we'll need to send our city defender with the settler while we build the next warrior (hopefully with enough overflow). If there is still anger, best to push out another worker, as we need to get a road out, and there are a ton of forests to be chopped as well.
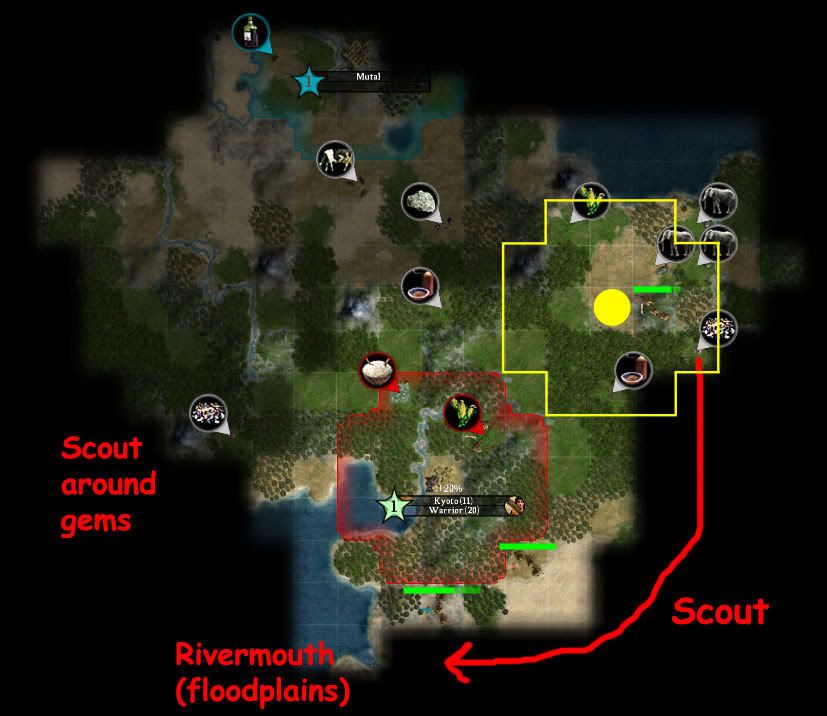
Yellow Dot is live, and we definitely want that town now that copper is in the home row. The hill site loses the corn (bad), and the phants site is one tile off the coast (3 dead tiles), so we want YELLOW DOT.
One criticism of the set DE... The scouting was brutal. You reached the flood plains but didn't scout just past that where we hit the coast. Settling the coastal plains looks strong (sucks up all the floods), but we have no idea of knowing if there is any seafood off the coast to boost that site. We'll have to run back and check.
goblinmarine is up next, so just to quickly run over the plan again.
1. Tech Path is Myst->Hunting->AH to spot horses. Up to you if you want to play that many turns, as I think it's 30ish to AH. Alternative tech to AH is pottery, as they both unlock Writing, but we want to crack some heads... so yeah...
2. Ok, so the builds at Kyoto (and the MM are going to be a bit confusing).
The event anger is at 17 turns left and +2 anger. At 15 turns, it will fade down to +1 anger (it works like the whip), so we can afford to grow by then.
First thing is we need another scout.... not to mention needing guards for the new town. We have 3 pop in Kyoto and for some reason we are working Max food while not needing or wanting it.
Only tile we need to work is the rice tile. Get the two other citizens working the forested plains hill and a forested grass hill (preferably the riverside one so we don't have to micro that citizen later). This stalls growth a bit and gets us a warrior in 3 turns. This is our scout for the west, and we need to send him out there to figure out what's going on. While this is going on, you can tell the worker to mine that hill he is standing on (extra hammer and commerce).
Total yields is 6 hammers into the warrior, and 2 food into the food box.
Next turn, the warrior will be at 14/22 hammers. So we need 8 hammers to finish it. So it will be done if we switch from the grassland hill back to the corn. This also ensures maximum food so we grow as fast as possible to size 4 (more people around while building the settler). You can leave this tile configuration.
After the warrior builds, the town will grow the next turn. It's fairly silly to not let it grow, so we can dial up another warrior to collect the turn's production, or even a barracks (good idea, as we will be fighting a lot).
Once Kyoto hits size 4, get it on a settler and simply work the maximum combination food + hammers to get it done in the fastest possible time. The chop from the mine will help it out.
After the settler is done building, you can revolt to slavery. A big wishlist of items for Kyoto include another worker (to hook up that copper ASAP and get a road back to Kyoto), a barracks, some axes to get our military rating up and scout... etc...
3. Since Tanaka is basically standing around already scouted land, you can send him a bit east to see what we can discover, but bring him back to cover Yellow Dot, as he will be the garrison for that city.


 , 50% of +1
 , 25% of -1 pop (afaik)