• We are currently performing site maintenance, parts of civfanatics are currently offline, but will come back online in the coming days. For more updates please see here.

ALC Game #6: France/Louis

Sisiutil

All Leader Challenger
Joined
Feb 19, 2006
Messages
6,899
Location
Pacific Northwest
All Leaders Challenge Game #6:
France/Louis


LouisSM.jpg

Pre-Game Thread

Round 0: 4000 BC
Round 1: to 2440 BC
Round 2: to 900 BC
Round 3: to 1 AD
Round 4: to 1020 AD
Round 5: to 1520 AD
Round 6: to 1802 AD
Round 7: to 1921 AD
Round 8: to 1954 AD
Post-Mortem

The idea of the All Leaders Challenge is that I'm going to play a game with each of the Civ IV leaders--mostly the less popular ones--that I haven't tried before on my current difficulty level, Prince. With the help of all the posters who participate, I will attempt to make the most of the leader's traits, starting techs, and UU.

Aside from the leader, the other game settings are kept constant, at their defaults, for the sake of comparison. I will post the saved game files, screenshots, and status reports here as the game progresses. Everyone then has a chance to chime in with their strategy ideas, or voice their frustration when I make a mistake. But it's all part of the learning process, right? That's what I keep telling myself...

Everyone is invited to offer opinions and advice, and make your own attempt at playing the same game. But if you do play a "shadow game", I kindly request that you refrain from posting spoilers--i.e. any facts or even hints about the map, opponents, and so on--before I'm there myself. I'm trying to play the game as authentically as possible.

In this ALC game, I'm playing as Louis XIV, leader of France.

Here are the initial game settings:

ALCLouis4000BC01.jpg


And the starting position:

ALCLouis4000BC02.jpg


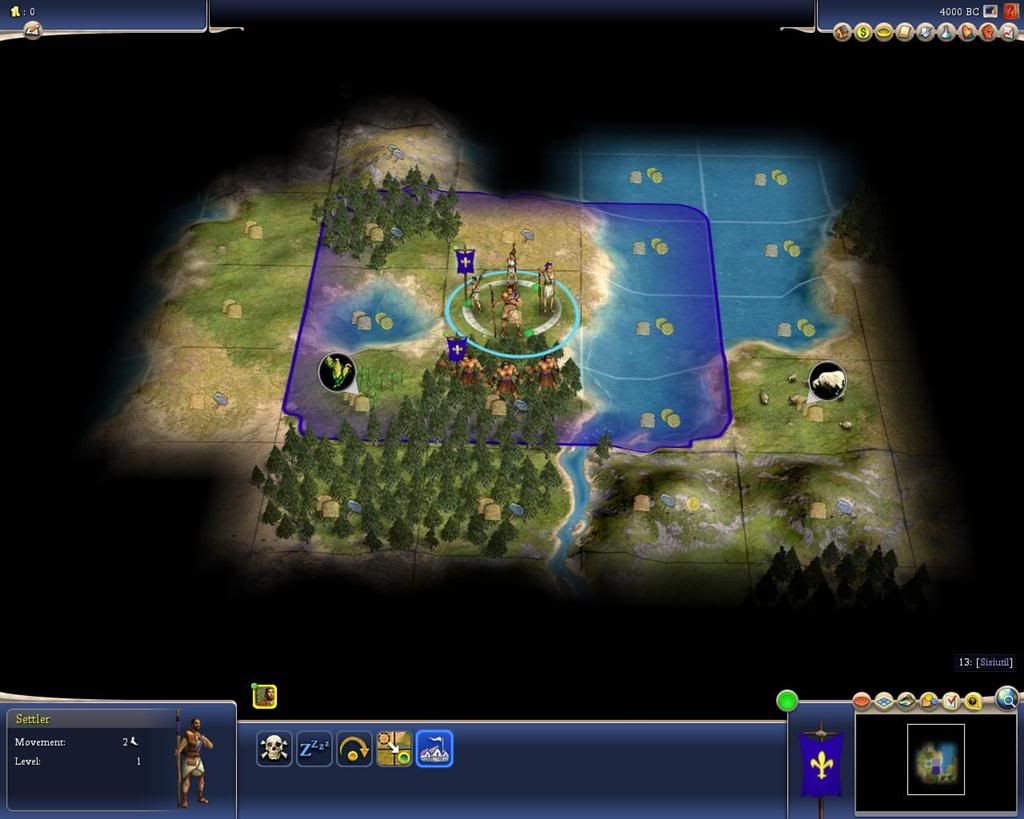
Since Louis starts with Agriculture, I was hoping for a farming resource in the capital's fat cross, and lo and behold, there's corn right there. And sheep too; once I get Animal Husbandry, this bodes well for my plans to expand quickly, since I can churn out settlers and workers with relative ease.

So let me start off the first debate: settle in place or explore and move elsewhere? I'm tempted to move the Settler two tiles due south to get the fresh water health bonus from the river and still keep the two resources that are in sight. There are no visible seafood resources, so I'd prefer to trade water for land tiles. However, there's a desert tile to the west that has me worried; looks like there might me tundra to the south of me too, but it's hard to tell. I can definitely make out tundra at the edge of the fog-shrouded tiles to the north, so I don't want to move in that direction, despite the temptation of the plains hill. I'd say there's either the tip of a peninsula up there, or that's a big freshwater lake to the west.

Seems to me the Warrior should move first, to the south, to reveal more of what will be in the fat cross. Should he go SW, S, or SE? The SE hill would reveal more tiles, but if I'm worried about the desert tile, maybe I should head SW.

Here's the saved game:
 
Sisiutil said:
I'm tempted to move the Settler two tiles due south to get the fresh water health bonus from the river and still keep the two resources that are in sight.

The lake also gives the health bonus - the key is that the plot you are on has access to fresh water (you can determine this by hovering over the plot and looking at the details that appear on the lower left corner of the screen
 
VoiceOfUnreason said:
The lake also gives the health bonus - the key is that the plot you are on has access to fresh water (you can determine this by hovering over the plot and looking at the details that appear on the lower left corner of the screen
DUH! (Smack to the forehead) :rolleyes:

This is why I always do better in the ALCs than on my own. All you nice people remind me of these little details.

Still, it may be worthwhile to trade some water for earth, don't you think? Depending on what the Warrior reveals...
 
If there's tundra to the south of you, then I recommend you settle in place. There's clearly tundra north of you, so if you've got it in both directions, that means you got totally screwed (your capital was generated in the middle of the tundra) and the only reason your fat cross isn't also tundra is because the map generator fixed up your capital. Any move you make is likely to worsen the terrain.

I say move the warrior south or southeast, probably southeast. I'd be inclined to just assume the desert is desert. About the only way it isn't is if it's oasis (nice) or if it's incense. Incense is a nice luxury to pick up, but it's not that spectacular a tile to work. You get great commerce from it but no food, and even the commerce isn't better than what you can eventually get from a nice town.
 
It looks like a tiny bit of tundra to the NW, desert to the SW and forest to the SE. I would use the warrior to scout the hill to the SE before settling.

You probably should settle in place, everything is good within the fat cross.
 
I like the settle in place myself. Get that first warrior-worker-warrior-settler cranking.

For Research, I say beeline Bronze working, then Animal Husbandry for the sheep.

In my first game with Louis for this challenge, I followed the following path:

Mining
Bronze Working
Pottery
Mysticism
Animal Husbandry (resource present)
Masonry (resource present)
Polytheism (for Parthenon)
Priesthood
Writing
CoL
(oracle popped for Metal Casting while researching CoL)

After this, the reccommended Bee-line path went:

Monarchy
Feudalism (helped my eventual axe rush against Alexander and to let Lizzy Know that I wasn't her whipping boy)
Machinery
Guilds
Gunpowder.

With Industrious and Marble, Wonders were very tempting. I did get Stonehenge (Denies it to opponents and that extra culture helped me assimilate the Greek Mainland faster), Oracle (same city as Stone Henge), Parthenon, Collosus, Spiral Minaret and Hagia Sophia.

Warring has suffered, but I still managed to run Alexander off his starting land. I think that Lizzy may be next, but Saladin may be the biggest threat. Cathy is the closest I have to a friend (Yes, that is a treaty in my pocket and I am glad to see you...) in this game.

I think however that I have traded away some of the techs that lead to Gunpowder when maybe I shouldn't have. For the most part, Cathy is the only one that will trade with me, and I think she's trading with Saladin (but she really hates England for some reason).

I'm trying to get three cities producing huge ammounts of culture while getting the rest of the empire into a versatile unit that can roll an economy while having the production to build up the cities (temples enough to give me the Cathedrals I'll need to try for Cultural, Markets etc to slow scientific decline, libraries for science, forges to produce, Courthouses are becoming important now, Granaries for faster growth and whip recovery). Basically, I have been trying to build everything in peace, and be capable of building massive numbers of units in case of another war...
 
are you planning on being aggressive early in this game? if so, i would consider mining-bronze-myst-medit-priest-writing-CoL (oracle)-iron (if no copper)-alphabet (to back-fill techs; target masonry, math, construction, anhusb, pottery)

this build gives you courthouses, which help expansion. i also don't like to research something i feel the ai has if i can help it, so i like to drive to CoL via oracle and then alphabet right away and then use those two techs to backfill the rest. don't attack before you've traded with everyone at least once so that you get the most out of tech trading (unless you have a *really* sweet axerush situation)...
 
futurehermit said:
are you planning on being aggressive early in this game? if so, i would consider mining-bronze-myst-medit-priest-writing-CoL (oracle)-iron (if no copper)-alphabet (to back-fill techs; target masonry, math, construction, anhusb, pottery)

this build gives you courthouses, which help expansion. i also don't like to research something i feel the ai has if i can help it, so i like to drive to CoL via oracle and then alphabet right away and then use those two techs to backfill the rest. don't attack before you've traded with everyone at least once so that you get the most out of tech trading (unless you have a *really* sweet axerush situation)...
I think on Prince and above you have no choice but to expand to a reasonable size through an early war, unless you find yourself on a decent-sized continent by yourself. Which on the 1.61 continents map, ain't gonna happen. So BW is a definite first tech target.

I like the rest of your tech path, though I may research CoL on my own and use the Oracle for Metal Casting this time. Cheap forges and all, y'know. Especially if there's gold, silver, or gems about for the happiness bonus.
 
Judging from the screenshot, it's prety easy to see 2 SE of settler is unarable desert, south of that is a desert-hill or plains-hill, tile to the east of that is most likely plains-hill, and tile to east of that (next to river) is grassland/hill. tile to east of that (across the river) is most likely grassland, perhaps grassland hill, to the east of that is forest, northeast of that is plains hill, then going north plains, then plains, then plains/forest. Judging from the screenshot, i'd give it a 50-50 chance that the river ends right there as opposed to continuing deeper into the continent.

With this assesment, the best course of action to take is to move the warrior SE. If you don't see any cool new recources you want to pick up by moving 2 South, settle in place.
 
Quick side note on diplomatic strategy ... I just finished a diplomatic victory with Caesar where I needed to pull out an unorthodox technique to win.

Everything was going according to plan. All four remaining AI's (I killed one, Genghis killed one) had more or less equal landmass. I had two solid allies in Genghis and Washington, who were in last place and second to last in score. They both despised Asoka, who was #2 and my likely rival. It looked like we would have the required votes, but just to be sure I started farming as soon as I discovered Mass Media, and I gifted Biology to both Genghis and Washington.

Whether it was the Biology gift or the war with Asoka, things went south from there. Genghis took a few cities from Asoka and somehow moved up to #2 in population, though he was still #4 in score.

Lesson #1: Diplomatic votes are based on population. You want your enemy to be #2 in population. Score doesn't matter.

Of course, that can be hard to control, since you don't know the breakdown of who has what population, but it's something to watch out for. In hindsight, I should probably have bribed Genghis to make peace once I saw him starting to have success against Asoka, but the turnaround happened so fast that I'm not sure I could have stopped it.

Anyway, I tried a few votes with Genghis as my rival, and although I was able to close to within less than 2% of the required votes, it didn't look like my farms were going to be able to push me over the top. I carefully watched the vote deficit shrink until it eventually stabilized at 57 for three votes in a row. I needed a new plan.

Suddenly it came to me. From looking at the number of votes that each leader had, it was clear that Victoria was within a fraction of a percent of being my rival. If I could somehow increase her population by just a little bit, I could regain Genghis' votes on my side, and I'd win by a landslide. With me, Genghis, and Washington all voting for me, I'd have over 70% of the vote.

So I gifted Victoria the smallest city she would accept. :mischief: Next vote, she was my rival, all my pals voted for me, and I won easily.

Lesson #2: There are ways to influence who your rival is in the voting.
 
You could check for fresh water to be sure. Last time I checked, you could mouseover to see if a tile is fresh without actually being supposed to know it.
 
Dr Elmer Jiggle said:
How can you tell it's not an oasis?

If it was an Oasis, the surrounding tiles would have Fresh Water access. I haven't checked the save to see that they do not, but the key tile to check is the Grassland Forest 1S of the Corn, as both the Corn and the Plains tile 1W of the Corn have Fresh Water from the lake. Only that single Grassland Forest can reveal if that is a Oasis or not. My guess is that it is not, and that the start is, as indicated, just south of the northern Tundra, and just north of the northern Desert.

Ideally, the map has generated with either a very wet northern Desert band (mostly Plains with mixed Grassland), or with a number of rivers running through for numerous Flood Plains.

I would settle in place and build a Worker first. Research Hunting, followed by Animal Husbandry, then Mining and Writing, then Bronze Working, then Pottery. There should be enough time before your first Settler pops to squeeze Writing in there. The best case scenario is that Animal Husbandry completes as your Worker finishes Farming the Corn. If it does not, no worries, as your Worker will have at least two turns to move to the Sheep, and could always build Roads if even more turns are necessary. Given the relative difficulty of stealing a Worker on Prince/Normal/Continents, I would build a Scout while waiting on pop 2, at which point you would want to build a second Worker. Build a Warrior from pop2->3, and at pop 3 build a Settler.

In terms of Gold, Silver and Gems, you may be in luck. Silver spawns in Tundra almost exclusively. Gold tends to cluster in Desert bands. You're smack in the middle of the Tundra and Desert, so you've got a decent chance at once of the two, if not both (though I doubt either spawns in a 1st city expansion worthy site; maybe as a second city ala ALC4 with the double Gold city to the East). Gems spawn in the equatorial Jungle, so you're short on luck there.
 
Dr Elmer Jiggle said:
Oh yeah. Good tip. Thanks.

Heh, doubly so with the tip that only the Grassland Forest can indicate if it's a Oasis or not, as the other two already have Fresh Water access. :)
 
From the current position, every water tile is a coastal water tile with two coins. That's something. Also the lake has two coin. The sheep will produce a coin with a pasture.

I would settle in place and decide early on how to develop the hills and forests. You could certainly cottage or windmill; you could also cottage most things and workshop the grasslands while pursuing a Great Lighthouse - Colossus strategy or an Oracle Slingshot of some type. I wouldn't chop the forests though, you might need them even with a +2 health bonus from the corn and sheep. Mining the two hills is probably necessary for the 7 Hammers of early production they provide.
 
Eggolas said:
I wouldn't chop the forests though, you might need them even with a +2 health bonus from the corn and sheep. Mining the two hills is probably necessary for the 7 Hammers of early production they provide.

I wouldn't chop the Forests either, at least not at this point. There's plenty of production in those Hills.

The one thing to note is that 1S of the start would have access to Fresh Water. It would trade one Plains tile for one presumed Desert tile. It would also trade one Plains Hill for one of either a Plains Hill or Desert Hill. And it would pick up an additional Grassland Hill. It would also trade one Grassland tile for one riverside Grassland tile. EDIT: It's actually two Grassland Hills that would be picked up by doing this. And you still keep coastal access.
 
Another possibility for your capital would be an early whipping centre & GP farm (assuming you'd settle in place) The corn farm should yield 6F as it's irrigated and the sheep another 5F. So those alone are sufficient to work both hills within the fat cross and generate excess food for 2 specialists.
Farm all irrigated grassland tiles and you've got enough for another 2 specialists, though you'd need to chop 3 of the forests.
Finally, once you've achieved sailing+lighthouse - such that the lakes yield 3F - or research Civil Service - such that you can farm the tile 1S of the corn, you've got yourself another specialist.
That's a total of 5 specialists for 10 worked tiles, including the two hills. Not too shabby IMO. Potentially, there could be a sea resource in the tile 2N of your settler for another 1 or 2 specialists.

It wouldn't be the greatest of GP farms, granted, but it'll certainly do the trick until you discover a better spot. Moreover, you can easily replace the farms with cottages making for a solid commerce or science city should you find a more suitable GP farm location.
 
Back
Top Bottom