Dreadnought
Deity
Rules
you lead a squad of soldiers, four guys plus yourself. (Yes, you are in this NES literally, which means you can be killed by enemies and such). your squad has a specific name (Alpha squad, Beta squad, etc.) The four guys in the squad have stats like this:
Soldiers A
Weapon:
Morale:
Health:
The weapon is the gun he's using. Some examples are submachine gun, sniper, and so on. the morale is how scared he is, and it is ranked by a number 1-10, 10 is he isn't scared at all, and 1 is he's scared pantless. health is how many injuries he has. it is also a number 1-10. 10 means he's great, 9-7 means he's slightly injured, 6-4 means he's moderately injured and speead etc. is reduced, and 3-1 means he's almost dead, only thing he can really do is pull the trigger of his gun. if it reaches 0, he dies.
Turns are represented by 20 minutes of time for each turn. You can explore two rooms in that time. You can also fight many enemies in that time, so be careful.
Your orders are to silence the threat. Exterminate all enemies on the ship. A small vessel is going to check on you guys in four hours (12 turns). You have to go back to the Cargo Room in order to contact the vessel and tell them your OK (but if you can find another way to contact them, go ahead).
Sometimes you have to answer questions concerning actions you are going to do in between updates. You are given four, or sometimes three, ppossible answers. The first answer is always the nicest, as you head down the list, they get worse and worse (the last one is the worst). For example, one of the questions may be:
You see a doctor huddled in a dark corner, scared. What do you do?
A- Lower your gun, approach him, and ask if he's OK.
B- lower your gun, but do not approach him. Ask if he needs medical attention.
C- Do not lower your gun or approach him. demand that he drops any weapons and to stand up with his arms in the air.
D- Shoot him.
Squads
Maps of the Floors
Arranged top-bottom

you lead a squad of soldiers, four guys plus yourself. (Yes, you are in this NES literally, which means you can be killed by enemies and such). your squad has a specific name (Alpha squad, Beta squad, etc.) The four guys in the squad have stats like this:
Soldiers A
Weapon:
Morale:
Health:
The weapon is the gun he's using. Some examples are submachine gun, sniper, and so on. the morale is how scared he is, and it is ranked by a number 1-10, 10 is he isn't scared at all, and 1 is he's scared pantless. health is how many injuries he has. it is also a number 1-10. 10 means he's great, 9-7 means he's slightly injured, 6-4 means he's moderately injured and speead etc. is reduced, and 3-1 means he's almost dead, only thing he can really do is pull the trigger of his gun. if it reaches 0, he dies.
Turns are represented by 20 minutes of time for each turn. You can explore two rooms in that time. You can also fight many enemies in that time, so be careful.
Your orders are to silence the threat. Exterminate all enemies on the ship. A small vessel is going to check on you guys in four hours (12 turns). You have to go back to the Cargo Room in order to contact the vessel and tell them your OK (but if you can find another way to contact them, go ahead).
Sometimes you have to answer questions concerning actions you are going to do in between updates. You are given four, or sometimes three, ppossible answers. The first answer is always the nicest, as you head down the list, they get worse and worse (the last one is the worst). For example, one of the questions may be:
You see a doctor huddled in a dark corner, scared. What do you do?
A- Lower your gun, approach him, and ask if he's OK.
B- lower your gun, but do not approach him. Ask if he needs medical attention.
C- Do not lower your gun or approach him. demand that he drops any weapons and to stand up with his arms in the air.
D- Shoot him.
Squads
Spoiler Alpha Squad :
Location: Hallway A, Floor B
Commander: MjM
Health: 10-10
Weapon: shotgun
Moral: doesn't apply
Soldier A
Health: 8-10
weapon: submachine gun
Morale: 7.5-10
Soldier B
Health: 10-10
weapon: assault gun
Morale: 10-10
Soldier C
Health: 10-10
weapon: shotgun
Morale: 10-10
Soldier D
Health: 10-10
weapon: machine gun
Morale: 10-10
Commander: MjM
Health: 10-10
Weapon: shotgun
Moral: doesn't apply
Soldier A
Health: 8-10
weapon: submachine gun
Morale: 7.5-10
Soldier B
Health: 10-10
weapon: assault gun
Morale: 10-10
Soldier C
Health: 10-10
weapon: shotgun
Morale: 10-10
Soldier D
Health: 10-10
weapon: machine gun
Morale: 10-10
Spoiler Beta Squad :
Location: Infirmary, Floor B
Commander: Shalashaska / Cleric
Health: 10-10
Weapon: assault gun
Morale: doesn't apply
Soldier A
Health: 10-10
Weapon: sniper rifle
morale: 10-10
Soldier B
Health: 10-10
Weapon: assault gun
morale: 10-10
Soldier C
Health: 10-10
Weapon: shotgun
morale: 10-10
Soldier D
Health: 10-10
Weapon: machine gun
morale: 10-10
Spoiler Delta Squad :
Location: Medical Supplies, Floor B
Commander: Kentharu
Health: 10-10
Weapon: assault gun
morale: doesn't apply
Soldier A
Health: 10-10
Weapon: assault gun
morale: 10-10
Soldier B
Health: 10-10
Weapon: shotgun
morale: 10-10
Soldier C
Health: 10-10
Weapon: submachine gun
morale: 10-10
Soldier D
Health: 10-10
Weapon: machine gun
morale: 10-10
Spoiler Gamma Squad :
Location: Hallway A Floor B
Commander: Swiss Bezerker
Health: 10-10
Weapon: assault gun
morale: doesn't apply
Soldier A
Health: 10-10
Weapon: shotgun
morale: 10-10
Soldier B
Health: 10-10
Weapon: sniper rifle
morale: 10-10
Soldier C
Health: 10-10
Weapon: submachine gun
morale: 10-10
Soldier D
Health: 10-10
Weapon: assault gun
morale: 10-10
Spoiler Omega Squad :
Location: Hallway A, Floor B
Commander: Eric Mesoy
Health: 10-10
Weapon: sniper
morale: doesn't apply
Soldier A
Health: 10-10
Weapon: machine gun
morale: 10-10
Soldier B
Health: 10-10
Weapon: assault gun
morale: 10-10
Soldier C
Health: 10-10
Weapon: sniper rifle
morale: 10-10
Soldier D
Health: 10-10
Weapon: submachine gun
morale: 10-10
Spoiler Security Squad :
Location: Hallway A, Floor B
Leader: Warman
Health: 10-10
Weapon: pistol
Morale: doesn’t apply
Guard A
Health: 10-10
Weapon: Pistol
Morale: 8.5-10
Guard B
Health: 10-10
Weapon: Pistol
Morale: 10-10
Guard C
Health: 10-10
Weapon: Pistol
Morale: 10-10
Guard D
Health: 10-10
Weapon: Pistol
Morale: 10-10
Leader: Warman
Health: 10-10
Weapon: pistol
Morale: doesn’t apply
Guard A
Health: 10-10
Weapon: Pistol
Morale: 8.5-10
Guard B
Health: 10-10
Weapon: Pistol
Morale: 10-10
Guard C
Health: 10-10
Weapon: Pistol
Morale: 10-10
Guard D
Health: 10-10
Weapon: Pistol
Morale: 10-10
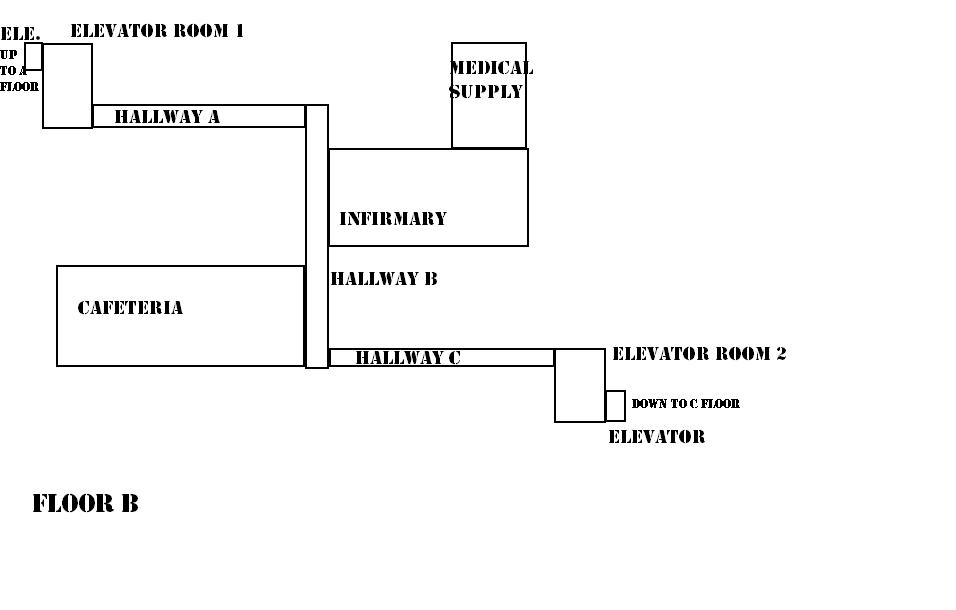
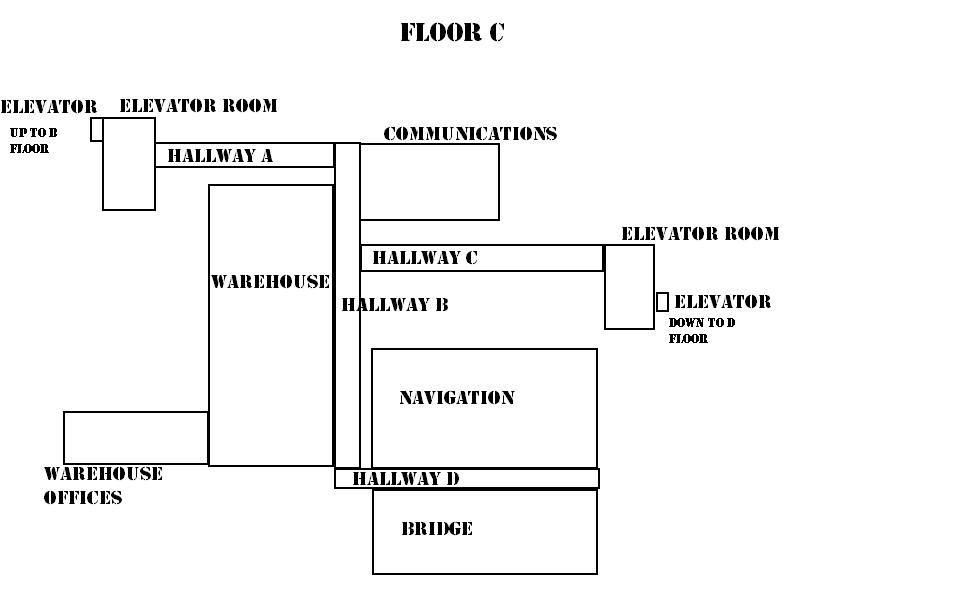
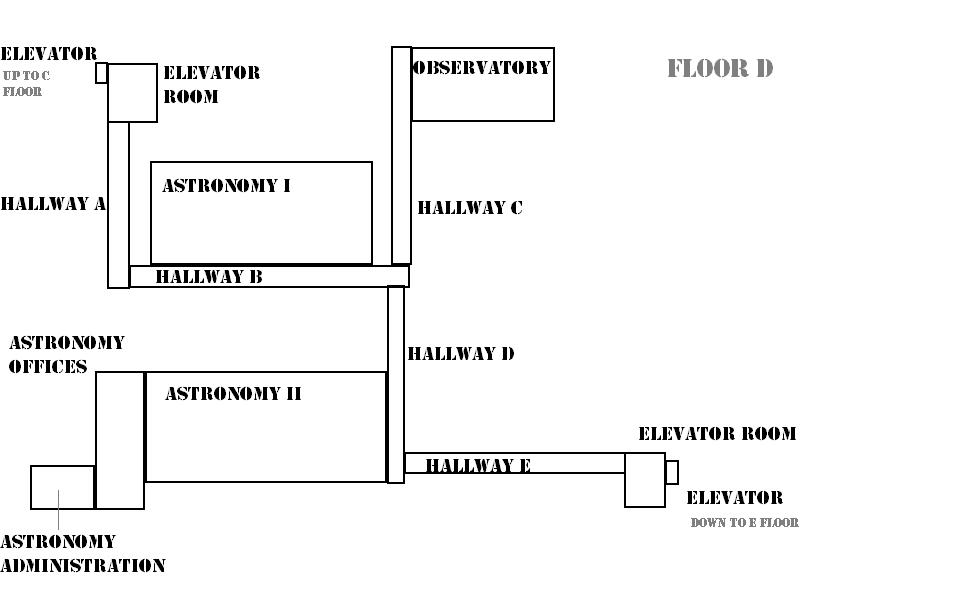
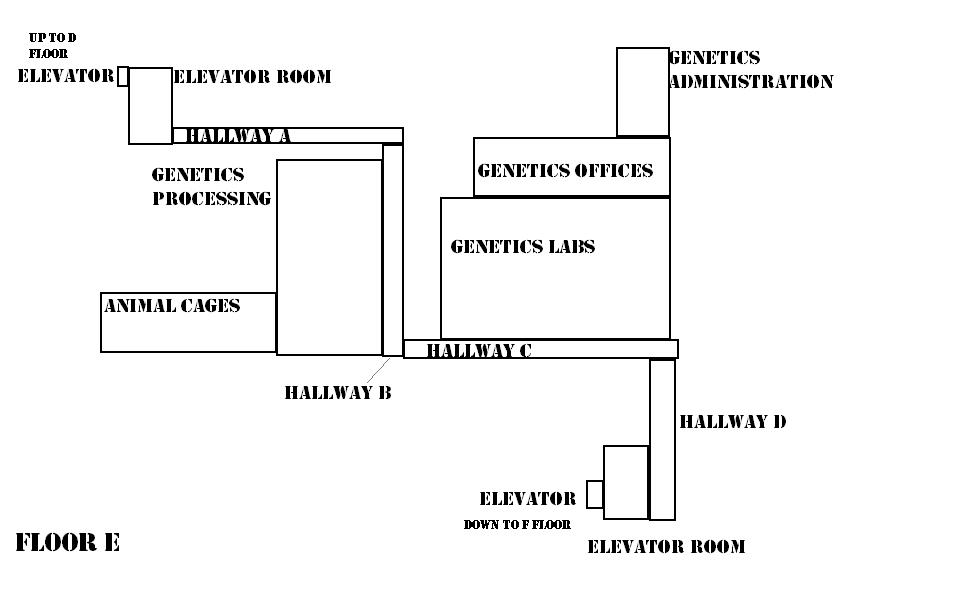
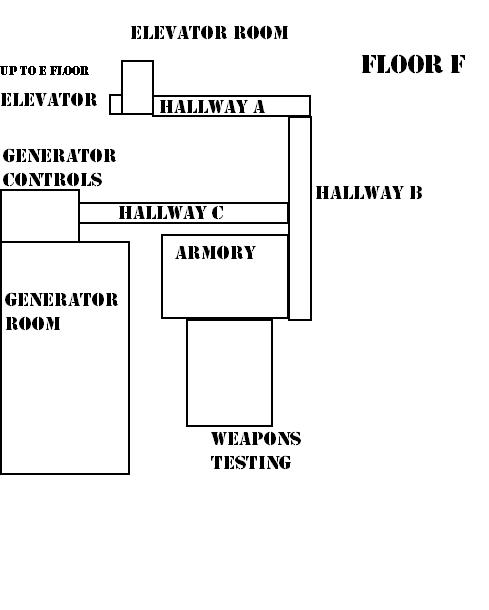
Maps of the Floors
Arranged top-bottom
Spoiler Floor A :
Spoiler Floor B :
Spoiler Floor C :
Spoiler Floor D :
Spoiler Floor E :
Spoiler Floor F :

 )
)")
")