The Americans still arent attacking, but they do found St. Louis near the ruins of Washington. Im really not worried.
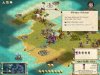
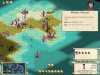
My counterattack in 1740 isnt nearly as impressive, in terms of sheer size/numbers, but it is more effective. I kill 11 more Japanese units, with no losses. That brings the total, in the not-quite-5 turns since I formed Kawauka 2, to 205 dead Japanese and 4 dead Iroquois. According to my military advisor, my army is now strong compared to the Japanese. I wonder why
.
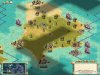
Back north to New York, where bombard shows 6 units a spear, a horse, and 4 longbows as the best defenders. The knight army kills three and a cav army finds a regular longbow cowering in the corner away from bombardment as the seventh unit, but it doesnt matter. New York, with its four wonders, burns very brightly and colorfully into the night. I have no hope of defending it, either militarily or culturally, so it had to go. And, honestly, at this point, I dont even really need the happy faces. One cav army is dispatched to St. Louis, to raze that ugly blight.
Almarikhs troops need rest. Ive not been having the best luck, even attacking units with only one defense. All the defensive bombard from longbows has to be to blame, at least in a fairly large part. Thats OK. The 3-knight mistake army from Southeast America is en route, too, to give me a fourth army on Mongolia, which will hopefully help with kill rate.
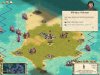
Japans offense is starting to get gassed. Only 9 troops suicide against Kawauka 2 this time. That barely dents the fully healed armies. On the not-so-warm-fuzzy side, all those troops that have been attacking had a spear with them. I see what must be 100 spears move into Kyoto. With more on the way. Finishing them off will require massive firepower and, probably, some additional treachery.
1745 sees action on all three fronts. I mount my first strong counterattack in Japan. I kill 19 units, but I lose one of my few attackers. It was an elite MDI whod already produced a leader, but it still hurts to lose a troop. Small attack parties are easy to redline and completely destroy. Killing spears in the open is much easier than killing them when they benefit from defensive bombard and city defensive bonuses.
Six more troops die in Almarikh. Im seeing horsemen die now. All the warriors are gone. Wont be TOO much longer now, I hope, and I will actually be able to raze this city.
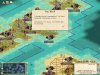
St. Louis is better defended than Id expected. I kill 4 troops with the cav army and its still standing. Bummer. Ill probably have to heal before hitting it again. I also make an interesting tactical decision, one which is usually a no-no. I split my forces. One army starts escorting the cannon stack towards the major metropolis and capital city of Boston. The rest of the armies will work in conjunction with a couple regular troops being landed from Southeast America to cross the mountains and take out the two fringe cities of Chicago and Seattle, hopefully to reunite with the main stack for the final destruction of America.
And Id done such a good job cleaning up the trash around Kawauka 2, it wasnt even attacked in 1745. What a deal.
Things are starting to really slow down around 1750. Or speed up, depending on how you look at it. But Iroquois forces, despite taking only 2 years to accomplish a goal instead of 5, dont do a whole lot. An even dozen Japanese troops that were exposed wither under bombardment and die to bows, maces, musket balls (a musket army attacks with strength 4), and rifles. Attack 11 produces an MGL whose name escapes me, who immediately forms an army. Attack 12 produces Tecumseh with a cavalry unit named Tecumsehs Team. Apparently, Tecumseh was part of this unit when it was a knight unit and his spirit lives on the cavalry! The cav army in Japan goes off SW for explicable reasons. No losses for the Iroquois. Unfortunately, I wasnt quite quick enough to record this momentous occasion in a picture
.
The first army will be a second cavalry army for Japan. Ive got a lot of troops to kill and not a whole heckuva lot of offensive firepower. The second will be shipped to Mongolia, as the Mongols are now the biggest threat to Iroquois sovereignty in the world. And I cant seem to raze Almarikh with troops on hand.
Almarikh loses another 10 defenders. Armies, regular troops, you-name-it, and the city continues to shrug them off like a cork hitting a dangling one-ton anvil. The effects may not be visible, but repeated enough times, they will have an effect.
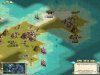
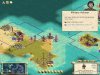
Its only 1752 before Iroquois forces are ready to march again. And march they do. In Mongolia, 4 more troops in Almarikh die. In America, St. Louiss three defenders fall and the city is razed. Detroit, another newly-founded city, loses 3 defenders but seriously redlines the knight army, so I have to detour a cav army earmarked for the north to cover him. The northern troops, minus an expected cav army, still destroy all 11 defenders in Chicago, and raze it. The Americans are now reduced to Seattle in the tundra, size-one Detroit, and Boston. I see no settlers in their stacks still scattered randomly around what was once their territory.
The Japanese, too, are attacked. 14 more of their finest troops die. Four of those happened to be the defenders of Satsuma
the only defenders of Satsuma. Scratch one more Japanese city. Id sent the cavalry army SW earlier to get to remote cities, which had emptied to attack Kawauka 2. The cities on the front are getting seriously reinforced with spears, but Id hoped/figured that the cities in the rear would still be only lightly defended. I was right.
Another small stack (~100 units, half offensive) is in position to attack Kawauka 2 this interturn, too. Id seen it coming, so the musket armies are both fully healed and fortified. Id been using them for the occasional attack earlier, but now they need to fulfill their primary purpose.
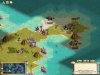
The two armies, alone, were not enough to defend Kawauka 2. Once again, some of the elite muskets in Kawauka 2 are called upon in defense, as the armies redline. The attackers consisted of 11 warriors, 37 archers, and 3 longbows. Thats 51 more troops suicided against the walls of Kawauka 2. I wonder if the bodies alone are enough to form a ramp up the hill and up the wall to negate the defensive bonus.
")
No more MGLs, though. And I think that was the last of the primary Japanese offensive theyre gassed to a trickle now.
In 1754, I kill 9 more troops in Almarikh, 6 outside Kawauka 2, and 3 in Detroit, with no casualties. Im up to 63/72 and I really hope I wont get surprised by domination. A few temples are still completing here and there and cultural expansions give me more land. 3 per cent is both a lot and a little. Ill try to keep an eye on it.
I guess I was wrong about Japan being gassed. They mustered up a warrior, three longbows, and eight archers. The musket armies yawn and blow them away. Maybe these were injured units earlier? Or are they the remnants from far-away cities? I dunno, but its barely a nuisance attack.
Arathorn

 ensues as America does not apparently wish to see a revival in 1776. More troops pour OUT of New Orleans. That darn slave in the tundra I couldnt rescue is drawing quite a crowd!