zyxy
Warmongering Fool
I made an alternative plan before I saw the one by Niklas - here it is. I intend to play tomorrow sometime.
Canning the Khan - Mongolia War Plan
A picture....

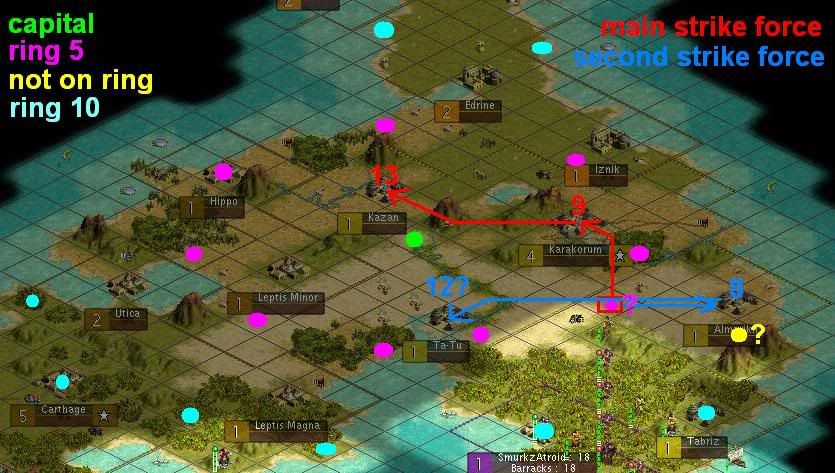
In this map, red dots indicate swords, yellow dots archers, blue dots horses, green dots settlers. In pink is indicated the first turn that a road will be available on this tile - counting the current turn 750BC as turn 0.
I think that all the dotted units, as well as the sword from Albu and the unmoved one from Beard can reach Red Square on turn 6, and enter Mongol territory on turn 7. A few more horses from the core might reach it in time as well (and they can arrive a turn later because they can catch up). A few settlers to quickly grab any open terrain would be good. This gives an attack force of 13 swords (1 elite, well done CB!), 4+ horses, 2 archers (1 elite). Chosing a smaller attack force doesn't speed this up by much, because the rear guard can catch up with the vanguard using newly laid roads. This should be more than enough for two attack stacks as discussed before, a main force for Karakorum, and a smaller stack for Almarikh, see the map below. I suggest 9 swords, 1 archer, 2 horse for the main stack, 4 swords, 1 archer, 2 horse for the secondary stack. With these numbers, the stacks can probably keep moving without waiting for stragglers. Both stacks should end up near the Carthaginian border around turn 15.
Other swords should move to the front asap, and will probably be needed as reserves or to beef up the strike force against Carthage. Some of the latecomers can defend our worker gangs, deal with that yellow settler pair, and with any units from Tabriz. Especially horses are good for this - swift enough to cover a large range.
Worker plan - needs the five workers roading jungle near Atroid:
Turn 0 - nothing
Turn 1 - four workers E of Atroid are done and move N
Turn 2 - three of these four workers help roading, the fourth moves N.
Turn 3 - the fourth worker starts roading the hill where our scout now is.
Turn 4 - the four workers N-E of Atroid are done and move N.
Turn 5 - the four workers road the hill and finish on this turn - meaning it is a good idea to move military units after these workers! This frees one worker who moves N.
Turn 6 - The hill worker roads, the gang of four moves north to the same hill.
Turn 7 - Gang of four roads.
Turn 8 - roading done, 5 workers free to move. If we send another worker up north to arrive at the end of turn 7, then we have 2 crews that can lay a road in 2 turns, or 3 crews that can do a road in 3, and they can do so just 1-2 turns behind our armies, which is excellent. If this extra worker arrives a little early, then the northern hill can be roaded 1 turn sooner.
Battlemap/dotmap for the north. I'm not so sure about the south eastern settlements. Tabriz will stay in hands of Mongols, so we cannot settle that (and need a new road, then).
Canning the Khan - Mongolia War Plan
A picture....
In this map, red dots indicate swords, yellow dots archers, blue dots horses, green dots settlers. In pink is indicated the first turn that a road will be available on this tile - counting the current turn 750BC as turn 0.
I think that all the dotted units, as well as the sword from Albu and the unmoved one from Beard can reach Red Square on turn 6, and enter Mongol territory on turn 7. A few more horses from the core might reach it in time as well (and they can arrive a turn later because they can catch up). A few settlers to quickly grab any open terrain would be good. This gives an attack force of 13 swords (1 elite, well done CB!), 4+ horses, 2 archers (1 elite). Chosing a smaller attack force doesn't speed this up by much, because the rear guard can catch up with the vanguard using newly laid roads. This should be more than enough for two attack stacks as discussed before, a main force for Karakorum, and a smaller stack for Almarikh, see the map below. I suggest 9 swords, 1 archer, 2 horse for the main stack, 4 swords, 1 archer, 2 horse for the secondary stack. With these numbers, the stacks can probably keep moving without waiting for stragglers. Both stacks should end up near the Carthaginian border around turn 15.
Other swords should move to the front asap, and will probably be needed as reserves or to beef up the strike force against Carthage. Some of the latecomers can defend our worker gangs, deal with that yellow settler pair, and with any units from Tabriz. Especially horses are good for this - swift enough to cover a large range.
Worker plan - needs the five workers roading jungle near Atroid:
Turn 0 - nothing
Turn 1 - four workers E of Atroid are done and move N
Turn 2 - three of these four workers help roading, the fourth moves N.
Turn 3 - the fourth worker starts roading the hill where our scout now is.
Turn 4 - the four workers N-E of Atroid are done and move N.
Turn 5 - the four workers road the hill and finish on this turn - meaning it is a good idea to move military units after these workers! This frees one worker who moves N.
Turn 6 - The hill worker roads, the gang of four moves north to the same hill.
Turn 7 - Gang of four roads.
Turn 8 - roading done, 5 workers free to move. If we send another worker up north to arrive at the end of turn 7, then we have 2 crews that can lay a road in 2 turns, or 3 crews that can do a road in 3, and they can do so just 1-2 turns behind our armies, which is excellent. If this extra worker arrives a little early, then the northern hill can be roaded 1 turn sooner.
Battlemap/dotmap for the north. I'm not so sure about the south eastern settlements. Tabriz will stay in hands of Mongols, so we cannot settle that (and need a new road, then).

")


 ) but only a handful of military units, certainly MPs.
 ") ).
).


 . A barb warrior approaches Albu. 'heim settl -> settl. Beard cat -> cat.
